Transcription
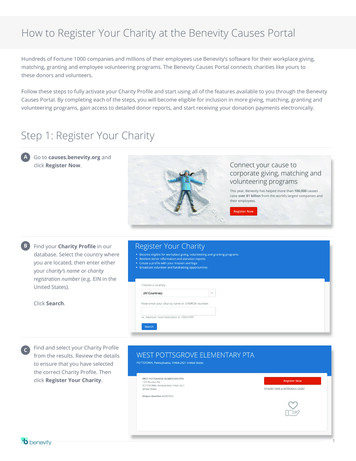
How to Register Your Charity at the Benevity Causes PortalHundreds of Fortune 1000 companies and millions of their employees use Benevity’s software for their workplace giving,matching, granting and employee volunteering programs. The Benevity Causes Portal connects charities like yours tothese donors and volunteers.Follow these steps to fully activate your Charity Profile and start using all of the features available to you through the BenevityCauses Portal. By completing each of the steps, you will become eligible for inclusion in more giving, matching, granting andvolunteering programs, gain access to detailed donor reports, and start receiving your donation payments electronically.Step 1: Register Your CharityAGo to causes.benevity.org andclick Register Now.BFind your Charity Profile in ourdatabase. Select the country whereyou are located, then enter eitheryour charity’s name or charityregistration number (e.g. EIN in theUnited States).Click Search.CFind and select your Charity Profilefrom the results. Review the detailsto ensure that you have selectedthe correct Charity Profile. Thenclick Register Your Charity.1
DComplete the form provided byadding your contact informationand setting a password. This is howyou will sign in to your CharityProfile from now on. Use thecontact details and email for theperson who will be the primary userof this account.EIf additional information is needed,you may be required to provideverification documents. If this is thecase, you will receive an email fromBenevity requesting the specificdocuments we need to completeyour registration.Once you’ve completed yourregistration, you will have fullaccess to update your CharityProfile and access donor reports.2
Step 2: Self-CertifyMany corporations have specific eligibility requirements that charities must meet for inclusion in their giving, matching, and volunteerprograms. We’ve prepared a Self-Certification process that allows charities to self-certify against these common eligibility requirements.Charities complete it once, renew it annually, and are automatically included in all programs for which they qualify.AClick Certification in the leftnavigation of your Charity Profiledashboard.BClick Create New SelfCertification Declaration.CRead through and respond to allthe declarations as applicable, andthen click Submit Declaration.3
Step 3: Electronic Donation PaymentsAs the world moves online, checks have become too expensive and inefficient, especially when companies are handling tens ofthousands of donations.Set up Electronic Donation Payments and receive disbursements directly to your bank account safely and securely, saving you time, feesand overhead costs. Please note: For all organizations outside of US and Canada, Electronic Donation Payments are mandatory.AClick Donation Method in the leftnavigation of your Charity Profiledashboard.BSelect your preferred DonationPayment Method.Fill out the form provided withthe necessary details. To enableElectronic Donation Paymentsyou will be asked to upload asupporting document so thatwe can start transferring fundselectronically to your bank account.4
CReview your details and clickSubmit. Once we’ve reviewedthe information provided, youwill receive an email confirmingthat you’ve successfully set upElectronic Donation Payments.Please Note:If you are located in North America and choose to keep checks as your donation payment method, anadministrative surcharge for paper checks will be applied starting with your fourth check. This fee is the greaterof either 25 per check or 7% of the total, up to a maximum of 100. We strongly encourage all charities to set upelectronic donation payments to receive disbursements via direct deposit and avoid these fees!5
Step 4: Complete Your ProfileTo help increase your exposure and visibility, we recommend that you make the following enhancements to your profile so that youcan provide potential donors with as much information about your organization as possible.ATo complete your profile with ashort summary, charity description,and your logo please follow thesteps below:1. Log in to the Causes Portal2. Click on Charity Profile on theleft-hand side menu3. Select Edit Charity Profile4. Update your organization’sdetails, then scroll down andclick Save*Use Part B (below) for reference.6
BShort Summary – think missionstatement! This is the place toshare a high-level summary of whatyour organization does.Charity Description – this shouldbe a detailed description of yourorganization. Let donors andvolunteers know about your latestnews and upcoming initiatives.Online Presence – share linksto your website, Twitter andFacebook.Logo – a picture is worth athousand words! Help get instantrecognition from donors andreinforce your brand with yourlogo!For more information about accessing donor reports, updating your Charity Profile, and making the most of the featuresavailable to you through the Benevity Causes Portal, check out the resources available on our Help page.Any questions?Find us here:benevity.comWe’re happy to help. Email us at causes@benevity.org#700, 611 Meredith Rd NE1.866.939.1736and we’ll help you with your registration.Calgary, AB T2E 2W57
Find your Charity Profile in our database. Select the country where you are located, then enter either your charity's name or charity registration number (e.g. EIN in the United States). Click Search. Find and select your Charity Profile from the results. Review the details to ensure that you have selected the correct Charity Profile. Then