Transcription
LMTB USER GUIDE FOR WEBADMINOVERVIEWThis is an in‐depth description of the new WebAdmin Last Minute Ticket Broker functionality and workflow.Melanie KuckoLast Updated: 10/26/20101
IndexIntroduction to the LMTB Program in WebAdminOverview of Last Minute Ticket Broker ProgramChanges to “Near Term Special Delivery” OptionProcess SummaryConsign InventoryConsignment QueueConsignments (LMTB only)Orders (LMTB only)3345Using the LMTB Program in WebAdminConsign Inventory TabView Available InventoryConsign Inventory“Streeting”Consignments Queue TabView Previously Made ConsignmentsNotes on Order ManagementAdding OrdersAdding Shipping LabelsView and Add NotesConsignments TabManipulate Incoming ConsignmentsView OrdersWhen Customers Pick Up TicketsOrders TabInventory Tab7791314152
Introduction to the LMTB Program in WebAdminOverview of the Last Minute Ticket Broker programThe Last Minute Ticket Broker (LMTB) program is a now available in the Web Admin for non‐POS users, expandingthe functionality that until now was only available through the POS.The purpose of the LMTB program is to allow non‐POS brokers to send their tickets to designated brokers who areclose to the physical venues.By having tickets held at an LMTB location, the consignee (Selling) broker does not have to worry about shippingtimes on last minute events and customers can pick up their tickets at the LMTB location. LMTB only applies to hard tickets, not category tickets or e‐tickets. The selling broker should ensure that tickets are at the LMTB location no later than 36 hours prior to thestart of the event. Once the LMTB receives the hard tickets from the Seller, they must check the inventory to ensure that theyhave received the correct inventory. As an introductory rate, the LMTB will receive 10 per order for handling. All LMTBs are assigned by TicketNetwork and cannot be changed by POS / non‐POS users. LMTBs may actively sell tickets on the street 2 hours before the event for a previously agreed to split price.The Selling Broker must have previously agreed to allow the tickets to be streeted.3
Changes to “Near Term Special Delivery” OptionIn an effort to provide more transparency to our customers during the check out process, TicketNetwork will nolonger be offering the default of Near‐Term Special Delivery as a shipping option for specific venues.Instead of Near‐Term Special Delivery a buyer will be able to select from broker‐specified “Special Delivery” options(Email, Will Call, Local Pickup Near Venue, Paperless, or Electronic Transfer).ORBuyers will be directed to pick up their tickets at the local LMTB office.If a broker does not designate a Near Term Shipping option when uploading their tickets, if the event is within 48hours the shipping method will default to the new Last Minute Pickup option. Shopping on the web sites for Last Minute Tickets, a buyer will see your special delivery options OR Last MinutePickup (LMP). When a customer selects LMP they will be given the address of the LMTB to pick up their tickets no earlier than 2hours before an event. The customer arrives at a professional office location in close proximity to the venue to pick and sign for theirtickets. When one of your customers selects LMP you can deliver your tickets to the LMTB noted on the order and theywill be responsible for delivery to your customer. You are charged 15 on that order by TicketNetwork. TicketNetwork remits payment for the pickup service to the LMTB.Important Note: This process will only pertain to those venues for which there is an LMTB presence. If you, theSelling Broker, has tickets for an event at a venue that does not have LMTB representation, the default setting willremain “Near Term Special Delivery.”4
Process SummaryHere is a brief, concise description of the steps required:Consign Inventory1.2.3.4.5.6.7.8.Select the first sub‐tab “Consign Inventory” under the LMT tab in WebAdminAll inventory available to participating LMT Venues will be accessible through this windowFrom the “Venue” drop‐down, select which venue to consign inventory for. Hit “View”Select which displayed ticket groups will be consigned by checking the ticker under “Select”For the selected ticket groups indicate numbering type, “Quantity” and “Low Seat” numberClick “Create Consignment” button when finishedA pop‐up will give the option of allowing “Street” and entering the “Street Split Percentage”Click “Create Consignment” button when finishedConsignment Queue [Cancel Consignments, Add Orders & Create Tracking Labels]1. Select the second sub‐tab “Consignment Queue” under the LMT tab in WebAdmin2. All consigned inventory will be visible through this window3. Cancel Consignments:a. Select “Cancel” at the end of the consignment description to cancel consignmentb. (Cannot cancel individual ticket groups)4. Create a Tracking Label:a. Once consignment is accepted by LMTB, selecting “Add Tracking” to add a FedEx labelb. Either “Create [new] FedEx Label” OR enter previously created number approved by LMTBc. “Create FedEx Label” will open the WebAdmin label creatord. Tracking label can be viewed by clicking on the tracking number link under “Tracking #”5. Add Orders to Consignmenta. Click “Add Order” under “Ticket Groups” to add order for that consignmentb. Pop‐up gives option of which ticket group to add order toc. Either enter “Web Order ID” for previous order, OR enter new customer informationd. Click “Place Order” button when finishede. Orders can be viewed and canceled by clicking “Orders(#)” under “Orders” columnConsignments (LMTB only)1.2.3.4.Select the third sub‐tab “Consignment” under the LMT tab in WebAdminAll consignments to that particular broker will be visible here by the LMTBTo accept split, select “Accepted” under “Status.” Otherwise, select “Reject”Once an accepted consignment arrives, LMTB can check it as “Received”a. IMPORTANT: Check the Packing List against what is in the package.b. If there is a problem with the consignment, contact the Selling Broker IMMEDIATELY5
Orders (LMTB only)1. Select the fourth sub‐tab “Orders” under the LMT tab in WebAdmin2. All orders placed for consignments made to that particular LMTB will be visible here by the LMTB3. When a customer comes in to pick up their tickets:a. Print “Receipt” from under “Picked Up” columnb. Check ticker under “Picked Up” column6
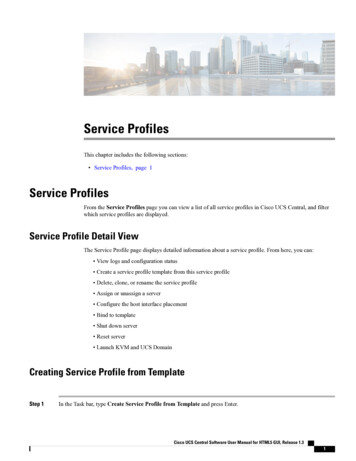
Using the LMTB Program in WebAdminDesignated LMTBs will have access to: Selling Brokers will have access to: Consign InventoryConsignment QueueConsignmentsOrdersInventoryConsign InventoryConsignment QueueInventoryConsign Inventory TabTo view available LMT inventory:1. Select the specific venue2. Hit “View”3. Note: Only ONE venue can be selected when creating consignments.7
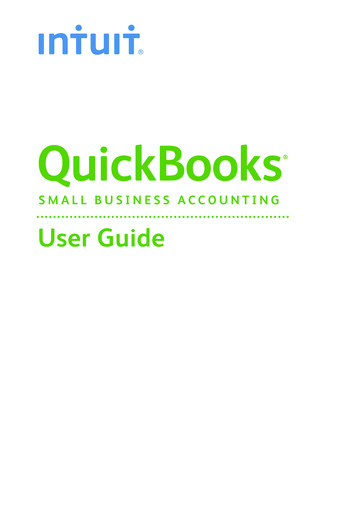
To consign inventory after a venue has been selected:1.2.3.4.Select all or some of the available ticket groups for the selected venue (only 1 appears in example)Choose between “Consecutive,” “Even/Odd” OR “General Admission” seatingEnter quantity to be consignedEnter “Low” seat number, “High” will automatically update (unless General Admission is selected, in whichcase “GA” will appear for both “Low” and “High”)5. Click the “Create Consignment” button after the select ticket groups have been detailedA pop‐up will appear indicating (1) how many ticket groups were selected for consignment and (2) giving the sellingbroker the option to “Street” tickets.“Streeting” allows the LMTB to take unsold tickets to the street 2 hours before a show to attempt to sell them beforethey become dead tickets.If the selling broker wishes to “Street” their consigned tickets that do not sell, they must:1. Select “Yes”2. Enter the “Split Percentage” the Selling Broker wishes to retain under “Mine.”automatically update)3. Click “Create Consignment” button4. Note: If Selling Broker does not wish to “Street,” select “No”8(LMTB’s split will
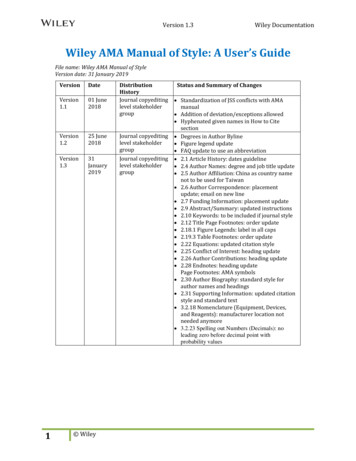
After “Create Consignment” has been selected, the pop‐up (shown above) will appear to indicate that theconsignment was successful.Consignments Queue TabTo view previously made consignments:1.2.3.4.5.Select the consignment “Status” (Active, Pending, Accepted, Rejected, Cancelled, All)Set “Consignments From” date range (only consignments MADE within this range will show)Click “View” buttonTo view “Tracking #,” “LMTB,” “Orders” or “Notes”‐ click on the hyperlinksNote: display defaults to the most recent month’s active consignments if no other criteria are selectedImportant notes on order management: Note: the LMTB will indicate the consignment has been received by checking the “LMTB Received” tickerNote: Orders and Tracking Numbers CANNOT be added to a consignment until it is ACCEPTED by the LMTBNote: Consignments CANNOT be CANCELLED by the Selling Broker if Orders have been placed for thatconsignment OR if the LMTB has already marked it RECEIVED9
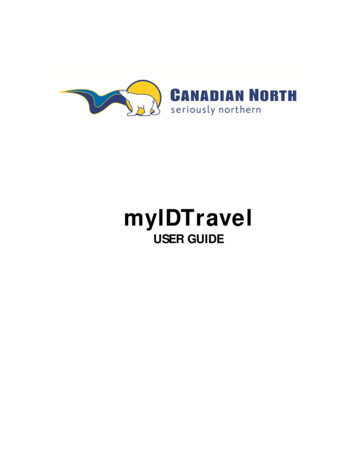
To add an order to a previously made consignment:1.Click “Add Order” hyperlink under “Ticket Groups” column to open the “Ticket Groups” pop‐up2. Select which ticket group from the consignment to add order to and click “Add Order” hyperlink3. In the “Create Order” pop‐up there are two options to enter an order:a. OPTION 1: copy and paste web order into “Web Order ID” field and click “Look up Customer Info.”Customer info will populate the “Customer Info” fields.b. OPTION 2: manually enter customer’s Name, Phone, Email, Quantity (of tickets) and any SpecialInstructions.4. Click “Place Order” after all fields have been entered to complete the order5. If successful, the order will appear in the “Orders” hyperlink pop‐up when clicked6. The LMTB will indicate the tickets have been picked up by checking the “Picked Up” ticker10
To add a shipping label to a consignment1. Note: the shipping label is for the Selling Broker to ship the consigned tickets to the LMTB2. Once the LMTB has accepted the consignment, the “Add Tracking” hyperlink will appear (otherwise“Pending Acceptance” will show)3. Click “Add Tracking” hyperlink. The “Add Tracking to Consignment” pop up will appear4. In the “Add Tracking to Consignment” pop up there are two options to enter tracking:a. OPTION 1: Click the “Create FedEx Label” hyperlink to go through the process to create a new label.b. OPTION 2: enter existing tracking label addressed to the same LMTB if shipping multipleconsignments at a time.5. Click “Save” to continue6. If Option 1 was selected (create new label), clicking “Save” will bring broker to the TicketNetwork LabelGenerator in WebAdmin7. Selling Broker and LMTB information will AUTOMATICALLY POPULATE the required shipping fields11
8. Select “Next Step ‐ ”9.10.11.12.13.Select which “Shipping Option” and any desired “Special Services” and click “Next Step ‐ ”The last page requires broker to review information. If correct, click “Create Label”Note: if the label does not appear, check that the pop up blocker is OFF.If successful, a tracking number will appear under “Tracking #” columnClick on the tracking number hyperlink to view, track and / or print the tracking label12
To view and add notes:1.Under the “Notes” column, click “View”2. The “Notes” pop up will appear. This window automatically keeps track of consignment creation, LMTBacceptance or rejection, consignment received and any user entered notes visible by both the Selling brokerand LMTB.3. In the “Add new note” field, enter the desired text and click “Add Note.” Note will appear in list.Consignments TabTo manipulate incoming consignments:1. To “Accept” or “Reject” a consignment, click the corresponding hyperlink2. When a consignment is received, check the ticker under “Received” columna. Note: only check “Received” if inventory matches the packing list exactly3. Click the hyperlinks to either “Accept” or “Reject” a consignment13
To view an order:1.Click on the hyperlink under “Orders,” indicating how many orders have been placed for that consignment2. A new window will open displaying all orders for that consignmenta. Note: adjust date range to ensure all orders show3. If the order does not appear, the broker can search by the “Customer Name,” “Order ID” and “ConsignmentID.” Click “Find”4. To view the entire ticket group, click the consignment number under “Consignment” column5. A new window will appear providing details about the ticket group consignmentWhen a customer comes to pick up an order:1.2.3.4.Open the order view and under the “Picked Up” column click “Receipt” hyperlinkPrint out receipt and have customer fill out relevant informationCheck the ticker under “Picked Up” column after tickets are handed over to customerNote: the check will be visible to the Selling Broker that the tickets have been picked upOrders TabTo view orders and handle pickups, brokers may also go directly to the “Orders” tab:14
Inventory TabThough no real functionality, the “Inventory” tab allows brokers to see all detailed ticket inventory that is currentlyon consignment.Clicking on the consignment number hyperlink under the “Consignment” column will open a new window showingthe details of that particular consignment.15
1. Select the second sub‐tab “Consignment Queue” under the LMT tab in WebAdmin. 2. All consigned inventory will be visible through this window 3. Cancel Consignments: a. Select “Cancel” at the end of the consignment description to cancel consignment b. (Cannot cancel individual ticket groups) 4.