Transcription
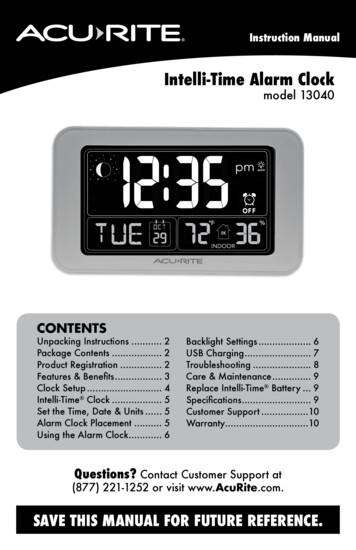
Instruction ManualIntelli-Time Alarm Clockmodel 13040 II IC -,c,,,: ( - · TII pm ;t OFFIE,dc ll?FG3c% DU -INDOORACU RITECONTENTSUnpacking Instructions . 2Package Contents . 2Product Registration . 2Features & Benefits. 3Clock Setup . 4Intelli-Time Clock . 5Set the Time, Date & Units . 5Alarm Clock Placement . 5Using the Alarm Clock. 6Backlight Settings . 6USB Charging. 7Troubleshooting . 8Care & Maintenance. 9Replace Intelli-Time Battery . 9Specifications. 9Customer Support .10Warranty.10Questions? Contact Customer Support at(877) 221-1252 or visit www.AcuRite.com.SAVE THIS MANUAL FOR FUTURE REFERENCE.
Congratulations on your new AcuRite product. To ensure the bestpossible product performance, please read this manual in its entiretyand retain it for future reference.Unpacking InstructionsRemove the protective film that is applied to the LCD screen prior to using thisproduct. Locate the tab and peel off to remove.Package Contents1. Alarm Clock2. Power Adapter3. Instruction ManualIMPORTANTPRODUCT MUST BE REGISTEREDTO RECEIVE WARRANTY SERVICEPRODUCT REGISTRATIONRegister onlineto receive 1 yearwarranty protectionArchived Productswww.AcuRite.com Register a Product2
FRONT OF CLOCKFeatures & Benefits231.12.SNOOZE ButtonIntelli-Time ClockPre-programmed to thecorrect time and automaticallyupdates for Daylight SavingTime.3. Moon Phase4. Day of the Week5. Date6. Current Indoor Temperature7.4567 910 11Humidity Level IconIndicates a high, low or idealhumidity comfort level.9. Current Indoor Humidity10.(11 S'11)AlarmON/OFF Indicator11. oY/:auto IconIndicates display backlight“AUTO DIM” mode activated.121314SIDE OF CLOCK12. “ ” Button15For setup and backlightbrightness preferences.1613. SET ButtonFor setup preferences.14. “” ButtonFor setup and backlightbrightness preferences.15. Alarm ON/OFF Switch16. Battery Compartment CoverBACK OF CLOCK.- ·- -017. USB ChargerDCSV -----171819For compatible Smartphones.18. Plug in for Power Adapter19. Battery Compartment20. Intelli-Time BatteryCompartment203
SETUPClock Setup 1 Plug in Power Adapter2 Install or Replace BackupBatteriesFor the best performance, plugin the power adapter as the mainpower source for this product.1. Remove the batterycompartment cover.2. Insert 2 x AAA alkalinebatteries into the batterycompartment, as shown.Follow the polarity( /-) diagram in the batterycompartment.3. Replace the battery cover.'f-f-0 1DC5V2Plug in PowerAdapter(on back of unit)Install orReplace BackupBatteries2 AAA alkalinebatteriesIMPORTANT: Batteries are a backup power source to preserve records in the event of apower outage. Power adapter recommended as the primary power source to enjoy the fullfunctionality of the product.PLEASE DISPOSE OF OLD OR DEFECTIVE BATTERIES IN AN ENVIRONMENTALLY SAFEWAY AND IN ACCORDANCE WITH YOUR LOCAL LAWS AND REGULATIONS.BATTERY SAFETY: Clean the battery contacts and also those of the device prior to battery installation. Remove batteries from equipment which is not to beused for an extended period of time. Follow the polarity ( /-) diagram in the battery compartment. Promptly remove dead batteries from the device. Dispose of usedbatteries properly. Only batteries of the same or equivalent type as recommended are to be used. DO NOT incinerate used batteries. DO NOT dispose of batteries in fre,as batteries may explode or leak. DO NOT mix old and new batteries or types of batteries (alkaline/standard). DO NOT use rechargeable batteries. DO NOT rechargenon-rechargeable batteries. DO NOT short-circuit the supply terminals.4
Intelli-Time ClockIntelli-Time clock and calendar are pre-programmed to the correct time anddate, and update automatically for Daylight Saving Time. All you need to do isselect your time zone during clock setup.Set the Time, Date & UnitsPress and HOLD the “SET” button, located on the side of the clock until"SELECT TIME ZONE" appears on the display to enter SET MODE. Once inSET MODE the preference you are currently setting will blink on the clock.To adjust the currently selected (flashing) item, press and release the ““ ” buttons (press and HOLD to fast adjust).” orTo save your adjustments, press and release the “SET” button to adjust the nextpreference. The preference set order is as follows:TIME ZONE (PST MST CST EST AST HAT AKT NDT)AUTO DST ON/OFF*CLOCK HOURCLOCK MINUTECALENDAR MONTHCALENDAR DATECALENDAR YEARTEMPERATURE SCALE (ºF or ºC)You will automatically exit SET MODE if no buttons are pressed for 5 seconds.Enter SET MODE at any time by pressing and holding the “SET” button until"SELECT TIME ZONE" appears on the display.*If you live in an area that observes daylight saving time, DST should be set toON.Alarm Clock PlacementPlace alarm clock in a dry area free of dirt and dust. To helpensure an accurate indoor temperature measurement, be sure toplace the clock away from heat sources or vents.Important Placement Guidelines To ensure accurate temperature measurement, place out of direct sunlightand away from any heat sources or vents.5
OPERATIONUsing the Alarm ClockSet the Alarm TimeTo set alarm time, press and RELEASE the “SET” button to enter ALARM SETMODE.To adjust the currently selected (flashing) item, press and release the ““ ” buttons (press and HOLD to fast adjust).” orTo save your adjustments, press and release the “SET” button to adjust the nextpreference. The preference set order is as follows:ALARM CLOCK HOUR (Please note AM/PM indicator)ALARM CLOCK MINUTEYou will automatically exit ALARM SET MODE if no buttons are pressed for5 seconds. Enter ALARM SET MODE at any time by pressing and RELEASINGthe “SET” button.Alarm Clock ON or OFFTo turn alarm on: Slide the ON/OFF switch on the side of the clock to ON. Theindicator appears on the screen.ONTo turn alarm off: Slide the ON/OFF switch on the side of the clock to OFF.'(:iThe OFFindicator appears on the screen.Alarm Clock SNOOZEThe alarm clock will sound, increasing in volume over a 2 minute period. Whenthe alarm is sounding, press the "SNOOZE" button to activate the SNOOZEfunction for 10 minutes. The SNOOZE function can be activated up to 10 times.Backlight SettingsThis clock’s color display features 6 different lighting settings: 100% (High),70%, 50% (Medium), 30%, 10% and 5% (Low) brightness.When clock is powered with the power adapter, backlight remains on at 100%brightness by default. Press the "SNOOZE" button at any time to momentarilylight the display at 100% brightness. After 5 seconds, the clock will return tothe user-selected brightness setting.Using battery power alone, the backlight is available momentarily for 10seconds by pressing the “SNOOZE” button.Manually adjust the backlight brightness by pressing and releasing the “ ”or " " buttons when not in SET MODE or ALARM SET MODE. Press the“ ” button a sixth time to enter “AUTO DIM” mode. will appear to theright of the time.*auto6
AUTO DIM MODE: Automatically adjusts display brightness based on time of day.7:00 a.m. - 9:00 p.m. 100% brightness9:01 p.m. - 6:59 a.m. 5% brightnessHumidity Level IconThe Humidity Level Icon easily conveys a low, high or ideal indoor humiditylevel for your home and health:QLOWLOW Humidity LevelHumidity islow relative totemperature.Makes for aDRY environment.GOK Humidity LevelHumidity isOK relative totemperature.Makes for anIDEAL environment.DHIGHHIGH Humidity LevelHumidity ishigh relative totemperature.Makes for a HUMIDenvironment.Learn more at http://www.acurite.com/humidity-healthMoon PhaseTrack the phases of the moon, conveyed through simple lunar phase icons:NEWWAXINGCRESCENT1STQUARTERFULL3RDQUARTERUSB ChargingWANINGCRESCENTCharge your mobile device by plugging your device’s USB power cord(not included) into the USB charging port on the back of the clock.USB charging is only available during power adapteruse; USB charging is not active when operatingon battery power only.Note: Follow the manufacturer’s instructions for yourmobile device(s) to determine compatibility with theUSB charging feature on this product. Some devices may notsupport USB charging or may require a higher power ratingthan this product provides. Observe the charging status onyour device. Ensure your device is working properly beforeattempting to charge.7
Troubleshooting Verify power adapter is plugged in. Check that the batteries are installed correctly. Batteriesmay need to be replaced.Clock is too dark, hardto read or doesn’t Increase brightness using “ ”/ “T ” buttons, locatedon the side of the clock.work The optimum viewing angle for this product is fromslightly above it.Inaccuratetemperature Make sure the clock is placed out of direct sunlight andaway from any heat sources or vents (see page 5).If your AcuRite product does not operate properly after tryingthe troubleshooting steps, visit www.AcuRite.com or call(877) 221-1252 for assistance.8
Care & MaintenanceClock CareClean with a soft, damp cloth. Do not use caustic cleaners or abrasives. Keepaway from dust, dirt and moisture. Clean ventilation ports regularly with agentle puff of air.Replace Intelli-Time Clock BatteryIntelli-Time technology is powered by a pre-installed coin-cell battery that storesthe time and date settings. The battery has a shelf life of several years. Timeand date will need to be enteredafter replacing Intelli-Time battery.To replace the Intelli-Time battery:CR203221. Locate the coin cell batterycompartment door in thebattery compartment of thealarm clock. Unscrew andremove the compartment cover.InsertCR2032Battery3V2. Insert 1 x CR2032 coincell battery into the batterycompartment, as shown. Installbattery with “ ” positiveterminal facing OUT.3. Screw in the battery cover.1RemoveBattery CoverWARNING: THIS PRODUCTCONTAINS A BUTTON-CELL BATTERY.IF SWALLOWED, ITffiCOULD CAUSE SEVERE INJURY OR DEATH IN JUST 2 HOURS.SEEK MEDICAL ATTENTION IMMEDIATELY IF INGESTED. POISONSpecificationsTEMPERATURE RANGEIndoor: 32ºF to 122ºF; 0ºC to 50ºCHUMIDITY RANGEIndoor: 1% to 99% RHOPERATING FREQUENCY 433 MHzPOWERClock: 5v power adapter2 x AAA alkaline batteries (for backup only)USB: 1.5A outputDATA REPORTINGIndoor data: 60 second updates9
Customer SupportAcuRite customer support is committed to providing you with best-inclass service. For assistance, please have the model number of thisproduct available and contact us in any of the following ways:(()(877) 221-1252info@chaney-inst.com24/7 support at www.AcuRite.com InstallationVideos Registeryour Product InstructionManuals SupportUser Forum ReplacementParts SubmitIMPORTANTPRODUCT MUST BE REGISTEREDTO RECEIVE WARRANTY SERVICEPRODUCT REGISTRATIONRegister onlineto receive 1 yearwarranty protectionArchived Productswww.AcuRite.comLimited One Year WarrantyFeedback & Ideas Register a ProductAt AcuRite, we proudly uphold our commitmentto quality technology. Chaney Instrument Co.warrants that all products it manufactures tobe of good material and workmanship, and tobe free of defects when properly installed andoperated for a period of one year from the dateof purchase.warranty will not be breached, and Chaney will give no creditfor products it manufactures which have received normal wearand tear, been damaged (including by acts of nature), tampered,abused, improperly installed, damaged in shipping, or repairedor altered by others than authorized representatives of Chaney.The above-described warranty is expressly in lieu of all otherwarranties, express or implied, and all other warranties arehereby expressly disclaimed, including without limitation theimplied warranty of merchantability and the implied warrantyof fitness for a particular purpose. Chaney expressly disclaimsWe recommend that you visit us atliability for special, consequential or incidental damages,www.AcuRite.com for the fastest way to register allwhether arising in tort or by contract from any breach of thisyour product. However, product registrationwarranty. Some states do not allow the exclusion or limitationof incidental or consequential damages, so the above limitationdoes not eliminate the need to retain youror exclusion may not apply to you. Chaney further disclaims alloriginal proof of purchase in order to obtainliability from personal injury relating to its products to the extentwarranty benefits.permitted by law. By acceptance of any of Chaney’s products,Chaney Instrument Co. warrants that all products it manufactures the purchaser assumes all liability for the consequences arisingfrom their use or misuse. No person, firm or corporation isto be of good material and workmanship, and to be free ofauthorized to assume for Chaney any other liability in connectiondefects when properly installed and operated for a period ofwith the sale of its products. Furthermore, no person, firm orone year from the date of purchase. Remedy for breach of thiscorporation is authorized to modify or waive the terms of thiswarranty is limited to repair or replacement of the defectiveparagraph, and the preceding paragraph, unless done in writingitem(s). Any product which, under normal use and service, isand signed by a duly authorized agent of Chaney. This warrantyproven to breach the warranty contained herein within ONEgives you specific legal rights, and you may also have otherYEAR from date of sale will, upon examination by Chaney,rights which vary from state to state.and at its sole option, be repaired or replaced by Chaney.Transportation costs and charges for returned goods shallFor in-warranty claims: Chaney Instrument Co.be paid for by the purchaser. Chaney hereby disclaims all965 Wells St., Lake Geneva, WI 53147responsibility for such transportation costs and charges. This10
11
ACU RITE WeatherStationsTemperature& HumidityWeatherAlert RadioKitchenThermometers& TimersClocksIt’s more than accurate, it’s ACU RITE.AcuRite offers an extensive assortment of precision instruments,designed to provide you with information you can depend on toPlan your day with confidence .www.AcuRite.comPrinted in China13040 INST 061815 Chaney Instrument Co. All rights reserved. AcuRite is a registered trademarkof the Chaney Instrument Co., Lake Geneva, WI 53147. All other trademarks andcopyrights are the property of their respective owners. AcuRite uses patentedtechnology. Visit www.AcuRite.com/patents for details.
use; USB charging is not active when operating on battery power only. Note: Follow the manufacturer's instructions for your . mobile device(s) to determine compatibility with the USB charging feature on this product. Some devices may not support USB charging or may require a higher power rating than this product provides.