Transcription
AT&T Online Fax allows you to send and receive faxes in emailformat, access your faxes from virtually any device with internetwithout the need for a dedicated fax line. 2018 AT&T Intellectual Property. All rights reserved. AT&T, the Globe logo, Mobilizing Your World and other marks are trademarks and service marks of AT&TIntellectual Property. All other marks are the property of their respective owners. The information contained herein is not an offer, commitment, representation orwarranty by AT&T and is subject to change.Page 0
ContentsUnderstanding Online Fax Navigation . 3Navigating the Main Menu . 3Navigating the Secondary Menu . 4Managing your Online Fax Settings . 5Contact Details . 5Cover Page . 6Preferences . 6Password . 7Additional Accounts . 7Blocked Numbers . 9Managing the Fax Inbox . 10Fax Notification . 11Encrypted Fax . 12Management Options . 12To email as an attachment:. 13Sending Faxes . 16Monitoring the Outbox . 18Archiving Sent and Received Faxes . 18Managing Contacts . 19Fax Contacts . 20Contact Import . 21Usage of Online Fax account . 22Email to Fax . 22Frequently Asked Questions . 25 2018 AT&T Intellectual Property. All rights reserved. AT&T, the Globe logo, Mobilizing Your World and other marks are trademarks and service marks of AT&TIntellectual Property. All other marks are the property of their respective owners. The information contained herein is not an offer, commitment, representation orwarranty by AT&T and is subject to change.Page 1
Welcome to Online FaxAT&T Online Fax allows you to send and receive faxes online and in email format, access yourfaxes through a fax portal or email on a mobile device or desktop computer. With Internet access,Online Fax allows you to send faxes without using a fax machine or a second phone line.With Online Fax, you can send and receive faxes, view queued/archived faxes, add contactsfrom the following North American locations: Toll Free Numbers – Standard (Non Data-encrypted) U.S.and Canada; Puerto Rico and the Virgin Islands areexcluded. Toll Free – Data-encryptedU. S. and Canada as well as Puerto Rico and Virgin Islands. US Local Numbers – Standard and Data-encrypted U.S. andCanada; Puerto Rico and the Virgin Islands are excluded.An alternative Online Fax offering is the data-encrypted service/version. Using data-encryptionallows you to limit the movement of your fax transmission – all faxes are stored encrypted and canonly be viewed online, through an SSL browser enabled connection. For more information onusing data-encryption, please see the Encrypted Fax section.Note: For those in the healthcare and related industries, the encrypted version helps meetsadditional technical, operational and administrative requirements, which support the HealthInsurance Portability and Accountability Act (HIPAA).Note: Once an Online Fax account has been setup, modifications to the primary email address arenot permitted. Please ensure that the account information is correct. To change the primary emailor update an Online Fax plan, contact Customer Service or Sales. 2018 AT&T Intellectual Property. All rights reserved. AT&T, the Globe logo, Mobilizing Your World and other marks are trademarks and service marks of AT&TIntellectual Property. All other marks are the property of their respective owners. The information contained herein is not an offer, commitment, representation orwarranty by AT&T and is subject to change.Page 2
TO LOGIN TO ONLINE FAX:1. Navigate to your Online Fax Login page.2. Enter your Fax Number.3. Enter your Online Fax Password.4. Click Log in.Understanding Online Fax NavigationOnline Fax provides a main menu, which allows you to view sent and received faxes, send a fax,and manage contacts. Online Fax also provides a secondary menu, which allows you to configurefax settings, open the online help, navigate to the home page or log out of the system.Navigating the Main MenuWhen you log in to Online Fax, the main menu is listed with details regarding each option. Onceyou select an option, the main menu moves to the top-right corner of the page. The followingoptions are available: Inbox, Send Fax, Outbox, Archive, Contacts. Please see the table below formore details regarding each menu option. 2018 AT&T Intellectual Property. All rights reserved. AT&T, the Globe logo, Mobilizing Your World and other marks are trademarks and service marks of AT&TIntellectual Property. All other marks are the property of their respective owners. The information contained herein is not an offer, commitment, representation orwarranty by AT&T and is subject to change.Page 3
Main MenuDescriptionInboxThe Inbox page allows you to manage received faxes. Each fax isstored in the Inbox, where you can view, download as a PDF or TIFF,move to an archive, or delete.Send FaxThe Send Fax page opens a screen that allows you to create and sendfaxes online.OutboxThe Outbox page allows you to view the queue of all outbound faxes.ArchiveThe Archive page displays faxes that have been archived on oursystem. These faxes are held for a period of one year.ContactsThe Contacts page allows you to create, manage and store fax andemail contacts.Navigating the Secondary MenuThe Secondary Menu is located in the top left corner of the Administration Panel of Online Fax andconsists of the following links: Home, Getting Started, Help and Feedback. 2018 AT&T Intellectual Property. All rights reserved. AT&T, the Globe logo, Mobilizing Your World and other marks are trademarks and service marks of AT&TIntellectual Property. All other marks are the property of their respective owners. The information contained herein is not an offer, commitment, representation orwarranty by AT&T and is subject to change.Page 4
Secondary MenuHomeGetting StartedHelpDescriptionThe “Home” link directs you to your InboxThe “Getting Started” link directs you to the “Getting Started withOnline Fax” screen.The “Help” link will guide you through managing fax to email.SettingsThe “Settings” link allows you to update your account information:company details, your personal signature.LogoutThe “Logout” link will log you out of the current session of OnlineFax.Managing your Online Fax SettingsThe Settings page allows you to update your account information: company details and yourpersonal signature as well as your preferences in terms of your cover letter template andattachment format.Contact DetailsIn this section you can edit your contact details that will appear on your cover letter of your fax.The fields that you can edit are: Your name, Company, Location and Phone number.TO MODIFY CONTACT DETAILS:1. Enter your data in the text fields provided.2. Click Apply to save changes. 2018 AT&T Intellectual Property. All rights reserved. AT&T, the Globe logo, Mobilizing Your World and other marks are trademarks and service marks of AT&TIntellectual Property. All other marks are the property of their respective owners. The information contained herein is not an offer, commitment, representation orwarranty by AT&T and is subject to change.Page 5
3. Click Cancel to dismiss the changes made.Note: Entering your name is mandatory. Also please note that you will not be able to edit youremail address and fax number.Cover PageIn this section you can chose a cover page template.TO SELECT A COVER PAGE:1. Click onto zoom in on a chosen template.2. Click on the chosen template. As soon as you click on a template it will be displayedwith a check mark. 3. Click Apply.PreferencesIn this section you can choose the format of the fax attachment, as well as the language in whichyou would like to use the application.TO MODIFY FAX PREFERENCES:1. Select the preferred language from the drop-down. 2018 AT&T Intellectual Property. All rights reserved. AT&T, the Globe logo, Mobilizing Your World and other marks are trademarks and service marks of AT&TIntellectual Property. All other marks are the property of their respective owners. The information contained herein is not an offer, commitment, representation orwarranty by AT&T and is subject to change.Page 6
2. Choose the attachment format you wish by clicking on the radio button. (PDF or TIFF)3. To have the deleted faxes, which have exceeded their storage period sent to your email, check the Emailme a copy of all automatically deleted faxes that have exceeded their storage period check box.4. To use a cover page when sending faxes from your email account, check the Use a cover page for faxessent from my email account check box.5. Click Apply to save the changes made.6. Click Cancel to dismiss the changes.PasswordIn this section you can change your current password.TO CHANGE YOUR PASSWORD:1. Enter your current password in the Current password field.2. Enter a new password in the New Password field3. Enter your new password again into the Confirm password field.4. Click Apply to save the changes made5. Click Cancel to dismiss the changes made.Note: Your password must be between 5-10 characters.Additional AccountsIn this section you can add up to 5 additional accounts. 2018 AT&T Intellectual Property. All rights reserved. AT&T, the Globe logo, Mobilizing Your World and other marks are trademarks and service marks of AT&TIntellectual Property. All other marks are the property of their respective owners. The information contained herein is not an offer, commitment, representationor warranty by AT&T and is subject to change.Page 7
TO ADD A NEW ACCOUNT:1. Click Click to add an additional account.The “Additional accounts details” box on the right will become active.2. Enter an email address in the box provided. Note: Email address is mandatory.3. Check off one or both of the functionality that you want to add to your email address:“Receive faxes in my email account” or “Send faxes from my email account”. Note: Youmust choose at least one of the options.4. Click Add.5. Click Cancel to dismiss all the changes made.TO VIEW AN EXISTING ACCOUNT:1. Click onto view the details of the account.2. The “Additional accounts details” section on the right will become active and it willdisplay the details of the chosen account.O DELETE AN ACCOUNT:1. Click onto delete an account.A pop-up will ask you to confirm the deletion of the chosen account.2. Click Yes to confirm the deletion.3. Click No to cancel the deletion. 2018 AT&T Intellectual Property. All rights reserved. AT&T, the Globe logo, Mobilizing Your World and other marks are trademarks and service marks ofAT&T Intellectual Property. All other marks are the property of their respective owners. The information contained herein is not an offer, commitment,representation or warranty by AT&T and is subject to changePage 8
Blocked NumbersIn this section you may block fax number(s).TO SEARCH FOR A BLOCKED FAX NUMBER:1. Enter a fax number in the Fax number field.Note: The proper fax number format includes only numbers and dashes. The area codemust be included.2. Click Search. The results will be displayed within the samepage. Note: This search will only display blocked faxnumbers.TO BLOCK A FAX NUMBER:1. Enter a fax number in the “Fax number” field. Please note that the proper fax numberformat includes only numbers and dashes. The area code must be included.2. Click “Block” in order to block the fax number entered.TO DELETE A BLOCKED FAX NUMBER:3. Enter a fax number in the Fax number field. Please note that the proper fax numberformat includes only numbers and dashes. The area code must be included. 2018 AT&T Intellectual Property. All rights reserved. AT&T, the Globe logo, Mobilizing Your World and other marks are trademarks and service marks ofAT&T Intellectual Property. All other marks are the property of their respective owners. The information contained herein is not an offer, commitment,representation or warranty by AT&T and is subject to changePage 9
4. Click Search. The results will be displayed within the same page. Note: This search willonly display blocked fax numbers.5. Click on theicon besides each number in order to delete the number.6. Click Yes to confirm the deletion or click No to cancel the deletion.Managing the inboxThe inbox allows you to manage all received faxes. Faxes are stored in theinbox and displays the following information each fax that you havereceived: Fax Number Company name Pages Date Received Management Utilities (icons) 2018 AT&T Intellectual Property. All rights reserved. AT&T, the Globe logo, Mobilizing Your World and other marks are trademarks and service marks ofAT&T Intellectual Property. All other marks are the property of their respective owners. The information contained herein is not an offer, commitment,representation or warranty by AT&T and is subject to changePage 10
Fax NotificationWhen faxes are received, they are delivered to your Inbox and you will also be notified throughemail. The email details the date and time of receipt, the number from which the fax was sent,the number of pages included in the fax, as well as a PDF fax attachment.If you are using a data-encrypted fax service, your email notification will contain all of thedetails about your fax; however, it will not contain the attachment. All secured faxes must beviewed through the Online Fax portal.TO VIEW YOUR SECURED FAX:1. Open your “Fax Receipt Success” email.2. Click on the Fax link.3. Log-in to your Online Fax portal. Your fax will open. 2018 AT&T Intellectual Property. All rights reserved. AT&T, the Globe logo, Mobilizing Your World and other marks are trademarks and service marks ofAT&T Intellectual Property. All other marks are the property of their respective owners. The information contained herein is not an offer, commitment,representation or warranty by AT&T and is subject to changePage 11
Encrypted FaxIf you have Online Fax Encrypted service, your fax content is encrypted while stored on ourservers. All encrypted faxes are viewed over a secure connection; therefore, when you receivea fax, you will be notified by email and provided a link, you will be required tolog into your account to view your fax. When using Online Fax Encrypted, faxes cannot be sentor received through email as an attachment.Note: For those in the healthcare and related industries, Online Fax Encrypted helps meetadditional technical, operational and administrative requirements, which support the HealthInsurance Portability and Accountability Act (HIPAA).If you are using Online Fax Encrypted, the secured lock is displayed in the portal. Securing yourdata ensures that when you are not actively sending or receiving faxes, your data is encryptedand secure.Note: If your faxes are secured, they cannot be forwarded via email. Notice the image belowcontains the Secured Data icon; however, the email icon is not available.Management OptionsManagement options are a series of icons, which provide the ability to store or send your faxcontents.The table below provides a brief description for each icon and a link to the See a thumbnail preview of your faxViewView a full-size version of your faxRotate FaxRotate your fax to adjust the viewEmail fax documentSend a received fax as an email attachment 2018 AT&T Intellectual Property. All rights reserved. AT&T, the Globe logo, Mobilizing Your World and other marks are trademarks and service marks ofAT&T Intellectual Property. All other marks are the property of their respective owners. The information contained herein is not an offer, commitment,representation or warranty by AT&T and is subject to changePage 12
Download PDFDownload your fax as a PDF documentDownload TIFFDownload your fax as a TIFF documentMove to ArchiveMove the fax to your archive folderDeletePermanently delete the selected faxTO PREVIEW THE FAX: Click the View Fax icon. Click the View Fax iconThe fax thumbnail is displayed.TO VIEW A FAX:.TO ROTATE THE FAX: Click the Rotate Fax icon.The fax image will rotate 90 clockwise.TO EMAIL A FAX AS AN ATTACHMENT:1. Click the Email fax document icon.The Forward fax via email screen opens.Note: Secured fax transmissions cannot be forwarded via email.2. Enter the email address in the Email Recipients field.Note: Multiple entries must be separated by commas.Alternatively, click the Select contact(s) link to add a contact from the list of existingcontacts 2018 AT&T Intellectual Property. All rights reserved. AT&T, the Globe logo, Mobilizing Your World and other marks are trademarks and service marks ofAT&T Intellectual Property. All other marks are the property of their respective owners. The information contained herein is not an offer, commitment,representation or warranty by AT&T and is subject to changePage 13
3. Enter the message description in the Email message field.4. Click Send.TO DOWNLOAD FAX AS A PDF:1. Click the Download PDF icon.All the fax contents will be converted into a PDF document in a detached window. 2018 AT&T Intellectual Property. All rights reserved. AT&T, the Globe logo, Mobilizing Your World and other marks are trademarks and service marks ofAT&T Intellectual Property. All other marks are the property of their respective owners. The information contained herein is not an offer, commitment,representation or warranty by AT&T and is subject to changePage 14
2. Click the Save icon.TO DOWNLOAD FAX AS A TIFF: Click the Download PDF icon.All the fax contents will be converted into a TIFF document.TO MOVE A FAX TO THE ARCHIVE:1. Click the Move to Archive icon.2. On the Confirmation dialog, click Yes.TO DELETE A FAX:1. Click the Delete icon.2. On the Confirmation dialog, click Yes.Note: Faxes that have been deleted are permanently removed from the system andcannot be restored. 2018 AT&T Intellectual Property. All rights reserved. AT&T, the Globe logo, Mobilizing Your World and other marks are trademarks and service marks ofAT&T Intellectual Property. All other marks are the property of their respective owners. The information contained herein is not an offer, commitment,representation or warranty by AT&T and is subject to changePage 15
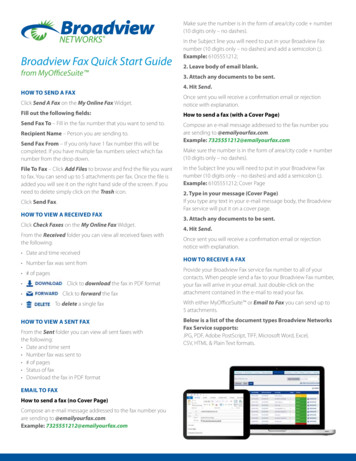
Sending FaxesThe Send Fax section allows you to create and send files on your computer as faxes; you canalso send faxes to multiple recipients simultaneously. Once sent, a fax will be queued in theOutbox for delivery. When sending a fax, you have the option to include a cover page,include recipients from your contact list, and add multiple attachments.TO SEND A FAX:1. Enter the fax number in the Destination Fax numbers text box.Alternatively, enter multiple fax numbers by: Manually enter multiple numbers.Note: Separate multiple fax numbers with a semi-colon.Click Add from contacts to select numbers from your saved contacts.Note: A dialog opens, where you can select the fax numbers that you want toadd. 2018 AT&T Intellectual Property. All rights reserved. AT&T, the Globe logo, Mobilizing Your World and other marks are trademarks and service marks ofAT&T Intellectual Property. All other marks are the property of their respective owners. The information contained herein is not an offer, commitment,representation or warranty by AT&T and is subject to changePage 16
.2. Too attach files to your fax, click Browse in the File(s) to Fax. You may attach up tothree files.3. To add a cover page, select the Yes radio button and complete the following: Select the cover page Language from the drop-down. Enter the following information: " Person" - (to whom will you address this fax) 2018 AT&T Intellectual Property. All rights reserved. AT&T, the Globe logo, Mobilizing Your World and other marks are trademarks and service marks ofAT&T Intellectual Property. All other marks are the property of their respective owners. The information contained herein is not an offer, commitment,representation or warranty by AT&T and is subject to changePage 17
Enter the Company Information - (company name) - (location) (phone number, (subject line - Regarding), and - (comments).If you wish to change the cover page template click the Change cover page link.A new window will open where you will be able to choose a new template.4. Click Send.Your fax will be placed in the Outbox with status message indicating success /failure ofdelivery.Note: An attached file cannot exceed 10 MB in size. You can attach up to 3 files.Monitoring the OutboxThe Outbox contains faxes that have been queued for sending. A maximum of twenty faxes arequeued at any given time (each fax number in a fax with multiple recipients is counted as aseparate fax in the queue). The speed at which the faxes are sent and the queue cleareddepends on the complexity of the images being faxed, the length (number of pages) of each fax,and the fax transmission speed with the receiving fax machine.Online Fax will make 5 attempts to send your fax to each recipient. Once a fax has beensuccessfully sent, the fax will be automatically moved from Outbox to your Archive folder; youwill also receive a notification by email that the fax was sent successfully.Archiving Sent and Received FaxesThe Online Fax Archive provides storage capability for both sent and received fax transmissions.All faxes that have been successfully sent are automatically moved into Archive. However, ifyou wish to store received faxes in your archives, you must select the Move to Archive optionfrom the Inbox. For more details on how to move items from the Inbox, see the “To Move a Faxto the Archive:” section. 2018 AT&T Intellectual Property. All rights reserved. AT&T, the Globe logo, Mobilizing Your World and other marks are trademarks and service marks ofAT&T Intellectual Property. All other marks are the property of their respective owners. The information contained herein is not an offer, commitment,representation or warranty by AT&T and is subject to changePage 18
The Archive page is separated into two sections: the Archive Search section provides a searchprovides search parameters, which allows you to narrow or broaden your search criteria asneeded. The Archive Results section displays a list of fax transmissions and is based on thesearch criteria entered. Please note that the default list is “All Items”. Within the ArchiveResults section, you can use the same Fax Management Tools that are available in the Inbox.For more information regarding the fax management options, please see the “ManagementOptions” section.TO SEARCH FOR A FAX:1.Enter any of the following: Keywords within a fax Company name Select whether you want to search faxes that were Sent, received or both Start Date and End Date select the date.2.Click Search.Managing ContactsThe Contacts section of Online Fax allows you to maintain a contact list of fax numbers. Thissection is separated into two pages: the Fax Contacts page displays a list of contacts along withtheir details. The Contact Import page provides can be added to your list manually or importedvia .csv (comma separated value) file. Fax contacts may be used when sending or replying to afax. 2018 AT&T Intellectual Property. All rights reserved. AT&T, the Globe logo, Mobilizing Your World and other marks are trademarks and service marks ofAT&T Intellectual Property. All other marks are the property of their respective owners. The information contained herein is not an offer, commitment,representation or warranty by AT&T and is subject to changePage 19
Fax ContactsThe Fax Contacts page contains two sub-sections: the Contact list and the Contact details. TheContact list displays a list of all contacts added to Online Fax. The Contact details section allowsyou to edit the information associated with a contact.TO ADD A CONTACT TO YOUR LIST:1. Click the Fax Contacts link.2. In Contact list section, click on Add a contact.3. In the Contact Details section, enter the required information.4. Click Add. 2018 AT&T Intellectual Property. All rights reserved. AT&T, the Globe logo, Mobilizing Your World and other marks are trademarks and service marks ofAT&T Intellectual Property. All other marks are the property of their respective owners. The information contained herein is not an offer, commitment,representation or warranty by AT&T and is subject to changePage 20
TO DELETE A CONTACT TO YOUR LIST:1.In Contact list section, click on the contact for which you want to delete.2.Click the Delete icon.3.In the Confirmation dialog, click Yes.Contact ImportThe Contact Import page allows you to upload multiple contacts into your list via .csv file. Whenuploading contacts, it is important to note that the .csv file must have the required fieldspopulated.Please make sure your list adheres to the following format:"Company One Name", Fax Number, "Contact Person", "Location", "Phone number", "Description","Email Address"Note: CSV (Comma Separated Value) file must follow a specific format in order to be successfullyimported; click the "View a sample CSV file" link located above the "File Name" field.TO IMPORT A CONTACT LIST:1. Click the Contact Import link.2. In File name filed, click Browse.3. Choose to ignore or overwrite duplicate contacts.4. Click Import. 2018 AT&T Intellectual Property. All rights reserved. AT&T, the Globe logo, Mobilizing Your World and other marks are trademarks and service marks ofAT&T Intellectual Property. All other marks are the property of their respective owners. The information contained herein is not an offer, commitment,representation or warranty by AT&T and is subject to changePage 21
Usage of Online Fax accountYour Online Fax account has a monthly limit. This limit varies by the specific package type youhave chosen. Once an account has exceeded its monthly page quota, the user will be chargedon a per-page basis. Quota warnings are emailed to the user at 80%, 90%, and 100%.Email to FaxThe email to fax feature allows you to send a fax, using your email client, from any of yourexisting Online Fax account numbers. You do not need to log in to the Online Fax application touse this feature.Note: If you have multiple fax numbers associated with your account, you must specify whichfax number you are sending the fax from.Send Fax from Email1. From your email account, create new email.2. In the “To” field, enter one of the following: If you only have one fax number associated with your email address, enter the“fax number to” followed by @onlinefax.comExample:5551234567@onlinefax.com If you have more than one fax number associated with your email, enter the “faxnumber to” “fax number from” followed by @onlinefax.comExample:5551234567 2123134444@onlinefax.comNote: Do not use spaces or hyphens in the in the subject line. Any unnecessary characters willprevent successful fax transmissions. 2018 AT&T Intellectual Property. All rights r
Fax Number. 3. Enter your . Online Fax Password. 4. Click . Log in. Understanding Online Fax Navigation . Online Fax provides a main menu, which allows you to view sent and received faxes, send a fax, and manage contacts. Online Fax also provides a secondary menu, which allows you to configure fax settings, open the online help, navigate to the .