Transcription
VOLUME4Internet Fax SolutionsINTERNET FAXRESELLER (IFR) GUIDEPANGEA COMMUNICATIONS CORP.
FAXING NAVIGATIONPortalsReseller Portal . https://ipfax.net/agent.htmCompany Portal . https://ipfax.net/company.htmUser Portal . https://ipfax.netContactsSupport Email.support@pangea-comm.comFax ATA Orders.ATA.shipping@pangea-comm.comAccounts comm.com
INTERNET FAXRESELLER GUIDEPANGEA COMMUNICATIONS CORP. Pangea Communications Corp.707 13th Street SE, Suite 116Salem, OR 97301Phone (503) 221-1111 Fax (503) 221-3080www.pangea-comm.com support@pangea-comm.comwebsite: https://www.pangea-comm.com/
Table of ContentsInternet Fax Reseller Configuration and Branding . 1How to Customize Confirmation Email and BrandingNew User . 5How to Create a New User for Internet Fax ServiceCompany . 12What is “Company” and How to Use Company FunctionWeb To Fax . 15How Users can Send a Web to FaxMobile Fax . 16How Users can Send a Fax from a Mobile DevicePrint to Fax . 18Customize and Configure Print to FaxEmail to Fax . . 21Email to Fax setup and ConfigurationFax Reports . 23Fax Reports and Status DefinitionsPorting Numbers (LNP) . 24Process for Porting Numbers
IFR Configuration andBrandingCHAPTERONEHow to Customize Confirmation EmailA Confirmation email is sent to a User each time they send or receive a fax.Basic information on the fax is included in the email automatically.In the case of the Sending a Fax, the email confirmation will include asalutation to the User, and the following: Subject (the subject of the fax if User defines a subject when sending)FaxID (tracking number of the message)Creation Time (time the system received the fax for processing)Dialed Number (destination number)Pages Sent (delivered pages)Fax Status (ultimate result-success/failure)Country (destination country)Duration (delivery duration)The Result of the sent fax will also show in the Subject Line of the emailreceived.For Fax to Email or Fax to Fax with Email delivery the email will include asalutation to the User. The Salutation text will read that they have receiveda fax as an attachment on their Internet or Fax to Fax number and includethe Fax number they received it on.Both types of confirmation emails (outbound fax to fax confirmationand fax to email confirmation) will contain a ‘Reseller Signature’. TheReseller Signature is a unique message each Reseller may include in theConfirmation email.Pangea’s white label allows for a customizable Reseller Signature whichcan include specific signature.I N T E R N E T FA X S O L U T I O N S 1
The Reseller Signature typically will read somethingas such:“Thank you for using Acme Fax Service. We appreciate your business. If you haveany comments on our service, please contact us at: support@acmefax.comSincerely, AcmeFax”The Reseller Signature is limited to 512 characters and is sent in htmlformat. For this reason, Resellers MUST put any links (such as emailaddresses OR web site addresses) on its own line (hit enter before puttingin a link and enter after putting in a link).Reseller Signatures may be changed at any time and take effectimmediately on the system.To create Reseller Signature in the Reseller Portal, click on “Account Info”then “Reseller Signature.”Once saved, log back in to ensure the full message is there. If the 512character limit is exceeded, the message will be cut short or truncated.Always test a signature by sending a fax to yourself to ensure it is how youwish it to look.2 I N T E R N E T FA X S O L U T I O N S
The ‘From Address’Resellers need to create a mail address that will be used as the ‘FromAddress’ for all emails sent from the service to their clients. This furtherbrands the service to your company and makes emails easily identifiablefor your users.The inbox for this mail account should be monitored by support staff as anybounced mails or replies will go there and immediate action can be taken.We recommend the email address to be something such as ‘Fax@domain.com’ or‘FaxAdmin@domain.com’ where domain is your company’s domain.Such addresses identify the email as fax related and from your company.Once you have created this mail account and have access to the inbox,please contact Pangea with the address you have chosen to use. Pangea willthen initiate the authorization process with AWS (which is used to send allmail from the platform) to send mail on behalf of your domain.We recommend setting a SPF record to minimize the likelihood of mail sentfrom the platform going to your user’s spam folder.You can find information on how to set the SPF record d-email-authentication-spf.htmlor Googling ‘AWS SES SPF Record’.I N T E R N E T FA X S O L U T I O N S 3
BrandingResellers can add their logo to the User login page to further brand theservice to their company.From the Reseller portal click on the ‘Branding’ button.Click on the ‘Upload New Logo’ button and load your Logo. You may needto do a bit of trial and error with different logos for the best look. Supportedformats include: png, .jpg, .gifNote the ‘User login url page’ url. This is your unique url for your users toaccess the portal and show your logo. Many Resellers will create a buttonon their other portals or home page linking to their url avoiding the long urlfor their Users.User may also continue to use the standard https://ipfax.net to login but theReseller logo will not show.4 I N T E R N E T FA X S O L U T I O N S
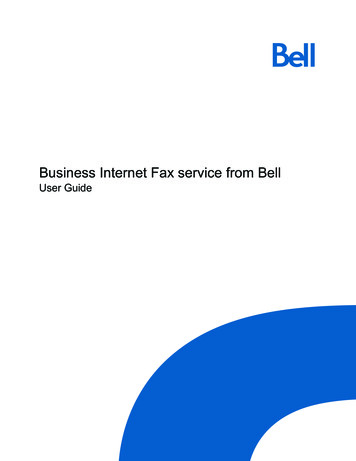
New UserCHAPTERTWOHow to Create a New User for Internet Fax orFax to Fax ServiceCreating a new User for Internet Fax to Email or Fax to Fax services is simplebut please pay close attention to details to avoid any issues. Simply clickon the ‘Users’ button from the Reseller Portal, then click on the ‘Create User’button.You are now shown the User entry page. Simply fill in the fields with thenew User’s information.User’s emailaddress.Check markoption tofax withoutpassword.Login: The login should be the User’s primary email address. It is easy forthe User to remember and is also used for authorization in Email to Fax.I N T E R N E T FA X S O L U T I O N S 5
Password: Case sensitive and contains numbers as well as letters.The Address, Phone and Country information are all optional.A proper Time Zone setting for the User will ensure that each fax isproperly recorded and stamped according to the User’s time zone.Global Configuration:IMPORTANT! Global Configurations setting will apply to Users of BOTHFax to Email or Fax to Fax services.SSL FaxBy selecting SSL Fax, Users will not receive any incoming fax in their emailas an attachment, but rather receive an HTTPS secure url in their emailinbox which they can click on and securely download their received fax.Allow View FAXSelecting ‘Allow View Fax’ will enable Users to view the first page of any faxsent or received in Online Reports.Allow Resend FaxAllow Resend Fax enables Users to resend faxes from portal in OnlineReports. They may edit the destination number before resending.Allow Desktop FaxingAllow Desktop Faxing enables Users to send faxes via Print to Fax, Email toFax, Mobile Fax and Web to Fax.6 I N T E R N E T FA X S O L U T I O N S
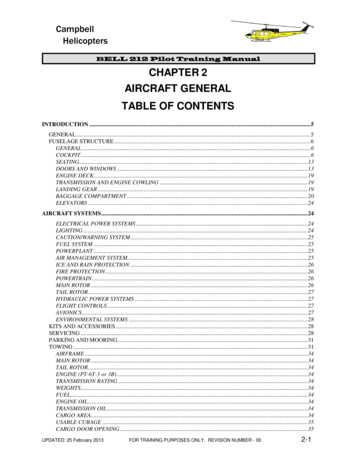
Receive Faxes as PDFTicking ‘Receive Faxes as PDF’ will set the system to send all incoming faxesfor email or Secure Fax (SSL Fax) as a PDF. Faxes will come as Tiff if not.Fax to Email Configuration:Complete this area ONLY if the User will be utilizing Fax to Email. If they willbe utilizing Fax to Fax (Fax machine and ATA), it is unlikely you will need tocomplete the area.If the User will have a Internet Fax to Email number, ensure that you checkthe ‘Allow Fax to Email’ box and select the proper Area Code and Prefix forthe User from the Drop Down list. Once you select the Area Code and Prefixfor the User, simply click on the ‘Use’ button and a number will be assignedfor this User.Drop downmenu forArea Codes.1. Select ‘Allow Fax to Email’2. Fill in ‘Fax 2 Email – Email’ field with email address to where faxeswill be delivered. If User wishes to receive faxes to multiple emailaddresses, place a comma (,) after first address then leave ablank space and add the additional address. (e.g. Jim@abc.com,myemailaddress@mail.com). Each fax received will then deliver to bothemail addresses.3. Select Area Code and Prefix of Desired fax to email number fromdropdown list.4. Click the ‘Use’ button and Fax to Email number will populate the ‘Fax 2Email – Number’ with the User’s number. If the number is to be ported,simply type in the full number without dashes (-) or spaces.5. Go to ‘Fax Confirmation Settings’ to set confirmation options.I N T E R N E T FA X S O L U T I O N S 7
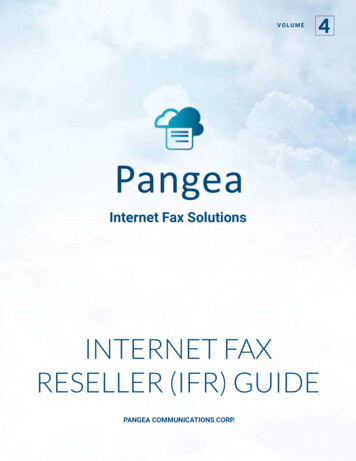
Fax to Fax Configuration (Fax Machine and Fax ATA):Complete this section ONLY if a User will be utilizing the Pangea Fax ATAfor faxing to and from their fax machine.Choose deliveryoption.1. Select ‘Allow Fax to Fax’. Failure to do so will not enable the ATA to beprogrammed and the User will not be able to send or receive a fax.2. Select ‘Queue fax when ATA is offline’ IF the client wishes Pangea tostore the fax on the backend until the ATA comes back online. If thisoption is not selected and the ATA is offline, The DID(s) assigned to theATA will not accept a fax when senders attempt to fax them.3. CAREFULLY type in the MAC address for the ATA. MACs are NOT cAsEsensitive but if not completed properly, the ATA will not program.4. If the User wishes to receive incoming faxes in their email, fill in the‘Fax2Fax – Email’ field.5. If the User’s DID(s) are to be ported, simply type them in the Line 1 andLine 2 Fields. Please leave no spaces or dashes. If they are to use anew number, select area code and prefix from drop-down and click the‘Use’ button. Numbers will then populate the Fax Number fields.6. Users may have incoming faxes delivered to their fax machine (printouton fax machine), email or both. Select which option the User desires.8 I N T E R N E T FA X S O L U T I O N S
Fax Confirmation Settings:IMPORTANT! The ‘Fax Confirmation Settings’ apply to BOTH Fax to EmailUsers AND Fax to Fax Users, although ‘Receive Fax Confirmation on FaxMachine’ does NOT apply to Fax to Email Users.1. For Fax to Fax Users, they may elect to receive confirmation on their faxmachine as well as in their email inbox. For Users wishing to receiveon their fax machine, please complete the ‘Receive Fax Confirmation onFax Machine’ section. Users may receive confirmation on fax success,failure or both.2. If User wishes to receive Email Confirmations, complete the ‘EmailConfirmations’ section. Users may elect to receive on ‘Failure’, ‘Success’or both. Users may receive a simple text email with confirmationinformation, text and an attached copy of the first page of the fax ortext and an attached copy of the full fax. These options apply to BOTHFax to Email and Fax to Fax Users.I N T E R N E T FA X S O L U T I O N S 9
Billing Settings:The Billing Settings will determine how the User is treated in the system froma rating/billing standpoint. The system is very flexible in this regard and Userscan be billed per minute, per page or allocated a set number or minutes/pagesper calendar month or every thirty days.NOTE: Consult Pangea on the plans you wish to offer your Users and forproper configuration for those plans.1. Select ‘Charges by the page’ if you want the User’s fax traffic tracked bythe page. Default is in minutes.2. Selecting ‘Do not reset usage’ will likely be selected if Users is billedmonthly for usage OR has an unlimited usage plan.3. Selecting ‘Reset usage every 30 days’ is typically set for Users with‘package’ type plans (e.g. 200 pages per month). The amount they haveused will ‘zero-out’ every 30 days.4. ‘Reset usage every 1st of the month’ is the same as ‘Reset usage every30 days’ BUT the usage for the User will ‘zero-out’ on the first day of eachcalendar month rather than every 30 days.10 I N T E R N E T FA X S O L U T I O N S
5. Select the appropriate ‘Rate’ plan for the User.6. If the User will belong under a ‘Company’ in the system, selectthe appropriate Company from the drop-down. You may create aCompany later and simply edit the User to belong to a Company at alater time.7. Set the ‘Credit Limit’. If the User will be an unlimited usage User OR ifyou will bill for the cdrs as a post-pay User, set the credit limit to 0. Ifthe User will have a package plan (e.g. 200 pages/mo) set the CreditLimit to the package limit (e.g. 200). If the User is a ‘fax to email’ onlyUser, set the credit limit to ‘.01’.Items to RememberUser IDThe User ID is pre-selected in the system and cannot be changed.Call records, will all be identified by the User ID.Login UsernameLogin must be unique and will enable the client (along with theirpassword) to access their call records via the web. Login andpasswords will also enable Print to Fax and Email to Fax. Werecommend making Login the user’s email address.Fax NumberWhen using Print to Fax, Web to Fax and Email to Fax, the Faxnumber will be included in the Fax header.I N T E R N E T FA X S O L U T I O N S 11
CompanyWhat is “Company” and How to Use Company FunctionThe Company facility within the Internet Fax Reseller interface is optionalto use. It is not necessary to utilize the Company feature if you wish not touse it.The primary function of the Company facility is to group more than oneUser from related entities into a single reporting, billing and debitingaccount. If a Reseller expects to only have a single User for each account,it is not necessary to utilize the Company facility.Resellers may have a combination of Users with Company and Userswithout Company.The Company facility will enable larger companies with multiple Users ofthe system to internally monitor and manage company’s usage and users.The Company facility offers no real benefit to a company with only a singleUser on the system.To add a Company, click on Companies link from the Reseller Portal HomePage and then click on Create Company.12 I N T E R N E T FA X S O L U T I O N SCHAPTERTHREE
OptionalFields1. Complete the Login and Password (login must be unique across allCompanies).2. Complete the Company details. These details are for the Reseller’sinformation only and do not affect the use of the system.I N T E R N E T FA X S O L U T I O N S 13
Billing Settings:1. Select a Rate plan for the Company. Companies CAN be rated differentlythan the Users under them BUT will be rated according to the Users underthem on a Per Page/Per minute basis. So if the Users are rate Per Page,the Company will also be rated Per Page.2. Set Credit limit to ‘0’ if the Company will be an unlimited orpost-pay account. If you wish to limit the usage of the Company,set the limit here.NOTE: the Company Limit supersedes any limit set on the Users underthe Company and ALL usage from Users under the Company aggregate tothe Company’s usage.1. Selecting ‘Allow Edit Users’ will enable the Company Administrator (whichyou are setting up here) to Add, Edit and Delete Users under the Company.If not selected, the Company Administrator will only be allowed to monitorUsage of Users and the Company as a whole.2. If the Company is a Post-pay or unlimited usage account, select ‘Do notReset Usage’. If the Company has a limited account select ‘Reset UsageEvery 30 Days’ or ‘Reset Usage Every 1st of the month’ according to whenyou would like their usage zeroed-out.Save and you may now create Users under the new Company or edit existingUsers to add them to the new Company.Company usage14 I N T E R N E T FA X S O L U T I O N S
Web to FaxCHAPTERFOURHow Users can send a Web to FaxUsers can send a Web to Fax from any browser they have access to.To send a Web to Fax, a User will log into the User Portal and do the following:1. Users can login to the user portal at ipfax.net with user’s credentials2. Once logged in, to send Web to Fax, click the ‘Send Web to Fax’ button.3. In the form screen fill the following required fields including: RecipientsName, Fax Subject and Fax Number.4. Click ‘Add’ after filling in the number field to add the number will show upin the ‘Destinations’ field.5. Once you have completed the required fields, attach up to three files youwant to send by clicking the attach button in red. The maximum size ofattachment is 1.5MB per file .6. Click ‘Send Fax now!’ Once the fax has been sent, the user will receiveconfirmation emails as configured on their account and may check OnlineReports for real-time status.I N T E R N E T FA X S O L U T I O N S 15
Mobile FaxHow Users can Fax from a Mobile DeviceUsers can utilize the Pangea Mobile Fax to send faxes or view status offaxes easily from their Internet-enabled phone or other mobile device.From their mobile browser, Users will go to https://ipfax.net/m and loginwith their Username and password.Here they can check User Report for real time status of any fax sent orreceived. Check Account Balance or send Web to Fax.By clicking ‘Web to Fax’, Users can send a fax directly from their mobile device.16 I N T E R N E T FA X S O L U T I O N SCHAPTERFIVE
Users should do the following to send a Web to Fax from their phone:1. Address the fax to the Recipients name in the ‘To’ field2. Include a Subject if desired. The subject will be included on any cover pageas well as email confirmation and Online Reports for easy identification bythe User.3. Include destination fax number including country code (‘1’ for N. America)4. Include any messaging they would like to appear on cover page of fax sent.5. Upload a file for faxing. Users may upload up to three files for faxing.Almost all file formats are supported.6. Click ‘Send Fax now!’ and the fax will be processed. Users can check OnlineReports for fax status or wait for an email confirmation.I N T E R N E T FA X S O L U T I O N S 17
Print to Client FaxDownload and Customize Print to Fax Client SoftwarePrint to Fax can provide Reseller’s clients with a valuable fax tool and canincrease a Reseller’s revenue. Print to Fax enables Reseller’s clients to faxdirectly from their Internet-Enabled PC to any fax number in the world. Userssimply need to download the Print to Fax client software, install on their PC,do a small amount of configuration and they are ready to fax. Of course, theUser must have sufficient credit in their fax account and be enabled to sendPrint to Fax in the Portal.Resellers need to prepare their customized Print to Fax client software fortheir clients to start using it.Download the customizable Print to Fax client software from the OnlineReseller Resource page. https://pangea-comm.com/resourceUnzip this file into its own directory. Now you can begin to brand the Print toFax Client software and your Company.First open the params.ini file. There are some instructions in this file on howto configure it.In the [App] section, please update the lines that read:SHOWLOGO 1 Setting this value to 1 will show the logo described later inthis document.COMPANYLINE ”PROMOTIONAL MESSAGE THAT APPEARS ON COVERPAGE” This message will appear on any fax cover sheet in small print. It is agood tool to use to promote your serviceDo not make any other changes in this file other than what is listed here.Now you may open the logo.bmp file. This is a bitmap and you may edit it inMicrosoft Paint. Do Not change its size. This logo will show on the Print toFax GUI.Once the Print to Fax client software is installed, users can send faxesfrom any open document by printing to the Internet Fax print driver.18 I N T E R N E T FA X S O L U T I O N SCHAPTERSIX
Once the InternetFax driver has beendownloaded, this optionshould be available whenprinting documents.The user will then be prompted by the Internet Fax GUI below where theycan manually address the fax number and recipient, or easily choose fromsaved contacts in the Address Book.After adding the recipient,the number should appearhere in this fashion:1888999888@RecipientSelect Cover Page to edit the content.I N T E R N E T FA X S O L U T I O N S 19
The user can then view the Fax File Cabinet from their system tray wherethat can see the status of the fax they sent in real time. Here the user canalso view, save, or resend fax that were sent via Print to Fax.To change the ‘Default country’ (Currently USA), open the cprefix.txt file andsimply place the country you want as the default at the top of the list. Youmay also add city codes and cities to this list.You may want to do some test installations to test the changes andconfigurations you have made.Now that you have customized your Print to Fax Client for your Users, youmay wish to create a self-executable file (see Winzip for this) for it and post iton your web site for your clients to easily download and install.To run the Print to Fax Client software, Users will simply download and installit on their PC.To send a fax, Users will simply open the document they want to fax, go tofile print and select Internetfax as their printer. This will activate the GUI andclients can begin faxing.20 I N T E R N E T FA X S O L U T I O N S
Email to FaxCHAPTERSEVENHow to Setup Email to Fax ServiceInternet Fax Resellers may utilize Email to Fax as a way for their clients tosend faxes. It is easy for a Internet Fax Reseller to setup email to fax bydoing the following:1. Setup a ‘catchall’ email account for the Internet Fax Reseller’s domain.A ‘catchall’ email account will accept all undefined emails sent to thedomain. Example, if a IFR’s domain is abc.com, the catchall accountwill receive all emails that are not addressed to a defined email usersuch as bob@abc.com. The format for receiving email to fax isdestinationnumber@domain.com (destination number is replaced withthe actual number the client wishes to fax to). It is impossible to defineALL possible destinations and thus the requirement for a ‘catchall’ emailaccount.2. Forward the catchall emails to catchall@ipfax.net3. If you do not wish to setup a catchall account with your domain, emailscan be sent to destinationnumber@ipfax.net directly.The above configuration will allow Internet Fax Resellers to maintain theirbranding and continuity for their clients if a catchall account is setup.How to send email to faxFormat:1. Email to Fax must be sent to: destinationnumber@ifrdomain.com2. Users MUST send from the email address they are registered to on thesystem as the system utilizes the ‘from’ email address as their Usernameor Login for authorization. Clients are to be registered in the system withtheir email address as their Login/Username. (If user is not set to sendemail to fax without a password.)3. The ‘Subject’ line of the email MUST include the word ‘pass’ followed bythe User’s password. If not set to : “allow Email to Fax without pass” inportal.I N T E R N E T FA X S O L U T I O N S 21
4. Email to Fax is recommended be sent in Plain Text format.5. Clients may attach up to three attachments for faxing. Almost allattachment formats are supported.6. Anything in the body of the email will be included in the cover page of thefax. An empty body will result in no cover page being sent and only theattachment(s) being faxed.7. Clients may include the fax recipient’s name (on cover page) by including itas the first words in the ‘Subject’ field of the email.8. Clients may include a subject for the fax by including ‘s subject’ in the‘Subject’ field of the email for faxing. (the word subject to be replaced byactual subject)Example of addressing of email for faxing:To: 15032213080@ifrdomain.comSubject: John Smith s resume’ pass secretAttachment: resume.docBody of email:Hi John:Please review this resume’ThanksIn the above example, the fax would be sent to the US number 15032213080(all email to fax number must be country code, area code, number format noprefix such as 011 for international)‘John Smith’ would be the recipient.‘secret’ is the User’s passwordThe body of the email would appear on the cover page of the fax sent.22 I N T E R N E T FA X S O L U T I O N S
Fax ReportsCHAPTEREIGHTFax Reports and Status Definitions:Delivered: Inbound fax was successfully delivered to the recipient’s faxmachine connected to the Fax ATA.Fax to Email: Inbound fax was sent to the recipient’s email address.SUCCESS: Outbound fax completed successfully.Failure: Outbound call could not be completed, and the fax was not sent.Sent to ATA: Inbound fax has been recieved by Pangea’s fax service buthas not yet been delivered to the recipient’s fax machine connected tothe Fax ATA.Fast Busy: When dialing the number, the sender hears a busy signalrather than fax tones and is unable to connect. It is likely a bad numberin this case.Voice answer: When dialing the number, the sender hears a voice ratherthan fax tones, and is unable to connect as a fax. Possibly bad number oranswered by a person or recording.I N T E R N E T FA X S O L U T I O N S 23
Porting NumbersProcess for Porting NumbersTo ensure efficiency and the fastest port times, please follow therequirements diligently.Port Requests Must Include:1. Completed Letter of Authorization (LOA):Pangea LNP can provide an LOA template that can be modified with yourown branding. You may also use your own LOA form, provided it containssubstantially the same information as required below. End User Business Name - required End User Address Service address (may be different than billing address) - required Current Provider - Losing Carrier (LEC) Billing Telephone Number (BTN) - required Telephone Number(s) being ported - required Authorized Signature, including a legible printed name, dated within30 days. - required Portout PIN (if applicable) - required Account Number - highly advisable to avoid delays Do not include non-porting numbers on LOA, and make sure the BTN isclearly labled.2. Invoice or Copy of Bill (COB) or Customer Service Record (CSR)from Current Provider:While a current CSR or COB will greatly increase the likelihood of asuccessful port, we will process the port request if unavailable.In the event of a rejection for data mismatch, COB/CSR may be required tocontinue the port request.We cannot initiate a dispute over rejections without a COB or CSR datedwithin 30 days and showing the disputed information.A CSR is more effective in resolving carrier disputes than COB and should24 I N T E R N E T FA X S O L U T I O N SCHAPTERNINE
be supplied whenever possible. Some DIDs are ‘resold’ or ‘off-netted’ andhave different underlying carrier data than what is shown on the customerCOB. In these cases, the only way to resolve the issue is for the line holderto obtain a CSR from the current provider.3. Email all Documentation to:lnp@pangea-comm.comPorting Timeframes 2 business days to review and submit the order to losing carrier. 4-7 business days for the port to complete. Please be aware that external factors may dictate the porting interval.Slow response by losing carrier, or rejections may lead to significantlylonger port intervals. Requested FOC dates are estimates only, and subject to change.You will be advised of actual FOC date once it is issued. No change of service, cancellation orders, or new port outrequests should be placed with the LEC until after pending portshave completed. Simultaneous port out requests for voice and fax number from thesame account will cause a ‘pending port rejection’ with most carriers.4. Create User:Once port request is submitted or an FOC has been recieved. This willensure no downtime for User when port completes. Pre-building a user withthe DID that is to be ported will have no impact on the user’s current FAXline operation. Before submitting a port request, verify that no pending port ordersexist on the customer’s account with LEC. When an order is rejected, there is a carrier-imposed maximum of30 days to make necessary corrections and/or provide supportingdocumentation. If the order remains rejected, the order will becancelled. A new port request will need to be submitted alongwith corrections. Although we make every effort to have the largest footprint possible,not all numbers can be ported to the Pangea Network. We regret anyinconvenience this may cause.I N T E R N E T FA X S O L U T I O N S 25
26 For porting a large quantity of DIDs, we have a bulk orderingspreadsheet. Please contact Pangea LNP for more details if you willbe doing a large porting project. Toll Free Number (TFN) ports require a RESPORG form in place ofthe LOA. If you plan to port a TFN please contact Pangea LNP for thespecific form required.I N T E R N E T FA X S O L U T I O N S
Letter of Authorization (LOA)Customer hereby requests service(s) through Pangea Communications Corp.Customer appoints Pangea Communications Corp. as its agent for ordering changesfrom its local carrier to Pangea Communications Corp. Pangea CommunicationsCorp. may deal directly with the Customer’s Local Company, or with any vendor, in allmatters pertaining to this agency. Customer understands that only one local companymay be designated for the telephone numbers listed below. Undersigned repres
a fax as an attachment on their Internet or Fax to Fax number and include the Fax number they received it on. Both types of confirmation emails (outbound fax to fax confirmation and fax to email confirmation) will contain a 'Reseller Signature'. The Reseller Signature is a unique message each Reseller may include in the Confirmation email.