Transcription
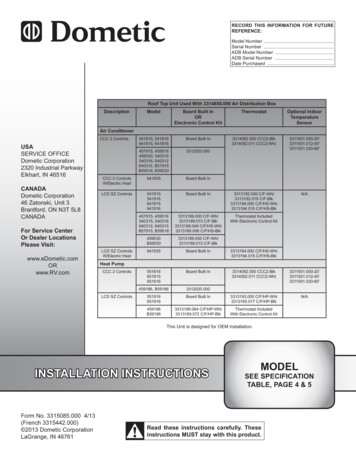
RECORD THIS INFORMATION FOR FUTUREREFERENCE:Model NumberSerial NumberADB Model NumberADB Serial NumberDate PurchasedRoof Top Unit Used With 3314850.000 Air Distribution BoxDescriptionModelBoard Built InORElectronic Control KitThermostatOptional IndoorTemperatureSensor541815, 541816641815, 641816Board Built In3314082.000 CCC2-Blk3314082.011 CCC2-Wht457915, 459516459530, 540315540316, 640312640315, B57915B59516, B595303312020.000 CCC 2 ControlsW/Electric Heat641835Board Built InLCD SZ Controls541915541916641915641916Board Built In3313192.000 C/F-Wht3313192.019 C/F-Blk3313194.000 C/F/HS-Wht3313194.015 C/F/HS-BlkN/A457915, 459516540315, 540316640312, 640315B57915, B595163313189.000 C/F-Wht3313189.015 C/F-Blk3313189.049 C/F/HS-Wht3313189.056 C/F/HS-BlkThermostat IncludedWith Electronic Control Kit459530B595303313189.000 C/F-Wht3313189.015 C/F-Blk641935Board Built In3313194.000 C/F/HS-Wht3313194.015 C/F/HS-Blk551816651815651816Board Built In3314082.000 CCC2-Blk3314082.011 020-60’N/AAir ConditionerCCC 2 ControlsUSASERVICE OFFICEDometic Corporation2320 Industrial ParkwayElkhart, IN 46516CANADADometic Corporation46 Zatonski, Unit 3Brantford, ON N3T 5L8CANADAFor Service CenterOr Dealer LocationsPlease Visit:www.eDometic.comORwww.RV.comLCD SZ ControlsW/Electric HeatHeat PumpCCC 2 ControlsLCD SZ Controls459186, B591863312020.000551916651916Board Built In3313193.000 C/F/HP-Wht3313193.017 C/F/HP-Blk459196B591963313189.064 C/F/HP-Wht3313189.072 C/F/HP-BlkThermostat IncludedWith Electronic Control KitThis Unit is designed for OEM installation.INSTALLATION INSTRUCTIONSForm No. 3315085.000 4/13(French 3315442.000) 2013 Dometic CorporationLaGrange, IN 46761MODELSEE SPECIFICATIONTABLE, PAGE 4 & 5Read these instructions carefully. Theseinstructions MUST stay with this product.
INTRODUCTIONThis air conditioner/heat pump (hereinafter referred to as “unit” or “product”) is design and intended for installation on theroof of a Recreational Vehicle (RV) during the time it is manufactured.Read these instructions and highlight the appropriate steps for your particular procedure before starting the installation.This unit can be installed by one person with brief help from additional personnel. Use these instructions to ensure a properlyinstalled, and properly functioning product." !# ! % ' ! ' *! # * #! # ! :! ' !# TABLE OF CONTENTSINTRODUCTION .2DOCUMENT SYMBOLS .2IMPORTANT SAFETY INSTRUCTIONS .3A. Recognize Safety Information .3B. Understand Signal Words.3C. Supplemental Directives .3D. General Safety Messages .3SPECIFICATIONS .4A. Table - Unit Data .4B. Roof Requirements.5INSTALLATION INSTRUCTIONS .6A. Choosing Proper Location For Unit .6B. Roof Preparation .7C. Wiring Requirements .8D. Choosing Thermostat Location.9E. Thermostat, Optional Indoor Temperature Sensor & Thermostat Communication Cable Installation .9F. Placing Unit On Roof .10G. Installation Preparation . 11H. 120 Vac Power Supply Connection . 11I. 120 Vac Power Supply Connection For 541X1XA, 551X16A, 6418XXH, & 65181XH Models. .12J. Duct Divider Installation .14K. LCD SZ System Low Voltage Wire Connections .14L. CCC 2 System Low Voltage Wire Connections .15 ! .16N. Installing Unit .17O. Installing Air Distribution Box .18P. (CCC 2 System Only) Reset & Checkout .19Q. (CCC 2 System Only) Furnace/Aqua Temperature Differential Setting .20GENERAL INFORMATION.20A. Heat Gain .20B. Condensation .20WIRING DIAGRAMS .21A. Simple RV Wiring Diagram .21B. Unit Wiring Diagrams.21C. Electronic Control Kit Wiring Diagrams .23DOCUMENT SYMBOLSIndicates additional information that is NOT relatedto physical injury.Indicates step-by-step instructions.2
IMPORTANT SAFETY INSTRUCTIONSThis manual has safety information and instructions to helpusers eliminate or reduce the risk of accidents and injuries.A.C. Read and follow all safety information andinstructions to avoid possible injury or death.Recognize Safety InformationRead and understand these instructions before [installing / using / servicing / performingmaintenance on] this product. This is the safety alert symbol. It is used toalert you to potential physical injury hazards.Obey all safety messages that follow thissymbol to avoid possible injury or death.B.Supplemental DirectivesUnderstand Signal WordsIncorrect [installation / operation / servicing /maintaining] of this product can lead to serious injury. Follow all instructions.A signal word will identify safety messages andproperty damage messages, and will indicate thedegree or level of hazard seriousness.The installation MUST comply with all applicable local or national codes, includingthe latest edition of the following standards: indicates a hazardous situation that,if NOT avoided, could result in death or serious injury.U.S.A. indicates a hazardous situation that,if NOT avoided, could result in minor or moderateinjury. ANSI/NFPA 1192, Recreational VehiclesCode ANSI/NFPA70, National Electrical Code(NEC)CANADA is used to address practices NOTrelated to physical injury. CSA C22.1, Parts l & ll, Canadian Electrical Code CSA Z240 RV Series, RecreationalVehiclesD.General Safety Messages Failure to obey the following warnings could result in death or serious injury: This product MUST be [installed / serviced] by a ! * %!# #' !#! Do NOT *! '! * # ! : tion can be extremely hazardous. *! # - Do NOT add any devices or accessories to this * # # ' #! # ' !? * ! writing by Dometic Corporation.3
SPECIFICATIONSA.Table - Unit DataModel No.NominalCapacity(BTU HR)CoolingElectricalRating120 Vac60 Hz 1 phCompressor Compressor Fan Motor Fan MotorRated LoadLockedRated Load 59196.70X15,00013.3459196.71X15,000459196E71XAC torSize**1 Unit / 2 Units20 Amp3.5 KW / 5.0 kW20 Amp3.5 KW / 5.0 kW18.020 Amp3.5 KW / 5.0 kW5.629.020 Amp3.5 KW / 5.0 kW5.629.020 Amp3.5 KW / 5.0 kW2.05.629.020 Amp3.5 KW / 5.0 kW70.02.05.629.020 Amp3.5 KW / 5.0 kW66.02.05.629.020 Amp3.5 KW / 5.0 kW13.370.02.05.629.020 Amp3.5 KW / 5.0 kW15,00013.370.02.05.629.020 Amp3.5 KW / 5.0 kWB59196.71X15,00013.370.02.05.629.020 Amp3.5 KW / 5.0 kW459516.70X15,00013.366.02.05.627.520 Amp3.5 KW / 5.0 kW459516.71X15,00013.370.02.05.627.520 Amp3.5 KW / 5.0 kW459516E71X15,00013.370.02.05.627.520 Amp3.5 KW / 5.0 kWB59516.71X15,00013.370.02.05.627.520 Amp3.5 KW / 5.0 kW459530.70XN/A8.650.02.55.820.015 Amp2.5 KW / 4.0 kWB59530.71XN/A8.650.02.55.820.015 Amp2.5 KW / 4.0 kW540315.70X13,50012.463.03.08.518.520 Amp3.5 KW / 5.0 kW540315.71X13,50012.468.03.08.518.520 Amp3.5 KW / 5.0 kW540316.70X15,00013.366.02.87.629.520 Amp3.5 KW / 5.0 kW540316.71X15,00013.370.02.87.629.520 Amp3.5 KW / 5.0 kW541815A70X13,50012.463.03.08.518.520 Amp3.5 KW / 5.0 kW541815A71X13,50012.468.03.08.518.520 Amp3.5 KW / 5.0 kW541816A70X15,00013.366.02.87.629.520 Amp3.5 KW / 5.0 kW541816A71X15,00013.370.02.87.629.520 Amp3.5 KW / 5.0 kW541915A70X13,50012.463.03.08.518.520 Amp3.5 KW / 5.0 kW541915A71X13,50012.468.03.08.518.520 Amp3.5 KW / 5.0 kW541916A70X15,00013.366.02.87.629.520 Amp3.5 KW / 5.0 kW541916A71X15,00013.370.02.87.629.520 Amp3.5 KW / 5.0 kW551816.70X15,00012.860.02.87.629.520 Amp3.5 KW / 5.0 kW551816.71X15,00012.870.02.87.629.520 Amp3.5 KW / 5.0 kW551816A70X15,00012.860.02.87.629.520 Amp3.5 KW / 5.0 kW551816A71X15,00012.870.02.87.629.520 Amp3.5 KW / 5.0 kW551916A71X15,00012.870.02.87.629.520 Amp3.5 KW / 5.0 kW640312.80X11,00011.553.02.68.520.020 Amp3.5 KW / 5.0 kW640312.83X11,00012.563.02.68.518.020 Amp3.5 KW / 5.0 kW640312C35X11,00010.553.03.510.019.020 Amp3.5 KW / 5.0 kW640312C85X11,00011.553.02.68.520.020 Amp3.5 KW / 5.0 kW640315.80X13,50012.663.02.68.518.020 Amp3.5 KW / 5.0 kW640315.83X13,50012.563.02.68.519.020 Amp3.5 KW / 5.0 kW640315.84X13,50012.563.03.58.519.020 Amp3.5 KW / 5.0 kW640315C35X13,50012.561.03.510.017.520 Amp3.5 KW / 5.0 kW640315C85X13,50012.663.02.68.518.020 Amp3.5 KW / 5.0 kW641815.80X13,50012.663.02.68.519.020 Amp3.5 KW / 5.0 kW641815C35X13,50012.561.03.510.017.520 Amp3.5 KW / 5.0 kW641815C85X13,50012.663.02.68.519.020 Amp3.5 KW / 5.0 kW641815H85X13,50012.663.02.68.519.020 Amp3.5 KW / 5.0 kW641816.80XHi Cap13.463.02.68.523.020 Amp3.5 KW / 5.0 kW641816C35XHi Cap12.361.03.38.523.020 Amp3.5 KW / 5.0 kW641816C85XHi Cap13.463.02.68.523.020 Amp3.5 KW / 5.0 kW641816H85XHi Cap13.463.02.68.523.020 Amp3.5 KW / 5.0 kW4MinimumWire Size*12 AWGCopperUp to 24'
SPECIFICATIONSModel No.NominalCapacity(BTU HR)CoolingElectricalRating120 Vac60 Hz 1 phCompressor Compressor Fan Motor Fan MotorRated LoadLockedRated Load z)MinimumWire Size*12 AWGCopperUp to 24'AC torSize**1 Unit / 2 Units641835.80X13,50012.663.02.68.519.020 Amp3.5 KW / 5.0 kW641835C35X13,50012.561.03.510.017.520 Amp3.5 KW / 5.0 kW641835C85X13,50012.663.02.68.519.020 Amp3.5 KW / 5.0 kW641835H85X13,50012.663.02.68.519.020 Amp3.5 KW / 5.0 kW641915.80X13,50012.663.02.68.519.020 Amp3.5 KW / 5.0 kW641915C35X13,50012.561.03.510.017.520 Amp3.5 KW / 5.0 kW641915C85X13,50012.663.02.68.519.020 Amp3.5 KW / 5.0 kW641916.80XHi Cap13.463.02.68.523.020 Amp3.5 KW / 5.0 kW641916C35XHi Cap12.361.03.38.523.020 Amp3.5 KW / 5.0 kW641916C85XHi Cap13.463.02.68.523.020 Amp3.5 KW / 5.0 kW641935.80X13,50012.563.02.68.519.020 Amp3.5 KW / 5.0 kW641935C35X13,50012.561.03.510.017.520 Amp3.5 KW / 5.0 kW641935C85X13,50012.563.02.68.519.020 Amp3.5 KW / 5.0 kW651815.80X13,50013.163.02.68.524.020 Amp3.5 KW / 5.0 kW651815C35X13,50012.561.03.510.025.020 Amp3.5 KW / 5.0 kW651815C85X13,50013.163.02.68.524.020 Amp3.5 KW / 5.0 kW651815H85X13,50013.163.02.68.524.020 Amp3.5 KW / 5.0 kW651816.80XHI Cap13.463.02.68.527.020 Amp3.5 KW / 5.0 kW651816C35XHI Cap12.361.03.38.524.020 Amp3.5 KW / 5.0 kW651816C85XHI Cap13.463.02.68.527.020 Amp3.5 KW / 5.0 kW651816H85XHI Cap13.463.02.68.527.020 Amp3.5 KW / 5.0 kW651916.80XHI Cap13.463.02.68.527.020 Amp3.5 KW / 5.0 kW651916C35XHI Cap12.361.03.38.524.020 Amp3.5 KW / 5.0 kW651916C85XHI Cap13.463.02.68.527.020 Amp3.5 KW / 5.0 kW***For wire length over 24 ft., consult the National Electrical Code for proper sizing.Dometic Corportion gives GENERAL guidelines for generator requirements. These guidelines come from experiencespeople have had in actual applications. When sizing the generator, the total power usage of your RV must be considered.Keep in mind generators lose power at high altitudes and from lack of maintenance.*** CIRCUIT PROTECTION: Time Delay Fuse or Circuit Breaker Required.B.Roof Requirements { ! ' ! * } ! ! ! * ! ! '! unit. This opening is part of the return air system of the unit and MUST ! ' * ! ## * # :! ' Roof construction with rafters/joists support frames on a minimum of 16 inch centers.Minimum of 2 inches and maximum of 4 inches distance between roof to ceiling of RV.5
INSTALLATION INSTRUCTIONSA.Choosing Proper Location For Unit '! ! ! #! # * ! * ! ! ' of a recreational vehicle (RV). When determining yourcooling requirements, the following should be considered: Size of RV; Window area (increases heat gain); Amount of insulation in walls and roof; Geographical location where the RV will beused; Personal comfort level required.1. For one unit installation: The unit should bemounted slightly forward of center (front to back)and centered from side to side.2. For two unit installations: Install one unit 1/3 andone unit 2/3’s from front of RV and centered fromside to side. ! * ' ' ! ! * !% and level roof section measured with the RV parked on alevel surface. See table below for maximum acceptable 6B59516459530B5953015 54031554031654181554181654191554191655181655191615 18156518166519168 Dimensions Are Nominal FrontKeep This Area Free Of ObstructionsFIG. 3Dimensions Are NominalModel540315, 540316541815, 541816541915, 541916551816, 551916 Roof OpeningCenter Line Of UnitFrontKeep This Area Free Of Obstructions Center Line Of UnitFrontKeep This Area Free Of ObstructionsRoof OpeningCenter Line Of UnitRoof Opening Model457915459186459196459516459530 ModelB57915B59186B59196B59516B59530 3. After Location Has Been Selected:a. Check for obstructions in the area whereunit will be installed. See (FIG. 1), (FIG. 2),(FIG. 3), (FIG. 4) & (FIG. 5).FIG. 1Dimensions Are NominalFIG. 26
INSTALLATION INSTRUCTIONSDimensions Are NominalFIG. 4FIG. 6 935651815651816651916 Keep These AreasFree Of Obstructions Dimensions Are NominalCenter Line Of Unit 3-7/16 FrontRoof Opening Roof Opening 3-7/16 6 Dimensions Are NominalFIG. 5Model640312C640315C641815C & H641816C & H641835C & H641915C641916C641935C651815C & H651816C & H651916CB. Keep These AreasFree Of ObstructionsCenter Line Of UnitRoof Preparation1. FIRE OR ELECTRICAL SHOCKHAZARD. Verify there are no obstacles insideRV’s roof and/or walls (wires, pipes, etc.). ShutOFF gas supply, disconnect 120 Vac power fromRV and disconnect positive ( ) 12 Vdc terminalfrom supply battery BEFORE drilling or cuttinginto RV. Failure to obey these warnings couldresult in death or serious injury. RoofOpeningFront b.2-7/8 Opening Requirements - Before preparingthe ceiling opening, the type of system options MUST be decided upon. Read all ofthe following instructions before beginningthe installation. 2. Carefully mark and cut the required roof opening.See "B. Roof Requirements" on page (5).3. Using the roof opening as a guide, cut the matching hole in the ceiling. Maintain structural integrity.Otherwise damage to product and/or RVcould occur.4.The roof must be designed to support 130pounds when the RV is in motion. Normallya 200 lb. static load design will meet thisrequirement.c. Check inside the RV for air distribution boxobstructions (i.e. door openings, room di%!* # ! # ! ! # (FIG. 6). Maintain structural integrity. Otherwise damage to product and/or RV could occur. NEVER create a low spot on RVroof. Otherwise, water will pool and could causea leak.7
INSTALLATION INSTRUCTIONSThe opening created must be framed to provideadequate support and prevent air from being* : ' # %! ! # more in thickness must be used. Remember toprovide an entrance hole for power supplies,thermostat communication cable, and furnacewiring (if applicable) at the front of the opening.See (FIG. 7).a. This supply wire must be located in the frontportion of the roof opening.b. ' :! extends into the roof opening.3. Thermostat Communication Cablea. CCC 2 ThermostatI. Route a 4 conductor communication cable from the roof opening to the thermostat mounting location using the shortestmost direct route. Make sure that at least ' :! * ! ' ! * * ' : ' thermostat mounting location. See "D.Choosing Thermostat Location" on page(9).FIG. 7Do Not Cut RoofStructure OrRaftersGood-RaftersSupported ByCross BeamsWhen more than one unit is beinginstalled (additional zones) with theCCC 2 thermostat, an additional4 conductor communication cableMUST be routed to each additionalunit roof opening. Make sure that ' :! * ! the roof opening. See (FIG. 46).Frame Opening So ItWon't Collapse WhenBolting Down Unit Leave Access ForPower Supply WiringC.Good LocationBetween RoofRaftersb. LCD SZ ThermostatI. Route a 3 conductor communication cable, 18 to 22 AWG, from the roof opening to the Liquid Crystal Display SingleZone (hereinafter referred to a LCD SZ)thermostat mounting location. Make sure ' ' :! * ! ' ! * * ' wall at the thermostat mounting location.See "D. Choosing Thermostat Location"on page (9).4. (CCC 2 system only) Optional Indoor Temperature Sensora. Route an indoor temperature sensor (optional) from the roof opening to the indoor temperature sensor location. The 2 pin connector end goes to the roof opening. See indoortemperature sensor installation instructionsfor proper sensor location.5. If system includes a gas furnace, route two 18gauge thermostat wires from the furnace to theroof opening of the unit that will control it. If morethan one furnace is to be used, route the secondset of thermostat wires to the second unit. Make ' :! * ! ' ! Front OfOpeningWiring Requirements Route a copper, with ground, 120 Vac supplywire from the time delay fuse or circuit breakerbox to the roof opening. The proper size wirecan be determined from chart on page 4.a. This supply wire must be located in the frontportion of the roof opening.b. The power MUST be on an appropriatelysized separate time delay fuse or circuitbreaker. The proper size protection can bedetermined from chart on page 4.c. ' :! extends into the roof opening. This insuresan easy connection at the junction box.d. Protect the wire where it passes into theopening with approved method.2. Route a dedicated 12 Vdc supply wire (18-22) ' # % * !* battery to the roof opening.When a Comfort Control Center 2 (hereinafter referred to as CCC 2) thermostatis being installed with more than 2 zones,route a dedicated 12 Vdc supply wire(18-22 AWG) to zone 1 and zone 3 roofopening.8
INSTALLATION INSTRUCTIONS6. (CCC 2 system only) If an Energy ManagementSystem (load shed feature) is to be used withthe control, two wires must be routed to theroof opening of the zone to be managed. Thesignal required for this function is normally anopen relay contact. When the EMS calls for thecompressor to shut off, the relay contacts should# ' ' wire extends into the roof opening.7. (CCC 2 system only) If an Automatic GeneratorStart (AGS) kit will be installed, an additional 4conductor communication cable must be routedfrom the last unit to the location of the AGS kit.Follow AGS kit instructions for installation.1. CCC 2 system without an optional indoor temperature sensor and LCD SZ systema. The proper location of the thermostat is veryimportant to ensure that it will provide a comfortable RV temperature. Observe the following rules when selecting a location. # ' ' % ' Install the thermostat on a partition, noton an outside wall. NEVER expose the thermostat to directheat from lamps, sun or other heat producing items. Avoid locations close to doors that leadoutside, windows, or adjoining outsidewalls. Avoid locations close to supply registersand the air from them.2. CCC 2 system with an optional indoor temperature sensor in ALL zonesa. The thermostat may be mounted anywherethat is convenient in the RV. Try to avoid hardto reach and hard to see areas.I. Refer to the instructions provided with theindoor temperature sensor for details ofinstallation.E.Pin 1BlackRedGreenYellowFIG. 9Choosing Thermostat LocationBlackRedGreenYellowD.FIG. 8RJ-11-6C4P ConnectorFlat Four ConductorCommunication Cableb. Route the communication cable through the2" diameter hole in the wall required for thethermostat. See (FIG. 10).FIG. 10CCC 2 Thermostat(Rear View)Thermostat,OptionalIndoorTemperature Sensor & ThermostatCommunication Cable Installation CCC 2 Systema. The previously run communication cable (4conductor telephone cable) must be terminated with two (2) RJ-11-6C4P telephoneconnectors. Refer to the crimp tool manufacturer for crimping instructions. See (FIG. 8)& (FIG. 9).Wallc. Optional Indoor Temperature SensorI. Refer to the instructions provided with theindoor temperature sensor for details ofinstallation.RJ-11-6C4P connectors MUST be installed as shown in FIGS. 7 & 8.9
INSTALLATION INSTRUCTIONSd. Thermostat InstallationI. Carefully separate the thermostat baseplate from the thermostat cover. Insert asmall screw driver into the slot on bottomof thermostat and disengage the tab. See(FIG. 11).a. Remove the cover from the LCD SZ thermostat. Depress tab on bottom of thermostatand separate it from the base.b. Insert the previously run communication cable (3 conductor cable) through the hole inthe base assembly.c. Cut back the outer cable shield approxi ! #' * ! ! ! each wire.d. Mount the thermostat level on the wall usingthe screws provided.e. Make the following connections to the thermostat. See (FIG. 13).FIG. 11CCC 2 Thermostat(Rear View)12V-WallII. Insert the 4 conductor communication cable through the hole in base plate. Alignthermostat base plate with hole in wall.Make sure base plate is level and attachbase plate to wall using the four (4) supplied screws.III. Insert the 4 conductor communicationcable connector (RJ-11-6C4P) into theconnector on the back of the thermostat.See (FIG. 12).COMMS12V FIG. 13 Red/white wire to the 12V terminal Black wire to the 12V– terminal Orange wire to the "COMMS" terminalf. Inspect all connections to make sure theyare tight and not touching any other terminals or wires.g. Push the wires back through the base intothe wall. Place cover on the thermostat andpush until an audible click is heard.FIG. 12F.Placing Unit On Roof Remove the unit from the carton and discardcarton.4 ConductorCommunication Cable2. LIFTING HAZARD. Use properlifting technique and control when lifting product.Failure to obey this caution could result in injury.Place unit on the roof.e. Align the thermostat with the back plate andsnap into position.2. LCD SZ System3.Wire colors listed for the communicationcable (3 conductor cable) match the wirecolors in the unit wire harness and the wireharness at the LCD SZ electronic controlbox. Available wire colors may vary. Do NOT slide unit. Otherwise,damage to gasket (on bottom of unit) may occur,and could cause a leak.Lift and place the unit over the prepared opening using the gasket on the unit as a guide. See(FIG. 14).10
INSTALLATION INSTRUCTIONSFIG. 14FIG. 16Lift And PlaceCeilingTemplateDuct DividerFrontDo Not SlideAir DistributionBox4. Place the air distribution box kit inside the RV.This box contains mounting hardware for theunit and will be used inside the RV.3. All models in this manual will use a four (4) boltpattern for installing the air distribution box kit.H.This completes the outside work. Minoradjustments can be done from inside theRV if required.G.120 Vac Power Supply ConnectionFor models 541815A, 541816A, 541915A,541916A, 551816A, 551916A, 641815H,641816H, 641835H, 651815H and 651816Hgo to section "I".Installation Preparation Check gasket alignment of the unit over theroof opening and adjust if necessary. Unit maybe moved from below by slightly lifting. See(FIG. 15).FIG. 151. ELECTRICAL SHOCK HAZARD.Verify 120 Vac power is disconnected from RV.Failure to obey this warning could result in deathor serious injury.2. ELECTRICAL SHOCK HAZARD.Provide grounding in compliance with all applicable electrical codes. Failure to obey this warning could result in death or serious injury.Center Unit From Below3. Reach up into the return air opening of the unitand pull down the unit electrical cord and powersupply wires. See (FIG. 17) & (FIG. 18).FIG. 17Models Using ElectronicControl KitRoof Gasket2. Remove air distribution box and mounting hardware from carton. See (FIG. 16).ElectricalCord11Measure CeilingThicknessAC PowerSupply
INSTALLATION INSTRUCTIONS2. ELECTRICAL SHOCK HAZARD.Provide grounding in compliance with all applicable electrical codes. Failure to obey this warning could result in death or serious injury.a. For units with board built in, mount the junction box with screws to framing in front ofroof opening and install strain relief. See(FIG. 18).b. For units with plastic electronic control box,remove junction box cover. Save screws forreinstallation.FIG. 18Low VoltageWiresElectricalCord3. Reach up into the return air opening of the unitand pull down the unit electrical cord and powersupply wires. See (FIG. 19).AC PowerSupplyFIG. 19AC PowerSupplyElectricalCordModels With Board Built In4. Route the previously run 120 Vac supply wirethrough the strain relief and into junction box.Tighten strain relief making sure not to damagewires. Leave enough wire inside junction box toconnect to unit 120 Vac wires.5. Connect white to white; black to black; and greento green or bare copper wire using appropriatesize wire connectors.6. Tape the connectors to the supply wire to ensurethey don't vibrate loose.7. Install junction box cover on all systems exceptCCC 2 electronic control box. Push the wiresinto the junction box and install junction box cover using screw(s) provided. The cover for CCC 2electronic control box will be installed later.8. If the system has an electron
W/Electric Heat 641935 Board Built In 3313194.000 C/F/HS-Wht 3313194.015 C/F/HS-Blk Heat Pump CCC 2 Controls 551816 651815 651816 Board Built In 3314082.000 CCC2-Blk 3314082.011 CCC2-Wht 3311931.000-20' 3311931.012-40' 3311931.020-60' 459186, B59186 3312020.000 LCD SZ Controls 551916 651916 Board Built In 3313193.000 C/F/HP-Wht 3313193 .