Transcription
HD Digital Cable Set-Top-BoxN8783CUser’s manualManufactured By: SHENZHEN COSHIP ELECTRONICS CO., LTD.
IMPORTANT SAFETY .17.Read these instructions – All the safety and operating instructions should be read beforethis product is operated.Keep these instructions – The safety and operating instructions should be retained forfuture reference.Heed all warnings – All warnings on the appliance and in the operating instructionsshould be adhered to.Follow all instructions – All operating and use instructions should be followed.Do not use this apparatus near water – The appliance should not be used near wateror moisture – for example, near a faucet, or near a swimming pool, and the like.Clean only with a dry cloth.Do not block any ventilation openings. Install in accordance with the manufacture'sinstructions.Do not install near any heat sources such as radiators, heat registers, stoves, or otherapparatus (including amplifiers) that produce heat.Do not defeat the safety purpose of the polarized or grounding-type plug. A polarizedplug has two blades with one wider than the other. A grounding type plug has two bladesand a third grounding prong. The wide blade or the third prong are provided for yoursafety. If the provided plug does not fit into your outlet, consult an electrician forreplacement of the obsolete outlet.Protect the power cord from being walked on or pinched particularly at plugs,convenience receptacles, and the point where they exit from the apparatus.Only use attachments/accessories specified by the manufacturer.When a cart is used, use caution when moving the cart/apparatus combination to avoidinjury from tip-over.Unplug this apparatus during lightning storms or when unused for long periods of time.Refer all servicing to qualified service personnel. Servicing is required when theapparatus has been damaged in any way, such as power-supply cord or plug isdamaged, liquid has been spilled or objects have fallen into the apparatus, theapparatus has been exposed to rain or moisture, does not operate normally, or hasbeen dropped.Do not install this equipment in a confined or built-in space such as a bookcase or similarunit, and keep well ventilated. The ventilation should not be impeded by covering theventilation openings with items such as newspaper, table-cloths, curtains etc.CAUTION: Danger of explosion if battery is incorrectly replaced. Replace only with thesame or equivalent type (AAA).WARNING: To reduce the risk of fire or electric shock, do not expose this apparatus torain or moisture. The batteries (battery pack or batteries installed) should not beexposed to excessive heat such as sunshine, fire or the like.2
18.19.20.21.22.23.24.WARNING: The direct plug-in adapter is used as a disconnect device, the disconnectdevice shall remain readily operable.Explanation of symbol, marking, signal lamp or similar means indicate that apparatus iscompletely disconnected from the mains.No open flame sources, such as lighted candles, should be placed on the apparatus.Follow proper environmental guidelines for battery disposal.Use of the apparatus in moderate climates.Minimum 5cm around the apparatus for sufficient ventilation.Battery should be recycled or disposed as per state and local guidelines.INSTALLATION STEPSStep 1:Connect the RF Coaxial cableto Cable In port on the cablebox and wall outlet. Handtighten the connections.3
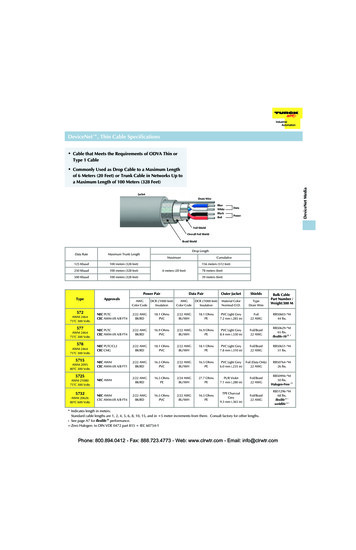
Step 2:Connect to the television using one of the methods below.HDTV - HDMI CableSDTV - Coaxial CableConnect the HDMI cable to the HDMI portConnect the RF Coaxial cable to the CH 3/4on the cable box and the desired HDMIport on the cable box and Antenna or Cableinput port on your television.In port on your television.Step 3:Connect the power adapter tothe wall outlet and the powerport on the cable box.4
Velcro Mounting InstructionsThere are two Velcro strips provided. peel one sideof the strip and attach it to the flat spots on thebottom of the cable box. Peel the other side of thestrip and attach the cable box to the back of yourtelevision or wall. The cable box can now be easilyremoved and replaced.Using the Cable BoxAfter all connections have been made properly, switch on the TV and make sure the unit isturned on.Power OnIf you are using the unitfor the first time or haverestored the unit tofactory default, the firsttime power on screenwill appear on your TVscreen.5
Main MenuPress the Menu key onthe remote to displaytheMainMenu.Navigate with the leftand right arrow keys and press SELECTonthedesireddestination.GuideSelect Guide on theMain Menu or press theGuidekeyontheremote to display theProgram Guide. Youcan browse up to twoweeksofprogramschedule information.SettingsNavigate to the settings section form the Main Menu to perform the following actions.Accessibility: View and modify Closed Caption settings.Audio/Video: View and modify audio language, video description, aspect ratio, video andresolution.Parental Controls: Activate parental controls and modify channel blocks, rating blocks, blocknot rated, and hide titles. In addition, you can view and modify the PIN password, which isrequired to view programs beyond the set rating.Favorite Channels: View and set favorite channels.Remote Pairing: Follow instructions to pair your remote to the cable box that will enablecontrolling the cable box without the need to point to it.Diagnostics: View serial number, unit identifier, UI version, EPG data, software version,hardware version, release time.6
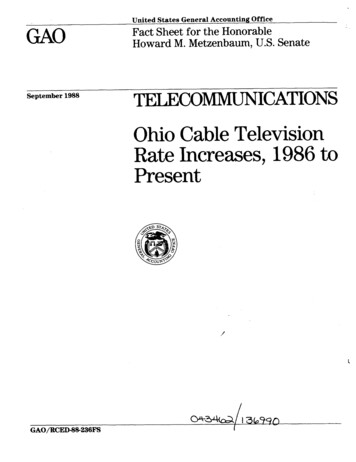
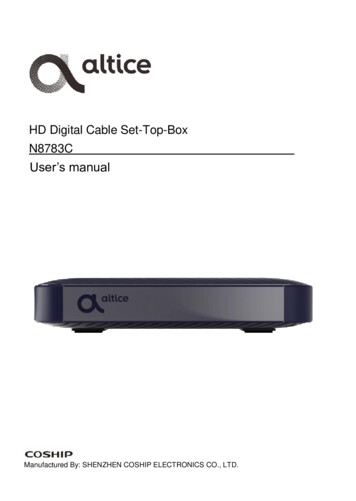
REMOTE CONTROL UNIT7
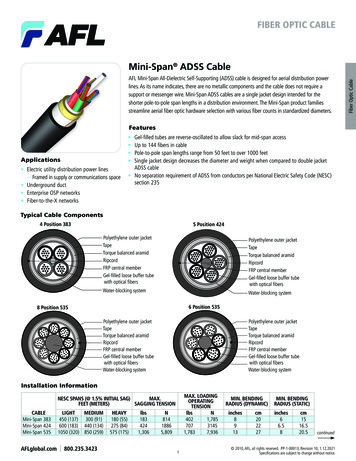
Remote Pairing to Cable BoxPair your remote to the cable box to enable controlling the cable box without the need to pointto it.Step 1: Navigate to pair remote in the settings section.Step 2: Select “Pair Remote Control” on screen.Step 3: Press “7” and “9” on the remote at the same time for at least 5 seconds to completethe pairing process.Note: Once paired, this remote will work exclusively with this box.Remote TV Control ProgrammingMethod 1: Quick Search by Top TV Brands1.The TV must be on.2.Hold theTV [Brand Number] keys for 3 seconds then release. The status lightilluminates and remains io03.Press and hold theTV key until the TV turns off.4.Press the SELECT key to set the TV code. The status light will turn off.8
Method 2: Auto Search1.Hold theTV & VOL keys for 3 seconds then release. Status light illuminates andremains on, release the keys.2.Press and release the number 1 key.3.Press and hold the4.Press the SELECT key to set the TV code. The status light will turn off.TV key until TV turns off.Method 3: Lookup and enter codePlease locate applicable codes on your Altice TV service support website.1.Hold theTV & SELECT keys for 3 seconds then release. The status lightilluminates and remains on, release the keys.2.Enter the 4 digit code corresponding to brand. The status light will turn off.3.Test the TV power.4.Repeat steps 1-3 until all the correct code is entered.SPECIFICATIONS9
FCC Warning StatementChanges or modifications not expressly approved by the party responsible for compliance couldvoid the user's authority to operate the equipment. This equipment has been tested and foundto comply with the limits for a Class B digital device, pursuant to Part 15 of the FCC Rules.These limits are designed to provide reasonable protection against harmful interference in aresidential installation. This equipment generates uses and can radiate radio frequency energyand, if not installed and used in accordance with the instructions, may cause harmfulinterference to radio communications. However, there is no guarantee that interference will notoccur in a particular installation. If this equipment does cause harmful interference to radio ortelevision reception, which can be determined by turning the equipment off and on, the user isencouraged to try to correct the interference by one or more of the following measures: Reorient or relocate the receiving antenna. Increase the separation between the equipment and receiver. Connect the equipment into an outlet on a circuit different from that to which the receiveris connected. Consult the dealer or an experienced radio/TV technician for help.This device complies with part 15 of the FCC rules. Operation is subject to the following twoconditions (1) this device may not cause harmful interference, and (2) this device must acceptany interference received, including interference that may cause undesired operation.10
TROUBLESHOOTINGSymptomResolutionFront panel light will notturn on.Make sure the power adapter is attached to the unit andplugged into a live power outlet securely.No sound1. Press the Mute key to resume volume if the unit is inmute mode.2. Press the VOL key to turn up volume if volume isset to minimum.No sound and No picture1. Make sure HDMI port or CH3/4 Out port is connectedcorrectly.2. Make sure the TV is set to correct input.3. Press thekey to switch to operation mode if the unitis in standby mode.Video pause or stuttersSignal is too weak. Please re-connect signal cablesecurely.A channel is not workingPlease contact your local operator.The unit stopped workingPoor ventilation, or heat-producing object or device isnearby. Put the unit in a cool and well-ventilated place.Remote control is notworking1. Make sure your remote control unit is aimed at the frontpanel.2. If paired, make sure your remote control unit is pairedsuccessfully.3. Replace batteries.11
Remote Pairing to Cable Box Pair your remote to the cable box to enable controlling the cable box without the need to point to it. Step 1: Navigate to pair remote in the settings section. Step 2: Select "Pair Remote Control" on screen. Step 3: Press "7" and "9" on the remote at the same time for at least 5 seconds to complete