Transcription
Avaya Solution & Interoperability Test LabConfiguring SIP Trunks between Avaya Aura SessionManager, Avaya Aura Communication Manager 5.2.1,and Avaya IP Office Release 5.0 – Issue 1.0AbstractThese Application Notes present a sample configuration for a network that uses Avaya Aura Session Manager to connect Avaya Aura Communication Manager 5.2.1 and Avaya IPOffice using SIP trunks. Session Initiated Protocol (SIP) is a standard based communicationprotocol capable of supporting voice, video, instant messaging and other multi-mediacommunication. These Application Notes will outline a solution for using SIP as a trunkprotocol between Avaya Aura Session Manager, Avaya Aura Communication Manager5.2.1 and Avaya IP Office.PV; Reviewed:SPOC 02/01/2010Solution & Interoperability Test Lab Application Notes 2010 Avaya Inc. All Rights Reserved.1 of 46ASM-CM-IPO
Table of Content123Introduction . 4Equipment and Software Validated . 5Configure Avaya IP Office . 63.1 Verify IP Office License . 63.2 Obtain LAN IP Address . 73.3 Configure Network Topology . 73.4 Administer SIP Registrar . 83.5 Administer Codec Preference. 83.6 Administer SIP Trunk . 93.7 Administer Short Code . 103.8 Configure Incoming Call Route . 113.9 Configure SIP User Names . 113.10Save Configuration . 124Configure Avaya Aura Session Manager. 124.1 Specify SIP Domain . 134.2 Add Locations . 134.3 Add SIP Entities . 154.4 Add Entity Links . 184.5 Add Time Ranges . 194.6 Add Routing Policies . 214.7 Add Dial Patterns . 225Configure Avaya Aura Communication Manager Access Element . 255.1 Verify Communication Manager License . 255.2 Configure System Parameters Features. 265.3 Configure IP Node Names . 265.4 Configure IP Interface for C-LAN . 275.5 Configure IP Codec Sets and Network Regions . 275.6 Configure SIP Signaling Group and Trunk Group. 285.6.1SIP Signaling Group . 285.6.2SIP Trunk Group . 295.7 Configure Route Pattern . 305.8 Configure Private Numbering . 315.9 Administer Dial Plan and AAR Analysis. 315.10Save Translations. 326Configure Avaya Aura Communication Manager Feature Server. 336.1 Verify Communication Manager License . 336.2 Configure System Parameters Features. 336.3 Configure IP Node Names . 346.4 Configure SIP Signaling Group and Trunk Group. 346.4.1SIP Signaling Group . 346.4.2SIP Trunk Group . 356.5 Configure Route Pattern . 366.6 Configure Private Numbering . 366.7 Administer Dial Plan and AAR Analysis. 37PV; Reviewed:SPOC 02/01/2010Solution & Interoperability Test Lab Application Notes 2010 Avaya Inc. All Rights Reserved.2 of 46ASM-CM-IPO
6.8 Save Translations . 377Verification Steps. 387.1 Verify Avaya Aura Communication Manager . 387.2 Verify Avaya Aura Session Manager. 427.3 Verify Avaya IP Office . 437.4 Verification Scenarios . 448Conclusion . 459Additional References . 45PV; Reviewed:SPOC 02/01/2010Solution & Interoperability Test Lab Application Notes 2010 Avaya Inc. All Rights Reserved.3 of 46ASM-CM-IPO
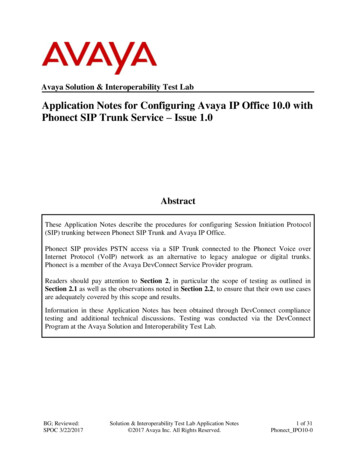
1 IntroductionThese Application Notes present a sample configuration for a network that uses Avaya Aura Session Manager to connect Avaya Aura Communication Manager 5.2.1 and Avaya IP Officeusing SIP trunks. Session Initiated Protocol (SIP) is a standard based communication protocolcapable of supporting voice, video, instant messaging and other multi-media communication.These Application Notes will outline a solution for using SIP as a trunk protocol between AvayaAura Session Manager, Avaya Aura Communication Manager 5.2.1 and Avaya IP Office.As shown in Figure 1, the Avaya 96xx IP Telephone (H.323) and 2420 Digital Telephone aresupported by Communication Manager which serves as an Access Element within the AvayaAura Session Manager architecture. The Avaya 5610 and 1608 IP Telephones (H.323) and54xx Digital Telephones are supported by Avaya IP Office 500. SIP trunks are used to connectthese two systems to Avaya Aura Session Manager, using its SM-100 (Security Module)network interface. All inter-system calls are carried over these SIP trunks. Avaya Aura Session Manager can support flexible inter-system call routing based on dialed number, callingnumber and system location, and can also provide protocol adaptation to allow multi-vendorsystems to interoperate. It is managed by a separate Avaya Aura System Manager, which canmanage multiple Avaya Aura Session Managers by communicating with their managementnetwork interfaces. Avaya 9620 IP Telephones configured as SIP users utilizes the AvayaAura Session Manager User Registration feature and require Communication Manager FeatureServer. Communication Manager as a feature server only supports IMS-SIP users that areregistered to Avaya Aura Session Manager. The Communication Manager Feature Server isconnected to Session Manager via an IMS-enabled SIP signaling group and associated SIP trunkgroup.For the sample configuration, Avaya Aura Session Manager runs on an Avaya S8510 Server,and Avaya Aura Communication Manager 5.2.1 runs on an Avaya S8730 Server with AvayaG650 Media Gateway. The results in these Application Notes should be applicable to otherAvaya servers and media gateways that support Avaya Aura Communication Manager 5.2.1and Avaya IP Office on the 500 platform.These Application Notes will focus on the configuration of the SIP trunks and call routing.Detailed administration of Session Manager, Communication Manager Feature Server,Communication Manager Access Element and the endpoint telephones will not be described (seethe appropriate documentation listed in Section 9).PV; Reviewed:SPOC 02/01/2010Solution & Interoperability Test Lab Application Notes 2010 Avaya Inc. All Rights Reserved.4 of 46ASM-CM-IPO
Figure 1 – Sample Configuration2 Equipment and Software ValidatedThe following equipment and software were used for the sample configuration provided:Hardware ComponentAvaya S8510 ServerAvaya S8730 Servers with G650 Media GatewayAvaya S8300C Server with G450 Media GatewayAvaya 9630 IP Telephone (H.323)Avaya 9630 IP Telephone (SIP)Avaya 2420 Digital TelephoneAvaya IP Office ServerAvaya 5410 & Avaya 5420 Digital TelephonesAvaya 1608 IP Telephone (H.323)Avaya 5610 IP Telephone (H.323)PV; Reviewed:SPOC 02/01/2010Software VersionAvaya Aura Session Manager Release 5.2(Build 520011)Avaya Aura System Manager, Release 5.2(5.2.7.0)Avaya Aura Communication ManagerRelease 5.2 (R015x.02.1.016.4)Avaya Aura Communication ManagerRelease 5.2 (R015x.02.1.016.4)2.02.5.5.17NARelease 5.0 (8)NAha1608ual 2110.bin2.9Solution & Interoperability Test Lab Application Notes 2010 Avaya Inc. All Rights Reserved.5 of 46ASM-CM-IPO
3 Configure Avaya IP OfficeThis section provides the procedures for configuring Avaya IP Office. The procedures includethe following areas: Verify IP Office licenseObtain LAN IP addressConfigure Network TopologyAdminister SIP RegistrarAdminister Codec PreferenceAdminister SIP TrunkAdminister Short CodeConfigure Incoming Call RouteConfigure Users SIP Names3.1 Verify IP Office LicenseFrom a PC running the Avaya IP Office Manager application, select Start Programs IPOffice Manager to launch the Manager application. Select the proper IP Office system, andlog in with the appropriate credentials.The Avaya IP Office Manager screen is displayed. From the configuration tree in the left pane,select License SIP Trunk Channels to display the SIP Trunk Channels screen in the rightpane. Verify that the License Status is “Valid”.PV; Reviewed:SPOC 02/01/2010Solution & Interoperability Test Lab Application Notes 2010 Avaya Inc. All Rights Reserved.6 of 46ASM-CM-IPO
3.2 Obtain LAN IP AddressFrom the configuration tree in the left pane, select System to display the IPO500 screen in theright pane. Select the LAN2 tab, followed by the LAN Settings sub-tab in the right pane. Makea note of the IP Address, which will be used later to configure SIP trunks. Note that IP Officecan support SIP trunks on the LAN1 and/or LAN2 interfaces, and the sample configuration usedthe LAN2 interface.3.3 Configure Network TopologyFrom the configuration tree in the left pane, select System to display the IPO500 screen in theright pane. Select the LAN2 tab, followed by the Network Topology sub-tab in the right pane.Configure Firewall/NAT Type to “Open Internet”. Configure Binding Refresh Time to “5”.Click OK.PV; Reviewed:SPOC 02/01/2010Solution & Interoperability Test Lab Application Notes 2010 Avaya Inc. All Rights Reserved.7 of 46ASM-CM-IPO
3.4 Administer SIP RegistrarSelect SIP Registrar sub-tab in the right pane. Enter a valid Domain Name. Select TCP onlyfrom the drop down menu for Layer 4 Protocol. Make a note of the TCP Port number. Thesewill be used later to configure SIP trunks. Click OK.3.5 Administer Codec PreferenceFrom the configuration tree in the left pane, select System to display the IPO500 screen in theright pane. Select the Telephony tab. Configure Automatic Codec Preference to “G.711ULAW 64K”. Click OK.PV; Reviewed:SPOC 02/01/2010Solution & Interoperability Test Lab Application Notes 2010 Avaya Inc. All Rights Reserved.8 of 46ASM-CM-IPO
3.6 Administer SIP TrunkFrom the configuration tree in the left pane, right-click on Line and select New SIP Line toadd a new SIP Trunk. Enter the “IP address for Session Manager” in ITSP IP Address field.Make a note of the Line Number. Select Layer 4 Protocol as “TCP” and Send Port “5060”.Select “LAN2” in the Use Network Topology Info. Retain default values for all other fields.Click OK.Select the SIP URI tab, and click on Add radio button. In the Incoming Group and OutgoingGroup enter the “Line Number” from the above step. Retain default values for all other fields.Click OK.PV; Reviewed:SPOC 02/01/2010Solution & Interoperability Test Lab Application Notes 2010 Avaya Inc. All Rights Reserved.9 of 46ASM-CM-IPO
3.7 Administer Short CodeFrom the configuration tree in the left pane, right-click on Short Code, and select New. Enterthe dialing string that will be used to call the users on Communication Manager in the Codefield. Select “Dial” from the drop down menu for Feature and enter the phone number appendedwith “@ ip-address of Session Manager ” in the Telephone Number. Select SIP trunkadministered in Section 3.6 in the Line Group Id. Shown below are two short code which wereadded for the sample configuration.PV; Reviewed:SPOC 02/01/2010Solution & Interoperability Test Lab Application Notes 2010 Avaya Inc. All Rights Reserved.10 of 46ASM-CM-IPO
3.8 Configure Incoming Call RouteFrom the configuration tree in the left pane, right-click on Incoming Call Route, and selectNew. Under the Standard tab, enter the SIP trunk administered in Section 3.6 in the LineGroup Id.Under the Destination tab, enter “.” as the Default Value. This will enable all incoming calls tobe routed to any extension.3.9Configure SIP User NamesFrom the configuration tree in the left pane, right-click on User and select SIP tab. Modify theSIP Name to be the same as the user’s extension number. The other fields can be left as default.Repeat this for all users.PV; Reviewed:SPOC 02/01/2010Solution & Interoperability Test Lab Application Notes 2010 Avaya Inc. All Rights Reserved.11 of 46ASM-CM-IPO
3.10Save ConfigurationSelect File Save Configuration to save and send the configuration to the IP Office server.4 Configure Avaya Aura Session ManagerThis section provides the procedures for configuring Avaya Aura Session Manager. Theprocedures include adding the following items: SIP domain Logical/physical Locations that can be occupied by SIP Entities SIP Entities corresponding to the SIP telephony systems and Avaya Aura SessionManager Entity Links, which define the SIP trunk parameters used by Avaya Aura SessionManager when routing calls to/from SIP Entities Time Ranges during which routing policies are active Routing Policies, which control call routing between the SIP Entities Dial Patterns, which govern to which SIP Entity a call is routed Session Manager, corresponding to the Session Manager Server to be managed by AvayaAura System Manager.Configuration is accomplished by accessing the browser-based GUI of Avaya Aura SystemManager, using the URL “http:// ip-address /IMSM”, where “ ip-address ” is the IP address ofAvaya Aura System Manager. Log in with the appropriate credentials and accept theCopyright Notice. The menu shown below is displayed. Expand the Network Routing PolicyLink on the left side as shown. The sub-menus displayed in the left column below will be usedto configure all but the last of the above items (Sections 4.1 through 4.7).PV; Reviewed:SPOC 02/01/2010Solution & Interoperability Test Lab Application Notes 2010 Avaya Inc. All Rights Reserved.12 of 46ASM-CM-IPO
4.1Specify SIP DomainAdd the SIP domain for which the communications infrastructure will be authoritative. Do thisby selecting SIP Domains on the left and clicking the New button on the right. The followingscreen will then be shown. Fill in the following: Name: Notes:The authoritative domain name (e.g., “avaya.com”)Descriptive text (optional).Click Commit.4.2Add LocationsLocations can be used to identify logical and/or physical locations where SIP Entities reside, forpurposes of bandwidth management. For the sample configuration, Locations are added for theCommunication Manager Feature Server, Communication Manager Access Element and IPOffice.To add a location, select Locations on the left and click on the New button on the right. Thefollowing screen will then be shown. Fill in the following:Under General: Name: Notes:A descriptive name.Descriptive text (optional).Under Location Pattern: IP Address Pattern: Notes:A pattern used to logically identify the location.Descriptive text (optional).PV; Reviewed:SPOC 02/01/2010Solution & Interoperability Test Lab Application Notes 2010 Avaya Inc. All Rights Reserved.13 of 46ASM-CM-IPO
The screen below shows the information for IP Office. Click Commit to save.The following screen shows the updated Locations after all the three locations are added.PV; Reviewed:SPOC 02/01/2010Solution & Interoperability Test Lab Application Notes 2010 Avaya Inc. All Rights Reserved.14 of 46ASM-CM-IPO
4.3Add SIP EntitiesA SIP Entity must be added for Avaya Aura Session Manager and for each SIP-basedtelephony system supported by it using SIP trunks. In the sample configuration a SIP Entity isadded for the ASM, the C-LAN board in the Avaya G650 Media Gateway, and Avaya IP Office.To add a SIP Entity, select SIP Entities on the left and click on the New button on the right.The following screen is displayed. Fill in the following:Under General: Name: FQDN or IP Address: Type: Location: Time Zone:Under SIP Link Monitoring: SIP Link Monitoring:.A descriptive name.IP address of the ASM or the signaling interface onthe telephony system.“Session Manager” for Avaya Aura SessionManager,“CM” for Communication Manager Access Element,“CM” for Communication Manager Feature Server, and“SIP Trunk” for Avaya IP Office.Select one of the locations defined previously.Time zone for this location.Select “Use Session Manager Configuration” forCommunication Manager Access Element,Session Manager and Avaya IP Office.Select “Link Monitoring Enabled” forCommunication Manager Feature Server,Defaults can be used for the remaining fields. Click Commit to save each SIP Entity definition.PV; Reviewed:SPOC 02/01/2010Solution & Interoperability Test Lab Application Notes 2010 Avaya Inc. All Rights Reserved.15 of 46ASM-CM-IPO
The following screen shows addition of Avaya Aura Session Manager. The IP address used isthat of the SM-100 Security Module.The following screen shows addition of Avaya IP Office.PV; Reviewed:SPOC 02/01/2010Solution & Interoperability Test Lab Application Notes 2010 Avaya Inc. All Rights Reserved.16 of 46ASM-CM-IPO
The following screen shows addition of Communication Manager Access Element. The IPaddress used is that of the C-LAN board in the Avaya G650 Media gateway.The following screen shows addition of Communication Manager Feature Server. The IPaddress used is that of the S8300C server.PV; Reviewed:SPOC 02/01/2010Solution & Interoperability Test Lab Application Notes 2010 Avaya Inc. All Rights Reserved.17 of 46ASM-CM-IPO
4.4Add Entity LinksA SIP trunk between Avaya Aura Session Manager and a telephony system is described by anEntity link. To add an Entity Link, select Entity Links on the left and click on the New buttonon the right. Fill in the following fields in the new row that is displayed: Name: SIP Entity 1: Port: SIP Entity 2: Port: Trusted:A descriptive name.Select the Avaya Aura Session Manager.Port number to which the other system sends SIP requestsIn the sample configuration, TCP Protocol was used.Select the name of the other system.Port number on which the other system receives SIPrequestsCheck this box. Note: If this box is not checked, callsfrom the associated SIP Entity specified in Section 4.3will be denied.Click Commit to save each Entity Link definition. The following screens illustrate adding thethree Entity Links for:1. Avaya IP Office2. Communication Manager Access Element3. Communication Manager Feature ServerPV; Reviewed:SPOC 02/01/2010Solution & Interoperability Test Lab Application Notes 2010 Avaya Inc. All Rights Reserved.18 of 46ASM-CM-IPO
4.5Add Time RangesBefore adding routing policies (see next section), time ranges must be defined during which thepolicies will be active. In the sample configuration, one policy was defined that would allowrouting to occur at anytime. To add this time range, select Time Ranges, and click on the leftand click on the New button on the right. Fill in the following: Name:Mo through SuStart TimeEnd TimeA descriptive name (e.g., “Anytime”).Check the box under each of these headingsEnter 00:00.Enter 23:59Click Commit to save this time range.PV; Reviewed:SPOC 02/01/2010Solution & Interoperability Test Lab Application Notes 2010 Avaya Inc. All Rights Reserved.19 of 46ASM-CM-IPO
PV; Reviewed:SPOC 02/01/2010Solution & Interoperability Test Lab Application Notes 2010 Avaya Inc. All Rights Reserved.20 of 46ASM-CM-IPO
4.6Add Routing PoliciesRouting policies describe the conditions under which calls will be routed to the SIP Entitiesspecified in Section 4.3. Two routing policies must be added – one for IP Office, one forCommunication Manager Access Element. To add a routing policy, select Routing Policies onthe left and click on the New button on the right. The following screen is displayed. Fill in thefollowing:Under General:Enter a descriptive name in Name.Under SIP Entity as Destination:Click Select, and then select the appropriate SIP entity to which this routing policy applies.Under Time of Day:Click Add, and select the time range configured in the previous section.Defaults can be used for the remaining fields. Click Commit to save each Routing Policydefinition.The following screens show the Routing Policy for IP Office.PV; Reviewed:SPOC 02/01/2010Solution & Interoperability Test Lab Application Notes 2010 Avaya Inc. All Rights Reserved.21 of 46ASM-CM-IPO
The following screens show the Routing Policy for Communication Manager Access Element.No Routing Policy is required for Communication Manager Feature Server, as these phones areregistered directly to Session Manager.4.7Add Dial PatternsDefine dial patterns to direct calls to the appropriate SIP Entity. 7-digit extensions beginningwith “6664” reside on Communication Manager Access Element, and 3-digit extensionsbeginning with “2” reside on Avaya IP Office. To add a dial pattern, select Dial Patterns on theleft and click on the New button on the right. Fill in the following, as shown in the screen below,which corresponds to the dial pattern for routing calls to Avaya Aura CommunicationManager Access Element:Under General: Pattern: Min Max SIP Domain NotesDialed number or prefix.Minimum length of dialed number.Maximum length of dialed number.SIP domain specified in Section 4.1Comment on purpose of dial pattern.Under Originating Locations and Routing Policies:Click Add, and then select the appropriate location and routing policy from the list.PV; Reviewed:SPOC 02/01/2010Solution & Interoperability Test Lab Application Notes 2010 Avaya Inc. All Rights Reserved.22 of 46ASM-CM-IPO
In the sample configuration, all calls originating from endpoints connected to Avaya IP Officedial “666-xxxx” where “4xxx” is the 4-digit extension on Communication Manager AccessElement.In the sample configuration, all calls originating from endpoints connected to CommunicationManager Access Element or Feature server dial “2xx” where “2xx” is the 3-digit extension onAvaya IP Office.PV; Reviewed:SPOC 02/01/2010Solution & Interoperability Test Lab Application Notes 2010 Avaya Inc. All Rights Reserved.23 of 46ASM-CM-IPO
PV; Reviewed:SPOC 02/01/2010Solution & Interoperability Test Lab Application Notes 2010 Avaya Inc. All Rights Reserved.24 of 46ASM-CM-IPO
5Configure Avaya Aura Communication Manager AccessElementThis section describes configuring Avaya Aura Communication Manager Access Element inthe following areas. Some administration screens have been abbreviated for clarity. 5.1Verify Communication Manager licenseAdminister system parameters featuresAdminister IP node namesAdminister IP interfaceAdminister IP codec set and network regionAdminister SIP trunk group and signaling groupAdminister SIP trunk group members and route patternsAdminister private numberingAdminister dial plan and AAR analysisVerify Communication Manager LicenseLog into the System Access Terminal (SAT) to verify that the Communication Manager licensehas proper permissions for features illustrated in these Application Notes. Use the “displaysystem-parameters customer-options” command. Navigate to Page 2, and verify that there issufficient remaining capacity for SIP trunks by comparing the Maximum Administered SIPTrunks field value with the corresponding value in the USED column. The difference betweenthe two values needs to be greater than or equal to the desired number of simultaneous SIP trunkconnections.The license file installed on the system controls the maximum permitted. If there is insufficientcapacity or a required feature is not enabled, contact an authorized Avaya sales representative tomake the appropriate changes.display system-parameters customer-optionsOPTIONAL FEATURESPageIP PORT CAPACITIESMaximum Administered H.323 Trunks:Maximum Concurrently Registered IP Stations:Maximum Administered Remote Office Trunks:Maximum Concurrently Registered Remote Office Stations:Maximum Concurrently Registered IP eCons:Max Concur Registered Unauthenticated H.323 Stations:Maximum Video Capable Stations:Maximum Video Capable IP Softphones:Maximum Administered SIP Trunks:PV; Reviewed:SPOC 02/01/20105001800000010000502 of11USED0400000020Solution & Interoperability Test Lab Application Notes 2010 Avaya Inc. All Rights Reserved.25 of 46ASM-CM-IPO
5.2Configure System Parameters FeaturesUse the “change system-parameters features” command to allow for trunk-to-trunk transfers.Submit the change.This feature is needed to be able to transfer an incoming/outgoing call from/to the remote switchback out to the same or another switch For simplicity, the Trunk-to-Trunk Transfer field wasset to “all” to enable all trunk-to-trunk transfers on a system wide basis. Note that this featureposes significant security risk, and must be used with caution. For alternatives, the trunk-totrunk feature can be implemented using Class Of Restriction or Class Of Service levels. Refer tothe appropriate documentation in Section 9 for more details.change system-parameters featuresPageFEATURE-RELATED SYSTEM PARAMETERSSelf Station Display Enabled? nTrunk-to-Trunk Transfer: allAutomatic Callback with Called Party Queuing? nAutomatic Callback - No Answer Timeout Interval (rings): 3Call Park Timeout Interval (minutes): 10Off-Premises Tone Detect Timeout Interval (seconds): 20AAR/ARS Dial Tone Required? yMusic/Tone on Hold: none5.31 of18Configure IP Node NamesUse the “change node-names ip” command to add entries for the C-LAN that will be used forconnectivity, and Avaya Aura Session Manager and Avaya IP Office. The actual node namesand IP addresses may vary. Submit these changes.change node-names ipPage1 of2IP NODE faultgateway1procrPV; Reviewed:SPOC 02/01/2010IP 0.0.0.010.80.111.10.0.0.0Solution & Interoperability Test Lab Application Notes 2010 Avaya Inc. All Rights Reserved.26 of 46ASM-CM-IPO
5.4Configure IP Interface for C-LANAdd the C-LAN to the system configuration using the “add ip-interface 1a03” command. Theactual slot number may vary. In this case, “1a03” is used as the slot number. Enter the C-LANnode name assigned from Section 5.3 into the Node Name field.Enter proper values for the Subnet Mask and Gateway Node Name fields. In this case, “24”and “Gateway001” are used to correspond to the network configuration in these ApplicationNotes. Set the Enable Interface and Allow H.323 Endpoints fields to “y”. Default values maybe used in the remaining fields. Submit these changes.add ip-interface 1a03Page1 of3IP INTERFACESTy
Session Initiated Protocol (SIP) is a standard based communication protocol capable of supporting voice, video, instant messaging and other multi-media communication. These Application Notes will outline a solution for using SIP as a trunk protocol between Avaya Aura Session Manager, Avaya Aura Communication Manager 5.2.1 and Avaya IP Office.