Transcription
Outbound Option Installation: SCCP DialerNoteThe SCCP Dialer is deprecated for release 10.0 and will reach end-of-sale in an upcoming release.This chapter, intended for system administrators performing the initial installation of Outbound Option,describes how to set up and install the Outbound Option platform in an SCCP Dialer deployment.This chapter groups installation activities to minimize switching between configuration and actual softwareinstallation. The general flow lists Unified CCE configuration first, then the Unified CM configuration, andthen the Outbound Option component software installation and associated database creation.NoteCisco Finesse is not supported with the SCCP dialer. Installation task maps, page 2 Unified CCE Outbound Option Configuration, page 4 Configuration and scheduling of personal callback feature, page 10 Unified CMr and Gateway Configuration, page 15 Outbound Option Software Installation Steps, page 18 Installation of Cisco CTI Controls, page 22 Setup of Outbound Option in Cisco Desktop Administrator, page 24 Verification, page 25Outbound Option Guide for Cisco Unified Contact Center Enterprise and Hosted Release 10.0(1)1
Outbound Option Installation: SCCP DialerInstallation task mapsInstallation task mapsUnified CCE Outbound ConfigurationThe first phase of installing Outbound Option is configuring Unified CCE and Outbound Option components.The following table lists the steps that comprise Unified CCE Outbound configuration in the order that thesteps should be performed, and provides pointers to where the tasks are discussed.Table 1: IPCC Enterprise Outbound Configuration StepsStep NumberTaskIPCC EnterpriseProcedureSystem PG Procedure1Configure the IPCC PGConfigure the IPCC PGConfigure the IPCC PG2Configure the Dialer component Configure DialerComponentConfigure DialerComponent3Configure the port mapConfigure Port MapConfigure Port Map4Create a Network VRUCreate a Network VRUCreate a Network VRU5Configure the Media RoutingPGConfigure Media Routing Configure MediaPG (MR PG)Routing PG (MR PG)6Configure a Skill GroupConfigure Skill GroupConfigure Skill Group7Create a Dialed NumberCreate Dialed NumberCreate Dialed Number8Create Translation Route ToIVRIPCC EnterpriseDocumentationIPCC EnterpriseDocumentation9Configure System OptionsConfigure SystemOptionsConfigure SystemOptions10Enable ECC VariablesEnable ECC VariablesEnable ECC Variables11Configure and schedule personal Configure Personalcallbacks (optional)CallbacksConfigure PersonalCallbacksCisco Unified CM and Gateway ConfigurationThe following table lists the steps that comprise Unified CM configuration in the order that the steps shouldbe performed, and provide pointers to where the tasks are discussed.Outbound Option Guide for Cisco Unified Contact Center Enterprise and Hosted Release 10.0(1)2
Outbound Option Installation: SCCP DialerSoftware Installation and Database CreationTable 2: Cisco Unified Communications CM Steps for Deployments with SCCP DialerStep Number TaskIPCC EnterpriseProcedureSystem PGProcedure1Configure a separate Device Pool for each Dialer Cisco co nfigure a separate Unified CM ManagerCisco UnifiedGroup for each Dialer’s Unified CM subscriber CommunicationsManagerAdministrationGuideCisco port Dialer Ports and assign to the PG’s CTI Import and AssignApplication User, assigning Dialer ports for each Dialer PortsDialer component to a distinct device poolImport and AssignDialer Ports4Disable tone on hold/ music on hold for theDialerCisco UnifiedCommunicationsManager Featuresand Services GuideCisco UnifiedCommunicationsManager Featuresand Services Guide5Disable ring tone for dialer transferDisable RingbackDuring Transfer toAgent for SIPDisable RingbackDuring Transfer toAgent for SIP6Set Up Auto Answer on agent phone if zip tone Auto AnswerrequiredConfiguration onAgent PhonesAuto AnswerConfiguration onAgent PhonesSoftware Installation and Database CreationThe third phase of installing Outbound Option is installing the component software and creating the associateddatabase. The following table lists the steps that comprise software installation and database creation in theorder that the steps should be performed and provides pointers to where the tasks are discussed.Table 3: Software Installation and Database Creation StepsStep NumberTaskIPCC EnterpriseProcedure1Install the Outbound Option privateCreate Outbounddatabase on the Logger Side A platform Option PrivateDatabaseSystem PGProcedureCreate OutboundOption PrivateDatabaseOutbound Option Guide for Cisco Unified Contact Center Enterprise and Hosted Release 10.0(1)3
Outbound Option Installation: SCCP DialerUnified CCE Outbound Option ConfigurationStep NumberTaskIPCC EnterpriseProcedureSystem PGProcedure2Install the Dialer component on the PG Install DialerplatformComponentInstall DialerComponent3Edit Dialer-related Registry valuesConfigure DialerAfter InstallationConfigure DialerAfter Installation4Modify JTAPI for calls to invalidnumbersModify JTAPI forCalls to InvalidNumbersModify JTAPI forCalls to InvalidNumbers5Install the MR PG on the PG platformInstall MR PGInstall MR PGUnified CCE Outbound Option ConfigurationThis section provides procedures for the tasks associated with Unified CCE Outbound Option configuration.Configure IPCC PGPerform the following steps to configure the IPCC PG (PG1).ProcedureStep 1Step 2In ICM Configuration Manager, open the PG Explorer tool.Click Retrieve, and then click Add. Add an IPCC PG.Step 3Step 4Enter the name (for example, PG1 IPCC).Select the CallManager or PG Generic PG Type.Step 5Step 6Step 7Add a peripheral.Enter the name (for example, PG1 IPCC PIM1).On the Peripheral tab, click the Enable post routing check box.Step 8 Select the Default Desk Setting from the drop-down list.Step 9 On the Routing Client tab, enter the routing client name (for example, IPCC PIM1 Voice).Step 10 Select the Cisco Voice option from the Default media routing domain drop-down list.Step 11 Click Save.Step 12 Record the assigned Logical Controller ID for later use: .Step 13 Record the assigned Peripheral ID for later use: .Outbound Option Guide for Cisco Unified Contact Center Enterprise and Hosted Release 10.0(1)4
Outbound Option Installation: SCCP DialerConfigure Dialer ComponentConfigure Dialer ComponentPerform the following steps to configure the Dialer component.ProcedureStep 1Step 2Step 3Step 4Confirm that all ICM services are running.Open the ICM Configuration Manager.Double-click the Outbound Option - Dialer option to open the Outbound Option Dialer configurationwindow.Click Retrieve.Step 5Click Add to add a new Dialer.Step 6Enter the following information in the Dialer General Tab fields.FieldDescriptionDialer Name (required)The name of the system where the Dialer is located.Maximum 32-character string, includingalpha-numeric characters, periods (.), and underscores( ). Alphabetic characters can be upper- orlower-case. The name must begin with analpha-numeric character, and must not contain spaces.Computer Name (required)Maximum 32-character string, includingalpha-numeric characters, periods (.), underscores( ), and hyphens (-). Alphabetic characters can beupper- or lower-case. The name must begin with analpha-numeric character and must not contain spaces.EnableClick the check box to enable or disable this Dialerfor all campaigns.ICM Peripheral Name (required)Select a preconfigured peripheral name. This field isa drop-down list and is not editable.Dialer TypeSelect SCCP (Skinny Call Control Protocol).DescriptionMaximum 255 characters. This description appearsonly on this tab page.General TelephonyInclude Area Code when DialingWhen this option is enabled, the Dialer uses all digitsto reach local telephone numbers rather than not usingthe area code. The default is Disabled.Outbound Option Guide for Cisco Unified Contact Center Enterprise and Hosted Release 10.0(1)5
Outbound Option Installation: SCCP DialerConfigure Port MapFieldDescriptionDial prefixEnter any dialing prefix required by your location orby your campaigns. For example, some locationsmight require the prefix 9 to reach an outsidetelephone line.Long distance prefixEnter the pre-pended value for all long distance calls.The Dialer checks the local area codes against thecontact number. If the configured local area code doesnot match the area code in the contact number, theDialer determines this number is a long distance call.The default is 1.Local area code (comma delimited) (required)Enter the area/city code used at your location. Entermultiple local area codes separated by commas; forexample, “508,978,617” represents three local areacodes.Hangup Delay (1-10)Enter the number of seconds for the Dialer to waitbefore reusing a port after a hangup event. The defaultis one second.Port ThrottleThe maximum calls per second rate at which theDialer dials outbound calls. Default is 5 calls persecond for SCCP Dialer.If the Dialer is installed in a location outside the U.S., either enter the locally-specific long distanceprefix in the Long distance prefix field or leave the field blank.Click Save.NoteStep 7Configure Port MapPerform the following steps to configure the port map for each Dialer. This specifies the number of portsavailable on the Dialer and the extension numbers, which Unified CM assigns to those ports. The maximumnumber of ports per SCCP Dialer is 120. Each configured port represents a Dialer phone device (Cisco 30VIP) on Unified CM. Extension numbers must be unique across the full enterprise. If there are multiple Unified CM clusters,the extensions (Unified CM directory number) must still be unique. Extension numbers can be up to tendigits in length. When selecting extension numbers for Dialer ports, confirm that existing phone numbers in Unified CMand dial numbers in the Device Target Explorer tool are not already done.Outbound Option Guide for Cisco Unified Contact Center Enterprise and Hosted Release 10.0(1)6
Outbound Option Installation: SCCP DialerCreate a Network VRUProcedureStep 1Step 2Step 3Step 4Step 5Step 6Step 7Step 8Step 9In the ICM Configuration Manager Outbound Option Dialer configuration window, click the Port MapSelection tab to display the port map configuration.NoteConfirm that all agents and skill groups used by Outbound Option are associated with the UnifiedCM PG, and not the MR PG.To begin adding ports to this Dialer, click Add.Configure a set of ports and their associated extensions.NoteMake sure you provide the same number of ports for all the Dialers configured on the same peripheral.Click OK. The port mappings appear on the Port Map Selection tab.Click Save to save all the configuration information.Click Export. The Select CM Version dialog appears.Click the Unified CM option. (Select the latest Unified CM option if you are using a later version of UnifiedCM.)Click OK and specify the path for the port mapping file.Click Save to save the file. You will import this file, during Unified CM configuration.Create a Network VRUPerform the following steps to create a Network VRU using the Network VRU Explorer tool.ProcedureStep 1Step 2Step 3Step 4Step 5NoteOpen the ICM Configuration Manager application.Open the Explorer tools.Open the Network VRU Explorer tool.Create a type 2 VRU to be used during Media Routing (MR) PIM setup. Record the \ VRU name:.Click Save.See the ICM Configuration Guide for Cisco Unified ICM Enterprise for detailed information about theICM Configuration Manager tools.Configure Media Routing PG (MR PG)Perform the following steps to configure the MR PG (PG2).Outbound Option Guide for Cisco Unified Contact Center Enterprise and Hosted Release 10.0(1)7
Outbound Option Installation: SCCP DialerConfigure Skill GroupProcedureStep 1Step 2In ICM Configuration Manager, open the PG Explorer tool.Click Retrieve, and then click Add. Add an MR PG.Step 3Step 4Enter the name (for example, PG2 MR).Select the MR PG type.Step 5Step 6Step 7Add a peripheral.Enter the name (for example, PG2 MR PIM1).On the Peripheral tab, check the Enable post routing check box.Step 8Step 9On the Routing Client tab, enter the routing client name (for example, MR PIM1 Voice).Select the Cisco Voice option from the Default media routing domain drop-down list.Step 10 On the Advanced tab, select the Network VRU that you created during system installation from the drop-downlist.Step 11 Click Save.Step 12 Record the assigned Logical Controller ID for later use: .Step 13 Record the assigned Peripheral ID for later use: .Configure Skill GroupPerform the following steps to create a skill group for the PG using the Skill Group Explorer tool:ProcedureStep 1Step 2Step 3In ICM Configuration Manager, open the Skill Group Explorer tool.Confirm that the PIM created in the section Configure IPCC PG is displayed in the Select filter data section.Click Retrieve.Step 4Click Add Skill Group.Step 5Set the Media Routing Domain to the Cisco Voice option.Step 6Step 7Enter a peripheral name and number (record them): . (You can either enter a nameor allow the system to generate the name.)Enable the ICM picks the agent check box.Step 8Click Add Route.Step 9 Enter a name for the new route (any name is allowed).Step 10 Click Save.Outbound Option Guide for Cisco Unified Contact Center Enterprise and Hosted Release 10.0(1)8
Outbound Option Installation: SCCP DialerCreate Dialed NumberCreate Dialed NumberPerform the following steps to create a dialed number for the MR PG.ProcedureStep 1Step 2Step 3Step 4In ICM Configuration Manager, open the Dialed Number/Script Selector List tool.Click Add, then enter a dialed number for the MR PG.Select the MR routing client from the drop-down list.Select Cisco Voice from the Media Routing Domain drop-down list.Step 5Step 6Enter the dialed number.On the Dialed Number Mapping tab, click Add.Step 7In the Calling Line ID group box, click the All radio button.Step 8In the Caller-entered digits group box, click the All radio button.Step 9In the Call type drop-down list, select the MR call type.Step 10 Click OK on the Dialed Number Map Entry dialog box, and then click Save.NoteTo use the Personal Callback feature, a second dialed number is required. This dialed number must havethe PersonalCallback dialed number string. As with the previous dialed number, map all Calling LineIDs and all Caller-entered digits to the call type previously created for the MR routing client. Multipledialers require multiple dialed numbers—one for each routing client per skill group.Configure System OptionsUse the Outbound Option System Options component in the ICM Configuration Manager to define contactdialing time ranges that apply to all of your Outbound Option campaigns.Because this component uses 12-hour time notation, be sure to select AM or PM for your start and end times.ProcedureStep 1Step 2In ICM Configuration Manager, open the Outbound Option System Options component.Select the General Options tab page to define the total dialing time range for all your Outbound Optioncampaigns to use, and then click OK.Step 3Select the Bulk Update tab page to define specific dialing time ranges for telephone numbers, and then clickUpdate All Campaigns.Outbound Option Guide for Cisco Unified Contact Center Enterprise and Hosted Release 10.0(1)9
Outbound Option Installation: SCCP DialerEnable ECC VariablesEnable ECC VariablesPerform the following steps to enable the Expanded Call Context (ECC) variables using the System Informationtool and the Expanded Call Variable List tool.ProcedureStep 1Step 2Step 3Step 4Step 5Step 6Step 7Step 8Open the System Information tool in the Tools/Miscellaneous folder in the ICM Configuration Managerapplication.Enable the Expanded call context enabled check box.Click Save.Open the List tools.Open the Expanded Call Variable List tool.Click all BAxxxx variables (BAAccountNumber, BABuddyName, BACampaign, BADialedListID,BAResponse, BAStatus, and BATimezone).In the Attributes tab, click the Enabled check box for each variable.Click Save.Configuration and scheduling of personal callback featureConfigure Personal CallbacksNoteAll personal callbacks occur in Preview mode. Be aware that only one Dialer on a particular peripheralis assigned personal callback records.Some personal callback options must be configured through the registry. Furthermore, if a personal callbackrecord is not associated with a campaign, it follows the rules configured within the registry.ProcedureStep 1Configure the reschedule callback mode in the Outbound Option Campaign Configuration Component byselecting one of the following options on the Campaign General tab: Use the Campaign DN—the call is routed to the skill group DN for the campaign associated with thecallback, if the DN is available Reschedule the personal callback to the same time the next business day Abandon the personal callbackOutbound Option Guide for Cisco Unified Contact Center Enterprise and Hosted Release 10.0(1)10
Outbound Option Installation: SCCP DialerConfigure Personal CallbacksStep 2Step 3Open the HKEY LOCAL MACHINE\SOFTWARE\Cisco Systems, Inc.\ICM\ instancename \LoggerA\BlendedAgent\CurrentVersion folder in the Outbound Option registry.Configure the personal callback registry entries listed in the following table.NameDefault DescriptionValueCallbackTimeLimit15Calculates the callback time range for eachpersonal callback in minutes. The CampaignManager queries the Personal Callback List forcallback records where the CallbackDateTimevalue is between the current time and the sumof the current time minus sy1Sets the amount of time, in minutes, that theOutbound Option Dialer waits before retrying apersonal callback when the customer’s phone isbusy (minimum value is 1; maximum value is10).PersonalCallbackTimeToRetryNoAnswer20Sets the amount of time, in minutes, that theOutbound Option Dialer waits before retrying apersonal callback when the customer does notanswer the phone (minimum value is 5;maximum value is 60).PersonalCallbackTimeToRetryReservation5Sets the amount of time, in minutes, that theOutbound Option Dialer waits before retryingto reserve an agent if the agent is not available(minimum value is 1; maximum value is 10).PersonalCallbackMaxAttemptsDefault5Sets the maximum number of times a personalcallback will be attempted (minimum value is 1;maximum value is 20). When the number ofmaximum attempts reaches 0, the record is nottried again and the status is set to “M” The interval time, in minutes, at which theOutbound Option Dialer checks the CampaignManager for personal callback records (minimumvalue is 1; maximum value is 30).PersonalCallbackDaysToPurgeOldRecords5The number of days after the personal callbackhas been scheduled to keep the record before itis purged (minimum value is 1; maximum valueis 30).Outbound Option Guide for Cisco Unified Contact Center Enterprise and Hosted Release 10.0(1)11
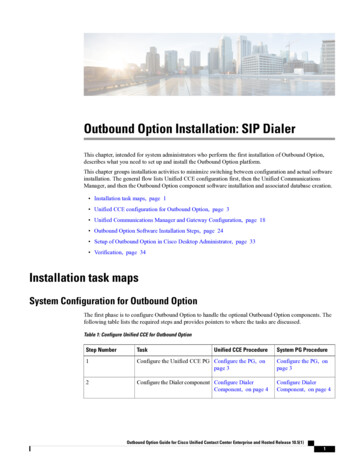
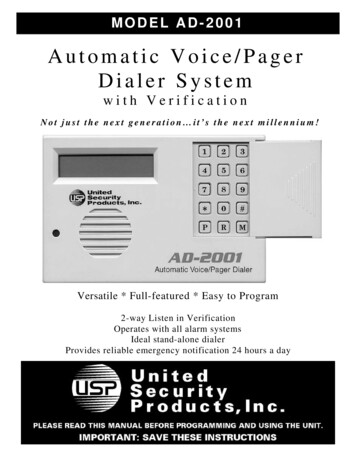
Outbound Option Installation: SCCP DialerConfigure Personal CallbacksNameDefault e number of personal callback records to sendto the Outbound Option Dialer at one time(minimum value is 5; maximum value is 100).PersonalCallbackSaturdayAllowed0Indicates whether personal callbacks are allowedon Saturdays: 0: Personal callbacks are not allowed onSaturdays and will be scheduled for thenext allowable day. For example, apersonal callback which fails to reach thecustomer on a Friday will be rescheduledfor the following Monday. 1: Personal callbacks are allowed s whether personal callbacks are allowedon Sundays: 0: Personal callbacks are not allowed onSundays and will be scheduled for the nextallowable day. For example, a personalcallback which fails to reach the customeron a Friday will be rescheduled for thefollowing Monday. 1: Personal callbacks are allowed onSundays.PersonalCallbackCallStatusToPurgeC, MString containing the call status types to considerwhen purging old personal callback records. Forexample, if the string contains “C,M,F,L,I,” allcalls with these call statuses will be purged fromthe database. (If the registry entry is missing, thedefault is assumed.)The call status values can optionally bedelimited using a comma, a hyphen, asemi-colon, or a colon.The number of times a customer phone ringsbefore being classified as an unanswered call(minimum value is 2; maximum value is 10).NotePersonalCallbackNoAnswerRingLimitStep 44Set up the Personal Callback reservation script using the Script Editor application.Outbound Option Guide for Cisco Unified Contact Center Enterprise and Hosted Release 10.0(1)12
Outbound Option Installation: SCCP DialerCreate Enterprise Skill Group Add a Wait node after the Queue to Agent node using a value that is less than theTimeToWaitForMRIResponse Dialer registry setting (default value of 600 seconds equals 10 minutes). Like all reservations scripts, the script should end in a Release Node instead of an End Node to avoidcluttering up the Router Log Viewer with “No Default Label” errors.For example, the following Personal Callback reservation script uses the nodes described above:Figure 1: Personal Callback Reservation ScriptCreate Enterprise Skill GroupTo use the Personal Callback feature, you need to create the enterprise skill group associated with the agentusing the Enterprise Skill Group List tool.ProcedureStep 1Step 2Step 3Open the List tools.Open the Enterprise Skill Group List tool.Create an enterprise skill group. In the Add Name field, type the enterprise name, then click Add. Select theskill group, and then click Save.Step 4In the Attributes tab, click Add to add the skill group or groups.Step 5Click Save.Outbound Option Guide for Cisco Unified Contact Center Enterprise and Hosted Release 10.0(1)13
Outbound Option Installation: SCCP DialerCreate Enterprise RouteCreate Enterprise RouteAfter you create the enterprise skill group associated with the agent, you need to create an enterprise routeusing the Enterprise Route List tool. This route should target the enterprise skill group created in the previousstep.ProcedureStep 1Step 2Step 3Open the List tools.Open the Enterprise Route List tool.Create an enterprise route. In the Name field, type the enterprise route, and then click Add. Select the route,and then click Save.Step 4In the Attributes tab, add the route.Step 5Click Save.Configure Queue to Agent NodeIf you use personal callbacks, complete the following steps to configure the Queue to Agent Node in yourreservation script.Outbound Option Guide for Cisco Unified Contact Center Enterprise and Hosted Release 10.0(1)14
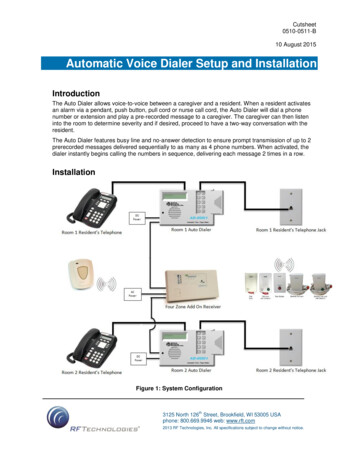
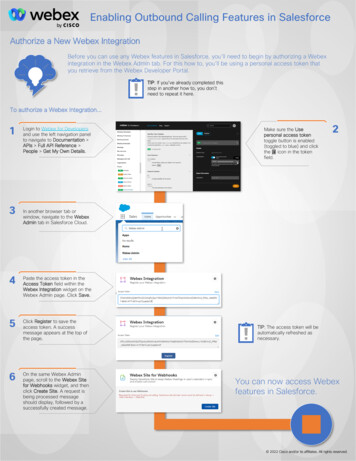
Outbound Option Installation: SCCP DialerUnified CMr and Gateway ConfigurationProcedureStep 1Step 2Right-click the Queue to Agent node and select Properties.Step 3Step 4Click Change in the “Queue to agent type” section.Select Lookup agent reference by expression, and then click OK.Enter the agent expression Call.PreferredAgentID.Step 5Step 6Step 7Step 8Step 9Select the enterprise skill group you created in the Creating an Enterprise Skill Group section.Select the enterprise route you created in the Creating an Enterprise Route section.Confirm that the Peripheral column is left blank.Click OK to save the Queue to Agent node.Save and then schedule the script.Figure 2: Scheduling ScriptUnified CMr and Gateway ConfigurationThis section provides procedures for the tasks associated with the Unified CM and gateway configuration.Outbound Option Guide for Cisco Unified Contact Center Enterprise and Hosted Release 10.0(1)15
Outbound Option Installation: SCCP DialerImport and Assign Dialer PortsEnsure that each dialer’s ports are contained on their own UCManager subscriber, and the UCManagersubscriber is not shared with any other Dialer. Because a Dialer port makes shorter calls at sustained highercall rates, it takes a larger portion of UCManager resources than a normal agent phone. The sizing calculatorshould have already been used to properly size when designing the solution. The port throttle configurationreferenced in Dialer configuration prevents the Dialer from over-using its subscriber. If more than one Dialerpoints to the same subscriber, then this Dialer throttling mechanism is not effective because it only applies toeach Dialer.Import and Assign Dialer PortsPerform the following procedure to import Dialer Ports and assign them to the PG’s CTI Application User.ProcedureStep 1After configuring the Dialer Port Map, click Select All, and then click Export to save the port map configurationto a CSV-formatted text file. Select the Unified CM version.NoteBe sure to select the Unified CM release that is compatible with the product release.Step 2Use the Cisco Unified CM BAT tool to create a new phone template.1 Select the Cisco 30 VIP phone choice.2 Enter the template name.3 Set the device pool.4 Choose the Standard 30 VIP phone button template and the device security profile.5 Save the phone template.6 Click the line1 template and insert a single line with no speed dials.7 Click Save.When creating a dialer port template using the BAT tool, be careful when selecting the Device pool.Make sure the correct region is set so it works across different audio codecs.Select Bulk Administration Upload Download. Click Add New. Browse to the CSV file, select Phones,select Insert Phones Specific Details, and then click Save.NoteStep 3Step 4Select Bulk Administration Phones Insert Phones. Select the file name and the phone template name,click Run Immediately, and then click Submit.To see the status of this job, select Bulk Administration Job Scheduler, and then click the Find button.Step 5Associate the newly created devices with a PG user. In the Unified CM Administration window, select UserManagement Application User, and then click Find.Step 6Step 7Select the Device Association link. In the Device List Filter, select the Directory Number and then enter thefirst few digits of the newly created Dialer ports.Click Select Devices. Make sure the check box next to each Dialer port is checked.Step 8Click Save.Outbound Option Guide for Cisco Unified Contact Center Enterprise and Hosted Release 10.0(1)16
Outbound Option Installation: SCCP DialerDisable Ringback During Transfer to Agent for SIPDisable Ringback During Transfer to Agent for SIPThe configuration for the SCCP Dialer does not work for the SIP Dialer. When the SIP Dialer is handing offthe call to an agent, it sends REFER to the voice gateway. The voice gateway initiates a new SIP call (newINVITE) to CUCM, and then receives a 180 RINGING response. As a result, the gateway generates a ringbacktone to the customer. With CUCM 8.5 and later, you can disable the ringback by applying a SIP normalizationscript to the CUCM SIP trunk. This script manipulates the 180 ringing to a 183 SESSION PROGRESS messageto prevent the gateway from generating a ringback.NoteApply this script only to the SIP trunk that is handling the inbound call from voice gateway for agenttransfer. If you use the same gateway for both PSTN calls and the SIP Dialer, you must configure separatetrunks in CUCM and apply this normalization script only to the Dialer SIP trunk. The trunk for PSTNcalls still needs a 180 ringing response for inbound calls to trigger the gateway to play ringback to thePSTN.NoteSkip step 1 if a dedicated SIP trunk already exists for handling agent transfer dial. Perform step 1 if thesame SIP trunk is used for normal inbound PSTN calls and Dialer agent transfer calls.ProcedureStep 1To create a SIP trunk in CUCM with a SIP security profile for the Dialer agent transfer calls, selectCommunications Manager GUI System Security SIP Trunk Security Profile [Add New].Step 2Click Save.Step 3Step 4Create a new IP trunk and associate the created SIP trunk Security Profile.Click Save.Step 5Click Reset.Step 6In Communications Manager GUI Device Settings SIP Normalization Scripts [Create New], enterthe following SIP normalization script into the content field. All other values remain set to default.M {}function M.outbound 180 INVITE(msg) msg:setResponseCode(183, "Sessionin Progress") endreturn MStep 7Click Save.Step 8Click Reset.Step 9 Associate the created normalization script with the SIP trunk.Step 10 Click Save.Step 11 Click Reset.Outbound Option Guide for Cisco Unified Contact Center Enterprise and Hosted Release 10.0(1)17
Outbound Option Installation: SCCP DialerAuto Answer Configuration on Agent PhonesAuto Answer Configuration on Agent PhonesThe dialer component is preconfigured during installation to auto answer Outbound Option related calls tothe Outbound Option agent. However, this default configuration does not provide a zip tone to the agent(which notifies of incoming calls), so agents must monitor the agent application for incoming customer calls.To enable zip tone, enable auto-answer on the agent’s phone configuration in Unified CM. This solution addsabout a second onto the transfer time. This solution is identical to the solution that is used for Unified CCE.For Mobile Agents using the nailed connection, the Unified CM auto answer setting does not provide a ziptone, but Unified CCE does provide an option for playing a notification tone to the agent using the agent desksettings.Enabling auto answer in the agent desk settings or in the dialer component in conjunction with the UnifiedCM can be problematic. Therefore, Cisco recommends that you disable the auto answer option in the dialercomponent, and enable it either in the agent desk settings or in Unified CM.Outbound Option Software Installation StepsThis section describes h
Outbound Option Installation: SCCP Dialer . Outbound Option Guide for Cisco Unified Contact Center Enterprise and Hosted Release 10.0(1) 17 Outbound Option Installation: SCCP Dialer Disable Ringback During Transfer to Agent for SIP. Auto Answer Configuration on Agent Phones