Transcription
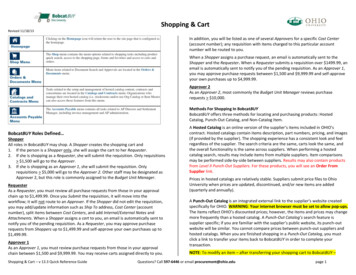
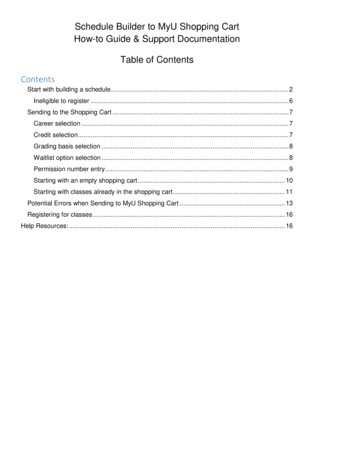
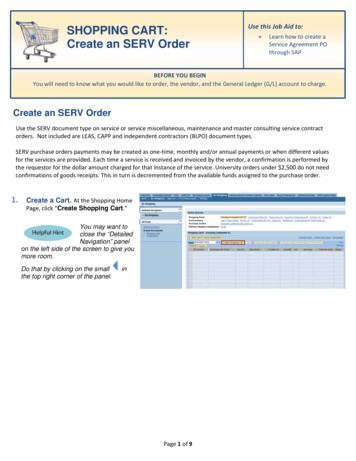
SHOPPING CART:Create an SERV OrderUse this Job Aid to: Learn how to create aService Agreement POthrough SAPBEFORE YOU BEGINYou will need to know what you would like to order, the vendor, and the General Ledger (G/L) account to charge.Create an SERV OrderUse the SERV document type on service or service miscellaneous, maintenance and master consulting service contractorders. Not included are LEAS, CAPP and independent contractors (BLPO) document types.SERV purchase orders payments may be created as one-time, monthly and/or annual payments or when different valuesfor the services are provided. Each time a service is received and invoiced by the vendor, a confirmation is performed bythe requestor for the dollar amount charged for that instance of the service. University orders under 2,500 do not needconfirmations of goods receipts. This in turn is decremented from the available funds assigned to the purchase order.1.Create a Cart. At the Shopping HomePage, click “Create Shopping Cart.”You may want toclose the “DetailedNavigation” panelon the left side of the screen to give youmore room.Do that by clicking on the smallthe top right corner of the panel.inPage 1 of 9
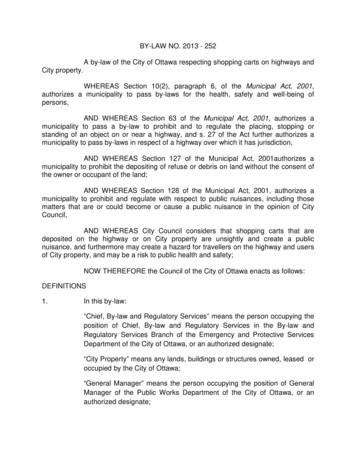
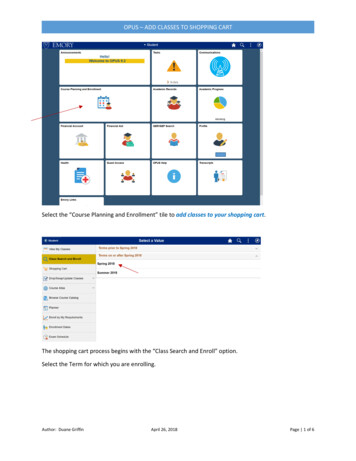
2.Enter General Data. The “Create ShoppingCart” screen will appear. Start your order in the“General Data” section of this screen. 3.The first step is to rename the cart to somethingthat you will recognize and that will make it easierfor you to locate the cart in the future. This samplecart is renamed “Dr. Smith MaintenanceAgreement 04/11/13.”Click “Set Values” next to the label “DefaultSettings” to set the default values that will be carriedthroughout this cart. For example, you can set up thecost assignment and G/L number, split the costdistribution, and set up the product category for thecart here, and the default data will populate each line inthe cart.When the “Change DefaultSettings” dialog box appears,you won’t see all of the tabs that are available toyou. Stretch the box horizontally so that all of thetabs appear or just click on the white file folder todisplay a list of the available tabs.4.Click Item Basic Data tab. Enter the “ProductCategory.” The “Product Category” field should showas “SERVICE AGREEMENTS”. Click the Product Category icon in the field to“Search Product Category”. Type a portion ofthe description surrounded by asterisks (*) into theDescription field, i.e: *agree*. Click “Start Search”. Clicking the words “SERVICE AGREEMENTS”will automatically populate the “ProductCategory” field.Page 2 of 9
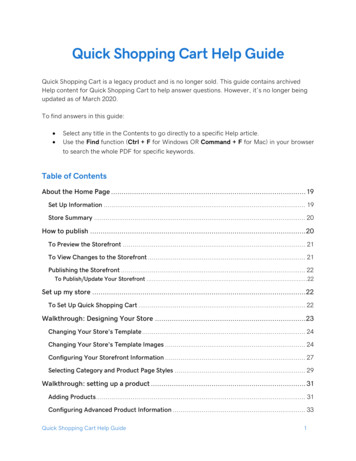
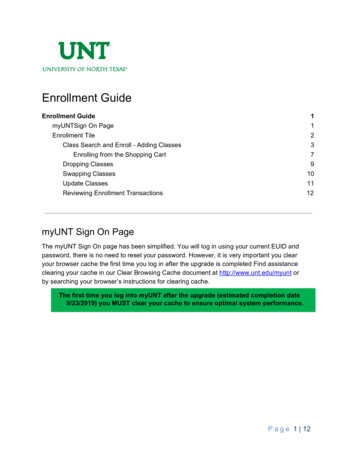
5.Click the “Account Assignment” tab to enter the cost center, internal order, WBS elements and generalledger numbers for one or more account assignments. Choose the appropriate “Cost Distribution” from the dropdown list: Percentage, By Quantity or By Value. From the “Accounts Assignment Category” dropdown list, select the cost center, internal order or WBSelement numbers for one or more account assignments. Click in the field under the header “General Ledger Account.” Verify the appropriate G/L account with yourfinancial administrator and then enter it into this field.Note: Even after the default values are set, individual items within the cart can still be changed to differentvalues. This feature can be a great time-saver for carts with multiple lines. 6.Click the “OK” button at the bottom of the pop-up to accept the changes.Select the Document Type for your order. In this case, we’ll change it to “SERV”.Page 3 of 9
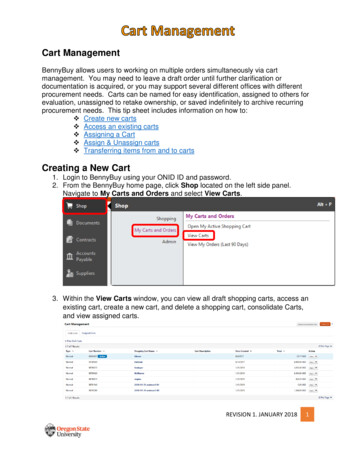
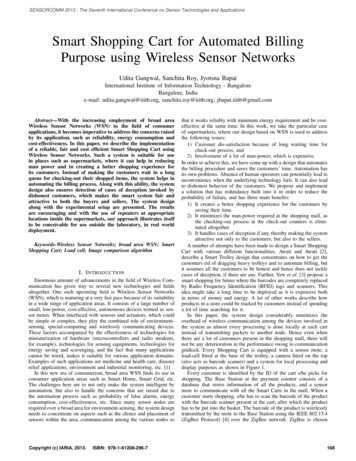
7.Enter Shopping Cart Vendor Number. Enterthe vendor number or select the vendor by clicking theicon in the “Shopping Cart Vendor” field. When the search pop-up window appears, you mayfill in any of the fields to search for your preferredvendor. The easiest way to search for a supplier is to enterthe vendor’s name in the “Vendor Name” field,using wildcard characters both before and after thename. This will make sure you will be able to findthe vendor even if the business name has additionalwords or characters before or after the main partthat you recognize. After you’ve entered your search criteria, click “StartSearch” to display a list of vendors. The search results populate below the “Start Search”button. Click the supplier name just once and the vendordata will be automatically populated in your cart. You can also click the gray box to the left of thevendor number and click “OK” to transfer thevendor information and return to the cart.Page 4 of 9
8.Item Overview. Go to the first line in the order and start entering the order information. You’ll work your wayacross the line for each item before you press Enter.Note: If you set up the default cart settings, much of this information will already be populated for you. Start with the “Description” field and enter text that identifies an activity or phase in the contract. If a quote willbe attached, please, include the quote number in the description field. Ensure the “Product Category Description” shows the “SERVICE AGREEMENTS”. Enter the “Quantity”. This could be the quantity of the items or the total dollar value of the materials or servicesrequested, or the total budgeted for the service. For example, when entering the “Quantity” you will need toknow how payment will be made: Will your department be billed per month at the same amount? Then, enter the quantity as 12 monthsat 1,000.00 USD per month. Will your department be billed a onetime payment? Then, enter the quantity as 1 YR at 12,000.00 USDper year. Will your department be billed a different value as service is provided such as when your departmenthas a contracted labor fee, the service is provided and the department receives a bill for 100.00? Then,enter the quantity as 12000.00 DOL at 1.00 USD. Enter the Unit of Measure in the “Unit” field. This should be the Unit of Measure described in the agreement orDOL if the dollar amount was listed in the Quantity field. In the “Net Price/Limit” field, enter the price per each single item or if the dollar amount was listed in theQuantity field, enter 1.00. The “Delivery Date” is when the service is expected to end and the Delivery Date must reflect the end date ofthe agreement. Ignore the “Per” field. When finished, click “Enter” on the keyboard to apply your selections.Don’t forget to click “Enter” on your keyboard when you have completed the line to ensureyour order details appear.Page 5 of 9
9.10.Details Button. After you click “Enter”, the“Details” button will become active. Click it to displaythe details for the first line in your order.Item Data. The first tab, “Item Data” will automatically bedisplayed.Enter the Supplier Product Number or the Manufacturer PartNumber, where applicable.11.Account Assignment. Check to ensure your “Account Assignment” information is accurate.If an error occurred, you are able to correct it. Update information. In thefollowing order, click the “Copy”, “Change All Items” and “Paste” buttons to ensure all ofthe updated/corrected information is applied to all of the line items.Page 6 of 9
12.Attach Required Documents. Click the “Notes and Attachments” tab to attached documents to theShopping Cart. All supporting documents to show services and pricing (Invoice, Quote, Bill, Estimation of Work,Statement of Work, Contract, Agreement and or Proposal) have to be attached to the shopping cart. To attachdocuments, click the “Add Attachment” button. A pop-up window will prompt you to browse for the document(s)that you would like to attach.If notes and/or attachments are added to one line item, they must be attached to all line itemsto avoid splitting the shopping cart into multiple purchase orders.Please, refer to quote or other document numbers that the vendor uses in both the SupplierText so the vendor will know which of its documents go with the purchase order.13.14.Delivery Address/Performance Location tab. Ensure all of the delivery information is still accurate underthe “Delivery Address/Performance Location” tab.Sources of Supply/Service Agents tab. Ensure the Shopping Cart Vendor is still correct under the“Sources of Supply/Service Agents”.Page 7 of 9
15.Approval Process Overview. Click the “Approval Process Overview” to view the “Approvers” on yourshopping cart. To find the Approvers’ contact information, click their names under Process. Clicking the linked namesopens the “User Details for Workflow Agent” pop-up. This pop-up contains the names, departments, buildings,telephone numbers, email addresses and JHED IDs of the Approvers. You will then be able to contact the Approvers, ifneeded.JHHS: Additional approval will be required by Clinical Eng for your hospital and CapitalAdministration.16.Check the Order. Your order is now17.Place the Order. Once you haveverified the order, click “Order”. Youwill see a message at the top of thescreen that says “Actions performedsuccessfully.”complete. Click the “Check” button at thetop or bottom of the screen to verify theorder and to ensure that no error messagesappear at the top of the screen.In addition, you will see a message inthe box at the top of the screen thatsays that the shopping cart wasordered successfully.Page 8 of 9
18.Click the Refresh. When your order iscomplete, click the “Refresh” button.19.Print Preview. You will then be able to“Print Preview”. Always print or save acopy of the order.20.Click the Close button. You willthen be able click the “Close” button toclose the cart and return to the ShoppingCart Home Page.21.Click the Refresh. Click the “Refresh” on the Shopping Cart Home Page to see the new shopping cart order in22.your queue.All done! The SERV Shopping Cart order has been successfully entered into SAP and will processto the next workflow step.Always click “Refresh” when you get to the Shopping Cart Home Page to see your mostrecent orders; the document numbers will not appear in the search results until you haveclicked “Refresh”.Page 9 of 9
Create Shopping Cart " screen will appear. Start your order in the " General Data " section of this screen. The first step is to rename the cart to something that you will recognize and that will make it easier for you to locate the cart in the future. This sample cart is renamed "Dr. Smith Maintenance Agreement 04/11/13." 4.