Transcription
HANDICARE 2000USER MANUALENSmart seatSimplicty seatStyle seat
FOREWORDCONTENTUSER MANUAL2OPTIONS11IMPORTANT INFORMATION14FAULT FINDING18ATTACHMENTSA. RemindersB. Emergency operationC. Diagnostic codesD. Spareparts2323242730Thank you for choosing a Handicare stairlift.This manual is for the HANDICARE 2000 lifttype, and includes instructions for thestandard features and optional upgrades.Make everyday life easier.USER MANUAL 1
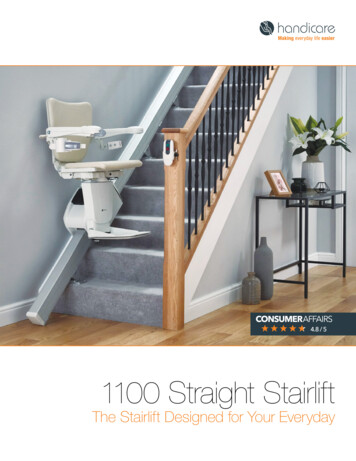
SMART SEATOPTIONSAutomatic SwivelP8Powered FootrestFolding hinge251The illustration above shows the features used to operatethe SMART seat. The SMART seat can be upgraded with theAutomatic Swivel seat, Powered Footrest and the Foldinghinge, options to create even more seat comfort anduser-friendliness.2 USER MANUAL4367[1]Diagnostic Display[2]Joystick[3]Emergency stop[4]Seat belt[5]Key switch[6]Seat swivel lever[7]Footplate[8]Remote control
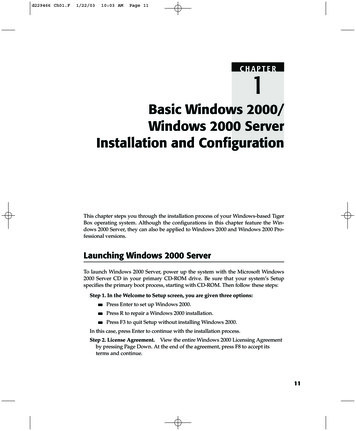
SIMPLICITY SEATOPTIONSPowered FootrestP8Folding hinge251The illustration above shows the features used to operatethe SIMPLICITY seat. The SIMPLICITY seat can be upgradedwith the Automatic Swivel seat, Powered Footrest and theFolding hinge, options to create even more seat comfort anduser-friendliness.4637[1]Diagnostic Display[2]Joystick[3]Emergency stop[4]Seat belt[5]Key switch[6]Seat swivel lever[7]Footplate[8]Remote controlUSER MANUAL 3
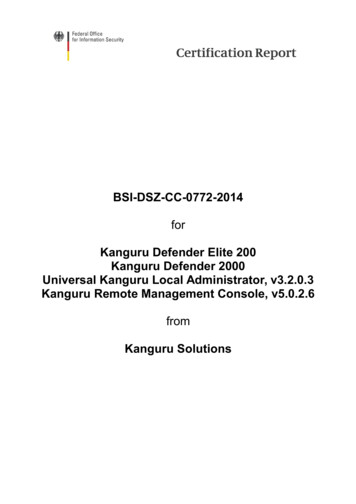
STYLE SEATOPTIONSAutomatic SwivelP8Powered FootrestFolding hinge251The illustration above shows the features used to operatethe STYLE seat. The STYLE seat can be upgraded with theAutomatic Swivel seat, Powered Footrest and the Foldinghinge, options to create even more seat comfort anduser-friendliness.4 USER MANUAL4637[1]Diagnostic Display[2]Joystick[3]Emergency stop[4]Seat belt[5]Key switch[6]Seat swivel lever[7]Footplate[8]Remote control
FOLD DOWNEnsure that the on/off switch is set in the 'ON' position. The diagnosic display willbe illuminated when switched on.Fold down the footplate, the armrests and seat.page 12 OPTIONAL POWERED FOOTRESTPLACE FEETPlace your feet on the footplate. Ensure that both feet are completely on theplate.USER MANUAL 5
SAFETY FIRSTCLICK!Fasten the seat belt securely, ensuring that it clicks into the holder. Put the key inthe switch and turn it ninety degrees clockwise. Check that the chair is in thelocked position.RIDEMove and hold the joystick in the desired direction of travel. The display shows a“8/9”, the lift will beep 3 times and start slowly after 1 second. When changingthe direction of travel the delay will be 3 seconds.6 USER MANUAL
EMERGENCY STOPIn an emergency, press the emergency stop once. The lift stops straight away.The emergency stop can be released by turning the emergency button.SWIVELCLICK!BAThe lift stops automatically at the end of the rail. You should now swivel the seatmanually, making it easier to get on and off. To do this, push down the lever{A}.Swivel the seat until you hear a 'click'. The seat is now in the correct position{B}.page 11 OPTIONAL AUTOSWIVELUSER MANUAL 7
SIMPLICITY - STYLELOOSEN BELTUnfasten the seat belt.STAND UPStand up from the seat.8 USER MANUAL
FOLD UPACLICK!BFold up the armrests, footplate and seat {A}. Push the handle, located to the leftor right under the seat, downwards {B}. Swivel the seat until you hear a 'click'.The seat is now in the locked position.PARKRFPPress and hold the up or down button on the remote control until the lift reachesa charge point. Upon arrival, the lift stops automatically.USER MANUAL 9
CHARGE45153015 sec.There are charge points for recharging the lift's batteries at the top and bottomof the rail (there may be additional charge points). If the lift is not in the correctposition at the charge point, the lift beeps for 15 seconds and the display showsa “2”. The lift does not work if the batteries are flat.10 USER MANUAL
OPTIONSAUTOSWIVELPOWERED FOOTRESTHINGED RAILpage 11page 12page 12AUTOSWIVELCLICK!The AUTOMATIC SWIVEL SEAT option lets you swivel the seat automatically toface the direction you are going to walk. To do this, push and hold the joystick inthe direction of travel.USER MANUAL 11
POWERED FOOTRESTARMREST1SEAT2To operate a POWERED FOOTREST press the switch under the armrest[1] orfold up the seat[2].The stairlift should beep whilst folding the footrest.Always ensure the footplate is in the down position during travel.HINGED RAILWith the FOLDING HINGE option, the seat stops just above the hinged rail.Move the joystick up or down to fold or unfold the rail.12 USER MANUAL
HINGED RAIL [CHARGING]RFPDo not leave the lift on the hinged rail after use. Use the remote control to movethe lift to a charge point and recharge the batteries. The first stopping point is acharge point.USER MANUAL 13
14 USER MANUAL
FOREWORDYour Handicare 2000 stairlift is a sophisticated product that has been specifically developedto carry one person (max 115 kg/18.1 stone/253 lbs) sitting on the seat (heavy dutytype: max 137 kg/21.5 stone/301 lbs). Before using your Handicare 2000 stairlift pleaseread this manual thoroughly to familiarise yourself with how to operate your stairlift.Your stairlift has been constructed with state of the art technology and in accordancewith recognised safety regulations so you can be sure that you have a safe and reliablesolution.Nevertheless, incorrect use of the stairlift may cause risk to the user or third parties,damage to your stairlift or other goods. Use your stairlift only when it is in good workingorder, in accordance with the intended use described above and with due attention tothis manual. Always keep this manual near the stairlift.TECHNICAL SUPPORTShould issues arise that are not covered by this document please contact your supplier.Their Service department staff will always be pleased to help you. To help them identifyyour product please have the following details to hand when you call them: this manual your name, address, postcode, town and telephone number stairlift serial number which can be found on the label located on the power packunderneath the seat.SAFETY INSTRUCTIONSWhen using the stairlift always observe appropriate safety regulations regarding risk ofelectric shock and physical injury.1. Provide an unobstructed environment by ensuring that the entire track is free ofobstacles.2. Take environmental influences into account. Do not expose the lift to damp orextreme sunlight. Make sure that the environment is well lit. In case of outdoor lift:always put the cover over the lift when the lift is not in use.3. The stairlift should only be used by individuals who have received the appropriateguidance. On installation the supplier is required to demonstrate how to use thisstairlift and the user is required to sign the declaration confirming that this instructionhas been received.4. Stairlifts should only be used for carrying one person: do not use your stairlift to carrypets, goods or more than one person at a time, even if the load is below themaximum user weight. Keep children and pets away from the stairlift.5. Remove the key after use to prevent unauthorised use.6. Keep limbs and clothing away from moving parts. Make sure that wide or looseclothing cannot become trapped between the chair and the stairs or rail.7. Ensure a safe position during use. Always ensure a correct, stable position. Pleasesit as far back in the seat as you can and place your feet as close to the centre ofthe footplate as you are able to. Always use the safety belt and never stand onthe stairlift.8. Take care at all times. Concentrate on the operation of the stairlift as releasing theoperating toggle will cause the lift to stop. To restart the lift wait 3 seconds andUSER1 MANUAL 15
push and hold the toggle in the direction of travel desired until you reach the landingor hallway.9. Check for damage. Before use check the lift for external damage. Report unusualnoises, such as squeaking and creaking, to your supplier. To avoid accidents repairsand preventive maintenance should only be carried out by engineers qualified to do so.10.The stairlift must not be used in the event of a fire or as a means of escape during a fire.11.If the stairlift is not fitted with a communication device, we recommend that you alwayshave one to hand.12. Only leave the stairlift at the designated points at the top and bottom of the rail.StructureThe strength and the suitability in general of wall, staircases, terraces, upper floors,banisters, plinths etc. which are to support or surround the installation have beenverified and ensured by the customer, who therefore accepts all relative responsibilities.Neither Handicare nor its authorised dealers may be held responsible for the suitabilityof the structures which surround and support the installation.MAINTENANCECleaningClean the stairlift regularly with a damp cloth; avoid excessive use of water. Ensure thetrack is kept free of dirt and dust. Over time the track wheels may leave a mark on therail.Preventive maintenanceIn addition to cleaning your stairlift, periodic preventive maintenance is necessary forcontinued long-term use.Your stairlift must be serviced at least once a year by a qualified person. If your stairlifthas more than two users we recommend a minimum of two services per year.Please make an electrical socket available to provide local lighting if required duringinspection and servicing. Lighting to a minimum value of 50 lux shall be provided at theboarding points whilst the stairlift is in use. Most light bulb packaging will detail the luxvalue of the light bulb.GUARANTEE AND LIABILITYThe manufacturer guarantees that this stairlift (excluding batteries) will be repaired freeof charge should manufacturing and/or material defects occur within 12 months of thepurchase date, during normal use in accordance with the recommended user,installation and maintenance instructions. Damage caused by normal wear and tear,overloading or misuse and the replacement of batteries in the remote control is notcovered by this guarantee.We recommend that your stairlift is serviced annually by an appropriately qualifiedstairlift engineer.Under no circumstances can the manufacturer accept responsibility for death, personalinjury, damage to property, or incidental, unforeseen consequences and/or costs ordamage resulting from the use of your stairlift.16 USER MANUAL1
The carrying out of alterations to the product is not permitted and doing so will invalidatethe warranty. The manufacturer is not liable for damage resulting from such alterations.The manufacturer accepts no liability for damage or injury caused by the non orinadequate observance of the safety regulations and instructions in this manual, or bynegligence during the installation, use, maintenance and repair of this stairlift.Installation and servicing should only be carried out by dealers or installers/serviceengineers authorised by the manufacturer in accordance with local regulations.The wall mounted remote controls operate on a radio frequency; Handicare isunable to accept responsibility for system inoperability in the unlikely event ofinterference from signals external to this stairlift.This equipment has been tested and found to comply with the limits for a Class Bdigital device, pursuant to part 15 of the FCC Rules. These limits are designed toprovide reasonable protection against harmful interference in a residential installation.This equipment generates, uses and can radiate radio frequency energy, and if notinstalled and used in accordance with the instructions, may cause harmful interferenceto radio communications. However, there is no guarantee that interference will notoccur in a particular installation. If this equipment does cause harmful interference toradio or television reception, which can be determined by turning the equipment OFFand ON, the user is encouraged to try to correct the interference by one or more of thefollowing measures: Reorient or relocate the receiving antenna. Increase the separation between the equipment and receiver. Connect the equipment into an outlet on a circuit different from that to which thereceiver is connected. Consult the dealer or an experienced radio/TV technician for help.TECHNICAL SPECIFICATIONSSupply voltageFrequencyCurrentPowerFusesLoad230 VAC50/60 Hz1A360 watt30 A(max.) 115 kgSpeedAmbient temperatureRelative humidityUsageNoise0.15 m/s (max.)0 - 40 C20 - 80%15 rides per 24 hours10 rides continuous56 dBThe information provided in this manual is based on general specifications regarding the construction, materialproperties and working methods known to us at the time of publication; alterations and improvements aretherefore anticipated.All rights reserved. No part of this publication may be reproduced and/or published by means of print,photocopy, microfilm or in any other way or form, without prior written permission from the manufacturer.This also applies for the accompanying drawings and diagrams. The manufacturer reserves the right tochange parts at any time, without prior or direct notification to the customer. The contents of this manualmay also be changed without prior warning. This manual is intended for the standard models of the lift.The manufacturer therefore cannot be held liable for any damage resulting from specifications that differfrom those of the standard model of the lift supplied to you. For information concerning adjustment,maintenance or repairs not provided in this manual, please contact your supplier's service department.This manual has been compiled with the best intentions and every possible care but the manufacturercannot accept responsibility for any errors in this manual or for the consequences thereof.The Dutch manual is the original language.USER1 MANUAL 17
FAULTFINDINGDIAGNOSTIC DISPLAYCHAIR POSITIONEMERGENCY STOPARMRESTKEYBATTERIES RCPOWEROBSTACLESWITCHpage 18page 19page 19page 20page 20page 21page 21page 22page 22DIAGNOSTIC DISPLAYThe stairlift is fitted with a diagnostic display that displays a code to help diagnosefaults. Refer to APPENDIX E for an explanation of the diagnostic codes. Pleaseinform the customer service operator of this code when reporting any fault.18 USER MANUAL
CHAIR POSITIONCLICK!CAUSESOLUTIONProblem: the lift does not travel in either direction and the display shows a “0”.Cause: the seat is not locked and is in a swivelled position.Solution: swivel the seat using the handle located to the left or right under the seat,until it “clicks” into position.EMERGENCY STOP12CAUSESOLUTIONProblem: the lift does not travel in either direction, the display shows a “0” [1]and the emergency stop [2] is pressed.Cause: the emergency stop has been pressed.Solution: the emergency stop can be released by turning the emergency button.USER MANUAL 19
ARMRESTCAUSESOLUTIONProblem: the lift does not travel in either direction and the display shows a “-”.Cause: an armrest has not been folded down.Solution: fold down the armrest fully.KEYCAUSESOLUTIONProblem: the lift does not travel in either direction and the display shows a “0”.Cause: the key-operated switch is in the off position.Solution: turn the key-operated switch ninety degrees clockwise.20 USER MANUAL
FAULTFINDINGBATTERIES RCRED lightCAUSESOLUTIONProblem: the lift does not travel in either direction and the LED on the remotecontrol does not light up when the remote control is operated.Cause: the batteries in the remote control are flat.Solution: replace the batteries in the remote control.POWER45153015 sec.CAUSESOLUTIONProblem: the lift batteries are not recharging, the lift beeps for 15 seconds andthe display shows a “2”.Cause: the lift is not in the correct position at a charge point or the plug is not inthe socket.Solution: move the lift to a charge point or put the plug in the 1socket.USER MANUAL 21
OBSTACLEABCAUSESOLUTIONProblem: the lift travels in one direction only and the display shows a “4/6”.Cause: there is an obstacle between the lift and the stairs.Solution: move the lift in the opposite direction {A} and remove the obstacle {B}.SWITCHCAUSESOLUTIONProblem: If the lift is not moving in either direction, there is no code on thediagnostic displayCause: The lift may be switched off.Solution: Turn the lift on.22 USER MANUAL
ATTACHMENTSREMINDERSEMERGENCY OPERATIONSDIAGNOSTIC CODESSPAREPARTSpage 23page 24page 27page 30REMINDERSABPOWEREDFOOTRESTPCD[A]Remove the key from the switch whenever you leave the lift.[B]Never remove the lift plug from the wall socket.[C]It is recommended that the keys be stored close to the stairlift by hanging akey on the handset wall bracket.USER MANUAL 23
EMERGENCY OPERATION TRACKSTOPB.1B.2AB.3B.4B[B.1]When the stairlift stops unexpectedly and no longer moves any further, thehand winder can be used to move the lift to a charging point. [B.2]Turn off thelift. [B.3]Remove the cap from the unit with a screwdriver. [B.4]Turn the handwinder as indicated on the winder. Then wind the lift in the required direction.24 USER MANUAL
EMERGENCY OPERATION SMART SEATEMERGENCY ONLY !C.2C.1B.1BABACLICK!CC.3C.4[C.1]If the power swivel is not functioning it can be swivelled manually. Do thisonly in an emergency. [C.2]Insert a coin in the button on the side of the seat.[C.3]Swivel the seat manually. [C.4]The seat must be returned to the startposition. Remove the coin. Do this before you use the lift again.USER MANUAL 25
EMERGENCY OPERATION STYLE SEATEMERGENCY ONLY !D.1B.1D.2CLICK!D.3D.4[D.1]If the power swivel is not functioning it can be swivelled manually. Do thisonly in an emergency. [D.2]Press the release button. [D.3]Swivel the seatmanually. [D.4]The seat must be returned to the start position.Do this before youuse the lift again.26 USER MANUAL
DIAGNOSTICCODESIf the mentioned action does not help, call Handicare.DisplayAction DisplayF A U LTF A U LTAction DisplayAction DisplayONFinal limit circuit activatedFinal limit circuit activatedF A U LTDisplayRequires chargeTop safety edge activatedActionTop track limit activatedF A U LTAction DisplayF A U LTF A U LTAction DisplayOff chargeF A U LTActionFinal limit circuit activatedF A U LTAction DisplayDisplayWrite down the diagnosticcode when you callHandicare for help.Charging, but the lift doesnot driveNo displayDisplayActionF A U LTAction DisplayActionBottom track limit activated Bottom safety edgeactivatedF A U LTF A U LTUSER MANUAL 27
DisplayAction DisplayLow battery voltageAction DisplayJoystick activatedActionJoystick activatedF A U LTAction DisplayDisplayIR address failThe main power relay notopenF A U LTDisplayAction DisplayBrake semi-conductorfailedAction DisplayCurrent limit exceeded28 USER MANUALActionThe main power relay hasclosed earlyF A U LTAction DisplayF A U LTF A U LTBrake not connectedF A U LTDisplayThe main power not closedF A U LTAction DisplayActionF A U LTAction DisplayLift driving at half speedF A U LTActionThe main control board hasa memory problemF A U LT
DisplayAction DisplayPower supply fault duringchargingPower supply fault duringchargingF A U LTDisplayAction DisplayMain board hardware faultF A U LTDisplayPower supply fault whenbattery on floatF A U LTAction DisplayF A U LTAction DisplayOver currentF A U LTActionActionActionSleeping modeF A U LTIf the display is showing anything but the diagnosticcodes listed it requires resetting: drive the lift off thecharge contacts. Turn the main switch on the unitunit off for 10 seconds and then back on.PSleeping modeF A U LTUSER MANUAL 29
SPAREPARTSSIM30019 - BACKREST CUSHIONONSA - SIMPLICITY SHORT ARMONSSBR3 - SEAT BASE RHONSSBL3 - SEAT BASE LHSIM30051 - SEAT CUSHION MKIISIM30700 - ARMRESTASSEMBLY CONTROL641016.52004 - CAP ARMRESTSIM33700 - KEY AND KEYSWITCHSIM30029 - SPRING SEAT RELEASESIM31150 - LOOM SEAT SWITCHSIM30046 - SEAT STEM BRG COVERSIM30047 - SEAT SWIVEL BUSHSIM31500 - SEAT POST ASSEMBLY LHSIM31600 - SEAT POST ASSEMBLY RHSIM30301 - SEAT ADJUSTMENT TUBE LHSIM30401 - SEAT ADJUSTMENT TUBE RHSIMPLICITY SEAT30 USER MANUAL
SMART SEAT UPHOLSTERY OPTIONSORCPUCO - COCOAORCPUJA - JADEORCPURU - RUBYORCPUSA - SANDORCPUSP - SAPPHIREORASKSSD - ARM SPACERSDOUBLE SIZESPAREPARTSSMART SEAT EXTENDED UPHOLSTERY OPTIONSORCPUEJA - JADEORCPUERU - RUBYORCPUECO - COCOAORCPUESA - SANDORCPUESP - SAPPHIREORASKSS - ARM SPACERSSTANDARD SIZERNA35031 - ARMRESTASSEMBLY RH(NO CONTROL)RNA35006 - ARMRESTASSEMBLY RH(CONTROL)RNA35004 - SEAT BELT ASSEMBLY RHRNA35030 - ARMREST ASSEMBLY LH (CONTROL)RNA35005 - ARMREST ASSEMBLY LH (NO CONTROL)RNP30050 - KEY SWITCHSIM33700 - KEY SWITCH641415.52001 - LEVER SWITCHRNA35003 - SEAT BELTASSEMBLY LHORESFK - EXTENDEDSEAT BASEOXSSSBEU - SEAT BASEEXTENSION UPGRADERNP30076 - FLAP SWITCH BRACKET172001.52120 - HAN 126 PCBRNP30129 - IGUS BEARINGRNP30155 - PRESSEDSHAFT AND PINIONRNP30041 - RELEASE LEVER LHRNP30042 - RELEASE LEVER RHRNP30094 - LOOM SEAT SWIVEL SWITCHRNP30077 - TORSION SPRINGRNP30015 - SWIVEL MOTORONRPSL - SMART SEATPOWER SWIVEL OPTION LHONRPSR - SMART SEATPOWER SWIVEL OPTION RHSMART SEATUSER MANUAL 31
SPAREPARTSSTYLE SEAT32 USER MANUAL
SPAREPARTS172001.52032S - IR HANDSET S/LINE WITH BATTERIES172001.52027S - RF HANDSET S/LINE WITH BATTERIESUSER MANUAL 33
Handicare Monte-escaliers4 Rue des PivertsZAC de l’ Aunaie91610 Ballancourt-sur-EssonneFranceTel: 33 (0) 1 69 46 86 10Fax: 33 (0) 1 69 46 86 19monte-escaliers@handicare.frHandicare GmbHHausberger Straße 1632457 Porta WestfalicaDeutschlandTel: 49 (0) 571 973398-55Fax: 49 (0) 571 973398-56data@handicare.comPrism Medical Inc.10888 Metro CourtSt. Louis, MO 63043United States of AmericaToll Free: fo@prismmedicalinc.comUSER MANUAL*000411.1507*0 0 0 4 11 . 1 5 0 6 , rev. E
This manual is for the HANDICARE 2000 lift type, and includes instructions for the standard features and optional upgrades. USER MANUAL 1. 1 7 8 2 6 4 5 3 P . occur in a particular installation. If this equipment does cause harmful interference to radio or television reception, which can be determined by turning the equipment OFF .