Transcription
Viola Systems Ltd.Lemminkäisenkatu 14-18 AFIN-20520, TurkuFINLANDtel 358-(0)201-226 226fax 358-(0)201-226 220e-mail support@violasystems.comweb www.violasystems.comTECHNICAL DOCUMENT TD-12-3-1.2VIOLA SYSTEMSVIOLA CLOUD M2M PILOT KITUSER MANUALVersion history:1.2 Added DHCP client instructions1.1 Added login instructions, minor corrections1.0 Published by LaHDate: Jul-05-2013Version: 1.2Author: LaH 2013 Viola Systems Ltd.www.violasystems.comTechnical Document TD-12-3-1.2
Technical Document TD-12-3-1.2Viola Cloud M2M Pilot Kit User ManualCopyright and TrademarksCopyright 2013, Viola Systems Ltd. All rights to this document are owned solely by Viola Systems Ltd. All rightsreserved. No part of this document may be transmitted or reproduced in any form or by any means without aprior written permission from Viola Systems.Ethernet is a trademark of Xerox Corporation. Windows , Windows XP and Internet Explorer aretrademarks of Microsoft Corporation. Netscape is a trademark of Netscape Communications Corporation.Mozilla and Firefox are registered trademarks of Mozilla Foundation. Linux is a trademark of LinusTorvalds. Cisco is a registered trademark of Cisco Systems Corporation. All other product names mentioned inthis document are the property of their respective owners, whose rights regarding the trademarks areacknowledged.DisclaimerViola Systems reserves the right to change the technical specifications or functions of its products or todiscontinue the manufacture of any of its products or to discontinue the support of any of its products withoutany written announcement and urges its customers to ensure that the information at their disposal is valid.Viola software and programs are delivered “as is”. The manufacturer does not grant any kind of warrantyincluding guarantees on suitability and applicability to a certain application. Under no circumstance is themanufacturer or the developer of a program responsible for any damage possibly caused by the use of aprogram. The names of the programs as well as all copyrights relating to the programs are the sole property ofViola Systems. Any transfer, licensing to a third party, leasing, renting, transportation, copying, editing,translating, modifying into another programming language or reverse engineering for any intent is forbiddenwithout the written consent of Viola Systems.Viola Systems has attempted to verify that the information in this document is correct with regard to the stateof products and software on the publication date of the document. We assume no responsibility for possibleerrors which may appear in this document. Information in this document may change without prior noticefrom Viola Systems. 2013 Viola Systems Ltd.2 / 26Document version 1.2
Technical Document TD-12-3-1.2Viola Cloud M2M Pilot Kit User ManualContents1. GENERAL .42. ARCHITECTURE .53. DEPLOYMENT .64. INSTALLING THE OPENVPN CLIENT TO A PC .135. CONFIGURING OPENVPN .166. USING OPENVPN .197. CONFIGURING THE MONITORING APPLICATION .218. TESTING THE SOLUTION .219. CONFIGURING ARCTICS IN FIXED IP MODE .2310. TROUBLESHOOTING .2511. REFERENCES .26 2013 Viola Systems Ltd.3 / 26Document version 1.2
Technical Document TD-12-3-1.2Viola Cloud M2M Pilot Kit User Manual1. GeneralThis document is the user’s manual for Viola Systems Viola Cloud M2M Pilot Kit, product code 4000.1.1. IntroductionCongratulations for ordering the Viola Cloud M2M Pilot Kit from Viola Systems Ltd.The pilot kit is designed for smooth pilot execution, where the devices are delivered pre-configured and theViola Cloud M2M Gateway is hosted by Viola Systems Ltd. The pilot configuration may later on be transferred tothe actual production system.The pre-configured set of devices with Viola Cloud M2M Gateway server removes most of the configurationwork, leaving time and resources for the actual system tests.1.2. The content of Viola cloud M2M Pilot KitThe Viola Cloud M2M Pilot Kit consists of the following: Viola Cloud M2M Gateway service2 pcs. Viola Arctic devicesAccessory kits for the Arctic devices (Cables, power supplies, antennas)Preconfiguration for the devicesUser’s guide (this manual)Usernames and passwords for the devices (may be provided by email)Technical support for the pilot kit1.3. ConventionsThe following conventions may be used in this document: The menu items in graphical user interface are denoted with bolded italic font and the sequence ofmouse clicks, while configuring the devices in menus is separated with an arrow, e.g. “Click Tools System log”The console or command line output is printed with courier font and user input is printed with boldcourier font. Example:[viola-adm@m2mgw ]# dateFri Jul 5 08:52:00 CET 2013References to other documentation and figure/table captions are denoted with italic fontUsernames, passwords and parameter-value pairs are denoted with courier font1.4. Pre-requisites There is a PC running Microsoft Windows Vista, 7 or 8. Other operating systems can be used, butthey’re not supported by these instructions. The PC is used for the followingo Running OpenVPN client for connecting to Viola Cloud M2M Gatewayo Running a control/monitor/reading software (SCADA, etc.) for connecting to devices (Arctics,RTUs, PLCs, etc.) in remote sitesThe PC has internet connection, preferably a fixed line ADSL or similar 2013 Viola Systems Ltd.4 / 26Document version 1.2
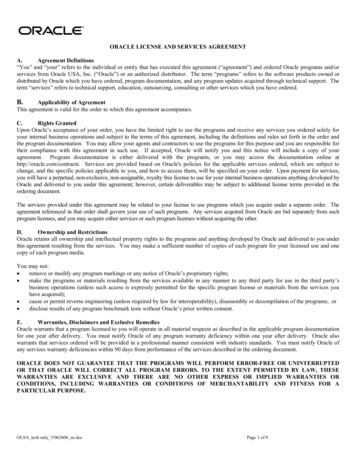
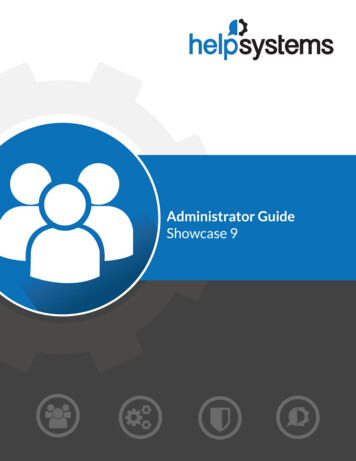
Technical Document TD-12-3-1.2Viola Cloud M2M Pilot Kit User Manual There are available SIM cards for each Arctic. The SIM cards need to have data plan (GPRS data, etc.)enabled and 3G SIM functionality is needed with Arctic 3G Gateway for accessing 3G cellular network2. ArchitectureThe Viola Cloud M2M Pilot Kit consists of selected Arctic devices, a Viola Cloud M2M Gateway, accessory kit, anOpenVPN client and ready-made configuration for communication between Arctic devices and Viola CloudM2M gateway.2.1. Overall ArchitectureThis is an example of the Viola Cloud M2M Pilot Kit Architecture.2.2. IP addressing example Customer’s LAN: Freely selectable (shouldn’t overlap other networks)LAN1: 10.20.1.0/255.255.255.0LAN2: 10.20.2.0/255.255.255.0Arctic 1, hostname: pilot1, IP address: 10.20.1.1Arctic 2, hostname: pilot2, IP address: 10.20.2.1SCADA is equipped with OpenVPN clientRouting between tunnels is allowedSCADA is connecting RTU1 with IP 10.20.1.2 (in LAN1)SCADA is connecting RTU2 with IP 10.20.1.1 (behind serial GW of LAN1 Arctic)SCADA is connecting RTU3 with IP 10.20.2.1 (behind serial GW of LAN2 Arctic)The hosted M2M GW’s own LAN is configured not to overlap any other LAN 2013 Viola Systems Ltd.5 / 26Document version 1.2
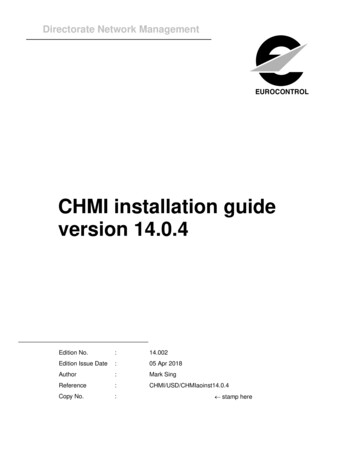
Technical Document TD-12-3-1.2Viola Cloud M2M Pilot Kit User Manual3. DeploymentThe deployment consists of the following high-level tasks.54321Connect theequipmentVerify CloudM2MconnectionConfigurecellulardetailsInstall andconfigureOpenVPNclientTest theend-to-endsolutionThere are some settings in Arctics that are needed for taking the system into use. Taking the Viola Cloud M2MPilot Kit into use consist of the following steps.1.2.3.4.5.6.7.8.9.10.11.Connecting cablesViola Cloud M2M Gateway loginVerifying the initial connectionConfiguring Arctics in DCHP client modeConfiguring cellular settingsInserting SIM cardInstalling the OpenVPN client to a PCConfiguring OpenVPNUsing OpenVPNConfiguring the monitoring applicationTesting the solution3.1. Connecting cablesThe necessary cables and power supplies (i.e. accessory kits) are supplied with the Arctics.The Arctics, depending on the model, have the following connectors: DC in (12 30 volts DC, positive pin on the left)Shared console/RS1 9 pin sub-D male connector (2G model) or separate RS1 port and Cisco type RJ45 serial console port (3G/LTE models)Dedicated configurable RS-232/422/485 port (RS1 or RS2, depending on the model)LAN Ethernet connector (2G model), 3 switched LAN ports, 1 WAN port (3G/LTE model)Antenna connector, type FME male in Arctic, female in antenna/antenna connector 2013 Viola Systems Ltd.6 / 26Document version 1.2
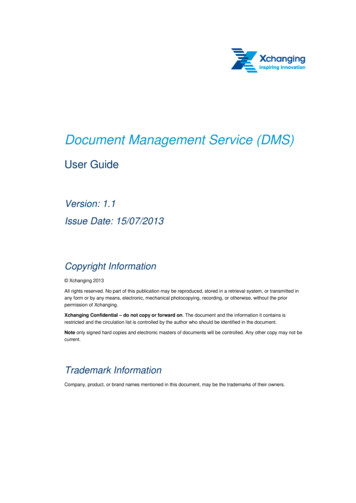
Technical Document TD-12-3-1.2Viola Cloud M2M Pilot Kit User Manual“2G” Arctic1.2.3.4.5.“3G/LTE” ArcticConnect the power supply to Arctic. Verify that the power switch is in OFF position.Connect the possible serial cable. If other than RS-232, verify the DIP switches as according to the user’smanual. The default position of the switches is RS-232.Insert the Ethernet cable to the LAN port. The cable is provided with the accessory kit. Generally, useunshielded twisted pair, CAT5(e) Ethernet cables.Insert the antenna or antenna cable to Arctic’s FME antenna connector.When the power is switched on in the Arctic:a. 3G/LTE Gateway: The RUN LED should start blinking after a while from restart. The Error LEDshould turn off soon after starting.b. 2G Gateway: The Power/Error LED is lit and the Function LED should start blinking soon afterstarting.3.2. Viola Cloud M2M Gateway loginUse the following login details when logging in to the Viola Cloud M2M Gateway. URL: https:// IP address :10000 for example, if the provided cloud M2M Gateway would reside at IP10.20.30.40, the browser URL would be: https://10.20.30.40:10000 (The real IP addresses are publicaddresses) Username: viola-adm Password: The password is delivered with the actual devices or in a separate email.Viola Cloud M2M Gateway login screen3.3. Verifying the initial connectionThe Arctics have DHCP client enabled and they’re pre-configured for connecting Viola Cloud M2M Gatewayautomatically, once connected to an internet router.Notes: The “2G” Arctics are having only one Ethernet interface, which has DHCP client enabled.Thus they are not initially available in the IP addresses 10.20.x.1. After verifying the initialconnection according to this chapter, the “2G” Arctics can be configured to fixed IP ratherthan using DHCP.The “3G” and “LTE” Arctics are having “WAN” and “LAN” Ethernet interfaces. The EthernetWAN interface is configured as DHCP client and is used for verifying the initial connection,whereas the LAN interface (switched, three ports) can be used for locally connecting toArctic using IP address 10.20.1.1 (Pilot1) or 10.20.2.1 (Pilot2). 2013 Viola Systems Ltd.7 / 26Document version 1.2
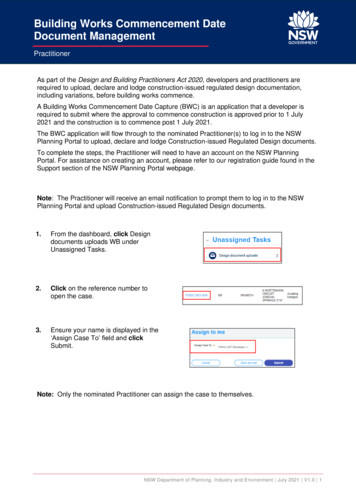
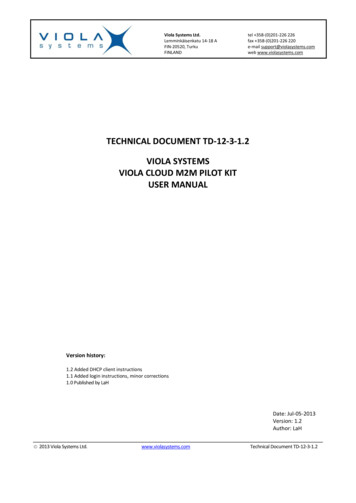
Technical Document TD-12-3-1.2Viola Cloud M2M Pilot Kit User ManualPerform the following steps for verifying that the Arctics are able to connect to Viola Cloud M2M Gateway.1.2.3.4.5.6.7.8.Verify that all cables and antenna are connectedThe Arctic’s Ethernet cable must be connected to an internet router providing IP address and defaultgateway via DHCP. With Arctic 3G/LTE GW, connect the “WAN” Ethernet port. You can additionally verifythe internet connectivity with a PCPower on the ArcticsWait approx. a minute for the Arctics to boot and to establish the connection to Viola Cloud M2M GatewayLog in to the cloud M2M gateway. See chapter Viola Cloud M2M Gateway login for detailsClick Viola Patrol Devices. You should soon see the Arctics appearing as new devices. You may want tocycle the Arctics’ power OFF and back ON if they’ve been on a long time. This will speed up their appearingto Viola PatrolThe “traffic lights” for Arctics should go greenAccept the devices once they appear as new in Patrol by clicking Accept button3.4. Configuring Arctics in DCHP client modeOnce it is checked that the Arctics are able to connect the Viola Cloud M2M Gateway, they can be configuredthrough Viola Cloud M2M Gateway. You can alternatively contact Viola Systems Ltd. Technical Support(support@violasystems.com) for remote support or configure the Arctics by your own.The following picture illustrates the connection from a PC through Viola Cloud M2M Gateway to Viola Arctic.Even though the Arctic may be connected to the same physical LAN as the configuration PC, the connectiongoes through the Viola Cloud M2M Gateway.Logical VPN tunnelPhysical Internet connectionPCVPN tunnelWeb UI tunneled over VPNInternetViola Cloud M2M GatewayVPN tunnelViola Arctic3.4.1.Logging in remotely to Arctic1.Verify that the Arctic is connected to the internet router that assigns IP address to Arctic via DHCP. Poweron the Arctic and wait a minute for the VPN tunnel to establish.2.Use Viola Cloud M2M Gateway’s link Patrol web UI for connecting the Arctic’s graphical user interface(Web UI). 2013 Viola Systems Ltd.8 / 26Document version 1.2
Technical Document TD-12-3-1.2Viola Cloud M2M Pilot Kit User ManualClick Web UI3. Configure the settings depending on the Arctic model, as described in next chapters.3.5. Configuring cellular settings3.5.1.2G Arctic (GPRS /EDGE)1.2.After clicking the WebUI button, login to Arctic as root user via Viola Cloud M2M Gateway.Disable the Ethernet DHCP client from Arctic. Click Network Ethernet. Change the Override Ethernetconfiguration by DHCP radio button to Disabled. Click Apply button and wait for acknowledgement“Operations completed successfully”.3.Click GPRS from left vertical menu bar. The following screen opens.Fill in the following values according to the instructions from cellular operator:Warning: Do not enter empty Access Point Name value. The Access point name is a requiredparameter. Empty access point name is a difficult value to correct later on. Obtain the correctsettings from your cellular network provider. Access Point Name (GPRS)PIN code (leave NoPin or empty if the SIM card doesn’t need one)GPRS usernameGPRS passwordNote: Some operators are instructing leaving the Access Point credentials (GPRS usernameand GPRS password) empty. However, if the GPRS network is requiring authentication (butnot verifying the actual username and password), some values need to be set in Arctic. In thiscase, you can use “dummy” username and password, e.g. username: username, password:password. 2013 Viola Systems Ltd.9 / 26Document version 1.2
Technical Document TD-12-3-1.2Viola Cloud M2M Pilot Kit User Manual4.5.Click Apply for applying the changes. Wait for acknowledgement “Operations completed successfully”.Click Commit from the lower left corner of the screen. This will write the changes to non-volatile memory.Wait for acknowledgement “Data files successfully saved”.6. Reboot the Arctic by clicking the Reboot button or cycling the power button.7. Take off the Ethernet cable that connects the Arctic to the internet router.8. Wait a minute for Arctic booting up and login as in chapter Configuring Arctics in fixed IP mode.9. Click Network from the upper horizontal menu bar. In the Status screen, you will see the active interfaces.Verify that the GPRS interface appears to the status screen. This may take a minute and the browser screenneeds to be refreshed in order to see the GPRS coming up.10. Check that the SSH-VPN interface appears to the status screen. This will require refreshing the browserpage as well.LAN IP addresGPRS IP addresVPN peer IP address11. If the GPRS and/or VPN interface doesn’t appear in the Network Interface Summary page, see thetroubleshooting chapter 10.2, Cellular data connection.3.5.2.3G/LTE ArcticThe parameters are entered similarly as in 2G Arctics but the Web UI’s outlook is slightly different.1.2.Login as viola-adm user as previously instructed (via Viola Cloud M2M Gateway, using Web UI button)Click Mobile WAN (3G SIM 1) and fill in the following values according to the instructions from cellularoperator: PIN code (leave empty if the SIM card doesn’t need one) APN (Access Point Name) Authentication (None, PAP, CHAP or PAP/CHAP, verify from operator). GPRS username and GPRS password 2013 Viola Systems Ltd.10 / 26Document version 1.2
Technical Document TD-12-3-1.2Viola Cloud M2M Pilot Kit User ManualNote: Some operators are instructing leaving the Access Point credentials (GPRS username and GPRSpassword) empty. However, if the GPRS network is requiring authentication, some values need to beset in Arctic. In this case, you can use “dummy” username and password, e.g. username: username,password: password. In this case, use pap/chap authentication setting.3.4.5.6.Click Submit button.Take off the Ethernet cable from WAN Ethernet interface of Arctic.Click Reboot from the left vertical menu bar. Confirm the reboot and wait approx. one minute for reboot.Log in as in chapter Configuring Arctics in fixed IP mode and click Status from the left vertical menu bar.Check the Network Interfaces section. The gprs0 and vpnc ssh0 interfaces should be seen. If not, seechapter 10, Troubleshooting.See the picture below for verifying the cellular and VPN interfaces. With 3G/LTE Gateway, the OpenVPN isused as the VPN tunnel.LAN IP addressGPRS IP addressVPN peer IP address 2013 Viola Systems Ltd.11 / 26Document version 1.2
Technical Document TD-12-3-1.2Viola Cloud M2M Pilot Kit User Manual3.6. Inserting SIM cardMake sure that the SIM card has cellular data plan enabled. You may test the SIM in a smartphone in order toverify the data transfer capability of the subscription.If the SIM card requires PIN number, you will need to configure the PIN number in Arctic prior to inserting theSIM card. In case of a wrong PIN in Arctic, correct the PIN and insert SIM card to a cellular phone and enter thecorrect PIN. The Arctic tries PIN only once for avoiding SIM lockup.Always use standard mini SIM card. A micro SIM card is not compatible unless a separate adapter is used. NanoSIM card is not compatible with Arctic devices.When the SIM card is inserted and the Arctic is powered on, the SIM LED should be lit after approx. a minutefrom starting. The SIG LED indicates strong signal (LED lit), weak signal (LED blinking) or no signal (LED not lit).1)Eject the SIM card cradle from the Arctic device by pushing the green/yellow eject button in the SIM holderwith a sharp pointy object, e.g. unfolded paper clip.Push the button2. Insert the SIM card to the cradle so that the clipped notch aligns with the notch in the cradle and theelectrical contacts of the SIM card are facing upwards. 2013 Viola Systems Ltd.12 / 26Document version 1.2
Technical Document TD-12-3-1.2Viola Cloud M2M Pilot Kit User Manual3. Insert the cradle to the Arctic. Make sure the cradle slides to the rails in the connector. Push the cradleall the way in until it stops.SIM CARD CRADLEEjectbuttonRails4. Installing the OpenVPN client to a PCFor safe connection from pilot SCADA or other supervisory/control application to Viola Cloud M2M Gatewayover the internet, the VPN tunnel is used. OpenVPN provides safe, encrypted and relatively light-weight VPNtunnel, which supports routing between the client PC, Viola Cloud M2M Gateway and remote Arctics’ LANs.For installing an OpenVPN client to your PC, where the SCADA application is located, perform the followingsteps.1.Obtain the OpenVPN client software. The newest version can be downloaded from the internet from thefollowing URL: .html. In case the link changes, youmay navigate to the correct location by opening http://openvpn.net page and going to Community andfrom there to Downloads.The correct package is called “Windows installer” and the filename is in form of “openvpn-install-n.n.nIx.x.x- architecture .exe”, where the n.n.n represents the current version (at the time of writing thisdocument, the filenames are): openvpn-install-2.3.2-I001-i686.exe (32-bit) openvpn-install-2.3.2-I001-x86 64.exe (64-bit)Download the .exe installerClick the file suitable for your Windows and the download will start. Save the file to the PC to adirectory, where you can easily locate it. If you’re unsure whether you’re running 32 or 64 bit version 2013 Viola Systems Ltd.13 / 26Document version 1.2
Technical Document TD-12-3-1.2Viola Cloud M2M Pilot Kit User Manualof Windows, verify it from Control Panel System and Security System System Type.2.Once the installer file is downloaded, you will need to install the OpenVPN client. Go to the folder, whereyou have downloaded the OpenVPN installer and double-click the installer file.You may get a warning screen similar to as follows.3.Allow the OpenVPN to make changes to the computer by clicking the Yes button.The Setup Wizard opens.Click Next to proceed.4.Agree the “GNU general public license” by clicking I agree button. Alternatively, you can read the licensefirst by scrolling the text down with the scroll bar.5.The Choose Components window will now open.All components are needed and already selected. Click Next, (do not unselect any components).6.The OpenVPN will ask the location where to save program files.7.Accept the default location by clicking Install button. 2013 Viola Systems Ltd.14 / 26Document version 1.2
Technical Document TD-12-3-1.2Viola Cloud M2M Pilot Kit User Manual8.The OpenVPN is being installed.During the installation, the following window will open.9.The Windows may warn about installing a device driver with the following details.Name: TAP-Win32 Provider v9 Network adaptersPublisher: OpenVPN Technologies, Inc.You can safely let the OpenVPN install a device driver, click Install button.Once the installation completes, you will see the following windows.Click Next when you’ll see that the OpenVPN has been installed and click Finish in Setup Wizard screen.Now the OpenVPN client is installed to the PC. However, before it can be used for connecting to ViolaCloud M2M Gateway, the OpenVPN certificates must be put to proper place in the OpenVPN folder. Seethe next chapter for details. 2013 Viola Systems Ltd.15 / 26Document version 1.2
Technical Document TD-12-3-1.2Viola Cloud M2M Pilot Kit User Manual5. Configuring OpenVPNThe OpenVPN uses secure cryptographic certificates (easy VPN) for ensuring that: The Client (PC) is authorized to connect to the server (Viola Cloud M2M Gateway) The server is really the server it states to be The certificates are really coming from the stated authority (Viola Systems Ltd.)The certificates are received from Viola Systems in form of a file, which is compressed (Zip file for easy VPN).Proceed as follows.1.You have received a file containing the needed client certificates from Viola Systems Ltd. In case you’remissing the file, please contact Technical Support at support@violasystems.com email address.Place the file to a directory, where you will easily find it (do not place it under OpenVPN directory yet). Inthis example, a directory (folder) is created at Windows desktop and we will name it as “Certificates”.Right-click the empty space of desktop and select New from context-menu and then select Folder. Namethe folder as Certificates.2.Copy the received file to the Certificates folder. In the folder, right-click the file and from the openingcontext menu, select Extract all. You may have different zip file managing software.Note that the Windows 7 or newer has native support for unzipping the file. 2013 Viola Systems Ltd.16 / 26Document version 1.2
Technical Document TD-12-3-1.2Viola Cloud M2M Pilot Kit User Manual3.You will now see plenty of files. All of the files need to be copied to proper folder in OpenVPN directorystructure. Leave this window open on your desktop and see the next steps for details.4.Click the start button (Windows logo) and select Computer from the right-side vertical menu bar.Alternatively, type explorer.exe to the search row and press enter.In the Explorer window, double-click the C-drive text (showing as Windows7 OS (C:) in the next picture).Double-clickScroll down the list of folders until you see the folder Program Files (x86) (the “x86” suffix is only in 64-bitWindows, select Program files folder in 32-bit Windows). Again, scroll down until you see a folder namedOpenVPN. Double-click the OpenVPN folder. Now you see several folders, double-click the config folder. 2013 Viola Systems Ltd.17 / 26Document version 1.2
Technical Document TD-12-3-1.2Viola Cloud M2M Pilot Kit User ManualThis is the folder you will need to copy the certificate files from your desktop’s Certificates folder. Leave theoriginal files to the Certificates folder as a backup. See the next step for copying the files.5.You should now have two Explorer windows open; the Desktop\Certificates folder and C:\ProgramFiles (x86)\OpenVPN\config folder.Select all files in Certificates directory (you can press ctrl a for selecting all files), then drag them to theOpenVPN’s config folder. Press ctrl key, while you drag the files to config folder so that the files arecopied rather than moved.You may be asked for elevated permissions as the program files folder is protected by Windows.Click Continue button to continue the copying. Now the config folder should look as follows. 2013 Viola Systems Ltd.18 / 26Document version 1.2
Technical Document TD-12-3-1.2Viola Cloud M2M Pilot Kit User Manual6.You have now copied the client certificate files to the OpenVPN directory. You may now start using theOpenVPN, as instructed in the next chapter.6. Using OpenVPNIn a Windows PC, the OpenVPN is managed by the OpenVPN GUI, which can be started as any other program.When started, the OpenVPN places an icon to the notification area in Windows taskbar. You can select whetherthe icon is always shown or hidden until Show hidden icons button is pressed.In contemporary Windows versions, the programs are not run with Administrator privileges, unless there’s aneed for that. The OpenVPN needs to be run with administrator rights as it needs to push routing entries toWindows’ routing table. The following steps are instructing how to run the OpenVPN permanently asAdministrator.1.Start the OpenVPN by clicking Windows start button (Windows logo) and click All programs and scrolldown to OpenVPN, then click the OpenVPN text to see the OpenVPN GUI menu option. Do not click it yet.With right mouse button, click the OpenVPN GUI menu option, and then from the context menu, selectProperties (at the bottom of the context menu). The following window opens. Click Compatibility tab.Click Compatibility tabClick to enter a tick mark 2013 Viola Systems Ltd.19 / 26Document version 1.2
Technical Document TD-12-3-1.2Viola Cloud M2M Pilot Kit User Manual2.Place a tick to the checkbox Run this program as an administrator and press OK button.Again, click Windows start button (Windows logo), click All programs and scroll down to OpenVPN, thenclick the OpenVPN text and click OpenVPN GUI. If asked, allow changes to be made to computer.Now the OpenVPN client is started, but it hasn’t established a VPN tunnel yet. You can see the OpenVPNicon in the notification area of Windows taskbar.OpenVPN GUI icon3.4.When the OpenVPN is running, the OpenVPN GUI icon is seen, either directly in the taskbar or by clickingShow hidden icons button (triangle-shaped button in the picture above). You can customize the visibility ofthe OpenVPN GUI icon, see Windows help for selecting which icons and notifications appear on thetaskbar.Click the OpenVPN GUI icon with right mouse button. A context menu opens.Note: For this step, you need to have an active internet connection in the PC.Click Connect for establishing a VPN tunnel to the OpenVPN server (Viola Cloud M2M Gateway). You willmomentarily see the connection screen similar to as picture below, which disappears once the connectionis established. 2013 Viola Systems Ltd.20 / 26Document version 1.2
Technical Document TD-12-3-1.2Viola Cloud M2M Pilot Kit User Manual5.Once the connection screen disappears, the VPN connection to Viola Cloud M2M Gateway is established.The state of the VPN connection can be checked by hovering the mouse pointer over the OpenVPN icon.For shutting down the VPN tunnel, right-click the OpenVPN icon and select Disconnect from the contextmenu.In case of a problem, see chapter 10.4, OpenVPN.7. Configuring the monitoring applicationThe end device, being it RTU, PLC or other is connected to Arctic. For Ethernet devices, configure the RTUs IP address from Arctic’s LAN, e.g. 10.20.x.10, where x 1(Pilot1 LAN) or x 2 (Pilot2 LAN) Set the default gateway IP address in RTU as Arctic’s IP address In case of serial device, set the Arctic’s serial settings according to the serial device(set the speed, number of data bits, number of stop bits, parity and flow control from Arctic’s Web UIand RS-232, 422 or 485 setting by DIP switches in Arctic) In case of IEC-101 to IEC-104
Technical Document TD-12-3-1.2 Viola Cloud M2M Pilot Kit User Manual 2013 Viola Systems Ltd. 4 / 26 Document version 1.2