Transcription
Allscripts PM Training / Reference GuideAllscripts PM Training / Reference GuidePa ge 1
Table of ContentsSection1 - Overview2 - Registration3 - Appointment SchedulingAllscripts PM Training / Reference GuideFunction1-1 - Logging on and off1-2 - Passwords1-3 - Security Questions1-4 - Resetting Forgotten Passwords1-5 - Main Screen2-1 - Registration Screen2-2 - Summary Tab2-3 - Patient Look Up2-4 - Adding a New Patient2-5 - Employer Information2-6 - Account Tab2-7 - Policies Tab2-8 - Additional Tab2-9 - Notes Management2-10 - Documents Patient Registration Form2-11 - Service Inquiry Diagnosis History2-12 - Procedure History2-13 - HCC History3-1 - Patient Scheduling Tab3-2 - Patient Scheduling Tab / Scheduling an Established PatientAppointment3-3 - Patient Scheduling Tab / Open Appointment Scheduling andRegistration Tabs3-4 - Patient Scheduling Tab / Patient Look Up3-5 - Patient Scheduling Tab / Create a New Patient3-6 - Schedule an AppointmentPage NumbersPa ge 2
Section3 - Appointment Scheduling4 - Financial Inquiry5 - AppendixAllscripts PM Training / Reference Guide3-7 - Patient Scheduling Tab / Find Open Times3-8 - Patient Scheduling Tab / Schedule Appointment Screen3-9 - Patient Scheduling Tab / Patient Information Command Button3-10 - Patient Scheduling Tab / Walk In AppointmentFunction3-11 - Patient Scheduling Tab / Use Book Option3-12 - Appointment Activity Tab3-13 - Patient Activity Tab3-14 - Patient Activity Tab / Patient Look up3-15 - Patient Activity Tab / Right Click Options3-16 - Patient Activity Tab / Right Click Options / Appointment Detail3-17 - Patient Activity Tab / Right Click Options / Patient Information3-18 - Patient Activity Tab / Right Click Options / Move PatientAppointment3-19 - Patient Activity Tab / Using Open Times3-20 - Patient Activity Tab / Using Book Option3-21 - Patient Activity Tab / Print Encounter Form3-22 - Patient Activity Tab / Request and View Eligibility4-1 - Financial Inquiry / Overview4-2 - Financial Inquiry / Account Inquiry Tab4-3 - Financial Inquiry / Viewing and Printing an Account Inquiry4-4 - Financial Inquiry / Detail View4-5 - Financial Inquiry / Summary View5-1 - Keyboard Shortcuts5-2 - Icons and Command Buttons5-3 - Checking the Application Version5-4 - Using On Line HelpPage NumbersPa ge 3
Section 1 Overview:Allscripts PM Training / Reference GuidePa ge 4
1-1 Overview Logging On and OffAllscripts PM Training / Reference GuidePa ge 5
Overview Logging On Click on the Allscripts iconfound on your desk top whichopens the Logon Dialog box displayed above.Tab to or click in the field “User Name.” Key in your assigneduser name.Tab or click in the field “Password.”If more than one Practice database is loaded on your network useyour mouse on the Database prompt drop down arrow and click onthe database you want to logon to. You can set this database as yourdefault. The Logging In screen displays.This user name is stamped on the tables of records and transactionsyou enter while logged on as this user. This means every financialtransaction entered, every quick note saved, every appointmentscheduled, cancelled etc. is stamped as having been done by theoperator associated with the registered user name entered in thisdialog box.Be sure you only work in a Practice database that is opened withyour assigned user name.Also, be sure to logoff when you leave your workstation.The user’s name and password must first be registered in theAllscripts PM Security Database. If not found please contact yourSystem AdministratorLogging Off of Allscripts PMThere are two types of logoff.1. Using the toolbar buttonenables you to keep the application openwhile you exit a Practice database. This is useful when you leave yourworkstation for any period of time. It guarantees that only authorizedusers can logon to the Practice database in your absence.If you have logged out of the application using the red arrowgreen arrow will display,ato be able to log back into the system.2. Clickingcloses the application. At the prompt "Are you sure youwant to log off?" click Yes.Passwords:User Passwords must conform to a specific format or message will appear.1-2 Overview Logging On and Off- PasswordsAllscripts PM Training / Reference GuidePa ge 6
Overview Logging On User Passwords must conform to a specific format (if the format isnot met, an invalid password message with display). Passwords arecase sensitive.Your new password must conform to a specific criteria1. Is at least 8 characters2. Has not been used as one of your last 10 previous passwords3. Contains any combination of at least 3 of the following 4character groups: Uppercase characters (A-Z) Lowercase characters (a-z) Numerals (0-9) Characters (such as but limited to:!, ,#,%, )4. Has not been changed within the number of hours set forminimum password age in Security Options. Your account is automatically locked if you make 10 consecutive failedattempts to log into the Allscripts PM application. After each of the first9 attempts an Invalid user name or password message displays. Thetenth attempt also display an invalid message that you have exceed thenumber of login attempts displays and you are locked out. You will also have the possibility of using the “Reset a forgottenpassword” option if enabled. This option allows you:o To select and answer 5 security questions.o Enables a Forgot Password button on the logon windowo Use the “Manage Security questions” option added to theChange Password toolbar screeno Audit tracking when you change your password using thisoption.If you attempt to reset your password but were unable to answer yoursecurity questions after 10 attempts, your account will be locked. 1-3 Overview Logging On Setting-up Security QuestionsAllscripts PM Training / Reference GuidePa ge 7
Allscripts PM Training / Reference GuidePa ge 8
Overview Logging On- Setting-up Security Questions After the security question setup is complete, you can reset yourpassword without being logged on if you know your user name, you cancorrectly answer 2 of the 5 security questions you selected, and youraccount was not manually locked by your system administrator. If youare unable to correctly answer the first set of security questions, you cantry again with a second set of randomly selected questions. If yoursecond attempt is unsuccessful, you must contact your systemadministrator to have your password reset.The first time you successfully log on to Allscripts PracticeManagement you will be asked to set up 5 security questions andanswers. There are 29 questions from which you must select 5.You can choose to set up the security questions at a later time, but youwill continue to be prompted with each logon until the setup is complete.The answers to the security questions are free-text, meaning you are notrequired to follow a specific format.You must pay close attention to the answers you enter during setup,because the answer you enter when you need to reset your passwordmust be an exact match to the answer you entered during setup, exceptfor capitalization. For example, if during setup you entered Rose-Marieas the answer to the question "What is your grandmother's middlename?", Rose-Marie or rose-marie are considered a match, but RoseMarie and Rosemarie are not acceptable answers. Any spaces youSteps to set up Security Questionsentered before, after, or within your answer text are considered part ofyour answer. If you entered a space before or after Rosemarie, you must 1. If you have not already set up your questions, you will be promptedupon logon- click Yes to open the Security Questions Setup.enter the space in the same position when you are asked to answer theOR- If you are logged into the application, but have not setup yourquestion.Your answers must be between 2 and 100 characters in length. They canquestions, click on theon the toolbar and select Manage Securitybe a mix of uppercase and lowercase letters, numbers, and specialQuestions.characters. You cannot use the same answer for multiple questions.2. Select or change your questions from the pre-defined questions andenter corresponding answers. You must select 5 questions and youranswers must be between 2 and 100 characters in length, a mix ofupper/lower/numbers/special characters.3. Click Save.1-4 Overview Logging On Resetting a Forgotten PasswordAllscripts PM Training / Reference GuidePa ge 9
Allscripts PM Training / Reference GuideP a g e 10
Steps to Reset a forgotten password1. On the Allscripts logon window, enter your user name and select adatabase. Forgot Password is enabled.You must have your security question setup complete before you can2. Click Forgot Password which will open the Security Questionsreset your password.window.If your security questions and answers are set up, and you have entered3.Enter an answer for each question. All answers boxes are highlighted inyour user name and selected a database on the Allscripts Practiceyellow, which indicate that they are required boxes. Your answers mustManagement logon window, you can use Forgot Password to reset yourmatch EXACTLY as they were set up. If you answer incorrectly, youpasswordwill be able to try again with a different randomly selected set ofquestions. The second time if incorrect you will be locked out.4. Click OK. The Reset Password of [user name] opens.5. Enter your New Password and Verify New password.Note: Password must meet the same specified criteria.6. Click OKResetting a Forgotten Password Your new password will be available to logon to the PM application.1-5 Overview Main ScreenAllscripts PM Training / Reference GuideP a g e 11
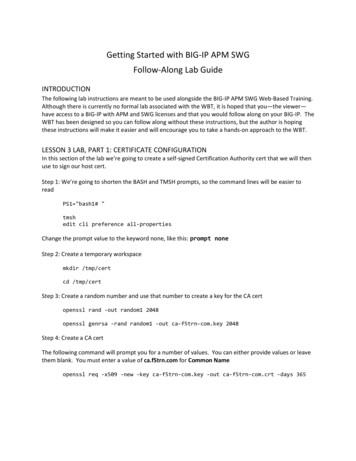
Title BarNavigational PaneIcon ToolbarLogoffPractice Management Function PanelParent WindowOverview Main Screen Title bar displays “database” nameTool bar allows access to icon functionalityNavigation pane on left allows access to system processes/functions.Gray area is called the Parent window.Practice Management Function panel allows you to access theOffice Manager function to work queues that have been set up.Allscripts PM Training / Reference GuideTitle Bar- Display the application name and the “database” or practice thatyou are working in.Can use Alt/underlined letter to access each option on the ribbon menu.P a g e 12
Section 2 Registration:Allscripts PM Training / Reference GuideP a g e 13
2-1 Patient Management RegistrationAllscripts PM Training / Reference GuideP a g e 14
Registration Ability to view patient information entered on an existing patientvia the Summary TabAbility to view patient demographic information on an existingpatient via the Patient TabAbility to view patient guarantor, subscriber, contact informationon an existing patient via the Account TabAbility to view patient insurance information on an existingpatient via the Policies TabAbility to view patient Additional Information on an existingpatient via the Additional Info Tab. Ability to search for a patient using the binoculars icon.Ability to add a new patient’s demographic information, accountinformation, insurance information and additional informationusing the Magic Wand icon(or Alt/Down arrow).Ability to pull a patient into focus by Patient number by enteringthe patient number and pressing Tab (the key icon displays).You can access the various tabs in Registration by clicking on thetab or Alt/underlined letter or use the hyperlinks at PatientInformation, Account Information or Policy Information.Always search before creating a new patient.2-2 Patient Management Registration Summary TabAllscripts PM Training / Reference GuideP a g e 15
Registration Summary Tab After searching for a patient and bringing the patient info focus,the Summary Tab appears providing view only information, nochanges can be done in this tab.Name, Address, Phone, Patient comments, Sex, DOB, UsualProvider, Referring Dr, Med Rec Location and No, Account andPolicy with subscriber information displays.You can “hover” over the Patient Information, AccountInformation or Policy Information command buttons todisplay a “hand icon”. By clicking on the hand icon you canquickly go to the chosen Registration Tab, Account Tab orPolicy Tab.Allscripts PM Training / Reference GuideNotes, Policies, ProceduresSuggested that if you leave your terminal while working inRegistration, especially if you have a patient in focus, you minimizethe Registration workbook by clicking on the minimize button in thechild window or clear the screen of the patient information using theClear Form iconfrom the toolbar.The telephone iconnext to a phone number indicates this is thepreferred number for contact across the system where phone numbersare displayed.P a g e 16
2-3 Registration- Patient LookupAllscripts PM Training / Reference GuideP a g e 17
Registration- Patient Lookup1. Enter the search criteria for the search (down arrow at Search Byprompt or F4). You can search by Patient Name, SSN, DOB,Patient #, Guarantor Name, Tel #, or do an Advanced Search withmultiple parameters.2. Enter the search value in the Search For prompt. You can use %as wildcard, before, after the search value.3. Click Local Search4. Highlight the correct patient in the grid displayed at the bottom ofthe screen.5. Click OK.6. If the patient is not found- can click on the New Patientcommand button to create a new entry.Notes, Policies, ProceduresCan use first few letters Lname, FnameCan search by first name ,FnameCan choose the default for Search By by checking the Save Searchby Settings box- this is user/workstation specificYou can do a multiple Parameter Search- Search By is primarySearch by : 2 secondary parameterSearch by: 3 third parameterIf you enter a 2 or 3 Search it makes these mandatory to enter valuesearch criteria.Your search can include Inactive patients by checking the box.The Search For criteria can be set up for number of required charactersfor patient last name lookup.Patient Management Registration- Adding a New PatientAllscripts PM Training / Reference GuideP a g e 18
Registration- Adding a New Patient After Searching, if the patient is not found in the database, clickon New Patient command button in bottom left of the Lookupscreen.The Begin New Patient screen displays.Enter the Patient’s SSN (if given to you)Enter the Patient’s Last Name, First Name, middle initial andDate of Birth.Click OK.Allscripts PM Training / Reference GuideNotes, Policies, ProceduresBold prompts displaying in “vanilla” are required.Use Proper Case- Need to use shift key to capitalize 1st letter of Firstand Last names, address, etc. DO NOT use all CAPS.Punctuation- can use spaces for hyphen names, no special characters,avoid periods, etc.P a g e 19
2-4 Patient Management Registration Patient Tab- Enter a New PatientAllscripts PM Training / Reference GuideP a g e 20
Registration- Enter a New Patient Enter demographic information on a patientEnter Employer information on a patientEnter a Referring Provider on a patientEnter a Medical Record location or number on a patientNotes, Policies, ProceduresProceed to the Account Tab to continue the registration.Proceed to the Policies Tab to continue the registration.Proceed to the Additional Tab to complete the registration.Registration –Enter a New PatientAllscripts PM Training / Reference GuideP a g e 21
Fields in the Patient Tab1. Patient Number – Is typically assigned by system when saved.2. SSN- Social Security #. No need to enter dashes as the system willformat the field3. Last Name - The system displays the information entered in theBegin New Patient Screen. Verify or complete the entry.4. First Name - The system displays the information entered in theBegin New Patient screen. Verify or complete the entry.5. MI - Middle initial.6. Suffix - Enter any initials that may follow the patient’s name (Jr, Sr,III, etc.)7. Address 1 - Do not use invalid characters such as -, *, @. Address 1& 2 go on statements. Between both fields 40 characters can beentered but only the first 30 characters between both fields will printon the statement.8. Address 2- Address 2 does NOT go on a claim (paper or EDI)9. City, State and Zip- The system will default the City and Statebased on the zip code you enter. If the zip code has been used for aprevious entry. Otherwise enter the City, St and Zip.10. Country- Can enter the Country if outside the US11. H/Phone - Enter the home area code and phone. The system willformat in (XXX) XXX-XXXX. Check box to indicate preferred #.12. W/Phone - Enter the work area code and phone. The system willformat in (XXX) XXX-XXXX. Check box to indicate preferred #.13. Ext - Enter the home or work phone extension. System will accept 5alphanumeric characters.14. Cell Number- Enter the cell area code and phone. The system willformat in (XXX) XXX-XXXX. Check box to indicate preferred #.18. Referring Dr- Enter the patient’s referring doctor. Use thebinocularsto scan (or Alt/Down arrow) for the referring doctor.19. PCP- Enter the patient’s PCP. Use the binocularsto scan (orAlt/Down arrow) for the PCP.20. Comment- Enter a free text comment that will display on the PatientSummary Screen. This comment can be a permanent need a patientmay have such as handicap, language need, alternative name ornickname. Displays in Scheduling and Summary Tab.in the system, you can create a new employer by clicking on theMagic wandicon (or Insert key).21. E-Mail- Enter the patient’s e-mail address if provided.Notes, Policies, and Procedures Bold prompts displaying in “vanilla” are required.Use Proper Case- Need to use shift key to capitalize 1st letter ofFirst and Last names, address, etc. DO NOT use all CAPS.Punctuation- can use spaces for hyphen names, no specialcharacters, avoid periods, etc.15. Sex - Enter the code or use theto select the patient’s sex (or F4).16. Date of Birth - Use the MM/DD/YYYY format to enter thepatient’s birth date. The system displays the information entered inthe Begin New Patient Screen. Verify or complete the entry.17. Employer- Use the binocularsto look up the employer. Enterthe search criteria and choose from the listing. If the Employer is notPolicy and Procedure for Referring field:Allscripts PM Training / Reference GuideP a g e 22
Allscripts PM Training / Reference GuideP a g e 23
2-5 Patient Management Registration Patient Tab- Enter a Patient’s EmployerRegistration- Enter a Patient’s Employer Search for the Employer for the patient, click on the binoculars.The Employer Lookup screen displays.Choose to Search By: Abbreviation or Employer Name.Enter Search For criteria and click on Local Search.Highlight the correct employer from the grid listing.Click on OK to add the existing employer to the patient’s record.Enter a New Employer Allscripts PM Training / Reference GuideScan for the Employer for the patient, click on the binoculars.The Employer Lookup screen displays.Choose to Search By: Abbreviation or Employer Name.Enter Search For criteria and click on Local Search.If the Employer is not found, click on the New Employercommand button. The Add New Employer screen displays.OR- Click on the wand icon to add display the Add NewEmployer screen.Complete the prompts. The Abbreviation of the employer shouldbe all CAPS. The Employer Name and Address should be propercase.Click Save to add the new employer to the master file and thepatient’s file.P a g e 24
2-6 Patient Management Registration Account TabAllscripts PM Training / Reference GuideP a g e 25
Registration- Account Tab Build the patient’s Account information and establish Guarantor,Subscriber and Emergency contact information.The system will prompt the account build of a new account withthe Patient as the Guarantor. If you click OK the patientdemographic information will be copied and the patient contactwill be built as a Guarantor record.You can use the Magic Wand icon(or Insert) to build a newcontact such as subscriber or Emergency contact.Notes, Policies, and Procedures Add the guarantor if not the same as the patient –check the box for guarantorAdd subscriber(s) if applicable – check the box forsubscriberGender and DOB required for guarantor andsubscribersAdd emergency contact if given – check the box foremergency contactRegistration –Account TabAllscripts PM Training / Reference GuideP a g e 26
Fields in the Account Tab – Tab is divided into 4 section grids,Use Magic wand to create a new contact.1st grid is Account Type Account type- Defaults to Standard. Do not change unlessdirected. Comments related to Acct Types, free text field, 81 charactersand displays in Charge Entry and Financial Inquiry.2nd section is Contacts You can build as many contacts as the patient needs. Contacts can be subscribers, guarantors, entries who need toreceive the stmt, emergency contacts For Emergency Contact indicate by checking box in 4th section. Apatient can only have 1 Emergency contact at a time. Guarantor rises to the top of the contact list. A patient can onlyhave 1 designated guarantor at a time. Contact can be designated for statements only which allows thecapability to have a stmt sent to this person for the patient. Guarantor gets statement for all outstanding balances andadditional stmt goes to all contacts designated with “Send Stmt” Need to designate a Subscriber to make them available in thePolicies tab. Make sure you Click on the Subscriber box todesignate the contact as a subscriber.3rd section is contact demo information Some demographic information copies from the patient when youcreate a new contact. Check boxes to indicate Preferred phone number for contact. You can also define a different Insured name when the patient isthe subscriber and the patient name listed on the insurance policyis not the same Click on the ellipses next to Insured name prompt.An Insured Name screen will display to enter a different name.Click OK to save the entry.**If different, this name will not change if the patient’s name isupdated in Registration tab.This will be the name that is reported when processing paper andelectronic claims for subscriber relationships set to Self.4th section is Emergency Contact designation Check box to indicate contact is Emergency Contact- onlyallowed 1 per patient Comments- Enter the free text comment for the Emergencycontact.Allscripts PM Training / Reference GuideP a g e 27
2-7 Patient Management Registration Policies TabAllscripts PM Training / Reference GuideP a g e 28
Registration- Policies Tab Enter the patient’s insurance carriers.Attach Ailment and employer records.Enter effective dates, Subscriber information (from the AccountTab), policy and group numbers, patient’s relationship and anycomments regarding this carrier record. Click on the Magic Wand(or Insert key) to create a newentry, enter the appropriate/required information and SAVE.Notes, Policies, ProceduresRegistration –Policies TabAllscripts PM Training / Reference GuideP a g e 29
2-8 Patient Management Notes Note Management TabAllscripts PM Training / Reference GuideP a g e 30
Note Management Tab To access Note Management: Double-click PatientManagement Double-click Notes or F9 NOTNote Management allows those users with the SecurityPermissions to do the following: Add a note to a Patient record,View / Print / Email any Note which has been attached to aPatient's record or Edit / Delete existing notes on a Patient recordThe screen opens displaying all Note Types which are associatedwith the Patient's record.Suggested not to delete notes so that you have a history.Expired notes disappear the next day.Allscripts PM Training / Reference GuideNotes, Policies and ProceduresThe default is to display the following note types: Patient, Collection, OtherAcct Notes. To display Claim, Service and Voucher note types click on theappropriate checkbox.Note: Though Claim Notes, Service Notes, and Voucher Notes cannot beadded from this screen, you can view and edit these Note Types here.Check the box at the top of the screen. Users with security permission canalso then edit these note types.Note: If a warning note no longer applies, you can change the type toHistory of Warning note and include the subject. The note will no longerdisplay.P a g e 31
Patient Management Notes Note ManagementAllscripts PM Training / Reference GuideP a g e 32
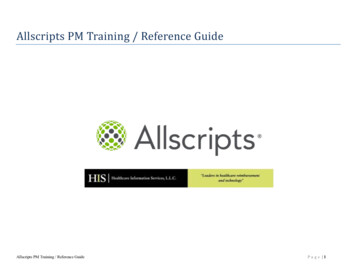
Steps to Enter Notes1. Retrieve a Patient or Guarantor by entering the patient/guarantornumber and then tab, OR search for the patient2. Be sure the type of note you are adding is checked.3. Click the Wand icon (or use the Insert key).4. Click the down arrow to open the Note Type drop-down list.Note: The list of Note Types available exclude Claim,Service, and Voucher Notes5. Choose the type of note you want to enter.6. Enter text on the subject line that identifies the reason for addingthis note. This text displays in the upper grid on this screen. This isa required field.Note: If a Default Subject was entered for the selected Note inNote Type Maintenance it will appear here.7. Tab to bring the cursor in the text grid. The text in this griddisplays only on this screen. Enter your note.8. Click Save or Alt s to save your entry.To Delete a NoteBring the patient and note into focus and click on theDelete option.Note Types:Patient Notes: Specific to a Patient's record; cannot be viewed on the records ofthose other Patients who share the same Guarantor Can prevent new appointments or prevent encounter forms fromprinting Example: To add special notes to a Patient record such as, need forspecial treatmentOther Notes: Generic type of note that is specific to the Patient's record; cannotbe viewed on the records of those other Patients who share thesame Guarantor Can hold statements, prevent new appointments and preventencounter forms from printing Example: To indicate that an X-ray or attorney's letter is part of thePatient record.Allscripts PM Training / Reference GuideCollection Notes: Collection Notes can be created to identify Patients or Accountsthat are delinquent or in collections. When a Collection Notes is added to the Guarantor record it isviewable on the records of all those Patients who share thatGuarantor.Claim Notes: Claim Notes are used to add notes to a claim for purposes ofmanaging an unpaid claim. They are created from Unpaid Claims Management and from theAccount Ledger screen and can be viewed in Unpaid ClaimsManagement, Pending Claims Management and Account Ledger.Service Notes: Service notes are specific to a service line on a voucher. You can add a Service Note to a voucher line from the PaymentEntry, Edits, and the Account Ledger You can view a voucher's Service Notes in Account Inquiry andPayment Entry viewers when selected as a view option. ServiceNotes attached to vouchers associated with a Patient can be viewedin Note Management.Voucher Notes: Voucher Notes are voucher specific. A voucher note can be added using the Quick Note icon from thetoolbar in Account Inquiry in Financial Inquiry, Payment Entry inTransactions, or Edits Tab in Batch Management. A voucher note can also be entered using the right click on thevoucher in Pending Claims Management or Account Ledger.HIPAA Notes: HIPAA Note types are used to facilitate the capture and display ofHIPAA information. In compliance with HIPAA privacy requirements these notes arespecific to a Patient's record. They cannot be viewed on the recordsof those other Patients who share the same Guarantor. HIPAA Notes can be accessed from Note ManagementCOMpanion screen by using the HIPAA Note toolbar button orNote Management screen HIPAA notes are created using the HIPAA note icon on the toolbarwhile in Registration or Scheduling.P a g e 33
Allscripts PM Training / Reference GuideP a g e 34
Patient Management Notes Note ManagementAllscripts PM Training / Reference GuideP a g e 35
Steps to Enter Notes9. Retrieve a Patient or Guarantor by entering the patient/guarantornumber and then tab, OR search for the patient10. Be sure the type of note you are adding is checked.11. Click the Wand icon (or use the Insert key).12. Click the down arrow to open the Note Type drop-down list.Note: The list of Note Types available exclude Claim,Service, and Voucher Notes13. Choose the type of note you want to enter.14. Enter text on the subject line that identifies the reason for addingthis note. This text displays in the upper grid on this screen. This isa required field.Note: If a Default Subject was entered for the selected Note inNote Type Maintenance it will appear here.15. Tab to bring the cursor in the text grid. The text in this griddisplays only on this screen. Enter your note.16. Click Save or Alt s to save your entry.To Delete a NoteBring the patient and note into focus and click on theDelete option.Note Types:Patient Notes: Specific to a Patient's record; cannot be viewed on the records ofthose other Patients who share the same Guarantor Can prevent new appointments or prevent encounter forms fromprinting Example: To add special notes to a Patient record such as, need forspecial treatmentOther Notes: Generic type of note that is specific to the Patient's record; cannotbe viewed on the records of those other Patients who share thesame Guarantor Can hold statements, prevent new appointments and preventencounter forms from printing Example: To indicate that an X-ray or attorney's letter is part of thePatient record.Allscripts PM Training / Reference GuideCollection Notes: Collection Notes can be created to identify Patients or Accountsthat are delinquent or in collections. When a Collection Notes is added to the Guarantor record it isviewable on the records of all those Patients who share thatGuarantor.Claim Notes: Claim Notes are used to add notes to a claim for purposes ofmanaging an unpaid claim. They are created from Unpaid Claims
Allscripts PM Training / Reference Guide Page 3 3-7 - Patient Scheduling Tab / Find Open Times 3-8 - Patient Scheduling Tab / Schedule Appointment Screen 3-9 - Patient Scheduling Tab / Patient Information Command Button 3-10 - Patient Schedulin