Transcription
Adafruit VL53L0X Time of Flight Micro-LIDAR DistanceSensor BreakoutCreated by lady adaLast updated on 2020-07-24 02:11:08 PM EDT
OverviewThe VL53L0X is a Time of Flight distance sensor like no other you've used! The sensor contains a very tiny invisiblelaser source, and a matching sensor. The VL53L0X can detect the "time of flight", or how long the light has taken tobounce back to the sensor. Since it uses a very narrow light source, it is good for determining distance of only thesurface directly in front of it. Unlike sonars that bounce ultrasonic waves, the 'cone' of sensing is very narrow. Unlike IRdistance sensors that try to measure the amount of light bounced, the VL53L0x is much more precise and doesn'thave linearity problems or 'double imaging' where you can't tell if an object is very far or very close.This is the 'big sister' of the VL6180X ToF sensor, and can handle about 50 - 1200 mm of range distance. If you need asmaller/closer range, check out the VL6180X which can measure 5mm to 200mm. Adafruit l0x-micro-lidar-distance-sensorbreakoutPage 3 of 27
The sensor is small and easy to use in any robotics or interactive project. Since it needs 2.8V power and logic we putthe little fellow on a breakout board with a regulator and level shifting. You can use it with any 3-5V power or logicmicrocontroller with no worries. Each order comes with a small piece of header. Solder the header onto your breakoutboard with your iron and some solder and wire it up for instant distance-sensing-success!As if that weren't enough, we've also added SparkFun qwiic (https://adafru.it/Fpw) compatible STEMMAQT (https://adafru.it/Ft4) connectors for the I2C bus so you don't even need to solder. Just wire up to your favoritemicro with a plug-and-play cable to get 6-DoF data ASAP. For a no-solder experience, just wire up to your favoritemicro, like the STM32F405 Feather (https://adafru.it/Iqc) using a STEMMA QT adapter cable. (https://adafru.it/JnB) TheStemma QT connectors also mean the VL53L0X can be used with our various associated Adafruit l0x-micro-lidar-distance-sensorbreakoutPage 4 of 27
accessories. (https://adafru.it/Ft6)There are two versions of this board - the STEMMA QT version shown above, and the original header-onlyversion shown below. Code works the same on both!Communicating to the sensor is done over I2C with an API written by ST, so its not too hard to port it to your favoritemicrocontroller. We've written a wrapper library for Arduino so you can use it with any of your Arduino-compatibleboards.Sensing CapablitiesThe sensor can measure approximately 50mm to 1.2 meter in default mode. Adafruit l0x-micro-lidar-distance-sensorbreakoutPage 5 of 27
In 'long range' mode you can detect as far as 1.5 to 2 meters on a nice white reflective surface.Depending on ambient lighting and distance, you'll get 3 to 12% ranging accuracy - better lighting and shiny surfaces Adafruit l0x-micro-lidar-distance-sensorbreakoutPage 6 of 27
will give you best results. Some experimentation will be necessary since if the object absorbs the laser light you won'tget good readings. Adafruit l0x-micro-lidar-distance-sensorbreakoutPage 7 of 27
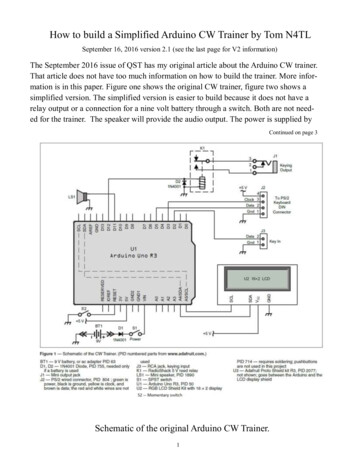
PinoutsThe VL53L0X is a I2C sensor. That means it uses the two I2C data/clock wires available on most microcontrollers, andcan share those pins with other sensors as long as they don't have an address collision.For future reference, the default I2C address is 0x29. You can change it, but only in software. That means you have towire the SHUTDOWN pin and hold all but one sensor in reset while you reconfigure one sensor at a time Adafruit l0x-micro-lidar-distance-sensorbreakoutPage 8 of 27
Power Pins:Vin - this is the power pin. Since the chip uses 2.8 VDC, we have included a voltage regulator on board that willtake 3-5VDC and safely convert it down. To power the board, give it the same power as the logic level of yourmicrocontroller - e.g. for a 5V micro like Arduino, use 5V2v8 - this is the 2.8V output from the voltage regulator, you can grab up to 100mA from this if you likeGND - common ground for power and logicI2C Logic pins:SCL - I2C clock pin, connect to your microcontrollers I2C clock line.SDA - I2C data pin, connect to your microcontrollers I2C data line.STEMMA QT (https://adafru.it/Ft4) - These connectors allow you to connectors to dev boards with STEMMA QTconnectors or to other things with various associated accessories (https://adafru.it/Ft6).Control Pins:GPIO - this is a pin that is used by the sensor to indicate that data is ready. It's useful for when doing continuoussensing. Note there is no level shifting on this pin, you may not be able to read the 2.8V-logic-level voltage on a5V microcontroller (we could on an arduino UNO but no promises). Our library doesn't make use of this pin butfor advanced users, it's there!SHDN - the shutdown pin for the sensor. By default it's pulled high. There's a level-shifting diode so you can use3-5V logic on this pin. When the pin is pulled low, the sensor goes into shutdown mode. Adafruit l0x-micro-lidar-distance-sensorbreakoutPage 9 of 27
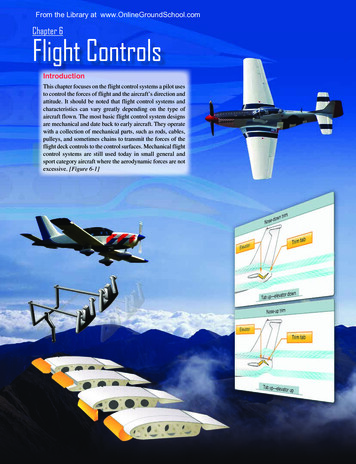
AssemblyDon't forget to remove the protective cover off the sensor, it may be a clear or slightly tinted plastic!Otherwise you will get incorrect readingsThis page shows the VL53L0X or VL6180X sensor - the procedure is identical!Prepare the header strip:Cut the strip to length if necessary. It will be easier tosolder if you insert it into a breadboard - long pins down Adafruit l0x-micro-lidar-distance-sensorbreakoutPage 10 of 27
Place the Breakout board on top so the shorter ends ofthe pins line up though all the pads Adafruit l0x-micro-lidar-distance-sensorbreakoutPage 11 of 27
Solder!Be sure to solder all pins for reliable electrical contact.(For tips on soldering, be sure to check out our Guide toExcellent Soldering (https://adafru.it/aTk)). Adafruit l0x-micro-lidar-distance-sensorbreakoutPage 12 of 27
OK You're done! Check your work over and continue onto the next steps Adafruit l0x-micro-lidar-distance-sensorbreakoutPage 13 of 27
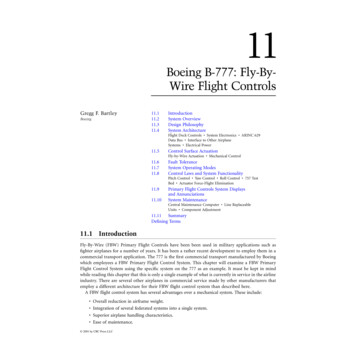
Arduino CodeYou can easily wire this breakout to any microcontroller, we'll be using an Arduino. For another kind of microcontroller,just make sure it has I2C, then port the API code. We strongly recommend using an Arduino to start though!Connect Vin to the power supply, 3-5V is fine (redwire on STEMMA QT version). Use the samevoltage that the microcontroller logic is based offof. For most Arduinos, that is 5VConnect GND to common power/data ground(black wire on STEMMA QT version)Connect the SCL pin to the I2C clock SCL pin onyour Arduino (yellow wire on STEMMA QTversion). On an UNO & '328 based Arduino, this isalso known as A5, on a Mega it is also known asdigital 21 and on a Leonardo/Micro, digital 3Connect the SDA pin to the I2C data SDA pin onyour Arduino (blue wire on STEMMA QT version).On an UNO & '328 based Arduino, this is alsoknown as A4, on a Mega it is also known as digital20 and on a Leonardo/Micro, digital 2 Adafruit l0x-micro-lidar-distance-sensorbreakoutPage 14 of 27
The VL53L0X has a default I2C address of 0x29!You can change it, but only in software. That means you have to wire the SHUTDOWN pin and hold all but one sensorin reset while you reconfigure one sensor at a timeDownload Adafruit VL53L0XTo begin reading sensor data, you will need to install the Adafruit VL53L0X Library (https://adafru.it/sDz).The easiest way to do that is to open up the Manage Libraries. menu in the Arduino IDEThen search for Adafruit VL53L0X and click InstallWe also have a great tutorial on Arduino library installation duino-libraries-install-use (https://adafru.it/aYM)Load DemoOpen up File- Examples- Adafruit VL53L0X- vl53l0x and upload to your Arduino wired up to the sensor Adafruit l0x-micro-lidar-distance-sensorbreakoutPage 15 of 27
Thats it! Now open up the serial terminal window at 115200 speed to begin the test.Move your hand up and down to read the sensor data. Note that when nothing is detected, it will say the reading is outof rangeDon't forget to remove the protective plastic cover from the sensor before using! Adafruit l0x-micro-lidar-distance-sensorbreakoutPage 16 of 27
Don't forget to remove the protective plastic cover from the sensor before using!Connecting Multiple SensorsI2C only allows one address-per-device so you have to make sure each I2C device has a unique address. The defaultaddress for the VL53L0X is 0x29 but you can change this in software.To set the new address you can do it one of two ways. During initialization, instead of calling lox.begin(), calllox.begin(0x30) to set the address to 0x30. Or you can, later, call lox.setAddress(0x30) at any time.The good news is its easy to change, the annoying part is each other sensor has to be in shutdown. You can shutdowneach sensor by wiring up to the XSHUT pin to a microcontroller pin. Then perform something like this pseudo-code:1.2.3.4.Reset all sensors by setting all of their XSHUT pins low for delay(10), then set all XSHUT high to bring out of resetKeep sensor #1 awake by keeping XSHUT pin highPut all other sensors into shutdown by pulling XSHUT pins lowInitialize sensor #1 with lox.begin(new i2c address) Pick any number but 0x29 and it must be under 0x7F. Goingwith 0x30 to 0x3F is probably OK.5. Keep sensor #1 awake, and now bring sensor #2 out of reset by setting its XSHUT pin high.6. Initialize sensor #2 with lox.begin(new i2c address) Pick any number but 0x29 and whatever you set the firstsensor to7. Repeat for each sensor, turning each one on, setting a unique address.Note you must do this every time you turn on the power, the addresses are not permanent! Adafruit l0x-micro-lidar-distance-sensorbreakoutPage 17 of 27
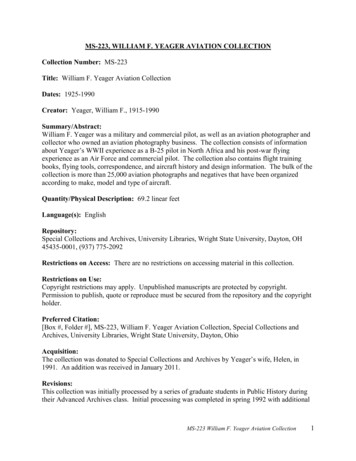
Python &CircuitPythonIt's easy to use the VL53L0X sensor with Python and CircuitPython, and the Adafruit CircuitPythonVL53L0X (https://adafru.it/C62) module. This module allows you to easily write Python code that reads the range fromthe sensor.You can use this sensor with any CircuitPython microcontroller board or with a computer that has GPIO and Pythonthanks to Adafruit Blinka, our CircuitPython-for-Python compatibility library (https://adafru.it/BSN).CircuitPython Microcontroller WiringFirst wire up a VL53L0X to your board exactly as shown on the previous pages for Arduino. Here's an example ofwiring a Feather M0 to the sensor with an I2C connection: Adafruit l0x-micro-lidar-distance-sensorbreakoutPage 18 of 27
Board 3V to sensor VIN (red wire on STEMMA QTversion)Board GND to sensor GND (black wire onSTEMMA QT version)Board SCL to sensor SCL (yellow wire onSTEMMA QT version)Board SDA to sensor SDA (blue wire on STEMMAQT version) Adafruit l0x-micro-lidar-distance-sensorbreakoutPage 19 of 27
Python Computer WiringSince there's dozens of Linux computers/boards you can use we will show wiring for Raspberry Pi. For other platforms,please visit the guide for CircuitPython on Linux to see whether your platform is supported (https://adafru.it/BSN).Here's the Raspberry Pi wired with I2C:Pi 3V3 to sensor VIN (red wire on STEMMA QTversion)Pi GND to sensor GND (black wire on STEMMAQT version)Pi SCL to sensor SCL (yellow wire on STEMMAQT version)Pi SDA to sensor SDA (blue wire on STEMMA QTversion) Adafruit l0x-micro-lidar-distance-sensorbreakoutPage 20 of 27
CircuitPython Installation of VL53L0X LibraryYou'll need to install the Adafruit CircuitPython VL53L0X (https://adafru.it/C62) library on your CircuitPython board.First make sure you are running the latest version of Adafruit CircuitPython (https://adafru.it/Amd) for your board.Next you'll need to install the necessary libraries to use the hardware--carefully follow the steps to find and install theselibraries from Adafruit's CircuitPython library bundle (https://adafru.it/zdx). Our introduction guide has a great page onhow to install the library bundle (https://adafru.it/ABU) for both express and non-express boards.Remember for non-express boards like the, you'll need to manually install the necessary libraries from the bundle:adafruit vl53l0x.mpyadafruit bus deviceYou can also download the adafruit vl53l0x.mpy from its releases page on Github (https://adafru.it/C63).Before continuing make sure your board's lib folder or root filesystem hasthe adafruit vl53l0x.mpy, and adafruit bus device files and folders copied over.Next connect to the board's serial REPL (https://adafru.it/Awz)so you are at the CircuitPython prompt.Python Installation of VL53L0X LibraryYou'll need to install the Adafruit Blinka library that provides the CircuitPython support in Python. This may alsorequire enabling I2C on your platform and verifying you are running Python 3. Since each platform is a little different,and Linux changes often, please visit the CircuitPython on Linux guide to get your computerready (https://adafru.it/BSN)!Once that's done, from your command line run the following command:sudo pip3 install adafruit-circuitpython-vl53l0xIf your default Python is version 3 you may need to run 'pip' instead. Just make sure you aren't trying to useCircuitPython on Python 2.x, it isn't supported!CircuitPython & Python UsageTo demonstrate the usage of the sensor we'll initialize it and read the range and more from the board's Python REPL.Run the following code to import the necessary modules and initialize the I2C connection with the sensor:import boardimport busioimport adafruit vl53l0xi2c busio.I2C(board.SCL, board.SDA)sensor adafruit vl53l0x.VL53L0X(i2c)Now you're ready to read values from the sensor using any of these properties:range - The distance in millimeter to an object in front of the sensor. Adafruit l0x-micro-lidar-distance-sensorbreakoutPage 21 of 27
print('Range: {}mm'.format(sensor.range))In addition you can adjust the measurement timing budget to change the speed and accuracy of the sensor. Get andset the measurement timing budget property with a value in nanoseconds. For example to increase the timingbudget to a more accurate but slower 200ms value:sensor.measurement timing budget 200000See the simpletest.py example (https://adafru.it/C64) for a complete demo of printing the range every second. Savethis as code.py on the board and examine the REPL output to see the range printed every second.That's all there is to using the VL53L0X with CircuitPython!Full Example Code# Simple demo of the VL53L0X distance sensor.# Will print the sensed range/distance every second.import timeimport boardimport busioimport adafruit vl53l0x# Initialize I2C bus and sensor.i2c busio.I2C(board.SCL, board.SDA)vl53 adafruit vl53l0x.VL53L0X(i2c)########Optionally adjust the measurement timing budget to change speed and accuracy.See the example here for more blob/master/examples/Single/Single.inoFor example a higher speed but less accurate timing budget of 20ms:vl53.measurement timing budget 20000Or a slower but more accurate timing budget of 200ms:vl53.measurement timing budget 200000The default timing budget is 33ms, a good compromise of speed and accuracy.# Main loop will read the range and print it every second.while True:print("Range: {0}mm".format(vl53.range))time.sleep(1.0) Adafruit l0x-micro-lidar-distance-sensorbreakoutPage 22 of 27
Python DocsPython Docs (https://adafru.it/C65) Adafruit l0x-micro-lidar-distance-sensorbreakoutPage 23 of 27
DownloadsFiles & DatasheetsDatasheet for the VL53L0X (https://adafru.it/sDw)ST product page (https://adafru.it/sDx) with more details including API downloadsFritzing object in Adafruit Fritzing library (https://adafru.it/aP3)EagleCAD PCB files in GitHub (https://adafru.it/sDy)Adafruit VL53L0X library (https://adafru.it/sDz)Pololu Vl53L0X library (https://adafru.it/sTf)Schematic & Fabrication Print - STEMMA QT Version Adafruit l0x-micro-lidar-distance-sensorbreakoutPage 24 of 27
Schematic & Fabrication Print - Original VersionUse M2.5 or #2-56 screws to mount Adafruit l0x-micro-lidar-distance-sensorbreakoutPage 25 of 27
Adafruit l0x-micro-lidar-distance-sensorbreakoutPage 26 of 27
Adafruit IndustriesLast Updated: 2020-07-24 02:11:08 PM EDTPage 27 of 27
Mouser ElectronicsAuthorized DistributorClick to View Pricing, Inventory, Delivery & Lifecycle Information:Adafruit:3317
VL53L0X (https://adafru.it/C62) module. This module allows you to easily write Python code that reads the range from the sensor. You can use this sensor with any CircuitPython microcontroller board or with a computer that has GPIO and Python thanks to Adafruit_Blinka, our CircuitPython-for-Python compatibility library (https://adafru.it/BSN).