Transcription
Using Netbeans and the Derby Database for ing a Derby Database in Netbeansa. Accessing servicesb. Creating a databasec. Making a connectiond. Creating tablese. Adding recordsUsing the examples provided by the instructora. Unzip the packages provided by instructorb. Restore the databasec. Configuring and running projectConnecting to derby DBMS from a servlet or other java programa. Connecting to an existing DBMS schemab. Adding, modifying, selecting dataPackaging an servlet assignment for IS2560a. Copy the DBMS folderb. Zip the filesA little more on other DMBS connectionsa. Connecting Mysqlb. Connecting AccessMore on Backup and Restore in Windows for Derbya. Copy Data Foldersb. Using Java Codec. Using dblook and ij toolMore on Backup and Restore in Mac for Derbya. Copy and Paste data foldersb. Using Java Codec. Using dblook and ij tool
1. PrerequisiteTo begin with, you should have installed the following software.1) Java: JDK 7.02) NetBeans 7.3.1 with Derby (Java DB)If not, you should download the JDK (with Java DB included) through JDK official ase/downloads/jdk7-downloads-1880260.htmlNetbeans can be found on the NetBeans official website (please download the Java EE 2. Creating a Derby Database in Netbeansa.Accessing Services:Open NetBeans and you should have the interface shown in Figure 1. The Java DB is located under the tab“Services”. If this tab is not visible, on the main menu: select “Window” and then “Services “as shown inFigure 2.Figure 1: The main Interface of NetBeansFigure 2: Open Services using Windows Servicesb. To create a new database, in the “services” tab:1) Expand “Database”2) Right click “Java DB”, and select “Create Database”.3) In the Create JavaDB Database window (shown as Figure 3), provide the database name, user name, andpassword. For class projects, use your name for the database name and use IS2560 as both username andpassword.4) When you have created a DBMS, a series of files will be created in your user space as will be describedbelow.
Figure 3: Creating a new databasec.Making a connection through Netbeans5) After creating a new database, Netbeans will automatically build a connection, shown in the figure 4.Figure 4: Derby database connections6) If not, expand “Java DB”, you will see a list of existing databases (in our case one called “IS2560”7) Right click “IS2560” and select “Connect ” (Figure 5)8) A new connection will be built as shown in Figure 4.Figure 5: Making a new connectiond. Creating tables9) Keep in mind, before you can create tables you must make a connection to your DBMS10) Expand existing connection “jdbc:derby://localhost:1527/IS2560 [IS2560 on IS2560]”. If you are not ableto expand this connection, make sure the server is started.How to Start Derby Server : Right click “Java DB”, select “Start Server”11) Expand “IS2560” (IS2560 is displayed in bold)12) Right click on “Tables” and select “Create Tables ”13) In the “Create Table” window (Figure 6), provide Table names and fields. In this example, we named thetable as “demo” and added two fields: id (numeric, size 10), name (varchar, size 255)
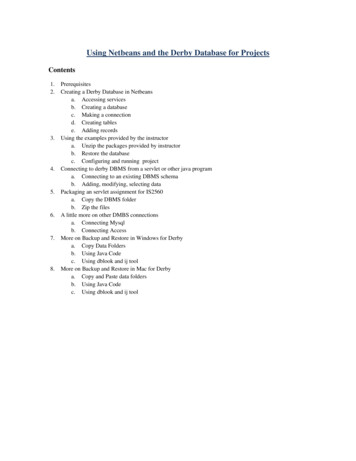
Figure 6: Creating a table schema14) The created table “demo” will be displayed under your DBMS in the “Services” tab, as shown in Figure 7.Figure 7: The created tablee.Adding records15) Expand your DBMS connection “jdbc:derby://localhost:1527/IS2560 [IS2560 on IS2560]”16) Right click on the table – in our case “DEMO”, select “View Data ”17) A “select * from IS2560 ” panel (Figure 8) will display on the main workspaceFigure 8: The SQL results panelFigure 9: Java DB file location18) Right click on the result panel (Figure 9) and select “Insert records”19) In the “Insert Records” window (Figure 10), prepare the data you need for IS2560 projects. In this example,we prepared two records: 1, demo1 and 2 demo2.
Figure 10: The “Insert Records” window
3. Using the examples provided by the instructorOn the class website, several code examples using the Derby database in servlets are provided. This sectionshows how to use these samples. This example uses “SimpleServlet DBMS Derby”.a. Get the files1) Download the zip file from the class website2) Unzip it to a location of your choice – the code will be in a folder with the same name as the zip file – inour example“SimpleServlet DBMS Derby”b. Restore the database3) Open the main folder (“SimpleServlet DBMS Derby”) and then the folder named “dbms”, inside the“dbms” and you will find a folder that is the Derby database – in this case“ss message”. Copy this folder tothe Derby DBMS data file location.a.To locate your Java DB file location, please click “Services” tabb.Expand “Database” and select “Java DB”c.Right click the “Java DB” and select “properties”d.The “Java DB properties” window (Figure 11) provides the Database Location. In our case (inWindows), it is located in “C:\Users\username\.netbeans-derby”. If you are in Mac, the locationshould be different.e.Navigate to this folder and paste project database folder “ss message”.Figure 11 Locate Java DB database locationNote: In both Mac and Windows, if you cannot find this folder, mostly, it is because this folder is hidden inyour computer. You can use this link for view the hidden files:http://guides.macrumors.com/Viewing hidden files on a Mac ow-hidden-files#show-hidden-files windows-7 (Windows)c. Run the Project in Netbeans
4) Start Netbeans. (Be sure you have moved the database folder before starting Netbeans – it only looks forthese files at startup time. If you are already running Netbeans, you can open the Java DB propertieswindow and change the database location -- I take the y off derby. The DB will indicate there are no DBs.If you now change it back to the correct location, it will find the new DB you added – you also have torestart Java DB.)5) Right click on “Projects” tab, select “Open Project ” (Figure 12) and select“SimpleServlet DBMS Derby” project (Figure 13)Figure 12 Open existing projectFigure 13 Open “SimpleServlet DBMS Derby” project6) You may encounter errors because your JDK version is different from what we used in this project.Generally you can right click on project and select “Properties” (Figure 14) to fix such “errors”.Figure 14: Check project properties
Two common issues relate to the JDK and the Java DB. In the “Project Properties” window , selectLibraries, you will see Figure 15In “Java Platform”, select the “JDK1.* (Default)”; In “Add Library ”,select “Java DB Driver”7) Click “Services” Tab, expand “Databases” , then right click on “Java DB”, choose “Start Server” (The firsttime you run a sample project, you may also want to connect to the database to make sure the username andpassword are correct – for our samples we always use TEST and TEST,8) Click “Projects” Tab, right click on “SimpleServlet DBMS Derby” , choose “run”.9) A system will be pop out in your web browser, as shown in Figure 16. You should be able to add messagesand list messages in the database.10) You might want to run the project with the debugger, setting a break point in one of the files so you canwalk through the project and see what is going on. The next section will explain how to write your owncode.Figure 15: Choose the right project librariesFigure 16: System interface
4. Connecting to derby DBMS from a servlet or other Java programIn this section, we will provide examples on how to connect a derby database through a java program. We willuse a Java application Web project as an example.a. Connecting to an existing DBMS schema1) Click the “Projects” tab2) Right click in a blank area, or click on the File menu and select “New Project”3) In the “New Project” window (Figure 17), select “Java Web” and choose “Web Application” (Figure 18)4) Create a new web application -- in our case named “DerbyWeb”Figure 17: Create a new projectFigure 18: The new project window5) In order to use Derby in web applications, we need to add Derby drivers to our project library. Expand theproject, right click on “Libraries”, and select “Add Library” (Figure 19). (You can also open the projectproperties window, go to Library and add it there.6) In the “Add library” window, select “Java DB Driver” (Figure 20).Figure 19: The new project windowFigure 20: Add Java DB Drivers7) The following Java code (Figure 21) is used to connect the database. (This is basically the same code usedto connect to any database – only the driver changes.)
String connectionURL RL, username and password should be specified in getConnection()try {Connection conn DriverManager.getConnection(connectionURL, "IS2560", "IS2560");System.out.println("Connect successfully ! ");conn.close();} catch (SQLException ex) {System.out.println("Connect failed ! ");}Figure 21: Derby Connection8) Normally, running a project will cause the Derby Database to start. If you get the message “connectionfailed” it may because the Derby server was not started. To Start Derby Server manually, go to theservices tab, right click “Java DB”, select “Start Server”b. Selecting, adding and modifying9) Through the standard SQL scripts, we could add, modify or select data from database.10) Figure 22, 23 and 24 provided examples of using “SELECT”, “INSERT” and “UPDATE” to select, addand modify data. An important note: in selecting data from database, use java.sql.Statement.executeQuerymethod, while for updating and adding new data, use java.sql.Statement.executeUpdate method instead.String connectionURL RL, username and password should be specified in getConnection()try {Connection conn DriverManager.getConnection(connectionURL, "IS2560", "IS2560");String sql "SELECT * FROM demo";Statement st conn.createStatement();ResultSet rs null;rs rintln(rs.getInt("id") "\t" close();} catch (SQLException ex) {System.out.println("Connect failed ! ");}Figure 22: Test SQL SELECT to select data
String connectionURL RL, username and password should be specified in getConnection()try {Connection conn DriverManager.getConnection(connectionURL, "IS2560", "IS2560");String sql "INSERT INTO IS2560.DEMO (ID, NAME) VALUES (3, 'demo3')";Statement st ose();conn.close();} catch (SQLException ex) {System.out.println("Connect failed ! ");}Figure 23: Test SQL INSERT to add new dataString connectionURL RL, username and password should be specified in getConnection()try {Connection conn DriverManager.getConnection(connectionURL, "IS2560", "IS2560");String sql "UPDATE IS2560.DEMO SET NAME 'demo2 new' WHERE ID 2";Statement st ose();conn.close();} catch (SQLException ex) {System.out.println("Connect failed ! ");}Figure 24: Test SQL UPDATE to modify existing records
5. Packaging an servlet assignment for IS2560a.Copy the DBMS folder1) To locate your Java DB file location, please click “Services” tab2) Expand “Database” and select “Java DB”3) Right click the “Java DB” and select “properties”4) The “Java DB properties” window (Figure 25) provides the Database Location. In our case (in Windows),it is located in “C:\Users\username\.netbeans-derby”. If you are in Mac, the location should be different.5) Navigate to this folder and copy the folder named “IS2560”, or the database name you chose for yourproject.6) Note: In both Mac and Windows, if you cannot find this folder, mostly, it is because this folder is hidden inyour computer. You can use this link for view the hidden files:http://guides.macrumors.com/Viewing hidden files on a Mac ow-hidden-files#show-hidden-files windows-7 (Windows)Figure 25: Locate Java DB database locationb. Zip the files7) Click “Projects” tab, and select your homework project. In our example, we select “DerbyWeb”.8) Right click on “DerbyWeb”, select “Properties” to see where your project is located.9) Go to the location of your project, create a folder called “DBMS”.10) Go to that folder and paste your DMBS11) Navigate back to the main project location12) Zip your project files with database files. This is what we expect you to submit.13)
Figure 26: Locate Java project location
6. A little more on DMBS connectionsMysql and Access are other two commonly used databases. In this section, we introduce how to connect withthese two databases using Java code.a.Installing MysqlTo use Mysql, you must install a Mysql Server and register it with netbeans. This step is not included here, butyou can find online help at: Installing Mysql: gure-mysql-server.htmlRegistering Mysql: https://netbeans.org/kb/docs/ide/mysql.htmlb. Connecting Mysql1) In order to use Mysql in web applications, we need to add Mysql JDBC drivers to our project library. Click“Projects” tab and select your homework projects2) Right click on “Libraries”, and select “Add Library” (Figure 27)3) In the “Add library” window, select “Mysql JDBC Driver” (Figure 28).Figure 27: The new project windowFigure 28: Add Drivers4) The following Java codes (Figure 29) allow you to connect the Mysql database. If the console printedconnection failed, it may because the Mysql server is stopped.5) The selecting, adding and modifying data using Mysql database are the same as using Derby after theconnection was built. Please refer to Figure 22-24.
String url "jdbc:mysql://localhost:3306/";String dbName "IS2560";String driver "com.mysql.jdbc.Driver";String userName "IS2560";String password "IS2560";try {Class.forName(driver).newInstance();Connection conn DriverManager.getConnection(url ected to the database");//You can add some functions hereconn.close();} catch (Exception se){System.out.println(“Connect failed !”);}Figure 29: Test Derby Connectionsc.Connecting to Access6) Different from Derby and Mysql, JDK provided the database connection drivers for Access. There is no needto add external drivers.7) The following Java codes (Figure 30) help to connect the Access database.String dbName "IS2560";String driver " sun.jdbc.odbc.JdbcOdbcDriver";String userName "IS2560";String password "IS2560";try {Class.forName(driver).newInstance();Connection conn DriverManager.getConnection(“jdbc:odbc:” ected to the database");//You can add some functions hereconn.close();} catch (Exception se){System.out.println(“Connect failed !”);}Figure 30: Test Derby Connections
7. More on Backup and Restore in Windows for Derbya.Copy Data Folders (See section 4)b. Using Java Code1) For adding Derby drivers, please refer to section 3.2) The codes displayed in Figure 31 implemented the Derby database backup function. To backup database“IS2560”, set variable backup true and run the program. A folder named “IS2560” will appear on yourfolder: “C:/dbbackups/”.boolean backup true;Connection conn null;if(backup){//jdbc:derby://localhost:1527/test is the database connection,//test is the database nameString connectionURL "jdbc:derby://localhost:1527/ IS2560";//username and password should be specified in getConnection()//test, test are username and password in this caseconn DriverManager.getConnection(connectionURL, " IS2560", " IS2560");String sqlstmt "CALL SYSCS UTIL.SYSCS BACKUP DATABASE(?)";CallableStatement cs conn.prepareCall(sqlstmt);//backup the database to ecute();cs.close();conn.close();}else{String dbURL "jdbc:derby://localhost:1527/ IS2560;restoreFrom C:/dbbackups/ IS2560";conn DriverManager.getConnection(dbURL, " IS2560", " IS2560");conn.close();}}}Figure 31: Backup and Restore database.3) To simulate the restore process, we delete the database “IS2560”: Expand “JavaDB” and select “IS2560”Right click “delete”.4) To restore database “IS2560”, set variable backup false and run the codes. Close and Reopen NetBeans,you will see “IS2560” database in your Java DB.c.Using dblook and ij toolThere are several available derby tools for operating derby database, among which the dblook and ij are twoimportant tools. There are three different ways of using dblook and ij, as provided in the following link. In thisdocument, we will demonstrate the second art/tgsrunningdblook.html
The dblook can be used to dump and restore the database scheme (not data files)and ij tool to export andimport data in tables (no scheme).1) Locate the derbyrun.jar file. In NetBeans, click the “Services” tab, right click the Java DB and choose“Properties ” The Java DB Installation path suggests derby installed in “C:\ProgramFiles\Java\jdk1.7.0 40\db”. To run dblook and ij tools, we need to run the jar files located in the folder“C:\Program Files\Java\jdk1.7.0 40\db\lib\derbyrun.jar”2) To test the derby dblook and derby ij, we create a temporary folder in “C:\” named “derbytest”. To test onit, we should open the command line, and navigate to “C:\derbytest”: click the Start, run ”cmd” and use “cd”command to redirect to “C:\derbytest\”For data backup3) Run dblook: (it will dump sql scheme files to the folder “C:\derbytest\”)C:\derbytest java -jar "C:\Program Files\Java\jdk1.7.0 40\db\lib\derbyrun.jar" dblook –d"jdbc:derby://localhost:1527/test;user test;password test" -o ‘C:\derbytest\my.sql’4) Run ij: (we want to dump the table “demo” in the database “test”, and it will be dumped to demo.sql)C:\derbytest java -jar "C:\Program Files\Java\jdk1.7.0 40\db\lib\derbyrun.jar" ijij connect ‘jdbc:derby://localhost:1527/test;user test;password test’;ij CALL SYSCS UTIL.SYSCS EXPORT TABLE('TEST', 'DEMO', 'C:\derbytest\demo.sql',null, null, 'UTF-8');For data restore (delete the database before restore)5) Restore data scheme using ij toolC:\derbytest java -jar "C:\Program Files\Java\jdk1.7.0 40\db\lib\derbyrun.jar" ijij connect 'jdbc:derby://localhost:1527/test;user test;password test;create true’;ij run ‘C:\derbytest\my.sql’;6) Restore data using ij toolij connect ‘jdbc:derby://localhost:1527/test;user test;password test’;ij CALL SYSCS UTIL.SYSCS IMPORT ull,'utf-8',0);Note: “SYSCS UTIL.SYSCS IMPORT TABLE” and “SYSCS UTIL.SYSCS EXPORT TABLE” can be foundhere: ence/sqlj02.html#ToC
8. More on Backup and Restore in Mac for Derbya.Copy Data Folders (See section 4)b. Using Java Code1) For adding Derby drivers, please refer to section 3.2) The codes displayed in Figure 32 implemented the Derby database backup function. To backup database“test”, set variable backup true and run the program. A folder named “IS2560” will appear on your folder:“/Users/Your Computer Name/ dbbackups”.boolean backup true;Connection conn null;if(backup){//jdbc:derby://localhost:1527/test is the database connection,//test is the database nameString connectionURL "jdbc:derby://localhost:1527/ IS2560";//username and password should be specified in getConnection()//test, test are username and password in this caseconn DriverManager.getConnection(connectionURL, " IS2560", " IS2560");String sqlstmt "CALL SYSCS UTIL.SYSCS BACKUP DATABASE(?)";CallableStatement cs conn.prepareCall(sqlstmt);//backup the database to ," /Users/ComputerName/dbbackups/cs.setString(1," ," lose();conn.close();}else{String dbURL "jdbc:derby://localhost:1527/IS2560;restoreFrom /Users/ComputerName/dbbackups/IS2560";conn DriverManager.getConnection(dbURL, "test", "test");conn.close();}}}Figure 32: Backup and Restore database.3) To simulate the restore process, we delete the database “IS2560”: Expand “JavaDB” and select “IS2560”Right click “delete”.4) To restore database “IS2560”, set variable backup false and run the codes. Close and Reopen NetBeans,you will see “IS2560” database in your Java DB.c.Using dblook and ij toolThere are several available derby tools for operating derby database, among which the dblook and ij are twoimportant tools. There are three different ways of using dblook and ij, as provided in the following link. In thisdocument, we will demonstrate the second method.
runningdblook.htmlThe dblook can be used to dump and restore the database scheme (not data files)and ij tool to export and importdata in tables (no scheme).5) Locate the derbyrun.jar file. In NetBeans, click the “Services” tab, right click the Java DB and choose“Properties ” The Java DB Installation path suggests derby installed �. To run dblook and ij tools, we need to run the jar fileslocated in the folder /derbyrun.jar”6) To test the derby dblook and derby ij, we create a temporary folder in “/Users/Your computer name/”named “derbytest”. To test on it, we should open the terminal (Apple Finder Applications Utilities terminal), and navigate to “/Users/Your computer name/derbytest”: run “cd” command to redirect to“derbytest”.For data backup7) Run dblook: (it will dump sql scheme files to the folder “Users/Your computer name/derbytest”)derbytest java -jar erbyrun.jar" dblook -d"jdbc:derby://localhost:1527/test;user test;password test" -o ‘/Users/ computer name /derbytest/my.sql’8) Run ij: (we want to dump the table “demo” in the database “test”, and it will be dumped to demo.sql)derbytest java -jar erbyrun.jar " ijij connect ‘jdbc:derby://localhost:1527/test;user test;password test’;ij CALL SYSCS UTIL.SYSCS EXPORT TABLE('TEST', 'DEMO', ‘Users/Your computername/derbytest/demo.sql', null, null, 'UTF-8');For data restore (delete the database as we showed above for demonstration)9) Restore data scheme using ij toolderbytest java -jar erbyrun.jar " ijij connect 'jdbc:derby://localhost:1527/test;user test;password test;create true’;ij run ‘/Users/ computer name /derbytest /my.sql’;10) Restore data using ij toolij connect ‘jdbc:derby://localhost:1527/test;user test;password test’;ij CALL SYSCS UTIL.SYSCS IMPORT TABLE('TEST','DEMO', ‘Users/Your ,0);Note that: “SYSCS UTIL.SYSCS IMPORT TABLE” and “SYSCS UTIL.SYSCS EXPORT TABLE” can befound here: ence/sqlj02.html#ToC
a. To locate your Java DB file location, please click "Services" tab b. Expand "Database" and select "Java DB" c. Right click the "Java DB" and select "properties" d. The "Java DB properties" window (Figure 11) provides the Database Location. In our case (in Windows), it is located in "C:\Users\username\.netbeans-derby".