Transcription
BBC micro:bit MicroPythonDocumentationRelease 1.0.1Multiple authorsJun 17, 2022
Tutorials1.334912141718202122263339422micro:bit Micropython API2.1 The microbit module . . . . . . . . . . . . . . . . . . . . . . . . . . . . . . . . . . . . . . . . . . .45453Microbit Module3.1 Functions .3.2 Attributes .3.3 Classes . .3.4 Modules .4Introduction1.1 Hello, World! . . .1.2 Images . . . . . .1.3 Buttons . . . . . .1.4 Input/Output Pins .1.5 Music . . . . . . .1.6 Random . . . . . .1.7 Movement . . . .1.8 Gestures . . . . .1.9 Direction . . . . .1.10 Storage . . . . . .1.11 Speech . . . . . .1.12 Network . . . . .1.13 Radio . . . . . . .1.14 Next Steps . . . .5151525761Audio4.1 Functions . . . .4.2 Classes . . . . .4.3 Using audio . . .4.4 Technical Details4.5 Example . . . .737373747474.5Bluetooth776Local Persistent File System797Machine81i
7.17.2Functions . . . . . . . . . . . . . . . . . . . . . . . . . . . . . . . . . . . . . . . . . . . . . . . . .Reading Memory . . . . . . . . . . . . . . . . . . . . . . . . . . . . . . . . . . . . . . . . . . . . .81828MicroPython8.1 Functions . . . . . . . . . . . . . . . . . . . . . . . . . . . . . . . . . . . . . . . . . . . . . . . . .83839Music9.1 Musical Notation . . . . . . . . . . . . . . . . . . . . . . . . . . . . . . . . . . . . . . . . . . . . .9.2 Functions . . . . . . . . . . . . . . . . . . . . . . . . . . . . . . . . . . . . . . . . . . . . . . . . .85868710 NeoPixel10.1 Classes . . . . .10.2 Operations . . .10.3 Using Neopixels10.4 Example . . . .919293939411 The os Module11.1 Functions . . . . . . . . . . . . . . . . . . . . . . . . . . . . . . . . . . . . . . . . . . . . . . . . .959512 Radio12.1 Constants . . . . . . . . . . . . . . . . . . . . . . . . . . . . . . . . . . . . . . . . . . . . . . . . .12.2 Functions . . . . . . . . . . . . . . . . . . . . . . . . . . . . . . . . . . . . . . . . . . . . . . . . .979798.13 Random Number Generation10113.1 Functions . . . . . . . . . . . . . . . . . . . . . . . . . . . . . . . . . . . . . . . . . . . . . . . . . 10114 Speech14.1 Functions . . . . . .14.2 Punctuation . . . . .14.3 Timbre . . . . . . .14.4 Phonemes . . . . . .14.5 Singing . . . . . . .14.6 How Does it Work?14.7 Example . . . . . .10310510510510610911011015 utime11315.1 Functions . . . . . . . . . . . . . . . . . . . . . . . . . . . . . . . . . . . . . . . . . . . . . . . . . 11316 Build and Flash MicroPython16.1 Dependencies . . . . . . . . . . . . . . . . . .16.2 Build MicroPython . . . . . . . . . . . . . . .16.3 Preparing MicroPython with a Python program16.4 Flashing the micro:bit . . . . . . . . . . . . .11511511511611617 Accessing the REPL17.1 Using the micro:bit Python Editor . . .17.2 Using a serial communication program17.3 Determining the port . . . . . . . . . .17.4 Communicating with the micro:bit . . .117117117117118.18 MicroPython Hex File12118.1 UICR format . . . . . . . . . . . . . . . . . . . . . . . . . . . . . . . . . . . . . . . . . . . . . . . 12118.2 Steps to create the firmware.hex file . . . . . . . . . . . . . . . . . . . . . . . . . . . . . . . . . . . 12218.3 Including a user script . . . . . . . . . . . . . . . . . . . . . . . . . . . . . . . . . . . . . . . . . . 122ii
19 Contributing12319.1 Checklist . . . . . . . . . . . . . . . . . . . . . . . . . . . . . . . . . . . . . . . . . . . . . . . . . 123Python Module Index125Index127iii
iv
BBC micro:bit MicroPython Documentation, Release 1.0.1Welcome!The BBC micro:bit is a small computing device for children. One of the languages it understands is the popular Pythonprogramming language. The version of Python that runs on the BBC micro:bit is called MicroPython.This documentation includes lessons for teachers and API documentation for developers (check out the index on theleft). We hope you enjoy developing for the BBC micro:bit using MicroPython.If you’re a new programmer, teacher or unsure where to start, begin with the Tutorials and use the micro:bit PythonEditor to program the micro:bit.Note: The MicroPython API will not work in the MakeCode editor, as this uses a different version of Python.Projects related to MicroPython on the BBC micro:bit include: micro:bit Python Editor - A simple browser-based code editor, developed by the Micro:bit Educational Foundation and designed to help teachers and learners get the most out of text-based programming on the micro:bit. Mu - A simple offline code editor for kids, teachers and beginner programmers. uFlash - A command line tool for flashing raw Python scripts onto a BBC micro:bit.Tutorials1
BBC micro:bit MicroPython Documentation, Release 1.0.12Tutorials
CHAPTER1IntroductionWe suggest you use the micro:bit Python Editor or Mu when working through these tutorials.Connect your micro:bit to your computer via a USB lead.Write your script in the editor window and click the “Download” or “Flash” button to transfer it to the micro:bit.If you have any problems with MicroPython or the editor, you can get support from the Micro:bit Educational Foundation team via support.microbit.org.1.1 Hello, World!The traditional way to start programming in a new language is to get your computer to say, “Hello, World!”.This is easy with MicroPython:from microbit import *display.scroll("Hello, World!")Each line does something special. The first line:from microbit import *. . . tells MicroPython to get all the stuff it needs to work with the BBC micro:bit. All this stuff is in a module calledmicrobit (a module is a library of pre-existing code). When you import something you’re telling MicroPythonthat you want to use it, and * is Python’s way to say everything. So, from microbit import * means, inEnglish, “I want to be able to use everything from the microbit code library”.The second line:display.scroll("Hello, World!")3
BBC micro:bit MicroPython Documentation, Release 1.0.1. . . tells MicroPython to use the display to scroll the string of characters “Hello, World!”. The display part of thatline is an object from the microbit module that represents the device’s physical display (we say “object” instead of“thingy”, “whatsit” or “doodah”). We can tell the display to do things with a full-stop . followed by what looks likea command (in fact it’s something we call a method). In this case we’re using the scroll method. Since scrollneeds to know what characters to scroll across the physical display we specify them between double quotes (") withinparenthesis (( and )). These are called the arguments. So, display.scroll("Hello, World!") means, inEnglish, “I want you to use the display to scroll the text ‘Hello, World!’”. If a method doesn’t need any arguments wemake this clear by using empty parenthesis like this: ().Copy the “Hello, World!” code into your editor and flash it onto the device. Can you work out how to change themessage? Can you make it say hello to you? For example, I might make it say “Hello, Nicholas!”. Here’s a clue, youneed to change the scroll method’s argument.Warning: It may not work. :-)This is where things get fun and MicroPython tries to be helpful. If it encounters an error it will scroll a helpfulmessage on the micro:bit’s display. If it can, it will tell you the line number for where the error can be found.Python expects you to type EXACTLY the right thing. So, for instance, Microbit, microbit and microBitare all different things to Python. If MicroPython complains about a NameError it’s probably because you’vetyped something inaccurately. It’s like the difference between referring to “Nicholas” and “Nicolas”. They’re twodifferent people but their names look very similar.If MicroPython complains about a SyntaxError you’ve simply typed code in a way that MicroPython can’tunderstand. Check you’re not missing any special characters like " or :. It’s like putting. a full stop in the middleof a sentence. It’s hard to understand exactly what you mean.Your microbit may stop responding: you cannot flash new code to it or enter commands into the REPL. If thishappens, try power cycling it. That is, unplug the USB cable (and battery cable if it’s connected), then plug thecable back in again. You may also need to quit and re-start your code editor application.1.2 ImagesMicroPython is about as good at art as you can be if the only thing you have is a 5x5 grid of red LEDs (light emittingdiodes - the things that light up on the front of the device). MicroPython gives you quite a lot of control over thedisplay so you can create all sorts of interesting effects.MicroPython comes with lots of built-in pictures to show on the display. For example, to make the device appearhappy you type:from microbit import *display.show(Image.HAPPY)I suspect you can remember what the first line does. The second line uses the display object to show a built-inimage. The happy image we want to display is a part of the Image object and called HAPPY. We tell show to use itby putting it between the parenthesis (( and )).4Chapter 1. Introduction
BBC micro:bit MicroPython Documentation, Release 1.0.1Here’s a list of the built-in images: Image.HEART Image.HEART SMALL Image.HAPPY Image.SMILE Image.SAD Image.CONFUSED Image.ANGRY Image.ASLEEP Image.SURPRISED Image.SILLY Image.FABULOUS Image.MEH Image.YES Image.NO Image.CLOCK12, Image.CLOCK11, Image.CLOCK10, Image.CLOCK9, Image.CLOCK8, Image.CLOCK7, Image.CLOCK6, Image.CLOCK5, Image.CLOCK4, Image.CLOCK3, Image.CLOCK2,Image.CLOCK1 Image.ARROW N, Image.ARROW NE, Image.ARROW E, Image.ARROW SE, Image.ARROW S,Image.ARROW SW, Image.ARROW W, Image.ARROW NW Image.TRIANGLE Image.TRIANGLE LEFT Image.CHESSBOARD Image.DIAMOND Image.DIAMOND SMALL Image.SQUARE1.2. Images5
BBC micro:bit MicroPython Documentation, Release 1.0.1 Image.SQUARE SMALL Image.RABBIT Image.COW Image.MUSIC CROTCHET Image.MUSIC QUAVER Image.MUSIC QUAVERS Image.PITCHFORK Image.XMAS Image.PACMAN Image.TARGET Image.TSHIRT Image.ROLLERSKATE Image.DUCK Image.HOUSE Image.TORTOISE Image.BUTTERFLY Image.STICKFIGURE Image.GHOST Image.SWORD Image.GIRAFFE Image.SKULL Image.UMBRELLA Image.SNAKE Image.SCISSORSThere’s quite a lot! Why not modify the code that makes the micro:bit look happy to see what some of the otherbuilt-in images look like? (Just replace Image.HAPPY with one of the built-in images listed above.)1.2.1 DIY ImagesOf course, you want to make your own image to display on the micro:bit, right?That’s easy.Each LED pixel on the physical display can be set to one of ten values. If a pixel is set to 0 (zero) then it’s off. Itliterally has zero brightness. However, if it is set to 9 then it is at its brightest level. The values 1 to 8 represent thebrightness levels between off (0) and full on (9).Armed with this information, it’s possible to create a new image like this:6Chapter 1. Introduction
BBC micro:bit MicroPython Documentation, Release 1.0.1from microbit import *boat lay.show(boat)(When run, the device should display an old-fashioned “Blue Peter” sailing ship with the masts dimmer than the boat’shull.)Have you figured out how to draw a picture? Have you noticed that each line of the physical display is represented bya line of numbers ending in : and enclosed between " double quotes? Each number specifies a brightness. There arefive lines of five numbers so it’s possible to specify the individual brightness for each of the five pixels on each of thefive lines on the physical display. That’s how to create a new image.Simple!In fact, you don’t need to write this over several lines. If you think you can keep track of each line, you can rewrite itlike this:boat Image("05050:05050:05050:99999:09990")1.2.2 AnimationStatic images are fun, but it’s even more fun to make them move. This is also amazingly simple to do with MicroPython just use a list of images!Here is a shopping list:EggsBaconTomatoesHere’s how you’d represent this list in Python:shopping ["Eggs", "Bacon", "Tomatoes" ]I’ve simply created a list called shopping and it contains three items. Python knows it’s a list because it’s enclosedin square brackets ([ and ]). Items in the list are separated by a comma (,) and in this instance the items are threestrings of characters: "Eggs", "Bacon" and "Tomatoes". We know they are strings of characters because they’reenclosed in quotation marks ".You can store anything in a list with Python. Here’s a list of numbers:primes [2, 3, 5, 7, 11, 13, 17, 19]Note: Numbers don’t need to be quoted since they represent a value (rather than a string of characters). It’s thedifference between 2 (the numeric value 2) and "2" (the character/digit representing the number 2). Don’t worry ifthis doesn’t make sense right now. You’ll soon get used to it.It’s even possible to store different sorts of things in the same list:1.2. Images7
BBC micro:bit MicroPython Documentation, Release 1.0.1mixed up list ["hello!", 1.234, Image.HAPPY]Notice that last item? It was an image!We can tell MicroPython to animate a list of images. Luckily we have a couple of lists of images already built in.They’re called Image.ALL CLOCKS and Image.ALL ARROWS:from microbit import *display.show(Image.ALL CLOCKS, loop True, delay 100)As with a single image, we use display.show to show it on the device’s display. However, we tell MicroPythonto use Image.ALL CLOCKS and it understands that it needs to show each image in the list, one after the other. Wealso tell MicroPython to keep looping over the list of images (so the animation lasts forever) by saying loop True.Furthermore, we tell it that we want the delay between each image to be only 100 milliseconds (a tenth of a second)with the argument delay 100.Can you work out how to animate over the Image.ALL ARROWS list? How do you avoid looping forever (hint:the opposite of True is False although the default value for loop is False)? Can you change the speed of theanimation?Finally, here’s how to create your own animation. In my example I’m going to make my boat sink into the bottom ofthe display:from microbit import *boat1 2 3 4 5 6 Image("00000:""00000:"(continues on next page)8Chapter 1. Introduction
BBC micro:bit MicroPython Documentation, Release 1.0.1(continued from previous page)"00000:""00000:""00000")all boats [boat1, boat2, boat3, boat4, boat5, boat6]display.show(all boats, delay 200)Here’s how the code works: I create six boat images in exactly the same way I described above. Then, I put them all into a list that I call all boats. Finally, I ask display.show to animate the list with a delay of 200 milliseconds. Since I’ve not set loop True the boat will only sink once (thus making my animation scientifically accurate).:-)What would you animate? Can you animate special effects? How would you make an image fade out and then fade inagain?1.3 ButtonsSo far we have created code that makes the device do something. This is called output. However, we also need thedevice to react to things. Such things are called inputs.It’s easy to remember: output is what the device puts out to the world whereas input is what goes into the device for itto process.The most obvious means of input on the micro:bit are its two buttons, labelled A and B. Somehow, we need MicroPython to react to button presses.This is remarkably simple:from microbit import *sleep(10000)display.scroll(str(button a.get presses()))All this script does is sleep for ten thousand milliseconds (i.e. 10 seconds) and then scrolls the number of times youpressed button A. That’s it!While it’s a pretty useless script, it introduces a couple of interesting new ideas:1. The sleep function will make the micro:bit sleep for a certain number of milliseconds. If you want a pause inyour program, this is how to do it. A function is just like a method, but it isn’t attached by a dot to an object.2. There is an object called button a and it allows you to get the number of times it has been pressed with theget presses method.Since get presses gives a numeric value and display.scroll only displays characters, we need to convertthe numeric value into a string of characters. We do this with the str function (short for “string” it converts thingsinto strings of characters).The third line is a bit like an onion. If the parenthesis are the onion skins then you’ll notice that display.scrollcontains str that itself contains button a.get presses. Python attempts to work out the inner-most answerfirst before starting on the next layer out. This is called nesting - the coding equivalent of a Russian Matrioshka doll.1.3. Buttons9
BBC micro:bit MicroPython Documentation, Release 1.0.1Let’s pretend you’ve pressed the button 10 times. Here’s how Python works out what’s happening on the third line:Python sees the complete line and gets the value of get presses:display.scroll(str(button a.get presses()))Now that Python knows how many button presses there have been, it converts the numeric value into a string ofcharacters:display.scroll(str(10))Finally, Python knows what to scroll across the display:display.scroll("10")While this might seem like a lot of work, MicroPython makes this happen extraordinarily fast.1.3.1 Event LoopsOften you need your program to hang around waiting for something to happen. To do this you make it loop around apiece of code that defines how to react to certain expected events such as a button press.To make loops in Python you use the while keyword. It checks if something is True. If it is, it runs a block of codecalled the body of the loop. If it isn’t, it breaks out of the loop (ignoring the body) and the rest of the program cancontinue.Python makes it easy to define blocks of code. Say I have a to-do list written on a piece of paper. It probably lookssomething like this:ShoppingFix broken gutterMow the lawnIf I wanted to break down my to-do list a bit further, I might write something like this:10Chapter 1. Introduction
BBC micro:bit MicroPython Documentation, Release 1.0.1Shopping:EggsBaconTomatoesFix broken gutter:Borrow ladder from next doorFind hammer and nailsReturn ladderMow the lawn:Check lawn around pond for frogsCheck mower fuel levelIt’s obvious that the main tasks are broken down into sub-tasks that are indented underneath the main task to whichthey are related. So Eggs, Bacon and Tomatoes are obviously related to Shopping. By indenting things wemake it easy to see, at a glance, how the tasks relate to each other.This is called nesting. We use nesting to define blocks of code like this:from microbit import *while running time() .SURPRISED)The running time function returns the number of milliseconds since the device started.The while running time() 10000: line checks if the running time is less than 10000 milliseconds (i.e.10 seconds). If it is, and this is where we can see scoping in action, then it’ll display Image.ASLEEP. Notice howthis is indented underneath the while statement just like in our to-do list.Obviously, if the running time is equal to or greater than 10000 milliseconds then the display will show Image.SURPRISED. Why? Because the while condition will be False (running time is no longer 10000). In thatcase the loop is finished and the program will continue after the while loop’s block of code. It’ll look like yourdevice is asleep for 10 seconds before waking up with a surprised look on its face.Try it!1.3.2 Handling an EventIf we want MicroPython to react to button press events we should put it into an infinite loop and check if the buttonis pressed.An infinite loop is easy:while True:# Do stuff(Remember, while checks if something is True to work out if it should run its block of code. Since True isobviously True for all time, you get an infinite loop!)Let’s make a very simple cyber-pet. It’s always sad unless you’re pressing button A. If you press button B it dies. (Irealise this isn’t a very pleasant game, so perhaps you can figure out how to improve it.):from microbit import *while True:(continues on next page)1.3. Buttons11
BBC micro:bit MicroPython Documentation, Release 1.0.1(continued from previous page)if button a.is pressed():display.show(Image.HAPPY)elif button b.is .clear()Can you see how we check what buttons are pressed? We used if, elif (short for “else if”) and else. These arecalled conditionals and work like this:if something is True:# do one thingelif some other thing is True:# do another thingelse:# do yet another thing.This is remarkably similar to English!The is pressed method only produces two results: True or False. If you’re pressing the button it returns True,otherwise it returns False. The code above is saying, in English, “for ever and ever, if button A is pressed then showa happy face, else if button B is pressed break out of the loop, otherwise display a sad face.” We break out of the loop(stop the program running for ever and ever) with the break statement.At the very end, when the cyber-pet is dead, we clear the display.Can you think of ways to make this game less tragic? How would you check if both buttons are pressed? (Hint: Pythonhas and, or and not logical operators to help check multiple truth statements (things that produce either True orFalse results).1.4 Input/Output PinsThere are strips of metal along the bottom edge of the BBC micro:bit that make it look as if the device has teeth. Theseare the input/output pins (or I/O pins for short).Some of the pins are bigger than others so it’s possible to attach crocodile clips to them. These are the ones labelled 0,12Chapter 1. Introduction
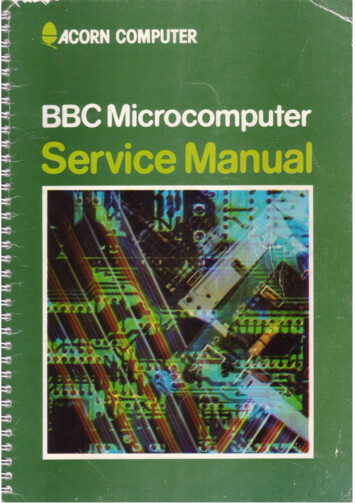
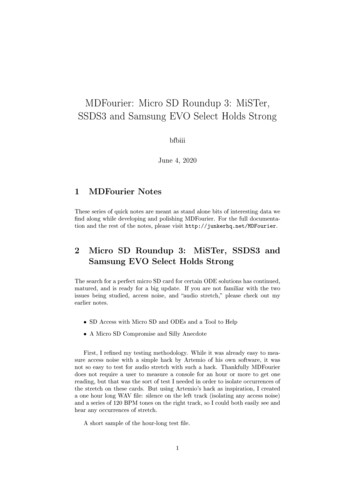
BBC micro:bit MicroPython Documentation, Release 1.0.11, 2, 3V and GND (computers always start counting from zero). If you attach an edge connector board to the deviceit’s possible to plug in wires connected to the other (smaller) pins.In MicroPython, each pin on the BBC micro:bit is represented by an object called pinN, where N is the number pf thepin.For example, to use the pin labelled 0 (zero), you can use the object called pin0 in your script.These objects have various methods associated with them depending upon what the specific pin is capable of eg. read,write or touch.1.4.1 Ticklish PythonThe simplest example of input via the pins is a check to see if they are touched. So, you can tickle your micro:bit tomake it laugh like this:from microbit import *while True:if pin0.is ow(Image.SAD)With one hand, hold your micro:bit by the GND pin. Then, with your other hand, touch (or tickle) the 0 (zero) pin.You should see the display change from grumpy to happy!This is a form of very basic input measurement. However, the fun really starts when you plug in circuits and otherdevices via the pins.1.4.2 Bleeps and BloopsThe simplest thing we can attach to the micro:bit is a Piezo buzzer. There are two types of piezo buzzers. The simplesttype to use are called active buzzers. Active buzzers contain an oscillator that produces a tone at a predetermined pitchwhen a current is passed through them. Passive buzzers require an oscillating current to be passed through them toproduce a tone at the frequency of the oscillation. In short, active buzzers are simple to use but produce only one tone,while passive buzzers are slightly more complicated to use but can produce a variety of tones.We’re going to use an active piezo buzzer for output. To attach one to your BBC micro:bit you should attach crocodileclips to pin 0 and GND (as shown below).1.4. Input/Output Pins13
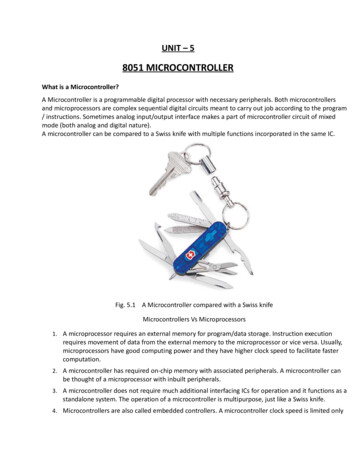
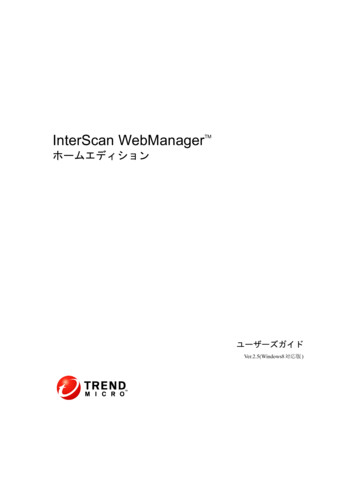
BBC micro:bit MicroPython Documentation, Release 1.0.1The wire from pin 0 should be attached to the positive connector on the buzzer and the wire from GND to the negativeconnector.The following program will cause the buzzer to make a sound:from microbit import *pin0.write digital(1)This is fun for about 5 seconds and then you’ll want to make the horrible squeaking stop. Let’s improve our exampleand make the device bleep:from microbit import *while True:pin0.write digital(1)sleep(20)pin0.write digital(0)sleep(480)Can you work out how this script works? Remember that 1 is “on” and 0 is “off” in the digital world.The device is put into an infinite loop and immediately switches pin 0 on. This causes the buzzer to emit a beep. Whilethe buzzer is beeping, the device sleeps for twenty milliseconds and then switches pin 0 off. This gives the effect of ashort bleep. Finally, the device sleeps for 480 milliseconds before looping back and starting all over again. This meansyou’ll get two bleeps per second (one every 500 milliseconds).We’ve made a very simple metronome!1.5 MusicMicroPython on the BBC micro:bit comes with a powerful music and sound module. It’s very easy to generate bleepsand bloops from the device by attaching a speaker or set of wired headphones.If you are attaching a speaker, a passive piezo buzzer, or headphones, you can use crocodile clips to attach pin 0 andGND to the positive and negative inputs. It doesn’t matter which way round they are connected to a speaker, but apiezo buzzer may be polarized (check for a “ ” marking the positive terminal).14Chapter 1. Introduction
BBC micro:bit MicroPython Documentation, Release 1.0.1Note: Do not attempt this with an active Piezo buzzer - such buzzers are only able to play a single tone.Let’s play some music:import musicmusic.play(music.NYAN)Notice that we import the music module. It contains methods used to make and control sound.MicroPython has quite a lot of built-in melodies. Here’s a complete list: music.DADADADUM music.ENTERTAINER music.PRELUDE music.ODE music.NYAN music.RINGTONE music.FUNK music.BLUES music.BIRTHDAY music.WEDDING music.FUNERAL music.PUNCHLINE music.PYTHON music.BADDY music.CHASE music.BA DING music.WAWAWAWAA music.JUMP UP music.JUMP DOWN music.POWER UP1.5. Music15
BBC micro:bit MicroPython Documentation, Release 1.0.1 music.POWER DOWNTake the example code and change the melody. Which one is your favourite? How would you use such tunes as signalsor cues?1.5.1 Wolfgang Amadeus MicrobitCreating your own tunes is easy!Each note has a name (like C# or F), an octave (telling MicroPython how high or low the note should be played) and aduration (how long it lasts through time). Octaves are indicated by a number 0 is the lowest octave, 4 contains middleC and 8 is about as high as you’ll ever need unless you’re making music for dogs. Durations are also expressed asnumbers. The higher the value of the duration the longer it will last. Such values are related to each other - for instance,a duration of 4 will last twice as long as a duration 2 (and so on). If you use the note name R then MicroPython willplay a rest (i.e. silence) for the specified duration.Each note is expressed as a string of characters like this:NOTE[octave][:duration]For example, "A1:4" refers to the note named A in octave number 1 to be played for a duration of 4.Make a list of notes to create a melody (it’s equivalent to creating an animation with a list of images). For example,here’s how to make MicroPython play opening of “Frere Jaques”:import musictune ["C4:4", "D4:4", "E4:4", "C4:4", "C4:4", "D4:4", "E4:4", "C4:4","E4:4", "F4:4", "G4:8", "E4:4", "F4:4", "G4:8"]music.play(tune)Note: MicroPython helps you to simplify such melodies. It’ll remember the octave and duration values until you nextchange them. As a result, the example above can be re-written as:import musictune ["C4:4", "D", "E", "C", "C", "D", "E", "C", "E", "F", "G:8","E:4", "F", "G:8"]music.play(tune)Notice how the octave and duration values only change when they have to. It’s a lot less typing and simpler to read.1.5.2 Sound EffectsMicroPython lets you make tones that are not musical notes. For example, here’s how to create a Police siren effect:import musicwhile True:for freq in range(880, 1760, 16):music.pitch(freq, 6)for freq in range(1760, 880, -16):music.pitch(freq, 6)16C
The BBC micro:bit is a small computing device for children. One of the languages it understands is the popular Python programming language. The version of Python that runs on the BBC micro:bit is called MicroPython. This documentation includes lessons for teachers and API documentation for developers (check out the index on the left).