Transcription
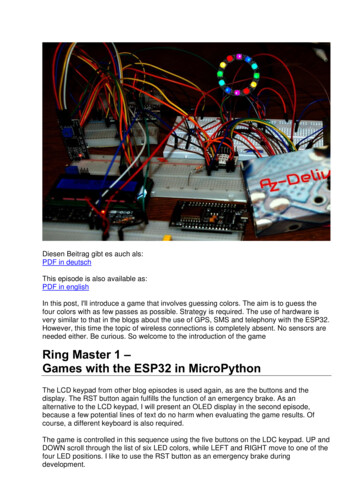
Diesen Beitrag gibt es auch als:PDF in deutschThis episode is also available as:PDF in englishIn this post, I'll introduce a game that involves guessing colors. The aim is to guess thefour colors with as few passes as possible. Strategy is required. The use of hardware isvery similar to that in the blogs about the use of GPS, SMS and telephony with the ESP32.However, this time the topic of wireless connections is completely absent. No sensors areneeded either. Be curious. So welcome to the introduction of the gameRing Master 1 –Games with the ESP32 in MicroPythonThe LCD keypad from other blog episodes is used again, as are the buttons and thedisplay. The RST button again fulfills the function of an emergency brake. As analternative to the LCD keypad, I will present an OLED display in the second episode,because a few potential lines of text do no harm when evaluating the game results. Ofcourse, a different keyboard is also required.The game is controlled in this sequence using the five buttons on the LDC keypad. UP andDOWN scroll through the list of six LED colors, while LEFT and RIGHT move to one of thefour LED positions. I like to use the RST button as an emergency brake duringdevelopment.
Using the emergency brake means terminating the current program precisely withoutrestarting it immediately. The name "reset button" is therefore rather misleading and onlyapplies if you use the keypad shield in the arduino's orbit, where it belongs natively.All objects, variable contents and function definitions created up to the point of cancellationare retained for manual access via REPL, the MicroPython command line. In this way, forexample, functions and program parts can be tested without having to re-enter a wholeseries of imports and declarations, etc. each time. The fact that such tests can be carriedout easily via the REPL command line is a decisive advantage of the MicroPythonenvironment.HardwareA MicroPython program is created for "Ring Master". That means we need a MicroPythoncapable controller. The choice fell on an ESP32, because no large screen like the Raspi,but only an LCD should be controlled. The ESP8266-12F is not available due toinsufficient RAM memory, it lacks a good 1200 bytes. As already mentioned, we aresatisfied with the five keys on the LCD keypad for the time being. The display is operatedvia an I2C parallel adapter, which also adjusts the level from 3.3V on the ESP32 to 5V onthe LCD keypad. There is a built-in module in the MicroPython firmware for the neopixelring, which makes programming child's play. A few comments on the function of the ringfollow below. Its current consumption is around 20mA.1114111ESP32 NodeMCU Module WLAN WiFi Development Board mit CP2102 oder ähnlichLCD1602 Display Keypad Shield HD44780 1602 Modul mit 2x16 ZeichenI2C IIC Adapter serielle Schnittstelle für LCD Display 1602 und 2004Widerstand 10kΩBattery Expansion Shield 18650 V3 inkl. USB KabelLi-Akku Typ 18650LED Ring 5V RGB WS2812B 12-Bit 37mm oder ähnlichThe circuit for "Ring Master 1" is largely taken from the fifth episode of the GPS blog. Ifyou want to use a 5V power supply instead of the battery holder and the Li battery, youhave to connect the 5V to pin 20, Vin, of the ESP32. The 3.3V pin of the ESP32 thensupplies the I2C parallel converter.
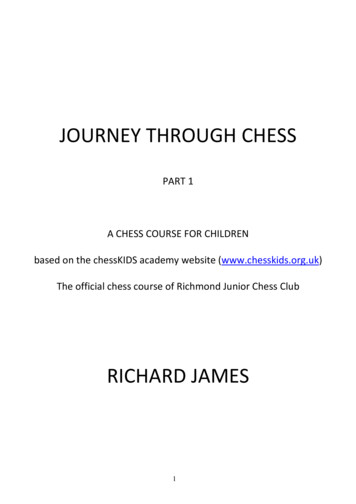
*The supply from a 4.5V block of alkaline cells would be sufficient for the controller board,but the display is not satisfied with that. An extra 5V regulator must be used for supplyvoltages above 5V, because the neopixel ring must not receive more than 5.3V. Old PCpower supplies are very suitable for experimenting because they provide 3.3V and 12V inaddition to 5V.The following figure shows the circuit diagram. A more readable copy in A4 can bedownloaded as a PDF file.
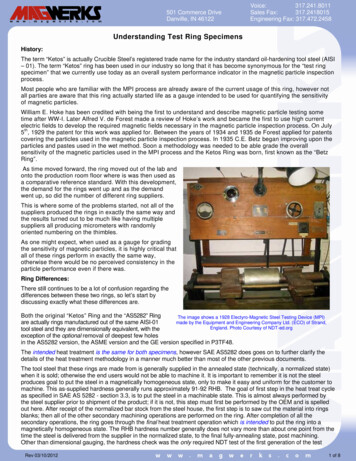
12 Neopixel LEDs of type WS2812B are installed on the LED ring. Power is supplied inparallel. The data line runs serially from one LED unit to the next and represents a specialtype of bus. Each unit contains an RGB LED and a controller that reacts to the firstincoming 24-bit sequence of color information. The signals are generated by amicrocontroller such as the ESP32. 24 bits are generated for each neopixel unit (8 eachfor green, red and blue). The duration for one bit is 1.25µs /- 0.150µs, the transmissionfrequency is thus approx. 800kHz. For a 1 the line is 0.8µs on HIGH and 0.45µs on LOW,a 0 is coded with 0.4µs HIGH and 0.85µs LOW. The first incoming 24 bits are processedby each WS2812B unit, all following bits are amplified and passed on to the next unit. Thesignal sequence from the microcontroller is therefore 24 bits shorter from LED to LED. Incontrast to a conventional data bus, the WS2812B units do not receive the data at thesame time, but with a time delay of 24 bits times 1.25 µs / bit 30 µs.A frame buffer in the RAM of the ESP32 temporarily stores the color values (3 x 256 16.7 million), and the NeoPixel.write () command sends the information over the "bus" thatis attached to a GPIO output (in our case GPIO13 ). Several rings can be cascaded justlike individual LEDs by connecting the input of the next ring to the output of the previousone. The connections are made at the rear, preferably using thin strands. To protect theeyes, I use a maximum brightness level of 32. The total current consumption of the ring isless than 20mA on average. The easiest way to determine the components for the mixedcolors is by experiment using REPL. The brightness of the individual partial LEDs is quitedifferent. The color codes in the tuples will therefore rarely have the same value.
from neopixel import NeoPixel neoPin Pin(13) neoCnt 12 np NeoPixel(neoPin,neoCnt) np[0] (32,16,0) np.write()For comparison, the last two commands are repeated with a different RGB code. Thevalues given here produce "yellow".At full luminosity, the LED units suck 50mA each, which requires a good constant voltagesource and cooling of the ring.Die SoftwareVerwendete Software:Fürs Flashen und die Programmierung des ESP32:Thonny oderµPyCraftVerwendete Firmware:MicropythonFirmwareBitte eine Stable-Version aussuchenMicroPython-Module und g zum LCD-Modulkeypad.py Modul für Tastenfeld-Unterstützung
mcp.py Modul für Porterweiterungsbaustein MCP23017ringmaster1.py HauptprogrammThe development environment - example: ThonnyThonny ist unter MicroPython das Gegenstück zur Arduino-IDE. In Thonny sind einProgrammeditor und ein Terminal sowie weitere interessante Entwicklungstools in einerOberfläche vereint. So haben sie das Arbeitsverzeichnis auf dem PC, das Dateisystem auf demESP32, Ihre Programme im Editor, die Terminalconsole und zum Beispiel den Object inspector ineinem Fenster übersichtlich im Zugriff.The resource for Thonny is the file thonny-3.3.x.exe, the latest version of which can bedownloaded directly from the product page. There you can also get an initial overview of thefeatures of the program.Right-click on Windows and save target as to download the file to any directory of your choice.Alternatively, you can also follow this direct link.In addition to the IDE itself, the Thonny bundle also includes Python 3.7 for Windows and esptool.py.Python 3.7 (or higher) is the basis for Thonny and esptool.py. Both programs are written in Python andtherefore require the Python runtime environment. esptool.py also serves as a tool in the Arduino IDEto transfer software to the ESP32 (and other controllers).Now start the installation of Thonny by double-clicking on your downloaded file, if you only want to usethe software for yourself. If Thonny & Co. is to be available to all users on your computer, you have torun the exe file as administrator. In this case, right click on the file entry in Explorer and select Run asadministrator.Most likely, Windows Defender (or your antivirus software) will answer you. Click on more informationand, in the window that opens, click on Run anyway. Now just follow the user guidance with Next
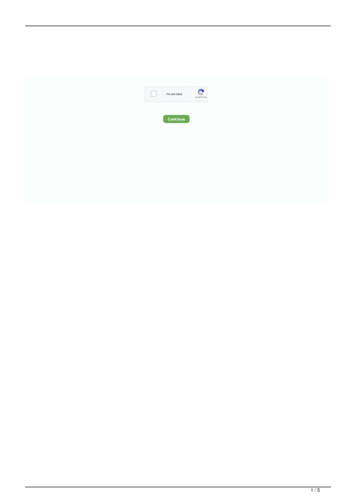
Click on Install to start the installation process.When you start the program for the first time, you specify the language, then the editorwindow is displayed together with the terminal area.
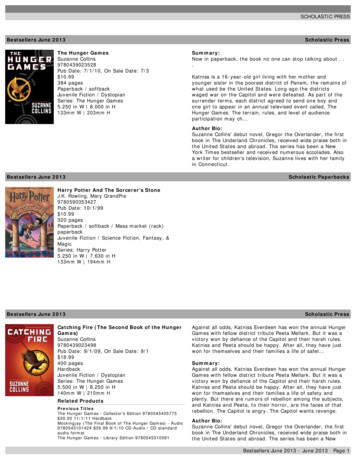
As the first action set the type of controller used. With Run - Select Interpreter you landin the options. For this project, please set Micropython (ESP32).Now download the Micropython firmware for the ESP32 from the selection page and savethis file in a directory of your choice. The bin file must first be transferred to the ESP32.This also happens to Thonny. Call up Thonny Options again with Run - SelectInterpreter . At the bottom right click on Install or update Firmware.
Select the serial port to the ESP32 and the downloaded firmware file. Start the processwith Install. After a short time, the MicroPython firmware is on the controller and you cansend the first commands to the controller via REPL, the MicroPython command line. Forexample, enter the following command in the Terminal window.print("Hallo Welt")Unlike in the Arduino IDE, you can send individual commands to the ESP32 and, if it isMicroPython instructions, it will respond well. On the other hand, if you send a text that isincomprehensible to the MicroPython interpreter, it will alert you to this with an errormessage. print"hallo nochmal"SyntaxError: invalid syntaxTraceback (most recent call last):File " stdin ", line 1SyntaxError: invalid syntax
To work, however, the overview of the workspace and the device directory is still missing. Theworkspace is a directory on the PC in which all files that are important for a project are located.In Thonny his name is This Computer. The device directory is the counterpart on the ESP32.In Thonny it is called MicroPython device. You can display it as follows.Click on View and then click on FilesBoth areas are now displayed, the workspace at the top and the device directory at thebottom. You can display additional tools via the View menu.
We enter our programs in the editor area. For a new program, open an editor window byclicking the New button or by pressing the key sequence Ctrl N.In the Arduino IDE, libraries are recompiled every time the program is compiled andintegrated into the program text. In MicroPython you only have to upload finished modules,they correspond to the libraries of the Arduino IDE, to the flash of the ESP32 at thebeginning. I will show this with an example.Create a project folder on your computer in any directory in Explorer. In this directory youcreate a folder with the name workspace. All further actions start in this directory and allprograms and program parts will live there.The KEYPAD class is required in the project. The text for this is in the keypad.py file. Thebest thing to do is to load all modules into your workspace right away. If you have notalready done so, start Thonny and navigate to your working directory in the "ThisComputer" window. The downloaded files should now appear in the workspace. A rightclick opens the context menu and the process is started by clicking on Upload to /.
If you have changed something on a module, it must be uploaded again, but only this one.Then answer the security question about overwriting with OK.After uploading the first 4 modules it looks like this. The boot.py file in the device directoryis automatically created when the firmware is flashed. At the end, when everything hasbeen tested, we will copy the content of our program into this file. The ESP32 will then runthe program autonomously each time it is started. A connection to the PC is then no longernecessary.
Tricks and Infos on MicroPythonMicroPython is an interpreter language. The main difference to the Arduino IDE, whereyou always and exclusively flash entire programs, is that you only have to flash theMicroPython firmware once at the beginning on the ESP32 before the controllerunderstands MicroPython instructions. You can use Thonny, µPyCraft or esptool.py forthis. For Thonny I have described the process above.As soon as the firmware is flashed, you can have a casual conversation with yourcontroller, test individual commands and immediately see the answer without first havingto compile and transfer an entire program. This is exactly what bothers me about theArduino IDE. You simply save an enormous amount of time if you can do simple tests ofthe syntax and hardware through to trying out and refining functions and entire programparts via the command line before you knit a program out of it. For this purpose I also liketo create small test programs over and over again. As a kind of macro, they combinerecurring commands. From such program fragments, entire applications can develop. Ifthe program is to start autonomously when the controller is switched on, copy the programtext into a newly created blank file. Save this file under boot.py in the workspace andupload it to the ESP32 / ESP8266-01. The program starts automatically the next time it isreset or switched on.
Programs are started manually from the current editor window in the Thonny IDE using theF5 key. This is faster than clicking the start button or using the Run menu. Only themodules used in the program must be in the flash of the ESP32.If you later want to use the controller together with the Arduino IDE again, simply flash theprogram in the usual way. However, the ESP32 / ESP8266 then forgot that it ever spokeMicroPython. Conversely, any Espressif chip that contains a compiled program from theArduino IDE or the AT firmware or LUA can easily be provided with the MicroPythonfirmware. The process is always as described above.Before we start programming the game, I'll briefly introduce you to a few importantMicroPython structures and commands that I used in the program.Data fieldsIn addition to the simple data types such as integers and floating point numbers, strings(aka character strings) and the Boolean values True and False as well as the exotic none,we encounter lists, dicts (dictionaries aka hash arrays) and tuples in the program. Listsreplace the arrays you may know from the Arduino IDE. Both types belong to the iterableobjects. That means you can edit them with the help of loops. We do this at various pointsin the program.So-called slicing allows subsets of lists and strings to be extracted. The ":" is used for thispurpose. Individual elements of a list are addressed by their index. This is the placenumber in the list or the key term in a dict. The following structures appear in our program.The following statement defines a list. Unlike in the Arduino IDE, data of different typescan be combined in a list or a dict.List [34, "Test", 3.1415, [4,5,6]]Indexing: Addressing individual elementsList [2] returns 3.1415, because indexing starts with 0, not with 1Slicing: Cut out a part of the listList [1: 3] returns ["Test", 3.1415], because the 3 limits the range, but is always left out.List [: 2] returns [34, "Test"], because the index 0 does not have to be specified.List [2:] delivers [3.1415, [4,5,6]] thus everything from the 2nd element to the last. Listelements such as [4,5,6] can also be any structure.List [2: -1] returns [3.1415], from the 2nd element to the last onlyList [2: -2] [] from the 2nd element to only the penultimate one. There is nothing left.List [-2] 3.1415, the penultimate elementpalette is a dictionary whose keys are strings. It is written with curly brackets. The valuesfollow the ":", here they are so-called tuples. They are written with round brackets. Eachtuple consists of the three color information for red, green and blue. Commas separate theindividual elements of the tuple. palette ["yellow"] has the value (32,16,0). You can alsosimply print out dicts. However, there is no guarantee that the elements will appear in theorder in which they were defined. With hashlists you have to live with it. palette { # ,16),
,8),"white":(12,12,12),"black":(0,0,0)} palette{'magenta': (16, 0, 8), 'yellow': (32, 16, 0), 'cyan': (0, 16, 8), 'blue': (0, 0, 16), 'white': (12,12, 12), 'black': (0, 0, 0), 'red': (32, 0, 0), 'green': (0, 16, 0)}color is a normal, indexed list. It is defined with square brackets. Lists begin with the index0. color [3] therefore references the fourth entry, the string "yellow".color hite","black",]The color list assigns a unique location number to the color codes. This makes it possibleto address the color codes in the palette in counting loops (for loops) using numbers asindex values in a targeted and reproducible manner. We do this at different points in theprogram.MicroPython behaves similarly to the assignment of simple variables when assigning lists.a 7b aListA [1,2,3,4]ListB ListAb and ListB are not new variables, just new names for the same object. You can check thiswith the help of REPL. a 7 b a a is bTrue id(a)15 id(b)15 ListeA [1,2,3] ListeB ListeA ListeB is ListeA
TrueA look into the object inspector confirms this based on the memory address of ListA andListB.We have to keep this in mind if we really want to create a copy of an object. It's not a bigact for simple variables. As soon as a or b is assigned a new value, the two go theirseparate ways. But we noticed a nasty side effect with lists. ListA [1,2,3] ListB ListA ListA [2] 5 List B.[1, 2, 5] ListA is ListBTrueListA is still identical to ListB. The two names refer to the same memory location. If a listelement is changed under the name ListA, this also affects the name ListB, because bothpoint to the same memory location, the beginning of the list [1,2,5]. In order to really createan independent copy of ListA, all elements must be copied individually. In addition to a forloop, this is much easier with the following notation, which is also used in the program.Such subtleties often seem inexplicable and are often overlooked. ListB ListA [:] ListA is ListBFalsecolors len (color) determines the number of entries in the color list.With a trick called comprehension, you can even get a list or dict to define itself.neoCnt 12.kringle [7 for i in range (neoCnt)]Our neopixel ring has 12 LEDs. The list kringel should contain color information for eachLED as a shadow variable and should be preset with 7, i.e. black ( off). Because thenumber of LEDs can change, we do not define the list with a constant length. range(neoCnt) includes the whole numbers from 0 to 11, because MicroPython always excludesthe upper limit of ranges, as we know. The comprehension7 for i in range (neoCnt)so creates a list with 12 times the 7 as elements. If you change neoCnt to 36, you get a listwith 36 sevens for kringel without changing the program.The following for loop is used in the lightKringel () function to display the currentassignment of kringel.
for i in range(neoCnt):np[i] palette[color[kringel[i]]]As a running index, i runs through the values from 0 to 12. Kringel [i] contains the colorindex 0 to 5. This determines the color string from the list color, which finally fetches thecorresponding tuple as a key from the dict palette. This is finally transferred to the neopixellist np [] with the same index.A central operation should perhaps be briefly discussed before finally programming. Atseveral points in the program, increasing and decreasing indexes is about maintaining therange of values. The color numbers may only be in the range between 0 and 5, the LEDpositions between 0 and 3. So that after cyan comes red immediately and not white orafter black an index error occurs because there is no color with the number 8, a rangecheck must be performed each time the index increases or decreases. Instead ofcumbersome with if and else, I chose the more elegant method of ring addition. Thenormal addition / subtraction paired with the modulo division, which delivers the rest of theoperation instead of the quotient value for an integer division (operator //). Your operator isthe "%" sign.- What do you mean, this is too complicated? - Yes of course, I understand, you preferexamples to general presentation, no problem, well then:13% 6 1, because 13 // 6 2 and therefore remainder 1.5% 6 5 because 5 // 6 0 and remainder 5(3 1)% 6 4, because 4 // 6 0 and remainder 4but:(5 1)% 6 0, because 6 // 6 1 and remainder 0With the addition we stay within the group of numbers from 0 to 5 and after 5 comes 0when counting.This also works with summands other than 1(5 4)% 6 3, because . but you can certainly justify that yourself now.It gets exciting when subtracting.(4-1)% 6 3, of course!but what do we do with this?(0-1)% 6 ? REPL says 5. But why?Actually, this is what happens. To avoid negative numbers, module 6 is added first. I coulddo that several times. Modulo 6, the values 0, 6, 12, . are equivalent, they all have thesame 6's remainder, namely 0. Now you can subtract 1 without going into the negativerange.(0-1)% 6 (0 6-1)% 6 5, because 5 // 6 0 and remainder 5.It is in this form in various places in the program. If you cut out the part of the number lineand bend it into a curl, you have the graphic illustration of the whole. Oh yes, with our LEDring, LED 0, modulo 12, comes after LED number 11.In order for the ringmaster1.py program to be executed, all modules listed above must beuploaded to the ESP32's flash memory. These are the files hd44780u.py, i2cbus.py, lcd.py
and mcp.py. When this is done, we can start the program ringmaster1.py in the editorwindow with F5 - provided the hardware is assembled and the ESP32 is connected to thePC.Here is the listing of the program.# ringmaster1.py# Author: Juergen Grzesina# Revision: 1.1#Score-Bug geloest#Anzeige verdeckter Farben korrigiert#Abbruch durch Taste A eingebaut#kleinere Bugs beseitigt# Stand: 04.06.2021# *******# Importgeschaeft# *******import os,sys# System- und Dateianweisungenimport espesp.osdebug(None)# nervige Systemmeldungen ausimport gc# Platz fuer Variablen schaffengc.collect()#from machine import Pin, I2Cfrom neopixel import NeoPixelfrom keypad import KEYPAD LCD, KEYPAD#from i2cbus import I2CBusfrom time import sleep, time, ticks msfrom lcd import LCDfrom hd44780u import HD44780U, PCF8574U I2C#from button import BUTTON32,BUTTONS## ***************** Objekte declarieren ******************# Pins fuer parallelen Anschluss des 4x4-Padsi2c I2C(-1,scl Pin(21),sda Pin(22),freq 400000)#ibus I2CBus(i2c)disp LCD(i2c,adr 0x27,cols 16,lines 2) # LCDPad am I2C-BuskeyHwadr 0x20 # HWADR des Portexpanders fuer das 4x4-Pad#kp KEYPAD I2C(ibus,keyHwadr) # Hardware Objekt am I2C-Bus#cols (15,5,18,19)#rows (13,12,14,27)#kp KEYPAD P(rows,cols) # HW-objekt mit Parallel-Anschlusskp KEYPAD LCD(pin 35) # LCD-Keypad-Tastatur an ADC35k KEYPAD(kp,d disp) # hardwareunabhaengige MethodenrstNbr 25#rst BUTTON32(rstNbr,True,"RST")
ctrl Pin(rstNbr,Pin.IN,Pin.PULL UP)#t BUTTONS() # Methoden fuer Taster bereitstellenneoPin Pin(13)neoCnt 12np NeoPixel(neoPin,neoCnt)palette { # (0,16,8),"white":(12,12,12),"black":(0,0,0)}color hite","black",]colors len(color)red 0; green 1; blue 2; yellow 3magenta 4; cyan 5; white 6; black 7kringel [7 for i in range(neoCnt)]ready FalsegameState [7,7,7,7]myState gameState[:]positions len(gameState)numberOfTrials 0def lightKringel():for i in range(neoCnt):np[i] palette[color[kringel[i]]]np.write()def clearKringel():global kringelkringel [7 for i in range(neoCnt)]for i in range(neoCnt):np[i] (0,0,0)np.write()sleep(0.03)
def clearRing():for i in range(neoCnt):np[i] (0,0,0)np.write()sleep(0.03)def rainbowKringel(colList,cnt 3,delay 0.3):colors len(colList)cols colList[:]cols.extend([7 for i in range(colors,neoCnt)])colors len(cols)global kringelglobal readyready FalseclearKringel()for m in range(colors):#print(m)for n in range(m 1):kringel[m-n] ep(delay)for m in range (cnt-1):for k in range(neoCnt):h11 kringel[neoCnt-1]for n in range(neoCnt-1):kringel[(neoCnt-1)-n] kringel[(neoCnt-1)-n-1]kringel[0] h11#print(kringel)lightKringel()sleep(delay)ready Truedef dimKringel(delay 0.1,stufen 8,down True):global readyready Falsefor h in range(stufen 1):for i in range(neoCnt):r,g,b palette[color[kringel[i]]]if down:col (r*(stufen-h))//stufenrn (col if h stufen else 0)col (g*(stufen-h))//stufengn (col if h stufen else 0)col (b*(stufen-h))//stufenbn (col if h stufen else 0)else:col (r*(h))//stufenrn (col if h stufen else r)col (g*(h))//stufen
gn (col if h stufen else g)col (b*(h))//stufenbn (col if h stufen else b)np[i] (rn,gn,bn)np.write()sleep(delay)ready Truedef blinkKringel(on 0.3,off 0.7,cnt 1):c cntfor i in range f randomKringel():global kringelkringel [int(i)%7 for i in os.urandom(neoCnt)]lightKringel()def showStatus(stat):for i in range(len(stat)):kringel[i*3] stat[i]lightKringel()def initGame():clearKringel()edge [int(i)%6 for i in os.urandom(4)]#print(edge)for i in range(positions):#np[i*3] palette[color[edge[i]]]print(color[edge[i]],end llow,green,cyan,blue,magenta],\cnt 2,delay 0.03)dimKringel(stufen 8)clearKringel()return edge # goes to gameStatedef startGame():# Keyblock:# Taste Funktion# *Position back (n 9)%12 (n 3)%4# #Position next (n 3)%12 (n 1)%4# AAbbruch# DOK, set myStatusstate [7,7,7,7]clearKringel()getColorStatus(state)
return statedef compareToSolution(mystat):global kringelglobal numberOfTrialsnumberOfTrials 1reply Truefor i in range(positions):kringel[3*i 1] 7if mystat[i] gameState[i]:kringel[3*i 1] gameState[i]reply reply & Trueelif mystat[i] in gameState:kringel[3*i 1] 6reply Falseelse:reply FalselightKringel()sleep(0.3)return replydef getColorStatus(myStat,delay 0.3):ms myStatshowStatus(ms)i 0w ms[i]np[neoCnt-1] .writeAt("up 2, down 0 {}".format(numberOfTrials),0,0)while 1:disp.writeAt("Position {}".format(i),0,1)ch k.asciiKey()if ch ! "\xFF":if ch "*":rp (i*3 (neoCnt-1))%neoCntnp[rp] palette[color[black]]i (i 3)%positions # 1 Position zurueckrp (i*3 (neoCnt-1))%neoCntnp[rp] palette[color[white]]np.write()w ms[i]sleep(delay)elif ch " ":rp (i*3 (neoCnt-1))%neoCntnp[rp] palette[color[black]]i (i 1)%positions # 1 Position vorrp (i*3 (neoCnt-1))%neoCntnp[rp] palette[color[white]]np.write()w ms[i]sleep(delay)
elif ch "\x0d":rp (i*3 (neoCnt-1))%neoCntnp[rp] rn mselif ch "2":w ms[i]w (w 1)%(colors-2) # mod (colors-2) Additionnp[i*3] palette[color[w]]ms[i] wnp.write()sleep(delay)elif ch "0":w ms[i]w (w colors-3)%(colors-2) # mod (colors-2) Subtr.np[i*3] palette[color[w]]ms[i] wnp.write()sleep(delay)elif ch "\x08":print("Game Over")disp.clearAll()disp.writeAt(" GAME OVER",0,0)clearKringel()sleep(delay)sys.exit()if ctrl.value() 0:print("Game Over")disp.clearAll()disp.writeAt(" GAME OVER",0,0)sys.exit()def play(mystat):ms mystatshowStatus(ms)if compareToSolution(ms):disp.clearAll()returnwhile 1:ms getColorStatus(ms)showStatus(ms)vergleich compareToSolution(ms)if vergleich:disp.writeAt("TRIALS: ll()returnsleep(0.5)# *****# ******************** Hauptschleife ********************
# *****disp.clearAll()disp.writeAt("RINGMASTER re 0games 0while True:numberOfTrials 0gameState initGame()clearKringel()disp.writeAt("Start now",0,1)sleep(1)myState startGame() #[1,0,3,1]play(myState)totalScore totalScore numberOfTrialsgames 1disp.clearAll()disp.writeAt("Rounds {}".format(games),0,0)disp.writeAt("Total score {}".format(totalScore),0,1)sleep(1)taste k.waitForKey(0,ascii True)print("Taste",taste)if taste " ":print("Game Over")disp.clearAll()disp.writeAt(" GAME OVER",0,0)sys.exit()disp.clearAll()The main program is very manageable with its 28 lines due to the relocation of the subtasks to the various functions. After the greeting, initGame () creates a new 4-tuple ofcolors that can be guessed. All colors of the game march in and dance 3 rounds.startGame () prompts for the first dance, that is to say, for the first choice of color. Thewhite LED indicates the input position. This is always the next LED next to it in a clockwisedirection. Use the UP and DOWN buttons to scroll through the color scale, and LEFT andRIGHT to move to the next LED position EAST, NORTH, WEST, SOUTH or vice versa.The selection is accepted with SELECT.With the play () function you enter the hot phase of the game. After checking the first colorchoice, which in most cases will probably not report an immediate hit, we are asked tomake another selection. If the check determines that the color sequence of the gameStatematches myState, we have all located the colors correctly - a direct hit. Each correctlyguessed color is indicated by switching on the same color on the LED following clockwise.If the color we have chosen is contained in the solution, but can be found in a differentdirection, then this is communicated to us by the color white. The number of attempts isincreased by 1 with each SELECT. This value is shown in the upper right corner of thedisplay.After finding the agreement for all positions, the program returns from the play () function.The content of the global variable numberOfTrials, the number of attempts, is added tototalScore. This value and the number of game rounds appear in the display. After
pressing (almost) any key, a new game ro
Games with the ESP32 in MicroPython . a 0 is coded with 0.4µs HIGH and 0.85µs LOW. The first incoming 24 bits are processed by each WS2812B unit, all following bits are amplified and passed on to the next unit. The . Python 3.7 (or higher) is the basis for Thonny and esptool.py.