Transcription
1999 Sid XC, SL andXL Owner's Manual
At A Glance Maintenance Interval ChecklistTable of ContentsCheck the following for each maintenance interval. For further details see page 12.EVERY RIDEEIGHT HOURS OF RIDINGONE YEAR OR 100 HOURS OF RIDINGFront wheelClean upper tubesCheck air spring for proper pressureQuick releaseOil upper tubesClean and lube bushings and Resi-wiperCheck for damageCheck crown and reflector bracket boltsClean upper tubes and inspect for damageCable routingCheck brake postsIntroduction . . . . . . . . . . . . . . . . . . . . . . . . . . . . . . . . . . . . . . . . . . . . . . . . . . . . . . . . . . .4Features . . . . . . . . . . . . . . . . . . . . . . . . . . . . . . . . . . . . . . . . . . . . . . . . . . . . . . . . . . . . . . .5Consumer Safety Instructions . . . . . . . . . . . . . . . . . . . . . . . . . . . . . . . . . . . . . . . . . . . . . .6Installation . . . . . . . . . . . . . . . . . . . . . . . . . . . . . . . . . . . . . . . . . . . . . . . . . . . . . . . . . . . .7Tuning . . . . . . . . . . . . . . . . . . . . . . . . . . . . . . . . . . . . . . . . . . . . . . . . . . . . . . . . . . . . . . .9Maintenance . . . . . . . . . . . . . . . . . . . . . . . . . . . . . . . . . . . . . . . . . . . . . . . . . . . . . . . . . . .12Service . . . . . . . . . . . . . . . . . . . . . . . . . . . . . . . . . . . . . . . . . . . . . . . . . . . . . . . . . . . . . . . .15Glossary of Terms . . . . . . . . . . . . . . . . . . . . . . . . . . . . . . . . . . . . . . . . . . . . . . . . . . . . . . .16Exploded Diagrams . . . . . . . . . . . . . . . . . . . . . . . . . . . . . . . . . . . . . . . . . . . . . . . . . . . . . .18Warranty . . . . . . . . . . . . . . . . . . . . . . . . . . . . . . . . . . . . . . . . . . . . . . . . . . . . . . . . . . . . . .21International Distributor List . . . . . . . . . . . . . . . . . . . . . . . . . . . . . . . . . . . . . . . . . . . . . .21Brake padsBrake leversHeadsetTop CapsIMPORTANT: TO MAINTAIN HIGH PERFORMANCE, SAFETY AND LONG LIFE, PERIODICMAINTENANCE IS REQUIRED. PERFORM MAINTENANCE MORE OFTEN IF YOU RIDE INEXTREME CONDITIONS.RockShox Policy On Dual Crown ForksROCKSHOX RECOMMENDS USING CAUTION IN RETROFITTING DUAL CROWN FORKS, SUCH AS THE JUDY XL,JUDY XLC, SID XL AND BOXXER ON TO OLDER BICYCLE FRAMES. DUAL CROWN FORKS ARE LONGER ANDSTIFFER THAN SINGLE CROWN FORKS AND MAY PASS GREATER STRESS TO THE BIKE FRAME THAN SINGLE CROWNFORKS.FRAMESWITH AN "OPTIMIZED TUBE SET" (I.E. BUTTED TUBES FOR THE LIGHTEST WEIGHT) SUCH AS ALIGHTWEIGHT RACING FRAME ARE INAPPROPRIATE FOR USE WITH A DUAL CROWN FORK.ANYQUESTIONS REGARDING WHETHER A PARTICULAR BICYCLE FRAME IS SUITABLE FOR USE WITH A DUALCROWN FORK MAY BE ANSWERED BY CONSULTING THE FRAME MANUFACTURER.PAGE 2PN 950-001770-03, Rev APN 950-001770-03, Rev APAGE 3
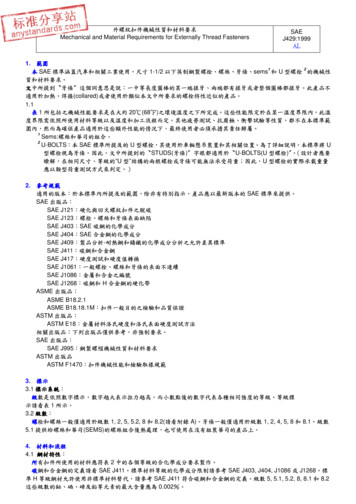
SID Features Ultra-lightweight design One-piece lower tube assembly Externally adjustable dual chamber air spring (compression and negative), easy to tune fordifferent riders. Main air spring pressure from 50 to 90psi and negative air spring pressure from 60 to 170psi fordifferent rider weights and styles Dual adjustable C3 cartridge for compression and rebound damping 28mm diameter ultra-light Easton tapered aluminum upper tubes Super stiff, lightweight Aluminum forged drop crown (SID XC and SL)URGE YOU TO READ IT CAREFULLY, BECOME FAMILIAR WITH Dual crown for increased rigidity on SID XL.ITS CONTENTS, AND FOLLOW OUR RECOMMENDATIONS TO HELP MAKE YOUR Aluminum top cap with Schrader valve for pressurizing the forkBICYCLING EXPERIENCE ENJOYABLE AND TROUBLE FREE. Resi-wiper seals Light-weight construction on steerer, crown and upper tubes.CONGRATULATIONS! YOUIN SUSPENSIONAREMADEOFHAVE PURCHASED THE BESTCOMPONENTS. ROCKSHOXLIGHTWEIGHT,FORKSHIGH-STRENGTHMATERIALS, AND ARE DESIGNED TO BALANCE HIGH PERFORMANCE WITHEASE OF MAINTENANCE. THIS MANUAL CONTAINS IMPORTANT INFORMATIONABOUT THE SAFE INSTALLATION, OPERATION, AND MAINTENANCE OF YOURPURCHASE.WESTANDARD EQUIPMENT PACKAGESSID XC - 63/80mm travelTop CapUpper CrownSID XL - 80/100mm travelSID SL - 63/80mm travelFork StopOPTIONAL EQUIPMENTUpper Fork TubeLower CrownBrake PostOne Piece Fork Braceand Lower TubeAssembly RockShox SID pump with valve adapter 80mm C3 Cartridge Long Travel Kit (XC and SL) 100mm C3Cartridge Long Travel Kit (XL) Air spring service kit Fork boot kitINTENDEDDisc Brake MountUSERockShox SID is designed as an ultra-lightweight, high performance cross country race fork. It is not meantto be raced as a downhill specific fork.Negative Shaft NutCartridge Adjuster KnobPAGE 4PN 950-001770-03, Rev APN 950-001770-03, Rev APAGE 5
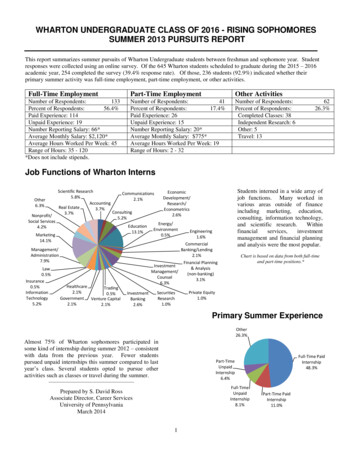
Consumer Safety InformationInstallation Instructions for SID XC and SLRiding a bike is dangerous. Not properly maintaining or inspecting your bike is even more dangerous. It’salso dangerous not to read these instructions.It is extremely important that your RockShox fork is installed correctly by a qualified technician with propertools. Improperly installed forks are extremely dangerous and can result in severe and/or fatal injuries.1. Before riding the bicycle, be sure the brakes are properly installed and adjusted. If the brakes don’twork properly, the rider could suffer serious and/or fatal injuries.2. Use this fork with cantilever-type brakes mounted to the existing mounting posts. Forks with hangerlessstyle braces were only designed for ‘V’- style or hydraulic cantilever brakes. Do not use any cantileverbrake other than those intended by the brake manufacturer to work with a hangerless brace. Do notroute the front brake cable and/or cable housing through the stem or any other mounts or cable stops.Do not use a front brake cable leverage device mounted to the brace. Mount disc style breaks onlythrough the mounting holes provided on the lower tube. Do not use disc-style brakes mounted to theouter lower tube. The lower tubes were not designed to sustain the stresses such brakes or other devicescould place on them, and structural failure to the fork may result. Structural failure could result in lossof control of the bicycle with possible serious and/or fatal injuries.3. Use extreme caution not to tilt the bicycle to either side when mounting the bicycle to a carrier by thefork drop-outs (front wheel removed). The fork legs may suffer structural damage if the bicycle is tiltedwhile the drop-outs are in the carrier. Make sure the front wheel is fastened down with a quick release.Make sure the rear wheel is fastened down when using ANY bike carrier that secures the fork’s dropouts. Not securing the rear can allow the bike’s mass to side-load the drop-outs, causing them to breakor crack. If the bicycle tilts or falls out of its carrier, do not ride the bicycle until the fork is properlyexamined for possible damage. Return the fork to your dealer for inspection or call RockShox if there isany question of possible damage (See International Distributors listed by country on Page 21). A forkleg or drop-out failure could result in loss of control of the bicycle with possible serious and/or fatalinjuries.4. If the fork ever loses oil or if it makes sounds of excessive topping out, stop riding the bicycleimmediately and have the fork inspected by a dealer or call RockShox. Continuing to ride with the forkin either of these conditions could result in loss of control of the bicycle with possible serious and/orfatal injuries.5. Always use genuine RockShox parts. Use of after-market replacement parts voids the warranty andcould cause structural failure to the fork. Structural failure could result in loss of control of the bicyclewith possible serious and/or fatal injuries.1. Remove the existing fork and lower headset race from the bicycle. Measure the length of the forksteerer tube diameter against the length of the RockShox steerer. The RockShox steerer tube may needcutting to the proper length. On threadless steerers (Aheadset design), make sure there is sufficientlength to properly clamp the stem (refer to stem manufacturer’s instructions). Remember to measuretwice and cut once.IMPORTANT: ROCKSHOX FORKS ARE DESIGNED FOR COMPETITIVE OFF-ROAD RIDING AND DO NOT COME WITHTHE PROPER REFLECTORS FOR ON-ROAD USE. YOUR DEALER SHOULD INSTALL PROPER REFLECTORS TO MEETTHE CONSUMER PRODUCT SAFETY COMMISSION’S (CPSC) REQUIREMENTS FOR BICYCLE STANDARDS IF THEFORK IS GOING TO BE USED ON PUBLIC ROADS AT ANY TIME.IMPORTANT: DONOT ADD THREADS TOONE-TIME PRESS FIT.REPLACEMENTROCKSHOXSTEERERS.THESTEERER TUBE CROWN ASSEMBLY IS AOF THE ASSEMBLY MUST BE DONE TO CHANGE LENGTH, DIAMETER, ORHEADSET TYPE (THREADED OR THREADLESS).DO NOT REMOVE OR REPLACE THE STEERER TUBE, THIS COULDRESULT IN LOSS OF CONTROL OF THE BICYCLE WITH POSSIBLE SERIOUS AND/OR FATAL INJURIES.2. Install the headset race (26.4 mm for 1" steerers, 29.9mm for 1-1/8" steerers) firmly against the top ofthe fork crown. Install the fork assembly on the bike. Make sure there are sufficient threads to properlylock the headset in place. On threadless steerers (Aheadset design), make sure there is sufficient lengthto properly clamp the stem (refer to stem manufacturer’s instructions). Adjust the headset so you feelno play or drag.3. Install the brakes according to the manufacturer’s instructions and adjust brake pads properly. Use thefork only with cantilever-type brakes mounted to the existing mounting posts or disc style brakesmounted through the mounting holes provided.4. On threaded steerers, insert stem to a minimum depth according to CPSC and JISstandards. The stem must be inserted to a minimum engaging length not lessthan 2.5 times the stem diameter from the lowest end of the stem, not the wedge(see Fig. 1).5. Fit a brake cable to the RockShox fork brace mount on hangered forks. Do notroute the cable through the stem or any other mounts or cable stops! The cableshould make a direct route from the brake lever to the RockShox fork braceFig.1mount and be able to freely move up and down with the suspension movement.It may be necessary to install a whole new cable. Forks with hangerless style braces were designed for Vtype, hydraulic cantilever brakes or disc style brakes mounted to the tabs provided. Do not use anycantilever brake other than those intended by the brake manufacturer to work with a hangerless brace.NOTE: THEDISTANCE FROM THE TOP OF THE BRAKE CABLE HANGER TO THE BOTTOM OF THE BRACE CABLEHOUSING STOP MUST BE A MINIMUM OF12 MM WITH THE BRAKES APPLIED. AN IMPROPERLY INSTALLED FRONTBRAKE CABLE COULD RESULT IN LOSS OF CONTROL OF THE BICYCLE WITH POSSIBLE SERIOUS AND/OR FATALINJURIES.6. Adjust the front wheel quick release to clear the dropout’s counter bore. The quick release nut must betightened after the wheel is properly seated into the dropouts counter bore. Make sure four or morethreads are engaged in the quick release nut when it is closed. Orient the quick release lever in front ofand parallel to the lower tube in the locked position.7. Keep in mind tire clearance as you choose tires. Maximum tire size is 2.2" wide or 335mm radius. Besure to check this radius whenever you change tires. To do this, remove the spring stack (per instructionson following pages), and compress fork completely to make sure at least 5 mm of clearance exists betweenthe top of the tire and the bottom of the crown. Exceeding this maximum will cause the tire to jamagainst the crown when the forks are fully compressed. The upper tubes must always be fully engaged inPAGE 6PN 950-001770-03, Rev APN 950-001770-03, Rev APAGE 7
the crown. The upper tubes, on clamp type crowns, must not extend above the crown more than 1mm.8. Hangerless Reflector Bracket Installation: Orient black reflector bracket to the front of thefork with the 90 degree bend under the fork brace. Place the .040" thick flat washers onto the hex boltand insert this assembly through the lowest oval hole in the bracket and through hole in brace. Placestar washer and thread nut onto bolt at back of brace. Torque to 60 in-lb. (6.8Nm).Hangered Reflector Bracket Installation: Orient the black reflector bracket with the hookof the bracket facing up and to the fork brace. Place the star washer onto the hex bolt and insert thebolt and star washer through the rear hole on the hook of the bracket. Thread the bolt through the holeon fork brace. Torque to 20in-lb. (2.3Nm).SID XL Installation Instructions1. Remove the existing fork and lower headset race from the bicycle.2. Before you install a XL on the bicycle,verify that the fork has been suppliedShort Upper Crown, Invertedwith the correct upper crown. Refer toFig. 2 for upper crowns available for XLand to maximize fork stiffness byproper selection and orientation of the 136mmupper crown.3. The steerer tube may need cutting toproper length. To cut the steerer tube,removal of the upper tubes are required.Tall Upper CrownThis is necessary otherwise the uppertubes will be in the way when cuttingthe steerer tube to proper length. Thesteerer tube length is determined by the156mm –following parts: XL upper crown steerer172mmclamp length, stem steerer tube clamplength, frame head tube length and topand bottom headset stack height (seeFig. 3). To ease in the assembly, do notFig. 2install the XL upper crown on to theupper tubes until the steerer has beencut to the proper length and the lowercrown has been fastened in the requiredposition. HINT: MEASURE TWICE ANDCUT ONCE!DONOT ADD THREADS TOTHE136mm –156mmExtra Tall Upper CrownREPLACEMENT170MMOF EXPOSED UPPER TUBES ABOVE THE LOWER CROWN, DOING THISOF THE BICYCLE WITH POSSIBLE SERIOUS AND/OR FATAL INJURIES.6. Assemble the headset, upper crown and stem on the bicycle. Adjust the headset so you feel no play ordrag. Complete the installation of the headset and stem according to the manufacturer’s instructions.Torque all the upper crown bolts to 90in-lb.7. Complete the rest of the XL installation by following steps three through seven under "InstallationInstructions (SID XC and SL)," page 7.Tuning Your ForkWhen tuning suspens
SID XL - 80/100mm travel SID SL - 63/80mm travel O PTIONAL E QUIPMENT RockShox SID pump with valve adapter 80mm C3 Cartridge Long Travel Kit (XC and SL) 100mm C3Cartridge Long Travel Kit (XL) Air spring service kit Fork boot kit I NTENDED USE RockShox SID is designed as an ultra-lightweight, high performance cross country .