Transcription
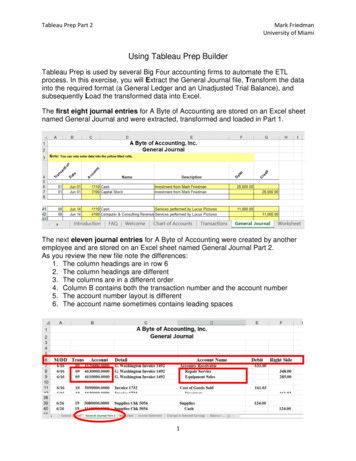
Tableau Prep Part 2Mark FriedmanUniversity of MiamiUsing Tableau Prep BuilderTableau Prep is used by several Big Four accounting firms to automate the ETLprocess. In this exercise, you will Extract the General Journal file, Transform the datainto the required format (a General Ledger and an Unadjusted Trial Balance), andsubsequently Load the transformed data into Excel.The first eight journal entries for A Byte of Accounting are stored on an Excel sheetnamed General Journal and were extracted, transformed and loaded in Part 1.The next eleven journal entries for A Byte of Accounting were created by anotheremployee and are stored on an Excel sheet named General Journal Part 2.As you review the new file note the differences:1. The column headings are in row 62. The column headings are different3. The columns are in a different order4. Column B contains both the transaction number and the account number5. The account number layout is different6. The account name sometimes contains leading spaces1
Tableau Prep Part 2Mark FriedmanUniversity of MiamiEnd with the General LedgerAnd the Unadjusted Trial Balance2
Tableau Prep Part 2Mark FriedmanUniversity of MiamiOpen the flow that we completed in Part 1.Select “File”, “Open”Or Select from “Recent Flows”Step 1: Input Excel fileIf the list of sheets in the file is not visible, click on the name of the file.Double click on “General Journal Part 2”.3
Tableau Prep Part 2Mark FriedmanUniversity of MiamiAfter selecting the sheet “General Journal Part 2” will appear on the “Flow” pane.Sample data for “General Journal Part 2” will be visible on the “Profile” pane.Note: The field “Trans Account” contains two fields, “Transaction” (09) and “Account”(1120) separated by spaces. The spaces are referred to as delimiters. Commondelimiters are commas, dashes, and semicolons.Each space is treated as a separate delimiter. Therefore, we will convert one field intoseveral fields.Click on the plus sign to the right of the “General Journal Part 2”.Select “ Add Step”.4
Tableau Prep Part 2Mark FriedmanUniversity of MiamiStep 2: Split a field.Select the “Trans Account” column by clicking anywhere in the column and a blueborder will appear around the column.Select “Custom Split”.5
Tableau Prep Part 2Mark FriedmanUniversity of MiamiSelect the “Use the separator” box and press the spacebar one time.Click on the drop-down to theright of “First” and select “All”.Select “Split”.There are now six new fields, “Trans Account - Split 1” to “Trans Account - Split 6”.The field “Trans Account - Split 1” contains the transaction number.6
Tableau Prep Part 2Mark FriedmanUniversity of MiamiThe first four characters of the field “TransAccount - Split 6” contains the account number.Step 3: Create a fieldWe are going to create a field consisting of the first four characters of the “TransAccount - Split 6” field.If “Create Calculated Field” is visible select it.If “Create Calculated Field” is not visible, select the three dots above the “Data” pane.Select “CreateCalculated Field”.7
Tableau Prep Part 2Mark FriedmanUniversity of MiamiIn the “Field Name” type “Account”.Type in the formula: Left ([TransAccount – Split 6],4)Select “Save”.8
Tableau Prep Part 2Mark FriedmanUniversity of MiamiStep 4: Deleting and modifying field characteristicsIn order to append the sets of data the “Field Names” and “Types” of “General JournalPart 2” must be the same as those in the data set “General Journal”.Make whatever modifications are needed.1) “Account” is a string so there are no changes.2) “Trans Account – Split 1” has to be renamed “Transaction” and it must be changedto a numeric field.a) Select the field “Trans Account – Split 1”.b) Select “Rename Field”.c) Type “Transaction” and hit “Enter”.d) Select “ABC”.e) Select “Number (whole)”.9
Tableau Prep Part 2Mark FriedmanUniversity of Miami3) “Trans Account – Split 2” through “Trans Account – Split 6” must be removed.a) Select “Trans Account – Split 2, hold down the “shift” key and select “TransAccount – Split 6”.b) Select “Remove Fields”.4) The field “M/DD” must be renamed “Date”.a) Select the field “M/DD”.b) Select “Rename Field”.c) Type “Date” and press “Enter”.10
Tableau Prep Part 25) The field “TransMark FriedmanUniversity of MiamiAccount” must be removed.a) Select “Trans Account”.b) Select “Remove Field”.11
Tableau Prep Part 2Mark FriedmanUniversity of Miami6) The field “Detail” must be renamed “Description”.a) Double click on “Detail”.b) Type “Description” and press “Enter”.7) The field “Account Name” must be renamed “Name”and the extra spaces must be removed.a) Double click on “Account name”b) Type “Name” and press “Enter”.c) Select the three dots in “Name”.d) Select “Clean”.e) Select “Trim Spaces”.12
Tableau Prep Part 2Mark FriedmanUniversity of Miami8) The field “Debit” is correct, and the type is “Number (whole)”. The null must bechanged to a “0”.a) Double click on “null”.b) Type “0” and press “Enter”.9) The field “Right Side” must be changed to “Credit”, the type is “Number (whole)”.The null must be changed to a “0”.a) Double click on “Right Side”.b) Type “Credit” and press “Enter”.c) Double click on “nulld) Type “0” and press “Enter”.13
Tableau Prep Part 2Mark FriedmanUniversity of Miami10) The field “Total Balance” does not exist.a) Select “Create Calculated Field”b) Type in the “Field Name”, “Total Balance”.c) Type in the formula [Debit]-[Credit]d) Select “Save”.14
Tableau Prep Part 2Mark FriedmanUniversity of MiamiThe sets of data the “Field Names” and “Types” of “General Journal Part 2” are thesame as those in the data set “General Journal” and we can combine, union, the twoparts.Step 5: Combine the two streams of dataAs you drag the “Cleaning” step from that we just created to the “Cleaning” step in thefirst stream of data, “General Journal”, an option will be presented to “Join” or “Union”.Drop the “Cleaning” step from the current stream of data into the “Union” area tocombine the two data streams.The two should match one to one. You will see merged columns with two colorindicators from both parts of the flow. If there is a mismatch, verify that the columnnames and datatypes for the two streams are identical.15
Tableau Prep Part 2Mark FriedmanUniversity of MiamiThe result will be a new tile “Union1”.Remove the column “Table Names” created by Union operation.Select the field “Table Names”.Select the three dots.From the pull down select “Remove Fields”.16
Tableau Prep Part 2Mark FriedmanUniversity of MiamiThe field “Transaction” may display in a bar graph format.Select the field “Transaction”.Select the three dots.From the pull down select “Detail”.17
Tableau Prep Part 2Mark FriedmanUniversity of MiamiStep 6: Reorder the fieldsIn the “Data Pane” select the field “Account” and drag it to the first field position.In the Data Pane” select the field “Name” and drag it between the field “Account” andthe field “Transaction”Now the fields are in the order that we need for the General Ledger.18
Tableau Prep Part 2Mark FriedmanUniversity of MiamiStep 7: Disconnect the output “General Ledger” branch and connect it to the“Union”.Right click on the branch leading to the “General Ledger” output tile and select“Remove”Drag the “Union” tile to the left of the “General Ledger” output tile and drop it inthe “Add” area.The “General Ledger” output tile will now be attached to the “Union” tile.19
Tableau Prep Part 2Mark FriedmanUniversity of MiamiStep 8: Disconnect the output “Unadjusted TB” branch and connect it to the“Union”.Right click on the branch leading to the “Unadjusted TB” output tile and select“Remove”Drag the “Union” tile to the left of the “Account Name” tile and drop it in the“Add” area.The “Account Name” output tile will now be attached to the “Union” tile.Select the “Run Flow” for each of the outputs and select “Done” when completed.20
Tableau Prep Part 2Mark FriedmanUniversity of MiamiStep 9: Create the General Ledger from the exported file and add a RunningBalance fieldOpen the “General Ledger.csv” file that was exported on the previous step.Select “Delimited.”Select “My data has headers”.Select “Next”.Select “,”.Select “Finish”.21
Tableau Prep Part 2Mark FriedmanUniversity of MiamiChange the column widths as needed.Sort by “Account” and “Transaction” in “Ascending” order.With the cursor in cell A1, select “Data” and then “Sort”22
Tableau Prep Part 2Mark FriedmanUniversity of MiamiIn the sorting dialog, first select the “Account” field and select the order “Smallest toLargest”. Then click the “Add Level” button on top and do the same for “Transaction”.Press OK.A General Ledger has a running balance within each account. To make RunningBalance calculation, type column header “Running Balance” into the first row of the firstempty column (cell I1).In the cell under header (I2) put in this formula: IF(A2 A1, I1 F2-G2,F2-G2)Copy the formula from cell I2 to the bottom of the data.Delete the “Total Balance” column – it is not needed anymore.23
Tableau Prep Part 2Mark FriedmanUniversity of MiamiStep 10: Transfer the data to the original MF8916.xlsx file1) Copy and Pastea) Open the initial excel file “MF8916.xls”.b) If a sheet “General Ledger” does not exist, name a new sheet “General Ledger”c) Return to the “Unadjusted Trial Balance” file.d) Highlight all the data in the “General Ledger”.e) Select “Copy”.f) Return to the file “MF8916.xls”.g) On the “General Ledger” select “Paste Values”.h) Save the files.2) Move the sheet into the “MF8916.xls” file.a) Right click on the “General Ledger” tab.b) Select “Move or Copy ”.c) Select the name of the original file.d) Scroll till the end and click on “(move to end)”.e) Then click “OK”.f) The “General Journal” has been createdsuccessfully.g) Save” and “Close” the Excel file.24
Tableau Prep Part 2Mark FriedmanUniversity of MiamiStep 11: Create the Unadjusted Trial Balance from the exported file in ExcelDouble click on the file “Unadjusted Trial Balance.csv” file in “File Explorer”.And the file opens in Excel.25
Tableau Prep Part 2Mark FriedmanUniversity of MiamiChange the column widths and with the cursor in cell “A1” select “Data”.Select “A to Z”.26
Tableau Prep Part 2Mark FriedmanUniversity of MiamiStep 12: Transfer the data to the original MF8916.xlsx file3) Copy and Pastea) Open the initial excel file “MF8916.xls”.b) If a sheet “Unadjusted Trial Balance does not exist, name a new sheet“Unadjusted Trial Balance”.c) Return to the “Unadjusted Trial Balance” file.d) Highlight all the data in the “Unadjusted Trial Balance”.e) Select “Copy”.f) Return to the file “MF8916.xls”.g) On the “Unadjusted Trial Balance Sheet” select “Paste Values”.h) Save the files.4) Move the sheet into the “MF8916.xls” file.a) Right click on the “Unadjusted Trial Balance” tab.b) Select “Move or Copy ”.27
Tableau Prep Part 2Mark FriedmanUniversity of Miamic) Select the name of the original file.d) Scroll till the end and click on “(move to end)”.e) Then click “OK”.The Unadjusted Trial Balance has been created successfully.Save” and “Close” the Excel file.28
Tableau Prep Part 2 Mark Friedman University of Miami . 1 . Using Tableau Prep Builder. Tableau Prep is used by several Big Four accounting firms to automate the ETL process. In this exercise, you will . E. xtract the General Journal file, T. ransform the data into the required format (a General Ledger and an Unadjusted Trial Balance), and .