Transcription
THE BENJAMIN INSTITUTE PRESENTSExcerpt from Listen To Your PainAssessment& Treatment ofLow Back PainA BENJAMIN INSTITUTE EBOOKBen E. Benjamin, Ph.D.
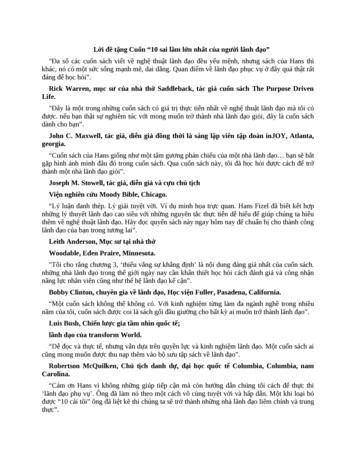
2THERAPIST/CLIENT MANUALThe Low Back and SacrumLow Back Assessment TestsA full assessment of the low back — which distinguishes between disc,ligament, muscle, and other injuries — includes more than 25 assessmenttests, which is beyond the scope of this book. Here I’m focusing onligament injuries, which are among the most common and least knowncauses of chronic low back pain. Damage to ligaments in the low back isindicated by the results of three tests: flexion, extension, and side-flexion.The major indicators differ somewhat among the various ligaments, as I’lldiscuss in the sections that follow. For each of these tests, have the clientbegin in a standing position with the knees straight and the feet a fewinches apart.FlexionTest 1. Flexion—Ask the client to bend forward slowly, stopping if andwhen pain is felt and immediately returning to the upright startingposition. If there was pain, ask the client to point to the area or areas thathurt. With a normal range of motion the person can touch the floor.Test 2. Extension—Ask the client to bend backward from the waist.Again, if there is any pain, have the client stop, return to the startingposition, and point to the place or places that hurt. With a normal rangeof motion the person can bend at least 30 degrees.Tests 3–4. Side-flexion—Ask the client to bend to the side as far aspossible, stopping if there is pain. Be sure the knees remain straight.Take note of where any pain is felt, and then have the client bend tothe opposite side. With a normal range of motion the person’s hand cantouch the side of the knee.ExtensionSide-flexion
3THERAPIST/CLIENT MANUALLow Back Exercise ProtocolThere are two standard exercises that are useful for most of the ligaments in the lowback and sacral area. These movements should cause no pain — only a slight pullingsensation.Sitting Forward BendsSit at the edge of a chair with your legs approximately two and a half feet apart. Claspyour hands together with your arms extended in front of you and slowly bend forward,relaxing your neck so that your head hangs down. As you stretch forward, your handsmake an arc and go under the chair, placing a gentle stretch on the low back ligaments.Keep the motion continuous — when you reach the end of the movement, slowlycome back up to the starting position. Don’t stretch any further than is comfortable.Repeat this movement 40–50 times twice a day or, if possible, three times a day.Sitting forward bend (Position 1)Sitting forward bend (Position 2)Standing Forward BendsStand with your feet a few inches apart. Slowly bend forward,moving your hands in the direction of your toes while keepingyour knees straight. Keep the motion continuous — when youreach the end of the movement, slowly come back up to thestanding position. Stay relaxed and avoid forcing the movement.The purpose of this exercise is to place tension on your low backligaments, not to touch your toes. Over time you will graduallyreach farther down. Do 40–50 repetitions, two or three times a day.(Note: Friction techniques for all of the low back injuriesdescribed below are demonstrated in the DVD The Power ofPrecision: The Low Back (see www.benbenjamin.net).)Standing forward bend
4THERAPIST/CLIENT MANUALSupraspinous Ligament InjuryMajor Indicators:Flexion, sometimes extension and palpation.Exercise Protocol:ABegin with the Sitting Forward Bends described aboveand add the Standing Forward Bends after several weeksif they are easy and painless to do. If neither of these isSupraspinous ligament (A) side viewcomfortable, begin with the more gentle Back Series 1exercises described on page 2.Friction Therapy:Stand at waist level with the client lying in a proneposition. To perform this friction, you can use yourthumb, index finger, or middle finger, whichever is easiestfor you. First palpate the ligaments — friction briefly ateach level with one or two cross-fiber strokes to find theareas of tenderness. They may be in the central portionFriction Therapyof the ligament or at the left or right edges. The mostcommon sites of injury are at L5, L4, and L3. When you find a tender area, applypressure on the ligament at the lateral edge closest to you, and sweep through to theother side. Do this motion repeatedly in one direction and then repeat from the otherside, pulling toward you. Perform friction at the various sites of tenderness for a totalof 5 to 10 minutes, taking breaks as needed.Sacroiliac Ligament InjuryMajor Indicators:Flexion, extension, and sometimes side-flexion andpalpation.Exercise Protocol:Begin with the Sitting Forward Bends and add theStanding Forward Bends after several weeks if they areeasy and painless to do (see page 2). If neither of theseis comfortable, begin with the more gentle Back Series1 exercises described on page 273.Once you’ve been able to perform these two exerciseseasily for a week or so, add the Leg Up Forward Bends(see description on page 4).BCDAThe sacrum (A), the iliac bone or ilium (B),the sacroiliac ligaments (C), and theiliolumbar ligament (D)
5THERAPIST/CLIENT MANUALFriction Therapy:There are thousands of ligament fibers crisscrossingthe sacroiliac joint. They are clearly palpable justmedial to where the lip of the ilium (near the PSIS)overhangs the sacrum. To friction these ligaments,work diagonally across the sacrum in the groovebetween the central extension of the spine and thelateral edge of the sacrum. Use your thumb or yourFriction Therapymiddle, index, and ring fingers to friction acrossthe fibers in one direction at a time. Move to different sections, depending on whereyou find the tender areas. As you perform this friction, you’ll be working through thethoracolumbar fascia, which lies superficial to the ligament fibers.Iliolumbar LigamentMajor Indicators:Side-flexion toward or away from the painful side.Sometimes flexion and/or extension. Pain is felt acrossthe superior ilium, lateral hip, and/or groin.Exercise Protocol:Leg Up Forward Bends is the primary exercise forthis injury. However, it is best to begin with theSitting Forward Bends, add the Standing ForwardBends after a week if they are easy and painless to do,and then add the Leg Up Forward Bends when theycan be done with relative ease.BDACThe sacrum (A), the iliac bone or ilium (B),the sacroiliac ligaments (C), and theiliolumbar ligament (D)Leg Up Forward BendsStand next to a chair or step and place yourfoot on it so that your thigh is at a 90-degreeangle (or less) to the trunk of your body. Thefeet can be turned slightly out or parallelto one another. Now slowly bend forwardtoward your standing foot, so that your handsmove toward the ground on either side ofthat foot. Having the right leg raised placesgreater tension on the right side of yourlow back — especially the right iliolumbarligament and sacrum — and having the leftleg raised places greater tension on the leftside. Repeat this movement 25–50 times oneach side, two or three times per day.Leg up forward ben (Position 1)Leg up forward ben (Position 2)
6THERAPIST/CLIENT MANUALFriction Therapy:Finding the iliolumbar ligament can be verychallenging. This ligament is located just inside thesuperior edge of the anterior lip of the posterioriliac crest. It is attached to the anterior superiorsurface of the ilium, approximately an inch lateraland superior to the posterior superior iliac spineFriction Therapy(PSIS). Because the female pelvis is wider andshallower than the male pelvis, the position of the attachment relative to the PSISdiffers a bit between the sexes (slightly more lateral for females, slightly more superiorfor males). When most people stand and put their hands on their hips, each thumbis either right on the ligament attachment or very close to it. The superficial portionof the iliolumbar ligament is accessible to the finger, but the deep portion is not.Fortunately, the superficial portion is where many of the injuries occur.The most efficient position for frictioning the iliolumbar ligament is standing at thehead of the table on the same side as the area you’ll be working on. Make sure theclient’s head is in a face cradle or turned away from that side. Now lean over theclient’s upper body and place both thumbs on the crest of the ilium, facing each other,approximately one inch lateral and superior to the PSIS. Move your thumbs laterally,while simultaneously pressing down on the ilium (inferiorly) and pressing toward thefloor (anteriorly). Then release your pressure, move back to the starting position, andrepeat the movement. Continue this frictioning for 1–2 minutes. (Over time, graduallyincrease the duration of frictioning to 5 minutes.)Sacrotuberous Ligament InjuryMajor Indicators:Flexion and palpation. Pain is felt in the buttock,down the back of the thigh, and into the calf and heel.Exercise Protocol:Begin with the Sitting Forward Bends described onpage 2 and add the Standing Forward Bends afterseveral weeks if they are easy and painless to do. Ifneither of these is comfortable, begin with the moregentle Back Series 1 exercises described on page 273.BCInjured, sacrotuberous and sacrospinousFriction Therapy:ligaments (B and C)This technique can be performed while the client islying prone or on one side with the knees up. Placeyour thumb or fingertips along the margin of the sacrum, just below the PSIS. Friction
7THERAPIST/CLIENT MANUALagainst the edge of the sacrum, moving gradually down to the superior edge of thecoccyx. This broad attachment is the location of most sacrotuberous lesions. It is veryrare for injury to occur at the ischial attachment.Friction TherapyGluteus MediusMajor Indicator:Resisted abduction of the hip in extension—Have the clientlying on their side with a pillow under the head. Ask them tobring the leg backward, while slightly extending the back. Havethem lift the leg — extending it a bit and bringing it about a footinto abduction. Then offer resistance, making sure they keep theknee straight. When the gluteus medius muscle is injured it isparticularly tender to the touch.Gluteus MediusExercise Protocol:Begin with the Sitting Forward Bends, add the StandingForward Bends after several weeks if they are easy and painlessto do (see page 2), and then move to the Leg Up ForwardBends (page 4). If none of these is comfortable, begin with themore gentle Back Series 1 exercises described on page 273.Friction Therapy:Facing the side of the table, place your thumb pad or thumbtip at the medial edge of the gluteus medius muscle, about an inchor two from the iliac crest. Have the thumb oriented toward theanterior pelvis, with the thumb pad facing the floor. To performthe friction, lean into your thumb and slowly move down(anteriorly) toward the table. Move to different sections of themuscle, frictioning any tender spots. Alternatively, you can reachacross the table and use your fingertips to friction. In this case,you will begin the movement at the lateral edge of the gluteusmedius, applying pressure and pulling upward (posteriorly)toward yourself. Friction for a minute or so in each area. Thismuscle can have multiple lesions, and can be very tender.Resisted abduction of the hipFriction of the gluteus medius muscle
8THERAPIST/CLIENT MANUALGluteus MaximusMajor Indicator:Resisted extension of the hip (with knee bent)—Ask the client to leanforward over the end of the table and place their chest on the table.Then have them lift the leg as high as possible, with the knee bent at 90degrees. Place your hand on the sole of the foot and ask the person toraise the leg into the air as you offer equal and opposite force.AGluteus MaximusExercise Protocol:Normal activities are sufficient to strengthen this muscle.Friction Therapy:With the client lying prone, stand at the side of the table, facingup toward the client’s head. Now place the fingertips of bothhands on the gluteus maximus muscle, in the area that is painful.Lean into your fingers and slowly move laterally in a diagonaldirection, so that your friction strokes are almost perpendicularto the muscle fibers. Move to different sections of the muscle,frictioning each tender area for a minute or so. This muscle mayhave multiple lesions.Resisted extension of the hip (with knee bent)Friction of gluteus maximus muscle
Low Back Assessment Tests A full assessment of the low back — which distinguishes between disc, ligament, muscle, and other injuries — includes more than 25 assessment tests, which is beyond the scope of this book. Here I'm focusing on ligament injuries, which are among the most common and least known causes of chronic low back pain.