Transcription
WebAdvisorStep by StepRegistration Instructionsfor Students
Login First
Login ID & PasswordTo view your personal records, you must enter alogin ID and password.Login ID:Password:Your login ID is in this format:firstname.lastname(no capital letters).Example: john.smith The first time you log in toWebAdvisor, your password willbe your 6-digit birth date.(January 1, 1993 010193) You will be asked to set a newpassword. Be sure to write it down.
Log In Takes You HereFill in your User ID and PasswordForgot your password click on “Show Hint”
Remember your Password If you forgot your password and selected hint as seen on previous slide youwill come to this page. We encourage you to use the password “hint” in case you lose or forget yourpassword in the future. You decide what the password hint is. Do not give your login ID or password to anyone. Keep your login ID andpassword in a safe place.
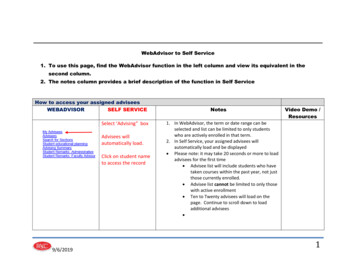
The Student Menu From the Student Menu you can access your academic andfinancial information. You can also register for classes and pay your bill online.
Registration: Important Features To check the schedule go toSearch for Sections. To register go toRegister for Sections. Register and Drop Sectionsallows you to drop sectionsyou have already registeredfor and add new ones. My Restrictions lists anyregistration holds.– You may have a financialhold, admissions hold, healthhold, judicial hold or advisorhold.
Your Academic Profile Grades shows your midterm and finalgrades for each term. Transcript shows your final grades forall courses you have taken and yourcumulative GPA. Program Evaluation shows yourprogress in fulfilling your degreerequirements. Test Summary shows your SAT/ACTscores and Accuplacer placementscores. Go to My Class Schedule to view andprint your class schedule. My Profile shows your advisor andmajor.
Registration: Step 1 Are you eligible to register?Check My Restrictions.Normally you should seeCannot Register : You must seeyour advisor prior to registrationThis just means that you mustsee your advisor before you canregister.Don’t forget to pay your bills.You will not be able to register ifyou are not up to date on yourpayments.Step 1:Go to Register for Sections
Registration: Step 2 Go to Search and Register for Sections if you need to look up class sections to add to yourPreferred Sections.Go to Express Registration if you already know what sections you want to add to yourPreferred Sections.Go to Register for Previously Selected Sections to see what is currently in your PreferredSections.
Registration: Step 3aSearch /Register for Sections Select the Term Select the Subject foreach course you wantto add. Type in the coursenumber if you know it. Or you can select thelevel. This will bring upall 100 level biologycourses. If you select only thesubject, you will see allthe courses for thatsubject.When your list is done,clickone time only.
Registration: Step 3bExpress Registration: Enter Synonym /(Course Number,Section Number) andTerm for each courseyou want to addWhen your list is done,clickone time onlyClick here to continue.
Registration Step 4 All the sections for the courses you selected will come up showing thedays and times for each section. Click in the box on the left-hand side to select the sections you want. Clickonce you have selected your sections. You can go back andselect other courses later if needed.
Registration Step 4 (contd) BIO 101 is the course number. There are four sections – 01, 02,03 & 04. BIO 101L is the optional lab for this course. Human Biology is the course title. Click on the blue number &title to access the course description, prerequisites etc.
Registration: Step 5 Preferred Sections -this is your registrationrequest areaIndicate an Action forall sections or forindividual sections inpreferred sections list(not both)You can also DROP aclass that you arecurrently enrolled in.Courses will stay inyour PreferredSections folder untilyou are ready toregister.Be sure toonlywhen you are done.
Registration: Step 5 (contd) WebAdvisor will indicateany problems with yourregistration request.Read each messagecarefully and respond withthe appropriate ACTIONfor each class.Leave the action box blankfor any section that cannotbe registered.Be sure towhenyou are done (one timeonly)
Registration: Step 6This is your receipt. The first part shows what justoccurred The middle part lists all theclasses you are currentlyregistered for The last part lists waitlistedclasses; however, we are notcurrently using Waitlisting.
What’s Next?You decide where to gofrom here: Go to Student Menuto:– Select and Register formore classes– Drop classes– View and print yourschedule
View Other InformationFrom WebAdvisorStudents Menu: View and pay yourbill. View your financialaid statement.Click here to continue.
We hope you find WebAdvisor a convenientand useful way to register for classes.For assistance, call the I.T. Departmenthelp line at (484) 365-8134.To exit this presentation,close your browser by clicking on theX box in upper right corner.www.webadvisor.lincoln.edu
WebAdvisor will indicate any problems with your registration request. Read each message carefully and respond with the appropriate ACTION for each class. Leave the action box blank for any section that cannot be registered. Be sure to when you are done (one time only) Registration: Step 5 (contd)