Transcription
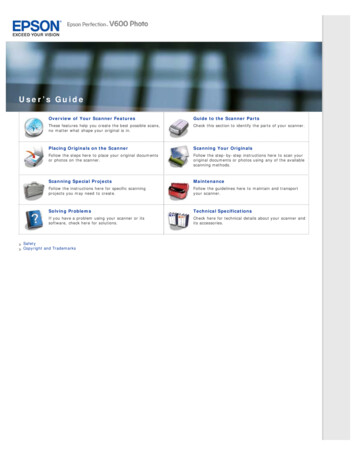
User’s GuideOverview of Your Scanner FeaturesGuide to the Scanner PartsThese features help you create the best possible scans,no matter what shape your original is in.Check this section to identify the parts of your scanner.Placing Originals on the ScannerScanning Your OriginalsFollow the steps here to place your original documentsor photos on the scanner.Follow the step- by- step instructions here to scan youroriginal documents or photos using any of the availablescanning methods.Scanning Special ProjectsMaintenanceFollow the instructions here for specific scanningprojects you may need to create.Follow the guidelines here to maintain and transportyour scanner.Solving ProblemsTechnical SpecificationsIf you have a problem using your scanner or itssoftware, check here for solutions.Check here for technical details about your scanner andits accessories.SafetyCopyright and Trademarks
Home Overview of Your Scanner FeaturesOverview of Your Scanner FeaturesThese features help you create the best possible scans, no matter what shape your original is in.Color RestorationDust RemovalDIGITAL ICE TechnologyBacklight CorrectionText Enhancement
Home Guide to the Scanner PartsGuide to the Scanner PartsCheck these sections to identify the parts of your scanner.Scanner PartsLights and Buttons
Home Placing Originals on the ScannerPlacing Originals on the ScannerFollow the steps here to place your original documents or photos on the scanner.Placing Documents or PhotosPlacing Film or Slides
Home Scanning Your OriginalsScanning Your OriginalsFollow the step-by-step instructions here to scan your original documents or photos using any of the available scanningmethods.Scanning with Epson ScanStarting Epson ScanSelecting an Epson Scan ModeChanging the Scan ModeScanning in Full Auto ModeScanning in Office ModeScanning in Home ModeScanning in Professional ModeSelecting File Save SettingsDetailed Setting InstructionsFinishing the ScanScanning with Easy Photo ScanScanning with Easy Photo Scan
Home Scanning Special ProjectsScanning Special ProjectsFollow these instructions for specific scanning projects you may need to create.Restoring ColorRemoving Dust Marks with the Dust Removal FeatureRemoving Dust and Scratch Marks from Originals Using DIGITAL ICE TechnologyFixing Backlit PhotosText EnhancementUsing the Scanner as a CopierScanning to a PDF FileScanning Directly to an E-mailConverting Scanned Documents Into Editable TextScanning Accurate Color ImagesAssigning a Program to a Scanner Button
Home MaintenanceMaintenanceFollow the guidelines here to maintain and transport your scanner.Cleaning the ScannerReplacing the Scanner Light SourcePower Off Timer SettingTransporting the Scanner
Home Solving ProblemsSolving ProblemsTroubleshootingIf you have a problem using your scanner or its software, check here for solutions.Scanner ProblemsScanning ProblemsScan Quality ProblemsUninstalling Your Scanning SoftwareWhere To Get HelpEpson Technical Support
Home Technical SpecificationsTechnical SpecificationsCheck here for technical details about your scanner and its accessories.System RequirementsScanner SpecificationsNote:Epson offers a recycling program for end of life products. Please go to www.epson.com/recycle for informationon how to return your products for proper disposal.
Home SafetyImportant Safety InstructionsRestrictions on CopyingRead all these instructions, and follow all warnings and instructions marked on the scanner.In this document, warnings, cautions, and notes indicate the following:Warningsmust be followed carefully to avoid bodily injury.Cautionsmust be observed to avoid damage to your equipment.Notescontain important information and useful tips on the operation of this product.Place the scanner close enough to the computer for the interface cable to reach it easily. Do not place or store thescanner or the AC adapter outdoors, near excessive dirt or dust, water, heat sources, or in locations subject toshocks, vibrations, high temperature or humidity, direct sunlight, strong light sources, or rapid changes in temperatureor humidity. Do not use with wet hands.Place the scanner and the AC adapter near an electrical outlet where the adapter can be easily unplugged.Caution:Be sure the AC power cord meets the relevant local safety standards.The AC power cord should be placed to avoid abrasions, cuts, fraying, crimping, and kinking. Do not place objects ontop of the AC power cord and do not allow the AC adapter or the power cord to be stepped on or run over. Beparticularly careful to keep the AC power cords straight at the end and the point where it enters the AC adapter.Use only the AC adapter that comes with your scanner. Using any other adapter could cause fire, electrical shock, orinjury.The AC adapter is designed for use with the scanner with which it was included. Do not attempt to use it with otherelectronic devices unless specified.Use only the type of power source indicated on the AC adapter’s label, and always supply power directly from astandard domestic electrical outlet with the AC adapter that meets the relevant local safety standards.When connecting this product to a computer or other device with a cable, ensure the correct orientation of theconnectors. Each connector has only one correct orientation. Inserting a connector in the wrong orientation maydamage both devices connected by the cable.Avoid using outlets on the same circuit as photocopiers or air control systems that regularly switch on and off.If you use an extension cord with the scanner, make sure the total ampere rating of the devices plugged into theextension cord does not exceed the cord’s ampere rating. Also, make sure the total ampere rating of all devicesplugged into the wall outlet does not exceed the wall outlet’s ampere rating.Never disassemble, modify, or attempt to repair the AC adapter, scanner, or scanner option by yourself except asspecifically explained in the scanner’s guides.Do not insert objects into any opening as they may touch dangerous voltage points or short out parts. Beware ofelectrical shock hazards.If damage occurs to the plug, replace the cord set or consult a qualified electrician. If there are fuses in the plug,make sure you replace them with fuses of the correct size and rating.Unplug the scanner and the AC adapter, and refer servicing to qualified service personnel under the followingconditions: The AC adapter or plug is damaged; liquid has entered the scanner or the AC adapter; the scanner or the
AC adapter has been dropped or the case has been damaged; the scanner or the AC adapter does not operatenormally or exhibits a distinct change in performance. (Do not adjust controls that are not covered by the operatinginstructions.)Unplug the scanner and the AC adapter before cleaning. Clean with a damp cloth only. Do not use liquid or aerosolcleaners.If you are not going to use the scanner for a long period, be sure to unplug the AC adapter from the electrical outlet.Restrictions on CopyingObserve the following restrictions to ensure responsible and legal use of your scanner.Copying of the following items is prohibited by law:Bank bills, coins, government-issued marketable securities, government bond securities, and municipal securitiesUnused postage stamps, pre-stamped postcards, and other official postal items bearing valid postageGovernment-issued revenue stamps, and securities issued according to legal procedureExercise caution when copying the following items:Private marketable securities (stock certificates, negotiable notes, checks, etc.), monthly passes, concession tickets,etc.Passports, driver’s licenses, warrants of fitness, road passes, food stamps, tickets, etc.Note:Copying these items may also be prohibited by law.A note concerning responsible use of copyrighted materialsEpson encourages each user to be responsible and respectful of the copyright laws when using any Epson product. While somecountries' laws permit limited copying or reuse of copyrighted material in certain circumstances, those circumstances may notbe as broad as some people assume. Contact your legal advisor for any questions regarding copyright law.Default Delay Times for Power Management for Epson productsThis product will enter sleep mode after a period of nonuse. The time interval has been set at the factory to ensure that theproduct meets Energy Star standards of energy efficiency, and cannot be modified by the consumer.Restriction on disassembling and decompilingYou may not disassemble, decompile or otherwise attempt to derive the source code of any software included with thisproduct.Top
Home Copyright and TrademarksCopyright and TrademarksNo part of this publication may be reproduced, stored in a retrieval system, or transmitted in any form or by any means,electronic, mechanical, photocopying, recording, or otherwise, without the prior written permission of Seiko Epson Corporation.No patent liability is assumed with respect to the use of the information contained herein. Neither is any liability assumed fordamages resulting from the use of the information contained herein.Neither Seiko Epson Corporation nor its affiliates shall be liable to the purchaser of this product or third parties for damages,losses, costs, or expenses incurred by the purchaser or third parties as a result of: accident, misuse, or abuse of this productor unauthorized modifications, repairs, or alterations to this product.Seiko Epson Corporation and its affiliates shall not be liable against any damages or problems arising from the use of anyoptions or any consumable products other than those designated as Original Epson Products or Epson Approved Products bySeiko Epson Corporation.EPSON and Perfection are registered trademarks and EPSON Exceed Your Vision is a registered trademark of Seiko EpsonCorporation.Microsoft , Windows , and Windows Vista are registered trademarks of Microsoft Corporation.Adobe , Adobe Reader , Acrobat , and Photoshop are registered trademarks of Adobe Systems Incorporated.Apple , ColorSync , and Macintosh are registered trademarks of Apple Inc.ABBYY and ABBYY FineReader names and logos are registered trademarks of ABBYY Software House.PRINT Image Matching and the PRINT Image Matching logo are trademarks of Seiko Epson Corporation.Intel is a registered trademark of Intel Corporation.Epson Scan Software is based in part on the work of the Independent JPEG Group.libtiffCopyright 1988-1997 Sam LefflerCopyright 1991-1997 Silicon Graphics, Inc.Permission to use, copy, modify, distribute, and sell this software and its documentation for any purpose ishereby granted without fee, provided that (i) the above copyright notices and this permission notice appear in allcopies of the software and related documentation, and (ii) the names of Sam Leffler and Silicon Graphics maynot be used in any advertising or publicity relating to the software without the specific, prior written permissionof Sam Leffler and Silicon Graphics.THE SOFTWARE IS PROVIDED "AS-IS" AND WITHOUT WARRANTY OF ANY KIND, EXPRESS, IMPLIED OROTHERWISE, INCLUDING WITHOUT LIMITATION, ANY WARRANTY OF MERCHANTABILITY OR FITNESS FOR APARTICULAR PURPOSE.IN NO EVENT SHALL SAM LEFFLER OR SILICON GRAPHICS BE LIABLE FOR ANY SPECIAL, INCIDENTAL, INDIRECTOR CONSEQUENTIAL DAMAGES OF ANY KIND, OR ANY DAMAGES WHATSOEVER RESULTING FROM LOSS OF USE,DATA OR PROFITS, WHETHER OR NOT ADVISED OF THE POSSIBILITY OF DAMAGE, AND ON ANY THEORY OFLIABILITY, ARISING OUT OF OR IN CONNECTION WITH THE USE OR PERFORMANCE OF THIS SOFTWARE.Digital ICE is a trademark of Kodak.General Notice: Other product names used herein are for identification purposes only and may be trademarks of theirrespective companies.This information is subject to change without notice.4/15 2015 Epson America, Inc.CPD-27477R4
Home Overview of Your Scanner FeaturesColor RestorationUsing the Color Restoration feature in Epson Scan, you can transform an old, faded, or badly exposed photo into one withtrue-to-life color and sharpness.Original imageFor instructions on using this feature, see Restoring Color.Color Restoration applied
Home Overview of Your Scanner FeaturesDust RemovalUsing the Dust Removal feature in Epson Scan, you can virtually “clean” the dust marks from your originals as you scanthem.Original imageDust Removal appliedFor instructions on using this feature, see Removing Dust Marks with the Dust Removal Feature.
Home Overview of Your Scanner FeaturesDIGITAL ICE TechnologyYour scanner and its Epson Scan software are equipped with the DIGITAL ICE Technology feature that removes dust orscratch marks from your originals.Original imageDIGITAL ICE Technology appliedDIGITAL ICE Technology can remove dust marks that the Dust Removal feature cannot. However, it takes longer to scan usingDIGITAL ICE Technology and also uses more of your system resources. It is best to try removing dust marks using DustRemoval before using DIGITAL ICE Technology.For instructions on using this feature, see Removing Dust and Scratch Marks from Originals Using DIGITAL ICE Technology forinstructions.
Home Overview of Your Scanner FeaturesBacklight CorrectionUsing the Backlight Correction feature in your scanning software, you can remove shadows from photos that have too muchbackground light.Original imageFor instructions on using this feature, see Fixing Backlit Photos.Backlight Correction applied
Home Overview of Your Scanner FeaturesText EnhancementWhen you scan documents, you can sharpen the text and increase accuracy by using the Text Enhancement feature in EpsonScan.OriginalText Enhancement: OffFor instructions on using this feature, see Text Enhancement.Text Enhancement: On
Home Guide to the Scanner PartsScanner Partsa. scanner covera. document matb. document tablec. carriage (in the document table)
a.b.c.d.Power switchDC inlettransportation lockUSB interface connectora. transparency unit window
Home Guide to the Scanner PartsLights and ButtonsLightsButtonsNote:Your product may look different from the illustrations in this guide, but the instructions are the same.The scanner has four buttons for scanning operations. The Status lights indicate whether the scanner is operating normally.a. Status lightsb.PDF buttonc.E-mail buttond.Copy buttone.Start buttonLightsThe green and orange status lights are on the left of geBlueFlashingFlashingPDF button and the blue status light is on the bottom of the fourMeaningPower is on.Entering power saving mode.An error has occurred. See The Status Light Is Flashing for more information.Initializing or scanning.
(None)OffThe scanner is off.TopButtonsBefore using the scanner buttons, make sure you have installed Epson Scan.ButtonFunctionStartEpson Scan starts.CopyCopy Utility starts.E-mailEpson Scan automatically scans, then the Send File Via E-mail window appears.PDFThe Scan to PDF window appears.See Using the Scanner Buttons.Top
Home Placing Originals on the ScannerPlacing Documents or PhotosPlacing Documents or Photos on the Document TablePlacing Large or Thick DocumentsCaution:Do not place heavy objects on the document table glass and do not press the glass with too much force.Placing Documents or Photos on the Document TableOpen the scanner cover.Make sure the document mat is installed inside the cover. If it is not installed, see Replacing the Document Mat forinstructions.a. document matPlace your document or photo facedown on the document table. Make sure the upper right corner of the document orphoto is against the corner of the scanner, next to the arrow mark.
Note:If you are scanning multiple photos at once, position each photo at least 20 mm (0.8 inch) apart from theothers.Close the scanner cover gently so that your original does not move.Note:Always keep the document table clean.Do not leave photos on the document table for an extended period of time as they may stick to theglass.
To start scanning, see Starting Epson Scan for instructions.TopPlacing Large or Thick DocumentsWhen you scan a large or thick document, you can pull the scanner cover straight up.Place a large or thick document on the document table.Close the document cover and hold it down firmly as you scan.Top
Home Placing Originals on the ScannerPlacing Film or SlidesRemoving the Document MatPlacing Film in the HolderPlacing Slides in the HolderReplacing the Document MatRemoving the Document MatTo scan film strips or slides, you need to remove the document mat from the scanner cover. This uncovers the transparencyunit window so your scanner can use it to scan your film or slides.Open the scanner cover and gently slide up the document mat to remove it.Use a soft cloth to wipe the transparency unit window and the document table before placing your film or slides.
a. transparency unit windowTo place film for scanning, see Placing Film in the Holder.To place slides for scanning, see Placing Slides in the Holder.To replace the document mat, see Replacing the Document Mat.TopPlacing Film in the HolderPlacing 35 mm Film StripsOpen the cover of the 35 mm film strip holder.Slide one or two film strips all the way into the film holder with the shiny base side facing down. Your images and anywording on the film strips should appear backwards on the side that faces up.
Note:Hold the edge of the film gently or use gloves to touch the film; otherwise you may damage the film.Make sure the white stickers on the back of the film holder and the areas around them are notscratched, dusty, or covered in any way. If the areas are obscured, the scanner may have troublerecognizing your film in Full Auto Mode.Do not cover the small holes in the film holder.Make sure the film strip is placed as shown.Close the cover and press it down until you hear a click. Then press down on all the edges of the covers to secure them.Place the film holder on the document table so that it is aligned as shown. Make sure the tab labelled “A” on the filmholder fits into the area labelled “A” on the scanner.
Make sure you removed the document mat. See Removing the Document Mat.Close the scanner cover.To scan your film, see Starting Epson Scan.When you are finished scanning film, be sure to replace the document mat before scanning documents or photos. SeeReplacing the Document Mat.Placing Medium Format FilmOpen the cover on the medium format film holder.Slide one medium format film image into the film holder with the shiny base side facing down. Your image and anywording on the film should appear backwards on the side that faces up. Make sure the entire image frame is positionedin the film holder opening.Note:Hold the edge of the film gently or use gloves to touch the film; otherwise you may damage the film.Do not cover any of the tiny holes in the film holder or the scanner may have trouble recognizingwhich film holder you are using.
Make sure the film strip is placed as shown.Close the cover over the film and press it down until it clicks. Then press down on all the edges of the cover to secure it.Place the film holder on the document table so that it is aligned with the upper left corner. Make sure the tab labelled“B” on the film holder fits into the area labelled “B” on the scanner.Make sure you removed the document mat. See Removing the Document Mat.Close the scanner cover.
Note:You cannot use Full Auto Mode to scan medium format film.When you are finished scanning film, be sure to replace the document mat before scanning documents or photos. SeeReplacing the Document Mat.Using the scanning support sheetWhen the film is curled, flatten the film using the scanning support sheet that came with the medium format film holder.Caution:Keep at least 2 mm space between the image frame and scanning support sheet.Make sure that the glossy side contacts with the film surface. When you set the scanning supportsheet upside down, it may damage the film.When the film is curled downwards:Place the scanning support sheet under the film with glossy surface facing up. Then, close the holder cover.When the film is curled upwards:Place the scanning support sheet on the film with glossy surface facing down. Then, close the holder cover.TopPlacing Slides in the HolderYou can scan up to four 35 mm slides at a time using the slide portion of the film holder.
Note:Make sure the white stickers on the back of the film holder and the areas around them are notscratched, dusty, or covered in any way. If the areas are obscured, the scanner may have troublerecognizing your slides in Full Auto Mode.Do not cover the small holes on the film holder.Place the film holder on the document table so that it is aligned as shown. Make sure the tab labelled “C” on the filmholder fits into the area labelled “C” on the scanner.Place up to four slides in the film holder with the shiny base side facing down. Your images should appear backwards onthe side that faces up. Your images should be oriented as shown.Note:
Make sure you place the long edge of the slide in the film holder as shown above.Make sure you removed the document mat. See Removing the Document Mat.Close the scanner cover.To scan your slides, see Starting Epson Scan.When you are finished scanning slides, be sure to replace the document mat before scanning documents or photos. SeeReplacing the Document Mat.TopReplacing the Document MatReplace the document mat by sliding it into the notches in the scanner cover. Make sure the white surface faces outwards.Top
Home Scanning Your OriginalsStarting Epson ScanUsing the Scanner ButtonsUsing the Epson Scan IconUsing the Scanner Buttonsa.PDF buttonb.E-mail buttonc.Copy buttond.Start buttonYou can start Epson Scan just by pressing theStart button on the scanner. The Epson Scan window automatically opens.See Selecting an Epson Scan Mode for instructions on selecting an Epson Scan mode.You can also start scanning by pressing the following buttons on the scanner.PDF button lets you scan multiple originals and save them as one PDF file on your computer. See Scanning to aPDF File for instructions.E-mail button lets you scan and attach the image file to an e-mail message. See Scanning Directly to an E-mailfor instructions.Copy button lets you use your scanner along with a printer connected to your computer just like you would use acopy machine. See Using the Scanner as a Copier for instructions.TopUsing the Epson Scan IconYou can start Epson Scan by double-clicking the Epson Scan icon.Windows 8:Double-click the Epson Scan icon on the desktop.Or, navigate to the Start screen Epson Scan.
Windows 7/Vista/XP:Double-click the Epson Scan icon on the desktop.Or, select the start button icon or Start All Programs or Programs Epson Epson Scan Epson Scan.Mac OS X:Select Applications Epson Software Epson Scan.The Epson Scan window automatically opens. See Selecting an Epson Scan Mode for instructions on selecting an Epson Scanmode.Note:You can use any TWAIN-compliant scanning program, such as ArcSoft PhotoStudio, to scan with your scanner.When you are finished scanning, the scanned image opens in your scanning program so you can modify,print, and save it.Top
Home Scanning Your OriginalsSelecting an Epson Scan ModeEpson Scan offers several scanning modes to choose from.Full Auto Mode lets you scan quickly and easily, without selecting any settings or previewing your image. Full AutoMode is best when you need to scan your originals at 100% size and you do not need to preview the images beforescanning. You can restore faded colors or remove dust marks in Full Auto Mode. This is the default mode in EpsonScan.See Changing the Scan Mode for instructions on switching to Full Auto Mode.See Scanning in Full Auto Mode for instructions on making settings in Full Auto Mode.Office Mode lets you quickly select settings for scanning text documents and check their effects with a previewimage.See Changing the Scan Mode for instructions on switching to Office Mode.See Scanning in Office Mode for instructions on making settings in Office Mode.Home Mode lets you customize some scanning settings and check their effects with a preview image.Home Mode is best when you want to preview images of your originals before scanning them. You can size the imageas you scan, adjust the scan area, and adjust many image settings, including color restoration, dust removal, andbacklight correction.See Changing the Scan Mode for instructions on switching to Home Mode.See Scanning in Home Mode for instructions on making settings in Home Mode.Professional Mode gives you total control of your scanning settings and lets you check their effects with a previewimage.Professional Mode is best when you want to preview your image and make extensive, detailed corrections to it beforescanning. You can sharpen, color correct, and enhance your image with a full array of tools, including colorrestoration, dust removal, and backlight correction.See Changing the Scan Mode for instructions on switching to Professional Mode.See Scanning in Professional Mode for instructions on making settings in Professional Mode.
Home Scanning Your OriginalsChanging the Scan ModeTo change the scan mode, click the arrow in the Mode box in the upper right corner of the Epson Scan window. Then, selectthe mode you want to use from the list that appears.Note:The mode you select remains in effect when you start Epson Scan next time.For instructions on scanning using these modes, see one of these sections.Full Auto Mode: Scanning in Full Auto ModeOffice Mode: Scanning in Office ModeHome Mode: Scanning in Home ModeProfessional Mode: Scanning in Professional Mode
Home Scanning Your OriginalsScanning in Full Auto ModeWhen you start Epson Scan for the first time, it runs in Full Auto Mode and displays the Epson Scan Full Auto Mode window.Note for film or slides:In Full Auto Mode, you can scan only 35 mm color film strip or color positive slides. To scan other types offilm, use Home Mode or Professional Mode. To change the scan mode, see Changing the Scan Mode.Note:If the Show this dialog box before next scan check box is cleared, the Epson Scan starts scanningimmediately without displaying this screen. To return to this screen, click Cancel in the Scanning dialog boxduring scanning.Place your original(s) on the document table. See one of these sections for instructions.Documents or photos: Placing Documents or Photos
Film or slides: Placing Film or SlidesStart Epson Scan. See Starting Epson Scan for instructions.Select Full Auto Mode from the Mode list. See Changing the Scan Mode for instructions.If you want to select a custom resolution, restore faded colors, or remove dust marks, click Customize. You see theCustomize window.Note:If you started scanning from a TWAIN-compliant program like ArcSoft PhotoStudio, the File Save Settingsbutton does not appear.Select your settings and click OK. For details on selecting the settings in the Customize window, see Epson Scan Help.Click Scan. Epson Scan starts scanning in Full Auto Mode.
Epson Scan previews each image, detects which type of original it is, and selects the scan settings automatically. After amoment, you see a small preview of each image in the Epson Scan window.Note:It takes a few minutes to scan a full film strip.If you need to change any settings, click Pause. You will return to the Epson Scan Full Auto Modewindow.If you need to cancel scanning, click Cancel when it appears.What happens next depends on how you started your scan. See Finishing the Scan for instructions.
Home Scanning Your OriginalsScanning in Office ModeWhen you select Office Mode, you see the Epson Scan Office Mode window.Place the original(s) on the document table. See Placing Documents or Photos for instructions.Start Epson Scan. See Starting Epson Scan for instructions.Select Office Mode in the Mode list. See Changing the Scan Mode for instructions.Select Color, Grayscale, or Black&White as the Image Type setting.Select Document Table as the Document Source setting.Select the size of your original document as the Size setting.
Click the arrow to open the Resolution list and select an appropriate resolution for your original. See Selecting the ScanResolution for instructions.Click Preview to preview your image(s). The Preview window appears and displays your image. See Previewing andAdjusting the Scan Area for instructions.Modify the image quality if necessary. See Adjusting the Color and Other Image Settings for instructions.Click Scan.What happens next depends on how you started your scan. See Finishing the Scan for instructions.
Home Scanning Your OriginalsScanning in Home ModeWhen you select Home Mode, you see the Epson Scan Home Mode window.Place your original(s) on the document table. See one of these sections for instructions.Documents or photos: Placing Documents or PhotosFilm or slides: Placing Film or SlidesStart Epson Scan. See Starting Epson Scan for instructions.Select Home Mode in the Mode list. See Changing the Scan Mode for instructions.Click the arrow to open the Document Type list, and select the type of your original(s) you are scanning.
Select Color, Grayscale, or Black&White as the Image Type setting.In the Destination box, click the button for the way you plan to use the scanned image(s).Screen/Web for images you will view only on a computer screen or post on the web.Printer for image(s) you will be printing or converting to editable text with an OCR (Optical Character Recognition)program.Other if you want to select a specific resolution for other purposes.Epson Scan selects a default resolution setting based on the Destination setting you select. If you selected Other as theDestination setting to select a specific resolution, see Selecting the Scan Resolution for instr
Home Scanning Your Originals Scanning Your Originals Follow the step-by-step instructions here to scan your original documents or photos using any of the available scanning