Transcription
GSL-1700X SeriesGSL-1700X Series1700 – 1750 C VACUUM* TUBE FURNACESOPERATION MANUAL860 South 19th Street, Richmond, CA 94804, USATEL: (510) 525 – 3070 FAX: (510) 525 – 4705Website: www.mtixtl.com Email: info@mtixtl.com* Vacuum pressures may be safely used up to 1500 C1MTI Corporation www.mtixtl.com
GSL-1700X SeriesTABLE OF CONTENTSIMPORTANT NOTES . 3GENERAL WARNINGS . 3WARRANTY . 3EQUIPMENT INFORMATION . 4INTRODUCTION: 4FURNACE STRUCTURE: 4SPECIFICATIONS: 5ASSEMBLY INSTRUCTIONS . 6EQUIPMENT INSPECTION: 6OPERATING ENVIRONMENT: 6POWER CONNECTION: 6 - 7AC POWER: 7 - 8THERMOCOUPLE INSTALLATION: 9 - 10GENERAL OPERATION: 10 - 13VACUUM AND GAS FLOW SYSTEMS: 13SYSTEM LOADING/ UNLOADING PROCEDURES: 13TEMPERATURE CONTROL INSTRUCTIONS . 14TEMPERATURE CONTROLLER: 14SETTING THE TEMPERATURE CONTROLLER: 14 - 15HEATING PROFILE SETTING EXAMPLE: 15 - 17ILLUSTRATION OF HEATING PROFILE SETTING: 17 - 18RUNNING THE PROGRAM: 18HOLDING THE PROGRAM: 18STOPPING THE PROGRAM/ FURNACE SHUT DOWN: 18TEMPERATURE CONTROLLER PARAMETERS: 19FUNCTIONS OF MAIN PARAMETERS: 19 - 21PARAMETER SETTING: 21AUTO - TUNE: 21 - 22MANUAL – TUNE: 22EQUIPMENT MAINTENANCE & TROUBLESHOOTING . 23MAINTENANCE AND EQUIPMENT CARE: 23CERAMIC TUBE REPLACEMENT: 24HEATING ELEMENTS REPLACEMENT: 25TROUBLESHOOTING FOR TYPICAL PROBLEMS: 26TROUBLESHOOTING RESOURCES: 262MTI Corporation www.mtixtl.com
GSL-1700X SeriesIMPORTANT NOTESThank you for purchasing from Materials Technology International Corporation. This manual contains important operation and safetyinformation prepared for those intending on using the equipment. The prospective user is responsible for carefully reading andunderstanding the contents of this manual prior to operating the equipment.MTI reserves the right to update or upgrade the product without informing customers of the data change(s) in this manual. Please visitwww.mtixtl.com frequently for the latest information and manual.GENERAL WARNINGSMTI will not be responsible for equipment damage, accidents leading to minor or fatal injuries, and etc. caused by the user’snegligence or lack of knowledge. Always read the manual fully beforehand and exercise the best judgment when handling theequipment.To avoid electrical shock: Use a properly grounded electrical outlet of correct voltage and current handling capacity. Disconnect equipment from the power supply before servicing. Always double check the wiring and consult a licensed electrician for installation.To avoid burns: Do not touch the exterior or interior surface of the furnace during operation or after use (cooling time depends on temperatureset by the user).Tube Replacement or Installation: Use extreme cautions and be aware of the surroundings when replacing or installing a tube. Read the installation instructions listed in the dedicated section prior to installing.To avoid Physical Injuries: Do not put this equipment near flammable or explosive environments and substances. Do not leave the internal circuit exposed after disassembly. Power should be cut off when performing external maintenance like cleaning.WARRANTYMTI Corporation provides one year limited warranty from date the product is shipped out. Any defective part(s) will be replaced freeof charge during warranty period. However, the warranty does NOT cover any equipment damage caused by misuse or negligence.After the expiration of warranty, MTI will continue to provide technical support and spare parts at a reasonable cost.3MTI Corporation www.mtixtl.com
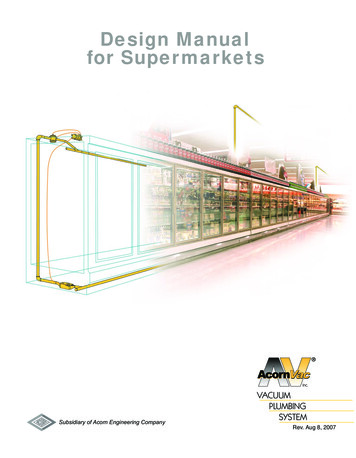
GSL-1700X SeriesEQUIPMENT INFORMATIONINTRODUCTIONEQ-GSL-1700X single-zone series furnace use high-powered electric Molybdenum Disilicide (MoSi2) or Kanthal Super HT Heatingelements to achieve faster heating and cooling rates. Stainless steel vacuum flanges with valves, vacuum gauge and high purityceramic tube are included for immediate use. This configuration allows for heating samples in vacuum or flowing gas. Precisiontemperature controller provides up to 30 segments of heating and cooling steps with /- 1 ºC accuracy.These types of furnaces are ideal for use in material & chemical researching labs to sinter all types of novel materials under vacuumand other gas conditionsFURNACE STRUCTURE4MTI Corporation www.mtixtl.com
GSL-1700X SeriesSPECIFICATIONS1700 C SeriesModelHeating Element: Super 1800 C MoSi2 Heating ElementsSizePower RequirementHeating Zone /Constant Temp. ZoneTube size:GSL-1700X-S60AC 208-240 V, 50/60 Hz, 2” alumina tube: OD: 54mm x ID:60 mm Length: 790 mm L3KW30A fuse required12”(300 mm) (single zone )/3" (75mm) ( /-1 C)Heating element size:30mm x 270mmDimensions: 445mm 380mm 615mm ( W x L x H)Tube size:GSL-1700X-80AC 208-240 V, 50/60 Hz 3” alumina tube: OD: 72mm x ID:80 mm Length:1 0 0 0 mm L5KW40A fuse required18”(457 mm) (single zone )/5.9" (150mm) ( /-1 C)Heating element size:30mm x 330mmDimensions: 590mm 490mm 760mm ( W x L x H)Tube size:AC 208-240 V, 50/60 Hz 4” alumina tube: OD:101.6mm x ID:92 mm Length:1 0 0 0 mm L 18”(457 mm) (single zone )/GSL-1700X-45KW40A fuse required5.9" (150mm) ( /-1 C)Heating element size:30mm x 330mmDimensions: 590mm 490mm 760mm ( W x L x H)1750 C SeriesHeating Element: Kanthal Super HT 1800 C MoSi2 Heating ElementsTube size:GSL-1700X-KS60AC 208-240 V, 50/60 Hz, 2” alumina tube: OD: 54mm x ID:60 mm Length: 790 mm L3KW30A fuse required12”(300 mm) (single zone )/3" (75mm) ( /-1 C)Heating element size:30mm x 270mmDimensions: 590mm 490mm 760mm ( W x L x H)Tube size:GSL-1700X- KS80AC 208-240 V, 50/60 Hz 3” alumina tube: OD: 72mm x ID:80 mm Length:1 0 0 0 mm L5KW40A fuse requiredHeating element size:18”(457 mm) (single zone )/5.9" (150mm) ( /-1 C)30mm x 330mmDimensions: 590mm 490mm 760mm ( W x L x H)Tube size:GSL-1700X- KS100AC 208-240 V, 50/60 Hz 4” alumina tube: OD:101.6mm x ID:92 mm Length:1 0 0 0 mm L 18”(457 mm) (single zone )/5.9" (150mm) ( /-1 C)Heating element size:5KW40A fuse required30mm x 330mmDimensions: 590mm 490mm 760mm ( W x L x H)5MTI Corporation www.mtixtl.com
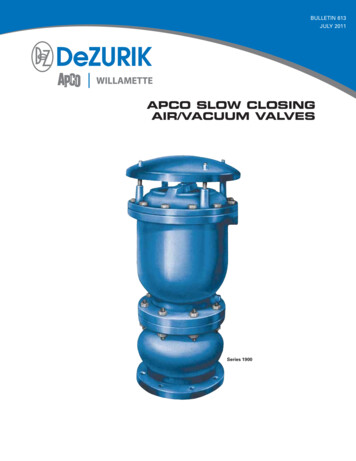
GSL-1700X SeriesASSEMBLY INSTRUCTIONSEQUIPMENT INSPECTIONOnce receiving the furnace, please inspect the equipment and all accessories for damage incurred from shipping and check thepacking list for missing items. If anything is damaged or missing, please inform us at info@mtixtl.com.WARNING:Prior to connecting power to the furnace, please open up the top lid of the furnace and remove the shock absorbent foam covering theheating elements. Put the top lid back in place afterwards.OPERATING ENVIRONMENTThe operating environment information listed below may be helpful for safely operating the instrument: The furnace should be placed on a dry, hard and flat surfaceUse should be limited to indoor only with adequate ventilation and away from direct sunlightEnvironment should be dust-free and without explosive and corrosive gasesRelative humidity (non-condensing): 10% 85%oCircumstance temperature: -10 75 CWARNING:To reduce the possibility of heat-related injuries or of overheating the instrument, do not place the instrument too close to the side wall orobstruct the air vents. Keep the instrument at least 1 meter in distance from the side wall.POWER CONNECTIONPlease make sure that the power source in your lab is sufficient to meet the power requirement listed for the equipment.The following picture shows the three wires of the power cable: Ground, Live 1, and Live 2. We strongly suggest consulting aprofessional or licensed electrician to perform the power connections. For more information, please refer to the “AC Power”section below.6MTI Corporation www.mtixtl.com
GSL-1700X SeriesAC POWERFor power connection, a licensed electrician should be consulted to meet and comply with the local electrical codes and requirements.Proper electrical power handling and knowledge are crucial for both safety and thorough application of the equipment.Attention:For countries that use 220V, the furnace’s power supply is already configured to work with this input voltage. However, in countries thatuse 110V, a 208 240V single phase AC power line needs to be setup.The following knowledge may be useful for configuring a single phase 208 240V power line from various electrical panels. A threephase 240V AC electrical panel generally found in most laboratories can be configured to output a single phase 208 240V power line.To do this, two of the three live wires from the panel need to be configured with the neutral wire. Please refer to the illustrations belowto get an idea of the connections for the three phase and as well as the single phase 208 240V AC.Attention:MTI Corporation will not be responsible for any equipment or property damage that results from improper or incorrect power connections.7MTI Corporation www.mtixtl.com
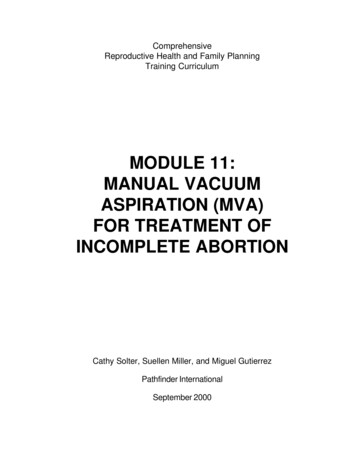
GSL-1700X SeriesTypical Single Phase AC Power In US8MTI Corporation www.mtixtl.com
GSL-1700X SeriesTHERMOCOUPLE INSTALLATIONThe thermocouple has been tested on the furnace to ensure proper function prior to shipping. However, some furnaces have specialthermocouples that had to be removed prior to shipping to protect against damage. If your furnace does not come with the thermocouplealready being installed, please use the following instructions to install it. Insert the thermocouple (ceramic tube) from the backside of the furnace and make sure that the tip of thethermocouple is fully protruded in the chamber for accurate temperature readings.Attention:A clearance of 1mm (millimeter) between tip of the thermocouple and the tube surface should be given to prevent damage to thethermocouple. Tighten screw to fix the thermocouple in position. Connect the wires coming out from the furnace to the terminals on the thermocouple block according to the labelsand markings. It is very important that the positive and negative polarities are connected correctly or else thethermocouple will not work. Please refer to pictures C and D for more details.Figure CFigure D9MTI Corporation www.mtixtl.com
GSL-1700X SeriesAttention:Once the furnace setup is finished, we strongly recommend reading the handbook and follow the instructions listed in the “ HEATINGPROFILE SETTING EXAMPLE” section to perform a quick test and check the heating condition of the furnace.GENERAL OPERATIONIf the furnace is being used for the first time (or use again after a long period of inactivity), please pre-heat the furnace to 300at least 2 hours for removing moisture inside the chamber to prevent cracking of the furnace refractory ceramics.forProperly setting up the tube and vacuum flanges prior to heating will ensure the furnace to work under the most ideal conditions. Thiswill insulate the heat from the flanges while simultaneously preventing the dissipation of heat from the furnace chamber. Theinsulation of heat stabilizes the heating zone which in turn expends less energy and places less wear on the heating elements. Place the test sample inside the tube chamber (crucibles or boats may be used as material containers, please visit:http://www.mtixtl.com/ceramiccrucibles.aspx) to order. Before operating the furnace, thermal insulation blocks must be placed inside the tube chamber at the positionsbelow (note the position of block placements). Install the vacuum sealing flanges on each side of the tube using the picture below as reference. Seal the flanges bytightening the screws to finish the assembly.10MTI Corporation www.mtixtl.com
GSL-1700X Series Limit the pressure regulator attached to the gas tank to below 1.1 atm before filling the tube with gas. Keep thevacuum valve(s) open during gas filling to avoid high pressure from building up inside tube.When the installation is finished, please do a test for gas leaks to check if the sealing parts were assembledwell.If your system has a big gas leaking rate, you may locate the leaking part(s) by using soap suds and apply vacuumgrease on the part(s):Please order it orsealinggloveboxeq-gb-vg.aspxWARNING: Tube furnaces are designed to be used under vacuum with low pressure gases. NEVER inject gas into the tube with pressurehigher than 1.1 atm. Pressure build up inside the tube may cause the flange(s) to be catapulted which may cause injury or death. Use of vacuum on alumina tubes at temperatures over 1500 ºC is strictly prohibited as the tube materials will become too soft towithstand vacuum. Also, do not pour any liquid or molten substances into the tube to keep its interiors clean. After an inspection has been performed to make sure there are no gas leaks, power on the instrument by turningthe “Power Lock” to the right and the temperature control LCD will start to blink. Press the “Turn On” button and a “clunk” sound should be heard. This switch activates the relay switch inside thefurnace to establish power connection to the heating elements. If the sound is not heard, please do not proceedwith operating the furnace. The furnace must be powered down and get inspected. Please refer to the “TEMPERATURE CONTROL INSTRUCTIONS” sections to learn how to setup and r
1 MTI Corp orati n www .mtixtl com GSL-1700X Series 1700 – 1750 C VACUUM* TUBE FURNACES OPERATION MANUAL 860 South 19th Street, Richmond, CA 94804, USA TEL: (510) 525 – 3070 FAX: (510) 525 – 4705 Website: www.mtixtl.com Email: info@mtixtl.com * Vacuum pressures may be safely used up to 1500 C