Transcription
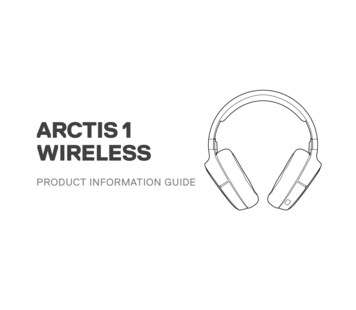
ARCTIS 1WIRELESSPRODUCT INFORMATION GUIDE
CONTENTSWelcome 2TranslationsSteelSeries Engine 3Español 15Product overview 5繁體中文 19한국어 23Setup Wireless Setup 7Wired Setup 8Charging 9Power On/Off 10简体中文 日本語 1721Deutsch 25Français 29Русский 27Pairing 11Italiano 31Microphone 12Português 33Multimedia Control 13Regulatory 35
WELCOME TO ARCTISYour new headset is the result of our unyielding pursuit ofperfection for over 15 years. We poured our hearts into creatingthe best possible gaming headset by pushing the boundaries ofsound quality, mic clarity, comfort, and style. Arctis is our glory;now go chase yours.2
STEELSERIES ENGINESTEELSERIES ENGINEDownload SteelSeries Engine to customize your audio settingsand to integrate with Engine Apps (like Discord):steelseries.com/engine3
find help at support.steelseries.comPACKAGE CONTENTSSYSTEM REQUIREMENTS //COMPATIBILITYArctis 1 Wireless HeadsetPCUSB-C Wireless DonglePlaystation 4USB Charging CableNintendo SwitchUSB-C to USB-A Adapter CableAndroid (with USB-C)ClearCast Microphone4
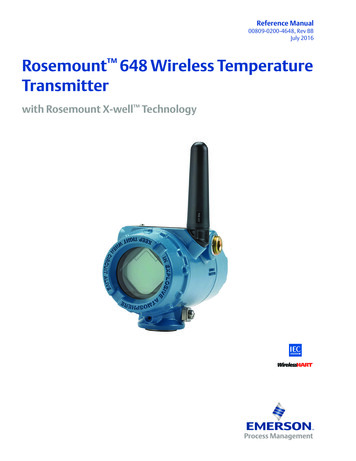
PRODUCT OVERVIEW01Airweave Ear Cushions*02ClearCast Microphone03Volume Wheel04Microphone Mute Switch053.5 mm Audio Jack06Power Button07Power LED08Micro-USB Jackfor charging and firmware updates0102509Microphone Jack10USB-C wireless Dongle11Micro-USB charging Cable12USB-C to USB-A Adapter Cable133.5 mm Audio Cable
* Find accessories and replacement parts at 0703046
SETUPWIRELESS SETUPConnection to USB-A1012DOCK2.4GHzPS4 SETTING DEVICES AUDIO DEVICESOutput to HeadphonesAll AudioConnection to USB-C102.4GHzTABLET7
WIRED SETUP13CONTROLLER8
CHARGINGTo charge the headset, connect the micro-USBcharging cable11to the micro-USB jack08onthe headset, and plug the other end into anyUSB power source.The color of the power LEDbattery level.9Green100–50 %Yellow49–20 %Red19–10 %Red (fast blink)9–1 %07indicates the
POWER ON/OFF2sTo power on the headset press andONhold the power button06for at least 2seconds. You will hear a tone, and thepower LED07will illuminate.To power off the headset pressOFFand hold the power06button for at least3 seconds10
PAIRING2.4GHzNote: The headset is already paired with thetransmitter out of the box01Connect the USB-C wireless dongle10toa Windows PC with SteelSeries Engineinstalled02Initiate wireless dongle pairing from Engine03With the headset off, press and hold thepower button04for 6 secondsYou will hear a tone when the pairing iscompleted1106
MICROPHONEMicrophone attachmentPosition the microphone close to thecorner of your mouth with the flatsurface facing youtop viewfront view12
MULTIMEDIA CONTROLAnswer/end voice callsingle · press Power Button06Play/pause musicsingle · press Power Button06Next trackdouble · · press Power Button06Previous tracktriple · · · press Power Button1306
14
ESPAÑOLCONTENIDO DEL PAQUETE08Toma micro-USB (para carga yactualizaciones de firmware)Auriculares Arctis 1 Wireless09Toma para micrófonoCable de carga USB10Adaptador USB-C inalámbricoCable adaptador USB-C a USB-A11Cable de carga micro-USBMicrófono ClearCast12Cable adaptador USB-C a USB-A13Cable de audio de 3,5 mmAdaptador USB-C inalámbricoREQUISITOS DEL SISTEMA//COMPATIBILIDADPCPlaystation 4Nintendo Switch15*Consulta accesorios y repuestos Android (con USB-C)CONFIGURACIÓN INALÁMBRICASi necesitas ayuda, visita support.steelseries.comConexión a USB-ADESCRIPCIÓN GENERAL DEL PRODUCTOPS4 AJUSTES Dispositivos Dispositivos deaudio01Almohadillas Airweave*02Micrófono ClearCast03Rueda de volumen04Botón de silencio del micrófono05Toma para audio de 3,506Botón de encendido07LED de alimentaciónSalida a auriculares Todo el audioConexión a USB-CCONFIGURACIÓN CON CABLECARGAPara cargar los auriculares, conecta el cable decarga micro-USB 11 a la toma micro-USB 08 de losauriculares y enchufa el otro extremo a cualquierfuente de alimentación USB.
El color del LED de alimentaciónde la batería.Verde07indica el nivel100–50 %segundos el botón de encendido06.Oirás un tono cuando se haya completado elemparejamiento.Amarillo49–20 %MICRÓFONORojo19–10 %Montaje del micrófonoRojo (parpadeo rápido)9–1 %Coloca el micrófono cerca de la comisura de tuboca, con la superficie plana orientada hacia ti.ENCENDIDO Y APAGADOPara encender los auriculares, mantén pulsado elbotón de encendido 06 al menos 2 segundos. Oirásun tono y se iluminará el LED de encendido 07 .Para apagar los auriculares, mantén pulsado elbotón de encendido 06 al menos 3 segundos.EMPAREJAMIENTONota: por defecto, los auriculares ya vienenemparejados con el transmisor.Conecta el adaptador inalámbrico USB-C 10 a unPC con Windows que tenga SteelSeries Engineinstalado.Inicia el emparejamiento de adaptador inalámbricodesde Engine.vista superiorvista frontalCONTROL MULTIMEDIAResponder/finalizar llamada de vozpulsación · única del botón de encendido06Reproducir/pausar músicapulsación · única del botón de encendido06Pista siguientepulsación · · doble del botón de encendidoPista anteriorpulsación · · · triple del botón de encendido0606Con los auriculares apagados, mantén pulsado 616
简体中文包装内容Arctis 1 无线耳机USB-C 无线发送器USB 充电线缆USB-C 转 USB-A 线缆ClearCast 麦克风系统要求 //兼容性PCPlaystation 4Nintendo SwitchAndroid(带 USB-C)如需帮助,请访问 7AirWeave 耳垫*ClearCast 麦克风音量轮麦克风静音开关3.5 mm 耳机接口电源按钮电源 LED 指示灯080910111213Micro-USB 接口 (用于充电和固件更新)麦克风接口USB-C 无线发送器Micro-USB 充电线缆USB-C 转 USB-A 线缆3.5 mm �线设置连接 USB-APS4 设置 设备 音频设备输出至耳机 连接 充电,可将 micro-USB充电线缆 11 连接至耳机的 micro-USB 接口 08 ,并将其另一端插入任何 USB 电源。电源 LED 指示灯07的颜色表示电池电量。
绿色100–50 %麦克风红色19–10 ��49–20 %安装麦克风红色(快速闪烁) 9–1 ��住电源按钮 06 至少 2 秒钟。您将会听到提示音,电源按钮 LED 指示灯 源按钮06配对至少 3 �发送器配对将 USB-C 无线发送器 10 连接到装有 SteelSeriesEngine 的 Windows PC通过 Engine 束语音通话按一下 · 电源按钮 06播放/暂停音乐按一下 · 电源按钮06下一曲按两下 · · 电源按钮06上一曲按三下 · · · 电源按钮066 秒钟18
繁體中文包裝內容Arctis 1 無線耳機USB-C 無線發送器USB 充電線USB-C 轉 USB-A 數據線ClearCast 麥克風系統要求 //相容性PCPlaystation 4Nintendo SwitchAndroid(使用 USB-C)如需協助,請前往 9Airweave 耳墊*ClearCast 麥克風音量旋鈕麥克風靜音開關3.5 mm 耳機插孔電源按鈕電源 LED 指示燈080910111213Micro-USB 插孔 -C 無線發送器Micro-USB 充電線USB-C 轉 USB-A 轉接線3.5 mm �連接到 USB-APS4 設定 裝置 音訊裝置輸出至耳機 連接到 電,請將 micro-USB 充電線 11 連接到耳機上的 micro-USB 插孔 08 ,然後將另一端插進任何一個 USB 電源。電源 LED 指示燈07的顏色可指示電池電量。
綠色100–50 %麥克風紅色19–10 0 %插入麥克風紅色(快速閃爍) 9–1 ��電源按鈕 06 最少 2 �源 LED 指示燈 源按鈕06配對至少 3 �器配對請將 USB-C 無線發送器 10 連接到裝有SteelSeries Engine 的 Windows PC從 Engine �源按鈕066 通話按一下 · 電源按鈕 06播放/暫停音樂按一下 · 電源按鈕06下一首歌按兩下 · · 電源按鈕06上一首歌按三下 · · · 按電源按鈕0620
日本語パッケージの内容08USB 充電ケーブル09ClearCast マイク11PC13USB-C ワイヤレスドングルUSB-C、USB-A 変換アダプターケーブル10電源 LEDマイクロ USB �用)マイク端子USB-C ワイヤレスドングルマイクロ USB 充電ケーブルUSB-C、USB-A � // 互換性12Playstation 4* 付属品と交換品は steelseries.com/gamingaccessories をご覧くださいNintendo SwitchAndroid (USB-C 対応)詳細については support.steelseries.com rctis 1 ワイヤレスヘッドホンAirweave イヤークッション*ClearCast �スイッチ3.5 mm オーディオジャック電源ボタン3.5 mm �設定USB-A への接続PS4 設定 デバイス �力 USB-C ��イクロUSB充電ケーブル 11 をヘッドホンのマイクロ USB 端子 08 に接続し、もうひとつの端子を USB 電源に接続します。
�ン/オフ100 50 %49 20 ��ますマイクマイクの装着19 10 ��ように、口の端近くに装着します9 1 ��電源ボタン �り、電源ボタン07 �オフにするには、電源ボタン06 �ールされている SteelSeries Engine を使って、USB-C ワイヤレスドングル 10 を Windows 回 · �時停止1回 · 電源ボタン 06 を押します次のトラックに移動2回 · · 電源ボタン 06 を押します前のトラックに移動3回 · · · 電源ボタン06を押しますEngine 間22
한국어패키지 구성품Arctis 1 무선 헤드셋USB-C 무선 동글USB 충전 케이블USB-C to USB-A 어댑터 케이블ClearCast 마이크시스템 요구 사항 // 호환성PCPlaystation 4Nintendo SwitchAndroid (USB-C 지원)도움말은 support.steelseries.com에서 찾아볼 수있습니다.제품 개요01020304050623Airweave 이어 쿠션*ClearCast 마이크볼륨 휠마이크 음소거 스위치3.5mm 오디오 잭전원 버튼07080910111213전원 LEDMicro-USB 잭 (충전 및 펌웨어 업데이트)마이크 잭USB-C 무선 동글Micro-USB 충전 케이블USB-C to USB-A 어댑터 케이블3.5mm 오디오 케이블* 액세서리 및 교체 부품은 steelseries.com/gaming-accessories에서 찾아볼 수 있습니다.설정무선 설정USB-A에 연결PS4 설정 장치 오디오 장치헤드폰 출력 USB-C에 연결모든 오디오유선 설정충전헤드셋을 충전하려면, micro-USB 케이블 11 을헤드셋의 micro-USB 잭 08 에 연결하고 다른 한쪽을USB 전원에 연결하세요.
전원 LED 07 의 색상은 배터리 잔량을 나타냅니다.마이크노란색마이크를 평평한 면이 입을 향하도록 입꼬리 근처에위치하게 하세요.녹색100–50 %빨간색19–10 %빨간색(빠르게 깜빡임)전원 켜기/끄기49–20 %9–1 %헤드셋 전원을 켜려면, 전원 버튼 06 을 2초 이상누르세요. 음향 신호와 함께 전원 LED 07 에 불이켜집니다.헤드셋 전원을 끄려면, 전원 버튼 06 을 3초 이상누르세요.페어링참고: 출고 시 이미 헤드셋이 트랜스미터와페어링되어 있습니다.USB-C 무선 동글 10 을 SteelSeries Engine이 설치된Windows PC에 연결하세요.마이크 장착윗면 보기전면 보기멀티미디어 제어전화 받기/끊기전원 버튼 06 을 한 번 · 누르세요.음악 재생/일시 정지전원 버튼 06 을 한 번 · 누르세요.다음 트랙전원 버튼 06 을 두 번 · · 누르세요.이전 트랙전원 버튼 06 을 세 번 · · · 누르세요.Engine을 이용해 무선 동글을 초기화하세요.헤드셋이 꺼진 상태에서 전원 버튼 06 을 6초간누르세요.페어링이 완료됨과 동시에 음향 신호가 들립니다.24
DEUTSCHLIEFERUMFANG08Micro-USB-Port (für Aufladung undFirmware-Updates)Headset Arctis 1 er USB-C-DongleAdapterkabel für USB-C auf terkabel für USB-C auf USB-A13Audiokabel 3,5 mmDrahtloser USB-C-DongleSYSTEMANFORDERUNGEN // KOMPATIBILITÄTPCPlayStation 4Nintendo Switch25* Zubehör- und Ersatzteile auf oid (mit USB-C)KABELLOSE KONFIGURATIONDu brauchst Hilfe? support.steelseries.comAnschluss per USB-APRODUKTÜBERSICHTPS4: Einstellungen Geräte Audiogeräte01Airweave-Ohrpolster*Ausgabe über Kopfhörer 02ClearCast-MikrofonAnschluss per USB-C03LautstärkeradKABELGEBUNDENE KONFIGURATION04Stummschalter für das MikrofonAUFLADEN05Klinkenstecker 3,5 mm06Ein/Aus-Taste07Ein/Aus-LEDStecke das Micro-USB-Ladekabel 11 in den MicroUSB-Port 08 des Headsets und verbinde dasandere Ende mit einer USB-Stromquelle, um dasHeadset zu laden.Gesamtes Audio
Die Farbe der Ein/Aus-LEDAkkuladezustand an.07zeigt denEin Ton ertönt, wenn die Kopplung abgeschlossenist.Grün100–50 %MIKROFONGelb49–20 %MikrofonbügelRot19–10 %Rot (schnelles Blinken)9–1 %Positioniere das Mikrofon nah am Mundwinkel. Dieflache Seite muss dabei zu dir zeigen.EIN-/AUSSCHALTENHalte die Ein/Aus-Taste 06 mindestens 2 Sekundengedrückt, um das Headset einzuschalten. Ein Tonertönt und die Ein/Aus-LED 07 leuchtet auf.Halte die Ein/Aus-Taste 06 mindestens 3 Sekundengedrückt, um das Headset EUERUNGAnruf annehmen/beendenEin/Aus-Taste 06 einmal · drücken.KOPPELNMusik abspielen/pausierenEin/Aus-Taste 06 einmal · drücken.Hinweis: Das Headset ist bereits mit dem Sendergekoppelt.Nächster TitelEin/Aus-TasteSchließe den drahtlosen USB-C-Dongle 10 aneinen Windows-PC an, auf dem die SoftwareSteelSeries Engine installiert ist.Vorheriger TitelEin/Aus-Taste 06 dreimal · · · drücken.06zweimal · · drücken.Starte den Kopplungsvorgang mit dem drahtlosenDongle über die Software.Das Headset muss ausgeschaltet sein. Halte nundie Ein/Aus-Taste 06 6 Sekunden gedrückt.26
ура Arctis 1 WirelessБеспроводной адаптер USB-C09Зарядный USB-кабель10Микрофон ClearCast12Кабель-переходник USB-C к USB-AСИСТЕМНЫЕ �PlayStation 4Nintendo SwitchAndroid (с USB-C)Поддержка на сайте support.steelseries.comОБЗОР ПРОДУКТА0102030405060727081113Разъем микро-USB (для зарядки иустановки обновлений)Гнездо микрофонаБеспроводной адаптер USB-CЗарядный кабель микро-USBКабель-переходник USB-C к USB-AАудиокабель 3,5 мм* Для подбора аксессуаров и запасныхчастей посетите страницу НИЕ И НАСТРОЙКАНастройка беспроводного подключенияПодключение к USB-AАмбушюры Airweave *НАСТРОЙКИ PS4 Устройства АудиотехникаРегулятор громкостиПодключение к USB-CМикрофон ClearCastКнопка отключения звука микрофонаАудиоразъем 3,5 ммКнопка питанияИндикатор питанияВыход для наушников Все аудиоНАСТРОЙКА ПРОВОДНОГО ПОДКЛЮЧЕНИЯЗАРЯДКАДля зарядки гарнитуры подключите кабельмикро-USB 11 к гнезду наушников микроUSB 08 , а другой его конец — к любому
источнику питания USB.Цвет индикатора питанияуровень заряда �100–50 %Красный19–10 %ЖелтыйКрасный (быстро мигает)49–20 %9–1 %ВКЛЮЧЕНИЕ/ВЫКЛЮЧЕНИЕ ПИТАНИЯДля включения гарнитуры нажмитеи удерживайте кнопку питания 06 какминимум 2 секунды. Вы услышите звуковойсигнал, загорится индикатор питания 07 .Для выключения гарнитуры нажмитеи удерживайте кнопку питания 06 какминимум 3 �ие: Гарнитура по умолчанию ужесопряжена с передатчиком.Подключите беспроводной адаптер USB-C10 к ПК с ОС Windows и установленным ПОSteelSeries Engine.6 секунд.Когда процесс сопряжения будет завершен,вы услышите звуковой сигнал.МИКРОФОНКрепление микрофонаРасположите микрофон близко к углу рта,развернув плоской стороной к себе.вид сверхувид спередиЭЛЕМЕНТЫ УПРАВЛЕНИЯ �ение звонкаодинарный · Нажмите кнопку питанияВоспроизведение музыки/паузаодинарный · Нажмите кнопку питанияСледующий трекдвойной · · Нажмите кнопку питания060606Предыдущий тректройной · · · Нажмите кнопку питания06Запустите в ПО процесс сопряжения.Нажмите и удерживайте кнопку питания06 на выключенной гарнитуре в течение28
FRANÇAISCONTENU DE L’EMBALLAGE07Voyant d’alimentationCasque Arctis 1 sans fil08Prise micro-USB (pour la charge et lesmises à jour du firmware)Câble de charge USB09Prise microphoneCâble adaptateur USB-C vers USB-A10Dongle USB-C sans filMicrophone ClearCast11Câble de charge micro-USB12Câble adaptateur USB-C vers USB-A13Câble audio 3,5 mmDongle USB-C sans filCONFIGURATION SYSTÈME REQUISE //COMPATIBILITÉPCPlayStation 4*Trouvez des accessoires et des pièces derechange sur steelseries.com/gaming-accessoriesNintendo SwitchCONFIGURATIONAndroid (avec USB-C)obtenez de l’aide sur support.steelseries.comVUE D’ENSEMBLE DU PRODUIT29CONFIGURATION SANS FILConnexion USB-A01Coussinets d’écouteur Airweave*Paramètres PS4 Périphériques Périphériquesaudio02Microphone ClearCastSortie vers le casque 03Molette de volumeConnexion USB-C04Bouton de désactivation du microphoneCONFIGURATION FILAIRE05Prise jack 3,5 mmCHARGE06Bouton marche / arrêtPour recharger le casque, connectez le câble decharge micro-USB 11 à la prise micro-USB 08 duTous audio
casque, puis branchez l’autre extrémité à unesource d’alimentation USB.La couleur du voyantbatterie.07indique le niveau de laLorsque le casque est hors tension, appuyez etmaintenez le bouton marche / arrêt 06 pendant6 secondes.Vous entendrez un signal sonore lorsquel’appariement est terminé.Vert100 – 50 %Jaune49 – 20 %MICROPHONERouge19 – 10 %Accessoire microRouge (clignotement rapide)9 – 1%Positionnez le microphone près de la commissuredes lèvres avec la surface plane face à vous.MARCHE / ARRÊTvue de dessusPour allumer le casque, appuyez sur le boutonmarche / arrêt 06 et maintenez-le pendant aumoins 2 secondes. Vous entendez une tonalité,puis le voyant 07 s’allume.vue de facePour éteindre le casque, appuyez sur le boutonmarche / arrêt 06 et maintenez-le pendant aumoins 3 secondes.APPARIEMENTRemarque : Le casque est appairé avec l’émetteurpar défaut.Branchez le dongle USB-C sans fil 10 sur un PCWindows sur lequel SteelSeries Engine est installé.Initiez l’appariement avec le dongle sans fil viaEngine.COMMANDES MULTIMÉDIASRépondre à / terminer un appel vocalAppuyez une · fois sur le bouton marche / arrêt06Lecture / pause de la musiqueAppuyez une · fois sur le bouton marche / arrêt06Piste suivanteAppuyez une · · fois sur le bouton marche / arrêt06Piste précédenteAppuyez une · · · fois sur le bouton marche /arrêt 0630
ITALIANOCONTENUTO DELLA CONFEZIONE08Presa Micro-USB (per ricarica eaggiornamenti firmware)Cuffie wireless Arctis 109Presa per microfonoCavo di ricarica USB10Dongle wireless USB-CCavo adattatore da USB-C a USB-A11Cavo di ricarica Micro-USBMicrofono ClearCast12Cavo adattatore da USB-C a USB-A13Cavo audio da 3,5 mmDongle wireless USB-CREQUISITI DI SISTEMA//COMPATIBILITÀPCPlayStation 4Nintendo Switch31* Accessori e parti di ricambio sono disponibili sulsito droid (con USB-C)CONFIGURAZIONE WIRELESSPer assistenza, visitare support.steelseries.comConnessione a USB-APANORAMICA DEL PRODOTTOIMPOSTAZIONE PS4 Dispositivi Dispositiviaudio01Cuscinetti auricolari Airweave*02Microfono ClearCast03Rotellina del volume04Interruttore di esclusione del microfono05Presa audio da 3,5 mm06Pulsante di accensione07LED di alimentazioneUscita per cuffie All AudioConnessione a USB-CCONFIGURAZIONE CABLATARICARICAPer ricaricare le cuffie, collegare il cavo di ricaricaMicro-USB 11 alla presa Micro-USB 08 sulle cuffiee collegare l’altra estremità a una sorgente dialimentazione USB.
Il colore del LED di alimentazionedella batteria.07indica il livelloCon le cuffie spente, tenere premuto il pulsante diaccensione 06 per 6 secondi.Un segnale acustico indica che l’abbinamento ècompletatoVerde100–50 %Giallo49–20 %Rosso19–10 %MICROFONO9–1 %Accessorio per microfonoRosso (lampeggio rapido)Posizionare il microfono vicino all’angolo dellabocca con la superficie piana rivolta verso di séACCENSIONE/SPEGNIMENTOPer accendere le cuffie, tenere premuto il pulsantedi accensione 06 per almeno 2 secondi. Le cuffieemetteranno un segnale acustico e il pulsante diaccensione 07 si illuminerà.Per spegnere le cuffie, tenere premuto il pulsantedi accensione 06 per almeno 3 secondi.ABBINAMENTONota: la cuffia è già preconfigurata perl’abbinamento al trasmettitoreCollegare il dongle wireless USB-CWindows con installato SteelSeries10a un PCAvviare l’abbinamento del dongle wireless daEnginevista dall’altovista frontaleCONTROLLO MULTIMEDIALEAvviare/terminare una chiamata vocalesingola · Premere il pulsante di accensione06Riprodurre/mettere in pausa la musicasingola · Premere il pulsante di accensione06Brano successivodoppia · · Premere il pulsante di accensioneBrano precedentetripla · · · Premere il pulsante di accensione060632
PORTUGUÊSCONTEÚDO DA EMBALAGEM08Entrada Micro-USB (para carregamento eatualizações de firmware)Auscultadores Sem Fios Arctis 109Conetor para MicrofoneCabo de Carregamento USB10Adaptador sem fios USB-CCabo adaptador USB-C para USB-A11Cabo de carregamento Micro-USBMicrofone ClearCast12Cabo adaptador USB-C para USB-A13Cabo de áudio de 3,5 mmAdaptador Sem Fios USB-CREQUISITOS DO SISTEMA //COMPATIBILIDADEPCPlayStation 433* Encontre acessórios e peças de substituição emsteelseries.com/gaming-accessoriesNintendo SwitchCONFIGURAÇÃOAndroid (com USB-C)Configuração Sem Fiosobtenha ajuda em support.steelseries.comLigação a USB-AVISÃO GERAL DO PRODUTODEFINIÇÕES DA PS4 Dispositivos Dispositivosde Áudio01Almofadas para auscultadores Airweave*Saída para Auscultadores 02Microfone ClearCastLigação a USB-C03Controlo de volume04Interruptor para desativar o microfone05Entrada para cabo de áudio de 3,5 mm06Botão de alimentação07LED de alimentaçãoTodo o ÁudioCONFIGURAÇÃO COM FIOSCARREGAMENTOPara carregar os auscultadores, ligue o cabomicro-USB 11 ao conetor micro-USB 08 nosauscultadores e ligue a outra extremidade a umafonte de alimentação USB.
A cor do LED de alimentaçãobateria.07indica o nível daVerde100–50 %Amarelo49–20 %Vermelho19–10 %Vermelho (intermitente rápido) 9–1 %LIGAR/DESLIGARPara ligar os auscultadores, prima sem soltar obotão de alimentação 06 durante, pelo menos, 2segundos. Irá ouvir um sinal sonoro e o LED dealimentação 07 irá acender-se.Para desligar os auscultadores, prima sem soltaro botão de alimentação 06 durante, pelo menos,3 segundosEMPARELHAMENTONota: Os auscultadores já se encontramemparelhados com o transmissor fora da caixaLigue o adaptador sem fios USB-C 10 a um PCWindows com o SteelSeries Engine instaladoInicie o emparelhamento do adaptador sem fios apartir do EngineCom os auscultadores desligados, prima semsoltar o botão de alimentação 06 durante 6segundosIrá ouvir um sinal sonoro quando oemparelhamento estiver concluídoMICROFONEUtilização do microfoneColoque o microfone perto do canto da sua boca,com a superfície plana virada para sivista superiorVista frontalCONTROLO DE MULTIMÉDIAAtender/terminar uma chamada de vozúnico · prima o Botão de Alimentação 06Reproduzir/pausar músicaúnico · prima o Botão de Alimentação06Faixa seguinteduplo · · prima o Botão de AlimentaçãoFaixa anteriortriplo · · · prima o Botão de Alimentação060634
REGULATORYEurope – EU Declaration of ConformityHereby, SteelSeries ApS. declares that the equipment which is compliance with directive RoHS 2.0 (2015/863/EU),R.E.D (2014/53/EU), EMC Directive (2014/30/EU), and LVD (2014/35/EU) which are issued by the Commission ofthe European Community.The full text of the EU declaration of conformity is available at the following internet address: https://steelseries.com/Operating Temperature: 0 to 40 CSteelSeries ApS. hereby confirms, to date, based on the feedback from our suppliers indicates that our productsshipping to the EU territory comply with REACH (Registration, Evaluation, Authorization, and Restriction of Chemicals- (EC) 1907/2006) compliance program. We are fully committed to offering REACH compliance on the products andposting accurate REACH compliance status for the all of products.Frequency bands and Powers (Headset and Transceiver)a. Frequency band(s) in which the radio equipment operates: 2.400 - 2.4835 GHzb. Maximum radio-frequency power transmitted in the frequency band(s) in which the radio equipment operates: EIRP:л/4-DQPSK: 4 dBm (Headset ANT 1) EIRP:л/4-DQPSK: 2.91dBm (Headset ANT2) EIRP:л/4-DQPSK: 7.72 dBm (Transceiver)c. Software Version: V1.05WEEEThis product must not be disposed of with your other household waste or treat them in compliance with the localregulations or contact your local city office, your household waste disposal service or the shop where you purchasedthe product.Safety Guideline for Lithium BatteryThis battery must not be disposed of with your other household waste or treat them in compliance with the localregulations or contact your local city office, your household waste disposal service or the shop where you purchasedthe product.“CAUTION!” Risk of explosion if battery pack is not replace by same type as specified by the manufacturer.Please keep follow all listed important warnings and cautions below while using this battery pack to avoid any damageor hazard.1. The battery polarity ( ) and (-) shall not be connected and charged reversely. Risk of explosion if the battery polarity( ) and (-) is reversed.2. Please keep this battery pack away from fire and high heat sources due to explosion might happen. Do not place your35
battery pack close to any heater or hot location.3. This battery pack shall not be hit or impacted. This battery pack shall not be dealt with any sharp or keen objectseither.4. This battery pack shall not be exposed to moisture, dripping or splashing.5. If any electrolyte flow out of this battery pack when touch the user’s eyes and skin, please seek medical adviceimmediately.Federal Communication Commission Interference StatementThis device complies with Part 15 of the FCC Rules. Operation is subject to the following two conditions: (1) This devicemay not cause harmful interference, and (2) this device must accept any interference received, including interferencethat may cause undesired operation.This equipment has been tested and found to comply with the limits for a Class B digital device, pursuant to Part 15 ofthe FCC Rules. These limits are designed to provide reasonable protection against harmful interference in a residentialinstallation. This equipment generates, uses and can radiate radio frequency energy and, if not installed and used inaccordance with the instructions, may cause harmful interference to radio communications. However, there is noguarantee that interference will not occur in a particular installation. If this equipment does cause harmful interferenceto radio or television reception, which can be determined by turning the equipment off and on, the user is encouragedto try to correct the interference by one of the following measures:Reorient or relocate the receiving antenna.Increase the separation between the equipment and receiver.Connect the equipment into an outlet on a circuit different from that to which the receiver is connected.Consult the dealer or an experienced radio/TV technician for help.Radiation Exposure Statement:The device has been evaluated to meet general RF exposure requirement, the device can be used in portable exposurecondition without restriction.FCC Caution:Any changes or modifications not expressly approved by the party responsible for compliance could void the user’sauthority to operate this equipment.This transmitter must not be co-located or operating in conjunction with any other antenna or transmitter.Headset FCC ID: ZHK-HS00021Transceiver FCC ID: ZHK-HS00021TXRegionsUSAContact InformationSteelSeries ApS.656 W Randolph St., Suite 3EChicago, IL 60661, USA 1-312-258-9467More information and support at steelseries.com36
Industry Canada Statement:This device complies with Industry Canada license-exempt RSS standard(s). Operation is subject to the following twoconditions:1) this device may not cause interference, and2) this device must accept any interference, including interference that may cause undesired operation of the device.Le présent appareil est conforme aux CNR d’Industrie Canadaapplicables aux appareils radio exempts de licence. L’exploitation est autorisée aux deux conditions suivantes:1) l’appareil ne doit pas produire de brouillage, et2) l’utilisateur de l’appareil doit accepter tout brouillage radioélectrique subi, même si le brouillage est susceptible d’encompromettre le fonctionnement.This Class B digital apparatus complies with Canadian ICES-003.Cet appareil numérique de la classe B est conforme à la normeNMB-003 du Canada.This device and its antenna(s) must not be co-located or operating in conjunction with any other antenna or transmitter,except tested built-in radios.Cet appareil et son antenne ne doivent pas être situés ou fonctionner en conjonction avec une autre antenne ou unautre émetteur, exception faites des radios intégrées qui ont été testées.The County Code Selection feature is disabled for products marketed in the US/ Canada.La fonction de sélection de l’indicatif du pays est désactivée pour les produits commercialisés aux États-Unis et auCanada.Radiation Exposure Statement:The device has been evaluated to meet general RF exposure requirement, The device can be used in portable exposurecondition without restriction.Déclaration d’exposition aux radiations:L’appareil a ete evalue pour repondre aux exigencies generals d’ exposition aux radio frequencies .L’appareil peut etre utilise en condition d’ exposition portable sans restrictionHeadset IC: 9638A-HS00021Transceiver IC: 9638A-HS00021TX해당 무선설비는 운용 중 전파혼신 가능성이 있음해당 무선설비는 전파혼신 가능성이 있으므로 인명안전과 관련된 서비스는 할 수 없음이 기기는 가정용(B급) 전자파적합기기로서 주로 가정에서 사용하는 것을 목적으로 하며, 모든 지역에서 사용할 수 �명:인증번호:SteelSeries ApS.Wireless Headset/ TransceiverHS-00021/HS-00021TXR-C-SS4-HS-00021/ R-C-SS4-HS-00021TX
5: 제조사/제조국:SteelSeries ことを目的とし ��と、受 �います。1 �。2 �いてご相談して下さい。3 電機管理辦法第十二條 之特性及功能。第十四條 �鋰電池安全使用指南注意: �收或處理電池。電池極性( )和( - ��处理。锂电池安全使用指南注意: �收或处理电池。1.电池极性( )和( - �两电池极性短路导致爆炸危险。38
設備名稱:Equipment name單元Unit型號(型式):Type designation無線耳機 / Wireless Headset鉛 Lead(Pb)汞 Mercury(Hg)鎘 Cadmium(Cd)六價鉻Hexavalentchromium(Cr 6)塑膠部件/ Plastic電路板及元件/ PCBA線材 / Cables金屬部件 / Metal備考1.〝超出0.1 wt %〞及〝超出0.01 wt ��比含量基準值。Note 1:“Exceeding 0.1 wt %” and “exceeding 0.01 wt %” indicate that the percentage content of therestricted substance exceeds the reference percentage value of presence condition.備考2.〝 �出百分比含量基準值。Note 2:“ ” indicates that the percentage content of the restricted substance does not exceed thepercentage of reference value of 為排除項目。Note 3:The “ ” indicates that the restricted substance corresponds to the exemptionThe RoHS test method is based on the standards JIS C 0950 and CNS icted substances and its chemical 溴二苯醚Polybrominateddiphenyl ethers(PBDE)
��。本表格依据SJ/T �该部件所有均质材料中的含量均在 GB/T 26572
16 El color del LED de alimentación 07 indica el nivel de la batería. Verde 100-50 % Amarillo 49-20 % Rojo 19-10 % Rojo (parpadeo rápido) 9-1%