Transcription
PRS SuperModelsUser Guide
PRS SuperModelsPrecision Guitar AmpsContentsIntroduction . 3Proper Input Signal . 3Product Overview . 3Signal Flow. 4Interface . 5Components . 5Quick Start . 6Modules . 7Amps . 7PRS Archon 50 .8PRS Dallas .12PRS Blue Sierra V9 .15Input and Output Module. 18Input Section.19Cabinet Loader .20Additional cabinet control .22Cabinets Module . 23Loading the Cabinet IRs .24Process Panel.26Other cabinet controls .27Using a Third-Party Amp . 27Standalone Application . 282PRS SuperModels / User Guide
IntroductionThanks for choosing Waves! In order to get the most out of your PRS SuperModels amplifier plugin, please take a fewminutes to read this user guide. We suggest that you visit Waves Support, where you’ll find an extensive answer base,system and host requirements, troubleshooting guides, and much more.To register and activate your new products, check for upgrades, and manage your account, log into your Wavesaccount and click My Account. If you don’t have a Waves account, click Create Account.We hope that PRS SuperModels brings you just the guitar sound and feel you’ve been waiting for.Proper Input SignalThe performance of a guitar amp is affected by the impedance of its input signal. Waves SuperModels is nodifferent. If the impedance is not correct, you may not experience the true sound of the original PRS amps. Werecommend that you play through a high-z instrument input (1M ohm or higher) and a buffered output (10k ohm)—any ordinary tuner pedal, for example—between the guitar and your audio interface input.The first time you instantiate PRS SuperModels, you’ll see a window that tells you how to properly set up your ampinput. This window will appear only once.Product OverviewWaves PRS SuperModels is a highly flexible guitar amplifier plugin. It was methodically modeled after threeamplifiers made by distinguished guitar and amp maker Paul Reed Smith. Each amp captures the sound and attitudeof the hardware original. Controls are the same as on the originals; on some amps we added a knob or switch forgreater flexibility.You can choose the speaker cabinets in which the amplifier output sound is created: Swapping the cabinet cangreatly alter the overall sound. The shape, size, and reflections inside the cabinet are captured using impulseresponses (IRs), which are very detailed descriptions of a space. Load one cabinet to accurately place the amp intoa specific cabinet—or combine cabinets to create a new cabinet sound.You also have control of tube and power amp transformer behavior. This influences the amp’s harmonics anddynamics.3PRS SuperModels / User Guide
Signal FlowArchon Signal FlowV9 Signal FlowDallas Signal Flow4PRS SuperModels / User Guide
InterfaceThe interface is divided into three modules: Input/Output, Cabinets, and Amplifier. The Input/Output and Amplifiermodules vary slightly, depending on the selected amp. The Cabinets module is the same for all amps.Amplifier moduleModeled after the three originalPRS tube amplifiers.Cabinets moduleUse this module to preview, select,and control cabinet IRs. Cabinetscan be mixed together and exported.Input and Output moduleUsed primarily to select cabinet IRs.It also manages input and outputlevels and the “air” (space) withinthe cabinet.ComponentsThere are six PRS SuperModels components: two for each amp.mono-to-monomono input/mono outputmono-to-stereomono input with a stereo output5PRS SuperModels / User Guide
Quick StartStart by inserting PRS amplifier on a mono track. Choose a mono or mono-to-stereo component. Each amplifier loadswith its own default preset: a suggestion from Paul Reed Smith about how to get his sound from that amp. You canuse the default preset as is, or as a starting point for building your own sound.Use the bar at the top of the plugin to save and load presets, compare settings, undo and redo steps, and resize theplugin. To learn more, click the icon at the upper-right corner of the window and open the WaveSystem Guide.If you want to set up your amp from scratch, follow these steps.Input/Output module (bottom panel)1. Use the Auto Input function to set gain to a level that best suits the amp and the gate. Choose an interval forautomatically setting the input level: 2.5, 5, or 10 seconds. Click the On button and then play your guitar asyou normally do. Auto Input switches off at the end of the interval. Input level is now set appropriately. If youload a different amplifier, you should recalibrate the input level.2. Use the Cabinet Loader knobs to select a factory IR for each cabinet. These factory IRs are sorted by cabinetpower, from the most aggressive to the least. Each cabinet can be bypassed independently.3. Adjust the noise gate to reduce noise from pickups, amp gain, and digital processing, as well as noises thatresult from playing, such as ringing strings.4. Use the Air control to add “space” within the cabinets. Lower settings yield a tighter cabinet sound, whilehigher settings create a bigger sense of air and space.Amplifier module (top panel)The Amplifier modules are just that: amplifiers. If you’re comfortable making an amp do what you want, this will beeasy.5. Adjust Amp Gain and EQ to taste. Boost adds gain to the input of the amplifier. It typically increases midrangeand reduces lows, so you can use it to pull a guitar to the front.6. The Archon amp lets you select between the Lead and Clean channels. These are markedly different sounds.6PRS SuperModels / User Guide
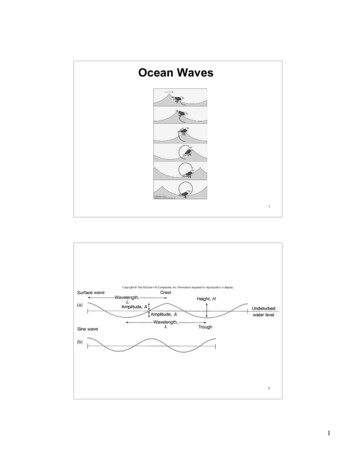
Go back to the Input/Output module7. Adjust the Output level. This sets the output of the plugin itself.You can use the Cabinets module (middle panel) to fine-tune cabinets and mix them to create new IRs. This panellets you audition all of your cabinets automatically, whether factory IRs or others. Click the Gear button on theCabinet Loaderto access the Cabinets module.Play and enjoy! Each amp has its own look and a few different controls, but once you’ve played through one of them,you’ll have no trouble using the others. Modules, controls, and workflows are described throughout this user guide.Use it as a refence as you get to know the plugin.ModulesAmpsPRS SuperModels gives you a choice between three Paul Reed Smith amplifiers:7PRS ArchonA very aggressive sounding amp that’s designed for heavier music, yet with surprisinglypristine, clean sound. It can also deliver a warmer, quieter sound. Two-channel design:Lead and Clean.PRS DallasAn amp whose sound ranges from very clean to a mild overdrive, with a classic soundthat's very spacious. Excellent at producing sparkling, clean tones, but you can push it intoa classic overdrive. This is a single-channel design.PRS Blue Sierra V9This overdrive amp is warm, fat, and raw, with a sweet-sounding distortion. It has a hugebottom end, and it’s focused and controllable. The V9 amp was never released, so you getto play on a PRS prototype.PRS SuperModels / User Guide
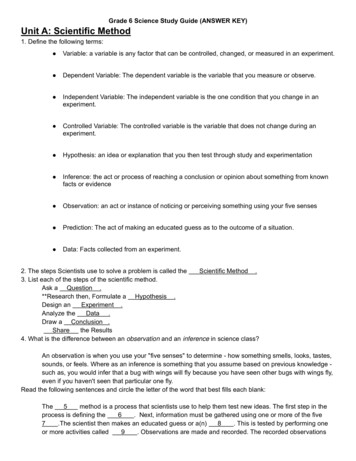
PRS Archon 50The Archon 50 is very aggressive. It has a huge low end, yet it’s focused and controllable. Separate clean and leadchannels deliver two very different amp sounds.Boost controlsPower amp setupClean channelLead channelpAm8nndeaf a sslf/o e/Con accadetLos olsBo ntrcosspaybPower Amp sectionsesrweoPff/onohtigrBlstroncoPreamp sectioncAcPRS SuperModels / User Guide
On/OffBypasses the amp. When switched off, only the Input/Output and Cabinet modules are heard. A greenlamp indicates that the unit is on. Bypass the Amp module when you use a third-party amp.BoostIncreases gain in the input of the amp. It typically increases midrange frequencies and reduces lows, soit can be used to focus a guitar.Click the pedal icon to access button to access the Boost control panel.GainThe amount of overdrive added to the soundLevelThe output level of the boost module that’s pushing the front end of the ampShapeA six-way rotary switch for tone shaping. Settings range from boosting low frequencies andreducing highs (full counterclockwise) to boosting the high frequencies and attenuating the lows(full clockwise).Choose between two separate Amp Channels.CleanProvides a clear sound without a lot of drive.LeadProvides a heavy music sound with modern high-gain distortion.The EQ (Preamp) section is immediately before the amp in the signal flow.BrightBassMiddleTrebleVolume9This high shelf sits at the beginning of the EQ section.Clean/Lead channels low frequency controlClean/Lead channels mid frequency controlClean/Lead channels high frequency controlPreamp gainPRS SuperModels / User Guide
Power Amp sectionMasterDepthPresenceMaster volume control for clean/lead channelsThe adjacent LED indicates that the amp output volume is too loud. The over-level may be from themaster output or elsewhere in the chain (most likely the EQ section), so check to see where itoriginates.Power amp low-frequency controlPower amp high-frequency controlDepth and Presence are global controls that affect both channels.Power Amp Setup SectionThe power amp is where the character of an amplifier is ultimately defined. What gives a power amp its personalityis how it handles harmonics, which are largely influenced by the vacuum tubes and the power transformer. Thepower Amp Setup section controls these. This affects the color of the amp as it approaches saturation. In ahardware amp, these controls are rarely changed: you usually need to open the cabinet to get to them. They’reeasier to access in SuperModels amps, but still think of them as setup controls rather than while-you-play controls.Click the tube icon to access the Power control panel.10PRS SuperModels / User Guide
SAGWhen the power transformer is being pushed very hard, there can be a dip in the power supply voltage. This affectsthe amp’s dynamics, articulation, and color. Two controls influence how tube sagging is replicated:SAGThe amount of the tube sag effect added to the signal. Increasing sag can make playing easier,and notes may punch out more.SpeedThe speed of the sag effect. It can influence the feel of attacks and releases.SAG MeterIndicates the effect of the sag process. As sag increases, the meter level lowers.Tube BiasIn a tube amp, biasing means adjusting the vacuum tube current to an ideal value. This affects the life of the tubes ina hardware amplifier, but it also influences the overtone harmonic structure of tube distortion. This control has asubtle effect on the overall sound, but once you learn what to listen for, you’ll hear how it can change the overallfeel.The Bias knob adjusts how the amp bias is set: hot (more harmonics, more sag, louder) to cold (less harmonics,etc.)The OT (Output Transformer) indicator shows the extent to which the output transformer is being stressed. As thepower transformer approaches saturation, its output is less linear.11 Green indicates an acceptable level. Yellow means you’re pushing it, but you’ll probably be okay. If the indicator is red, back off: your gain at this stage is too high.PRS SuperModels / User Guide
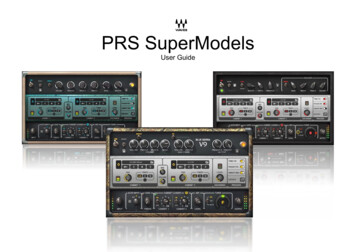
PRS DallasThe PRS Dallas is an exceptionally clean and balanced single-channel amp. It offers very organic overdrive.pAmfndoff a ssfn/ooen/ cchtto saigrsBo olBo ntrocsspaybOn/OffPreamp sectionrweoPctsenioAmponTurns the amp head on and off (bypass).(bypass)BoostProvides additional input gain, which pushes the front end of the amp. Boost can affect overdriveand the shape of the amp.Click on the pedal icon to open the Boost control panel. There are three controls.12PRS SuperModels / User Guide
BrightPreamp sectionVolumeReverbTrebleMiddleBassGainThe amount of overdrive added to the soundLevelOutput level of the boost module that’s pushing the amp’s front endShapeA six-way rotary switch for tone shaping. Settings range fromboosting low frequencies and reducing highs (full clockwise) toboosting the high frequencies and attenuating the lows (fullcounterclockwise).This high shelf sits at the beginning of the EQ section. As gain increases, the Bright effectbecomes less evident.Preamp gainSpring reverb mixTreble frequency controlMiddle frequency controlBass frequency controlPower Amp sectionMasterPower amp volumePower light Lights when amp is engaged (not bypassed).13PRS SuperModels / User Guide
Power Amp Setup SectionUse this pop-up window to set up the power transformer and tubes. These arefundamental power amp alignments that you’ll probably not need to adjustoften. Click on the tube icon to access the Power Amp Setup section.SAGSpeedThe amount of the tube sag effect added to the signal. Increasing sag can make playing easier, andnotes may punch out more.The speed of the sag effect. It can influence the feel of attacks and releases.BiasThe Bias knob adjusts how hot (more harmonics, more sag, louder) or cold (less harmonics, etc.) theamp bias is set.SAG MeterAs sag increases, the meter level lowers.OT indicatorThe OT (Output Transformer) indicator shows the extent to which the output transformer is beingstressed.Power Amp Setup is described thoroughly in the Archon 50 section earlier in this user guide.14PRS SuperModels / User Guide
PRS Blue Sierra V9This amp is tight, focused and controllable and it has a very deep low end. It’s a rock guitar amp that sounds great for avariety of classic/vintage tones. V9 is a single-channel amp.dssan spafybof spn/ cceomatAos rolsoB ntconfftio/ocneoshtpir gmBeaPrff/onoeeagagtStSnnai faiG n/ofGostjudamraewPoptputoupontupsepAmmarwe ionoP ctseOn/OffTurns the amp head on and off (bypass). When the amp is off, the output of the Input/Output andTweak modules are heard. Turn off the amp to use an external amp.BoostProvides additional input gain, which pushes the front end of the amp. Boost can affect overdriveand the shape of the amp.Click on the pedal icon to open the Boost control panel.15PRS SuperModels / User Guide
GainThe amount of overdrive added to the soundLevelOutput level of the boost module that’s pushing the amp’s front endShapeA six-way rotary switch for tone shaping. Settings range fromboosting low frequencies and reducing highs (full clockwise) toboosting the high frequencies and attenuating the lows (fullcounterclockwise).Preamp controlsBrightA high shelf on the input to the preampVolumePreamp gainTreblePreamp high-frequency controlMiddlePreamp mid-frequency controlBassPreamp low-frequency controlGain Stage VolumePreamp volume for gain stageGain Stage OutputAmount of volume from gain stage to power ampUse the Gain Stage controls to establish proper level between the preamp and the amp.Power amp controls16Output PresenceAdjusts amplifier high-frequency.Output MasterPower amp volume (before plugin main output in the Input/Output module)PRS SuperModels / User Guide
Power Amp Setup SectionUse this pop-up window to set up the power transformer and tubes. These arefundamental power amp alignments that you’ll probably not need to adjustoften. Click on the tube icon to open the control panel.There are three controls:SAGSAG SpeedThe amount of the tube sag effect added to the signal. Increasing sag can make playing easier,and notes may punch out more.The speed of the sag effect. It can influence the feel of attacks and releases.BiasThe Bias knob adjusts how hot (more harmonics, more sag, louder) or cold (less harmonics, etc.) theamp bias is set.SAG MeterAs sag increases, the meter level lowers.OTThe OT (Output Transformer) indicator shows the extent to which the output transformer is beingstressed.Power Amp Setup is described thoroughly in the Archon 50 section earlier in this user guide.17PRS SuperModels / User Guide
Input and Output ModuleThis module controls the plugin’s level before and after the amplifier. It’s also used to: control a noise gateselect and load cabinet IRsadjust the amount of space in the cabinethelp you tune your guitarBlue Sierra V9DallasArchon(lead channel)18PRS SuperModels / User Guide
Input SectionThe Input section is used to establish the ideal input level for efficient processing. Set thelevel too high and you may encounter distortion somewhere down the line. Too low and theremay be problems with noise or the gate may not work properly. In any case, incorrect inputlevels start you off to a bad start.Important reminder:The performance of a guitar amp is affected by the impedance of its input signal. WavesSuperModels is no different. If the impedance is not correct, you will likely not get the results youexpect from the amp. We recommend that you play through a high-z instrument input (1M ohm orhigher) and a buffered output (10k ohm)— any ordinary tuner pedal, for example—between the guitarand your audio interface input.You can set input gain manually or automatically. We recommend using the Auto Input function, since you will likelyget better results this way. Auto-Input analyzes the input signal over a specified time and calculates the peak andRMS levels. It averages these values and adjusts the input level to approximately -17 dB. This provides idealheadroom for the processor.Select an amplifier before you set the input level. Input level calculations are based on the dynamic characteristics ofa specific amp. If you swap amps after setting the input level, you will need to reestablish correct input level.To set input level automatically1. Choose a duration for the Auto Input calculation: 2.5 seconds, 5 seconds, or 10 seconds. Press “Start.”Typically, the longer the sample time, the more accurate the input level calibration.2. Play your guitar in a way that’s representative of what you’ll be playing. Calculation begins when you start. Asmall clock indicates time remaining in the calibration process.3. If you stop playing, the timer will pause. Resume playing to continue calibrating. The process will stopautomatically and the Start light will switch off. Try playing different short segments, each with different gainand dynamics. This can result in a more accurate, more representative input level. During the learning19PRS SuperModels / User Guide
process, Boost is switched off. When the calculation is finished, the Auto Input switch will automatically turnoff.4. Input gain will be adjusted over a period of 200 ms. This makes for a smooth transition from old to new inputgain levels.To set input gain manually, use the Input knob and the 6-LED gain display. Green generally indicates that input levelis low. To achieve the ideal input level, try to light as many yellow LEDs as possible. Red means that level is toohigh.Noise GateThis is intended primarily to remove system noise such as pickup buzz and hiss in order to provide aclean signal for the processor. With knob settings of less than -40, hiss and other low-level noisesshould be eliminated without impacting the notes themselves.The Archon amp has an additional gate at the front end. This gate chops the release of notes in a musical way andcreates a musical effect when playing very short notes or chords. Since this effect is often associated with Metalmusic, the mode switch is labeled with the letter M. In the Archon gate section, a single knob controls both modes.Cabinet LoaderThe speaker cabinet strongly influences the texture of an amp’s sound. PRS SuperModels cabinets are preciseacoustic reproductions of the PRS hardware originals, so they treat the amp’s sound just like the hardware does.This accuracy is achieved by creating an impulse response (IR) of the space within a specific cabinet. When theoriginal signal passes through the IR, it is convolved (literally, “rolled together”) with the IR, and it takes on theprecise acoustic characteristics of the cabinet.20PRS SuperModels / User Guide
The nine-position selector knobs are used to select cabinet IRs. The first eight positionsselect default IRs that correspond with the PRS cabinets. These factory IRs are sortedby the “aggressiveness” of the cabinet, from greatest to least.Default cabinet IRs: Knob positions and corresponding cabinets:123112 V30.wav212 Black 1.wav212 Black 2.wav4 212 V30.wav5 412 G65 off-axis.wav6 412 G65 on-axis.wav7 412 Green 55hz.wav8 412 Green 75hz.wavTo make IR selection easier, highlight an IR selection knob and use the up/down keyboard arrows to move throughthe list of cabinets.Both cabinets can have the same IR loaded, which tends to increase loudness, or different IRs, which usually resultsin a richer, more complex cabinet sound.A cabinet’s on/off switch bypasses that cabinet. You can monitor one cabinet, or two, or none.Turning off both cabinets bypasses the Cabinet Loader section altogether. If a user-created cabinetIR has been loaded in the Cabinet module (the module in the middle of the plugin), then knob position9 will load that IR. As long as a user- or third-party IR is available for that cabinet, position 9 will beactive.Other Panels21PRS SuperModels / User Guide
AirUse the Air control to adjust the effective size of the cabinet. Smaller settings yield a tighter cabinet sound, largersettings make for a more open size. Set the Air knob to zero to bypass the effect altogether.TunerThe Tuner section displays the pitch of the current note. This provides feedback while playing. The Tuner switch hasthree settings: OffThe section is bypassed.OnThe section is engaged and pitch is indicated on the display.Mute Tuning is engaged and output is muted. Use this setting when you want to tune silently.Output sets the output gain for the plugin. This control is post-amplifier.Additional cabinet controlThe Cabinet Loader enables you to load one or two PRS cabinet IRs. Commonly, this is all you need to build yourcabinet sound. If, however, you want more control over the cabinets or you want to automatically audition cabinetswhile playing, you’ll need to use the Cabinets module.The Cabinets module is described it the next section.22PRS SuperModels / User Guide
Cabinets ModuleThe Cabinets module (middle of the plugin) is used to audition and select cabinet IRs—PRS default cabinet IRs,third-party IRs, and user-made IRs. The Cabinets module also enables you to control speaker excursion within thecabinet. Cabinets 1 and 2 are identical.By default, the Cabinets module is covered. To open the cover, click on the Gear button in the Cabinet Loader.At the heart of the Cabinets module is a two-channel, zero-latency IR convolver. It enables you to align timing andphase, and adjust the level and pan of the two cabinets. If you want, you can create a new IR from this mix.23PRS SuperModels / User Guide
Loading the Cabinet IRsA cabinet’s IR is shown in the file name window. There are three ways to load an IR.1) Load an IR file directlyClick on the folder icon to open the IR Select drop-down menu. These are the eight WavesPRS cabinet IRs. Select one.You can apply custom cabinet IRs. Files must be in the WAV format, with a duration of 50 msor shorter. Longer files will be shortened and faded. This short IR duration is appropriate forspeaker cabinets; longer IRs can waste CPU resources and impose latency.To load a custom cabinet IR, select “Open file or directory.” Browse to the IR file and select.Once you load any custom IR, all of the IRs in its folder will appear in the menu. Use the“Clear User ID” menu item to remove all custom IRs from the list.When a custom IR is loaded in a cabinet, it can alsobe loaded with the Cabinet Loader knob.24PRS SuperModels / User Guide
2) Cycle through all available IRsUse “Forward” and “Backward” buttons to cycle through all available IRs. If a custom IRhas been loaded, then all IRs in that folder will be included in the audition.IRs are sorted and auditioned from “most aggressive” to “least aggressive” cabinets.3) Timed IR auditionsYou can automatically cycle though IRs for fixed periods of time. This lets you compare cabinets while playing a guitarthrough the amp.1) Select Cabinet 1 or Cabinet 2.2) Choose the amount of time you wish to audition a cabinet before moving on to the next one (2.5 seconds, 5seconds, or 10 seconds).3) Press the Play button to start IR auto-play. Play the guitar in a manner that resembles the concert performanceand listen to the effect of the various IRs. A small clock indicates how much time is left in the current IR preview.When the time period is finished, the next IR will be auditioned. All IRs that appear in the IR drop-down menu,factory and custom, are included in the automatic audition.4) To load the current cabinet, click Play once again.5) Click the Direction button on the left to reverse the order in which custom IRs are auditioned. Factory IRs arealways auditioned in the same order.6) Repeat the same process for the other cabinet.When loading an IR to Cab 1, Cab 2 is muted.When loading an IR to Cab 2, Cab 1 is muted.The On/Off button bypasses a cabinet.25PRS SuperModels / User Guide
Process PanelThe Process panel is used to align the two cabinet IRs. It can automatically align time and phase for two IRs, inorder to avoid phasing or lack of articulation. This panel is active when both cabinets are active.Time FixTrims the beginning of the IR so that audio begins precisely at the beginning of thefile. Applying Time Fix to two IRs forces them to start at precisely the same time.Phase FixAligns phase between two IRs.Smart Mix Aligns the perceived volume between two IRs to provide a good starting point formixing.ExportExports a new IR that’s the result of the combination of the two IRs.The convolver supports IRs of a duration of up to of 50 ms. Longer IRs will be truncated and faded.26PRS SuperModels / User Guide
Other cabinet controlsThe two cabinets have identical controls.On/OffEnables/Bypasses the cabinet.PanPans the cabinet location in the stereo image (mono-to-stereo component only).MixAdjusts the relative levels of the two IRs.VolumeAdjusts the overall output level of the Cabinet module.Excursion is the displacement of the loudspeaker coil as sound is created in the cabinet. Lowfrequencies at high volume usually require large speaker excursion, since the speaker must move lotsof air. This is tough on the speaker—and it can result in some interesting distortion. Use the Excursionknob to control and exaggerate speaker displacement.Listen for a very wide, full—but pretty fuzzy—low frequency. The knob sets the level of excursion signal for the twocabinets together, which is indicated with the three-LED indicator. Red means you’re overdoing the excursion.Using a Third-Party AmpYou can use the Input/Output and cabinet IR sections with third-party amps. Simply switch off the PRSamp and it will be bypassed. Insert the alternate amp before PRS SuperModels in your plugins ch
The performance of a guitar amp is affected by the impedance of its input signal. Waves SuperModels is no different. If the impedance is nrrecot co t, you may not experience the true sound of the original PRS aemps. W recommend that you play through a high-z instrument input (1M ohm or higher) and a buffered output (10k ohm)—