Transcription
IRIScanTM Pro 3 WifiUser GuideRegulatory model: IRIScanTM Pro 3 Wifimanual-en-250-0827-E-iriscanpro3wifi-v100
TrademarksMicrosoft is a U.S. registered trademark of Microsoft Corporation.Windows, Windows XP, Windows Vista, Windows 7 and Windows 8 are either registeredtrademarks or trademarks of Microsoft Corporation in the United States and/or other countries.IBM, IBM PC are registered trademarks of International Business Machines Corp.Other brands and product names herein are trademarks or registered trademarks of theirrespective holders.CopyrightCopyright 2014 I.R.I.S All rights reserved.Information in this document is subject to change without notice. The software described inthis document is furnished under a license agreement or nondisclosure agreement.No part of this publication may be reproduced, transmitted, transcribed, stored in a retrievalsystem, or translated into any language or computer language, in any form or by any means,electronic, mechanical, magnetic, optical, chemical, manual, or otherwise, without the priorwritten permission of I.R.I.S. s.a.Material scanned by this product may be protected by governmental laws and otherregulations, such as copyright laws, the customer is solely responsible for complying with allsuch laws and regulations.WarrantyThe information contained in this document is subject to change without notice.I.R.I.S. makes no warranty of any kind with regard to this material, including, but notlimited to, the implied warranties of fitness for a particular purpose.I.R.I.S. shall not be liable for errors contained herein or for incidental or consequentialdamages in connection with the furnishing, performance, or use of this material.Disposal of Waste Equipment by Users in Private UnionThis symbol on the product or on its packaging indicates that the product can not bedisposed of with your other household waste. Instead it should be sent to appropriatefacilities for recovery and recycling in an effort to protect human health and the environment.Fore more information about where you can drop off your waste equipment for recycling,please contact your local city office, your household waste disposal service or the shop whereyou purchased the product.ii
User GuideFCC Statement:This equipment has been tested and found to comply with the limits for a Class B digitaldevice, pursuant to Part 15 of the FCC Rules. These limits are designed to provide reasonableprotection against harmful interference in a residential installation. This equipment generates,uses and can radiate radio frequency energy and, if not installed and used in accordance withthe instructions, may cause harmful interference to radio communications.However, there is no guarantee that interference will not occur in a particular installation. Ifthis equipment does cause harmful interference to radio or television reception, which can bedetermined by turning the equipment off and on, the user is encouraged to try to correct theinterference by one of the following measures: Reorient or relocate the receiving antenna.Increase the separation between the equipment and receiver.Connect the equipment into an outlet on a circuit different from that to which thereceiver is connected.Consult the dealer or an experienced radio/TV technician for help.This device complies with Part 15 of the FCC Rules. Operation is subject to the following twoconditions: (1) This device may not cause harmful interference, and (2) this device mustaccept any interference received, including interference that may cause undesired operation.FCC Caution:Any changes or modifications not expressly approved by the party responsible for compliancecould void the user’s authority to operate this equipment.This device is intended only for OEM integrators under the following conditions:1) The antenna must be installed such that 20 cm is maintained between the antenna andusers.2) The transmitter module may not be co-located with any other transmitter or antenna.IMPORTANT NOTICE:FCC Radiation Exposure Statement:This equipment complies with FCC radiation exposure limits set forth for an uncontrolledenvironment. This equipment should be installed and operated with minimum distance 20cmbetween the radiator & your body. To maintain compliance with FCC RF exposure compliancerequirements, please avoid direct contact to the transmitting antenna during transmitting.IC Notice:Operation is subject to the following two conditions:1) This device may not cause interference and2) This device must accept any interference, including interference that may cause undesiredoperation of the device.iii
IMPORTANT NOTE:IC Radiation Exposure Statement:This equipment complies with IC radiation exposure limits set forth for an uncontrolledenvironment. End users must follow the specific operating instructions for satisfying RFexposure compliance. This equipment should be installed and operated with minimumdistance 20cm between the radiator & your body.This transmitter must not be co-located or operating in conjunction with any other antennaor transmitter.Règlementd’ Industry CanadaLes conditions de fonctionnement sont sujettes à deux conditions:(1) Ce périphérique ne doit pas causer d’interférence et.(2) Ce périphérique doit accepter toute interférence, y compris les interférences pouvantperturber le bon fonctionnement de ce périphérique.European Union Regulatory NoticeProducts bearing the CE marking comply with the following EU Directives: Low Voltage Directive 2006/95/ECEMC Directive 2004/108/ECRestriction of the use of certain hazardous substances (RoHS) Directive 2011/65/EUR&TTE Directive 1999/5/ECCE compliance of this product is valid if powered with the correct CE-marked AC adapterprovided by I.R.I.S. s.a.This product satisfies the Class B limits of EN55022, EN55024, safety requirements of EN60950 and ROHS requirements of EN50581.*This machine is certified as Class 1 LED product.iv
User GuideWarning and Precautions of the lithium-ion batteryWarning:Danger warning to prevent the possibility of the battery from leaking, heating, explosion,please observe the following precautions: Don’t immerse the battery in water and seawater. Please put it in cool and dryenvironment if no using. Do not discard or leave the battery near a heat source as fire or heater Being charged, using the battery charger specifically for that purpose Don’t reverse the positive and negative terminals Don’t connect the battery to an electrical outlet directly. Don’t connect the positive and negative terminal directly with metal objects suchas wire. Short terminals of battery is strictly prohibited, it may damage battery. Do not transport and store the battery together with metal objects such asnecklaces, hairpins. Do not strike, throw or trample the battery. Do not directly solder the battery and pierce the battery with a nail or other sharpobject. Do not use lithium ion battery and others different lithium polymer battery modelin mixture. Prohibition of use of damaged cells. Don’t bend or fold sealing edge. Don’t open or deform folding edge. Don’t fillet theend of the folding edge. Don’t fall, hit, bend battery body. Battery pack designing and packing Prohibition injury batteries. Never disassemble the cells. Keep the battery away from babies. Any components contacting these two edges, they must be insulated.v
Caution: Risk of explosion if battery is replaced by an incorrect type. Dispose the batteryaccording to local regulations. Never place batteries or devices on or in heating devices, such as microwaveovens, stoves, or radiators. Batteries may explode when overheated or itsperformance will be degenerate and its service life will be decreased. Do not use it in a location where is electrostatic and magnetic greatly, otherwise,the safety devices may be damaged, causing hidden trouble of safety. If the battery leaks, and the electrolyte get into the eyes. Do not wipe eyes,instead, rinse the eyes with clean running water, and immediately seek medicalattention. Otherwise, eyes injury can result. If the battery gives off an odor, generates heat, becomes discolored or deformed,or in any way appear abnormal during use, recharging or storage, immediatelyremove it from the device or battery charge and stop using it. Avoid charging batteries for more than a week, as overcharging may shortenbattery life. Over time, unused batteries will discharge and must be rechargedbefore use. Disconnect chargers from power sources when not in use. Use batteries only for their intended purposes. Store the battery at 0 C to 40 C. Avoid exposing your device and batteries to very cold or very hot temperatures.Extreme temperatures can cause the deformation of the device and reduce thecharging capacity and life of your device and batteries. Prevent batteries from contacting metal objects, as this can create a connectionbetween the and – terminals of your batteries and lead to temporary orpermanent battery damage. In case the battery terminals are dirty, clean the terminals with a dry cloth beforeuse. Otherwise power failure or charge failure may occur due to the poorconnection with the instrument. Be aware discharged batteries may cause fire. Follow all local regulations whendisposing of used batteries or devices. Never crush or puncture the battery. Avoid exposing the battery to high externalpressure, which can lead to an internal short circuit and overheating.vi
User GuideTable of Contents1.Overview . 1-11.11.21.31.41.51.62.Installation . 2-12.12.22.32.42.52.62.72.83.Precautions . 2-1Install the Battery . 2-1Charge the Battery . 2-32.3.1 Via the USB Cable. 2-32.3.2 Via the USB Power Adapter . 2-4Install a SD Card . 2-5Install the Feed Extension Plate . 2-6Install the Software . 2-82.6.1 System Requirements . 2-82.6.2 Installation on Windows . 2-82.6.3 Installation on Mac OS. 2-92.6.4 Power On the Scanner . 2-92.6.5 Connect to a Computer . 2-10Suitable and Unsuitable Original Types . 2-11Load a Document . 2-11Operation in Easy (SD) Mode . 3-13.13.23.33.43.53.63.73.84.Introduction . 1-1Package Contents . 1-1Front View . 1-2Rear View. 1-4Side View . 1-4LCD Display . 1-5Power on the Scanner . 3-1Switch to the SD Mode . 3-1Choose Your Desired Scan Settings . 3-2Start a Scan . 3-3Scan a Card . 3-4Scan Dark Pictures . 3-5Power off the Scanner . 3-6View or Download the Scanned Images . 3-63.8.1 Connect With Windows XP or Later . 3-73.8.2 Connect With Macintosh Computer . 3-73.8.3 Access Your Scanned Images . 3-73.8.4 Load Scanned Images in Readiris and Cardiris3-73.8.5 Disconnect the Scanner . 3-9Operation in Advanced (PC) Mode – Windows only . 4-14.14.24.34.44.5Switch to the PC Mode . 4-1Scan Documents with Readiris Corporate 14 . 4-1Scan Documents with Cardiris Corporate 5 . 4-2Scan Documents with the Capture Tool . 4-2A Glance of the Scanner Properties Dialog Box . 4-4vii
5.Access the scanned images through Wifi (SD Mode) . 5-15.15.25.35.4Access the Scanned Image through Wifi . 5-1Use Options under Image Thumbnails . 5-3Reset Login Settings . 5-5Exit the Wifi Mode . 5-56. Enhance Your Images with the Scanner Properties Dialog Box(PC Mode) . 6-16.16.26.36.46.56.66.76.86.97.Maintenance . 7-17.17.27.37.48.Clean the Scanner Glass, Separation Pad and Rollers . 7-1Calibrate the Scanner . 7-3Replace the Feed Roller . 7-5Replace the Separation Pad . 7-8Troubleshooting . 8-18.18.28.38.49.Buttons on the Scanner Properties Dialog Box . 6-2The Image Tab . 6-46.2.1 The Image Selection Box. 6-46.2.2 Other Image Options . 6-56.2.3 Scanning Color Images . 6-86.2.4 Scanning Grayscale Images. 6-86.2.5 Scanning B&W Images. 6-86.2.6 Editing Profiles . 6-9The Compression Tab . 6-11The Color Dropout Tab. 6-126.4.1 Color Dropout Selection . 6-12The Paper Tab . 6-136.5.1 Cropping. 6-136.5.2 Other Paper Selection . 6-17The Preview Tab . 6-18The Options Tab . 6-19The Setting Tab . 6-21The Information Tab. 6-22Clear a paper jam . 8-1Error Conditions. 8-2Frequently asked questions and answers . 8-3Technical Service . 8-7Specifications . 9-1viii
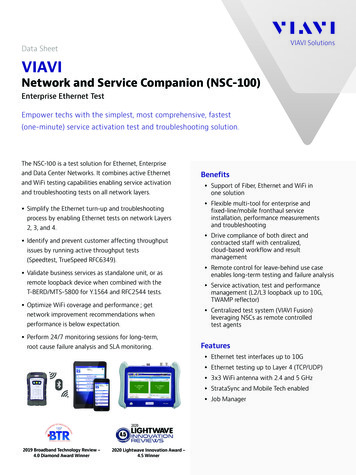
User Guide1.1.1OverviewIntroductionCongratulations on your purchase of the mobile scanner. This scanner provides youflexibility to start easy scans (SD mode) by pressing the Scan button without connecting itto a computer or you may use it like a regular scanner to start advanced scans (PC mode)by installing the scanner driver and connecting to a computer.Before you install and operate the product, please take a few minutes to read through thismanual. It provides proper instructions for you to install, operate and maintain theproduct. The following figure indicates the package contents. Please check all the itemsagainst your checklist. If you do not receive all the items, please contact your authorizedlocal dealer immediately.1.2Package ContentsScannerUSB CableCalibration SheetUSB Power AdapterLi-Ion BatterySoftware CD, includingQuick User GuidesCleaning ClothNote:1. Only use the USB adapter (DSC-5CU-05 050100 made by DVE) and the Li-ion Battery AP120 made by APACK/CB-PD(NP-120) made by City Bright included in the product. Usingother power adapters may damage the machine and void the warranty.1-1
2. Please unpack the packing carefully, and check the contents against the checklist. If anyitems are missing or damaged, please contact your dealer immediately.1.3Front View123459Item1Name876DescriptionLCD displayDisplays the battery status and current scan settings.Indicates the operating/warning status of the scanner.Solidly lit in green: The power is turned on.Flashing in green: Scanning a document in 300 dpi.23System indicatorlightSD/PCWifi SwitchFlashing in orange: Scanning a document in 600 dpi.Flashing in red: Paper is jammed. A double feed has been detected and the scannerhas stopped. The feeder cover is open. Another scanner error has occurred. Press to switch to SD (Scan to SD) or PC (Scan toPC) mode. In SD mode, hold down the button for one secondto turn on the Wifi connection; Press again to turnoff the Wifi connection.* Wifi connection is available for the SD mode only.4Scan5JPEG/PDF6300/600 dpiPress to switch to 300 dpi or 600 dpi.7Color/B&WPress to switch to Color or B&W mode.Press to start a scan.Press to switch to JPEG or PDF file format.1-2
User GuideItemName8Wifi IndicatorLight9Feed trayDescriptionIndicate the Wifi status.This tray is used for feeding documents. Open itwhen scanning documents.1223Item123NameDocumentExtension PlateDocument GuidesFeeder CoverDescriptionOpen the plate to support the document whenloading a long document.These guides ensure documents are fed straight.Raise the guides when loading a document, andthen align them to the edges of the document to bescanned.Open this when cleaning the scanner.1-3
1.4Rear View1Item1.52NameDescription1Plastic cardfeederUsed to insert and hold a business card or aplastic card.2Memory card slotUsed to insert a memory card.Side View1Item2NameDescription1Power switchTurn to the [ON] position to power on thescanner or turn to the [OFF] position to poweroff the scanner.2Micro USB portUsed to plug the micro end of the USB cable toconnect to PC.1-4
User Guide1.6LCD Display4152367ItemNameDescription1Battery statusIndicates the power status of the battery.2PC/Scancount/ErrorIndicates the PC mode, scan count or error.3File formatIndicates current file format for the scanned image.Choice: PDF, JPEG.4Color modeIndicates current color mode. Choice: Color, Blackand White.5Memory cardIndicates an inserted memory card.6ResolutionIndicates current resolution. Choice: 300 dpi, 600dpi.7WificonnectionIndicate the Wifi connection is turned on.1-5
User Guide2.Installation2.1 Precautions Keep the product out of direct sunlight. Direct exposure to the sun or excessiveheat may cause damage to the unit. Do not install the product in a humid or dusty place. Place the product securely on an even, flat surface. Tilted or uneven surfaces maycause mechanical or paper-feeding problems. Retain the product box and packing materials for shipping purposes.2.2 Install the BatteryImportant!Note the scanner scans a document using the power from the battery in both the SD and PCmode. Be sure to install the battery and charge it when the battery power is getting low.1.Open the feed tray.2.Open the feeder cover.2-1
3.Open the battery cover.2-2
User Guide4.Load the battery into the battery container. Make sure the battery is loaded with thecorrect polarity. Note the copper strips on the battery should be touching the copperstrips on the device. Note: Please use only the supplied battery.5.Close the battery cover and feeder cover.2.3 Charge the BatteryThere are two methods to charge the batteries,1. Through the USB cable to the computer.2. Through the USB power adapter to the electric outlet.2.3.1 Via the USB Cable1.Turn off the scanner.2.Connect the micro USB connector to the USB port of the scanner.3.Connect the other USB connector to the USB port on your computer.2-3
2.3.2 Via the USB Power Adapter1. Turn off the scanner.2. Connect the micro USB connector to the USB port of the scanner.3. Connect the other USB connector to the USB port of the USB Power Adapter.USB PowerAdapterImportant: For first-time use, please charge the battery for at least 4 hours. While charging the battery, the green LED light will be solidly on. After the chargingis completed, the LED light will be extinguished. When the battery is fully charged, an A4-sized of page can be scanned for 200 timesat 300 dpi (or 150 times at 600 dpi)!2-4
User Guide2.4 Install a SD CardTo scan in SD (Scan to SD) mode, the scanner’s built-in storage disk has approximately128MB of space that can be used to store scanned images. You can install a SD card to theSD slot of the scanner to expand your storage. Gently press in until the SD card is latched.Note:The scanner only accepts SD card in FAT16 or FAT32 format. NTFS and other file formats arenot supported.2-5
2.5 Install the Feed Extension Plate1. Open the feed tray.2. Open the feed extension plate.2-6
User Guide3. Raise the document guides and adjust them to the size of your documents.2-7
2.6 Install the SoftwareThe IRIScan Pro 3 Wifi comes with the software packages Readiris Corporate 14 (PC andMac), Cardiris Corporate 5 (PC), Cardiris Pro 4 (Mac) and IRISFile 12.5In Windows you can san directly from these applications, provided you install the Twaindriver from the DVD-ROM.Note:To ensure your computer can identify the USB scanner, please install scanner driver firstbefore connecting the scanner to your computer.On Mac OS you need to scan in Easy SD mode, and load the scanned images in Readiris andCardiris.2.6.1 System RequirementsMinimum System Requirements Windows PCOperating SystemWindows 8, Windows 7 and Windows VistaCPUPentium IV or equivalentRAM1 GBHD space300 MBHardwareDVD-ROM drive, 1 free USB 2.0 portMinimum System Requirements Mac OSOperating SystemMac OS Leopard, Snow Leopard, Lion and Mountain Lion (no driverinstallation required)CPUIntel processorRAM1 GBHD space300 MBHardwareDVD-ROM drive, 1 free USB 2.0 portMinimum System Requirements iOS and Android OSOperating SystemiOS 5.1 or later and Android OS 4.0 or later2.6.2 Installation on Windows1.Place the supplied DVD-ROM onto your DVD-ROM drive.2.The software setup menu appears. If not, run “setup.exe” from the DVD-ROM to makeit appear.2-8
User GuideContents of the setup menu:3.4.5.6. IRIScan Pro Wifi: install the driver to use the scanner in PC mode, and scandirectly from Readiris and Cardiris. Readiris Corporate 14: this is I.R.I.S.’ flagship OCR (Optical CharacterRecognition) software. Cardiris Corporate 5: this is I.R.I.S.’ business card reading software. IRISFile Pro 12.5: this is a file management application.Quick User Guides: view the quick and detailed user guides of the scanner andits software.ClickClickClickClickIRIScan Pro Wifi to install the scanner driver on your computer.Readiris Corporate 14 to install it.Cardiris Corporate 5 to install it.IRISFile Pro 12.5 to install it.2.6.3 Installation on Mac OS1.2.3.4.Place the supplied DVD-ROM onto your DVD-ROM drive.Click the DVD-ROM icon that appears on the Desktop.Click Readiris Corporate 14 to install Readiris on your computer.You will be asked to enter a serial number. The serial number contains 15 digits and can befound inside the product box.Click Cardiris Pro 4 to install Cardiris on your computer.2.6.4 Power On the ScannerMove the power switch on the left side of the scanner to the “ON” position to turn on thescanner.2-9
2.6.5 Connect to a Computer1.Connect the micro USB port of the USB cable to the USB port of your scanner.2.Connect the other end to the USB port of your computer.3. The computer should detect a “Mass Storage Device”.2-10
User Guide2.7 Suitable and Unsuitable Original TypesSuitable Original TypesThe scanner used with the feeder dock is designed to obtain the best scanning results withthe following types of originals: Photos and documents (3”x5”, 4”x6”, 5”x7”, 8.5”x14”) (76 x 127mm, 102 x 152 mm,127 x 177 mm, 216 x 356 mm) Business cards [standard 3.5” x 2” (88 x 50 mm) or larger] Document weight: 60 107 g/m² (16 to 28 lb)Long Page (216 x 916 mm) (available for 300 DPI only)Unsuitable Original TypesDo not use the following types of originals for scanning in the feeder dock, otherwise thefeeder dock may malfunction or cause the original to jam in the slot. Originals thicker than 1.00 mm Original with either side shorter than 50 mm Originals with lots of black or dark colors Original with dark colors surrounding the edges Printed media (newspapers, magazines, etc Soft and thin materials (thin paper, cloth, etc.) Curl or wrinkle originals Originals with staples or paper clips. Originals that exceed acceptable size – 8.5” (width) x 14”(length) (216 x 356 mm)(in 600 dpi) (SD Mode)2.8 Load a DocumentFanning Your DocumentStandard paper size should feed easily through the scanner. To avoid occasional paperjam when automatically feeding multiple documents, loosen the paper before loading.2-11
Document Feeding1. Load the stack of document FACE DOWN with the top of the pages pointing into thefeeder. Up to 8 pages of plain paper can be loaded at one time in the feeder.2. Make sure the document guides are aligned with the edges of the stack.24B2-12
User Guide3.Operation in Easy (SD) Mode3.1 Power on the ScannerTurn the Power Switch to the [ON] position to turn on the scanner. The LED indicatorlight will be lit and the default scan settings will be displayed on the LCD screen.3.2 Switch to the SD ModeTo start easy scan (SD mode) to save your images to the system’s built-in memory or yourSD card, make sure your scanner is in the following SD (Scan to SD) mode. The SD mode isalso a default mode when the scanner is turned on:3-1
3.3 Choose Your Desired Scan SettingsAfter the scanner is turned on, the LCD displays the default scan settings, Resolution: 300dpi, Color mode: color, File format: JPG.Color Mode(Color/BW)The scanner offers two color modes for your scanned image, Color(default, fits for photos) and Black and White (fits for textdocument).Press [Color/BW] to switch to BW mode.Save Format(JPEG/PDF)Resolution(300/600)The scanner offers two types of file formats for your scanned image,JPEG (default, fits for photos) and PDF (fits for text document).Press [JPEG/PDF] to switch to PDF file.The scan resolution is measured in dpi (dots per inch). The higherthe resolution, the more details the scanned image will be displayed.However, a higher resolution may require more disk space stored inthe SD card. The scanner offers two types of resolution, 300 dpi(default, fits for most document) and 600 dpi (higher resolution).Press [300/600 dpi] to switch to 600 dpi.3-2
User Guide3.4 Start a ScanPress the [Scan] button to start a scan and the paper will feed through the scanner.3-3
3.5Scan a Card1.Make sure the feeder cover and paper tray are closed as shown.2.Insert your plastic card FACE DOWN from the back of the scanner and align itaccording to the card feeder as shown. 3.As long as the card is inserted in the feeder, the scan will be started automatically.3-4
User Guide3.6Scan Dark PicturesThe scanner has a built-in cropping function that automatically detects and crops dark edgesand dark areas against the cropping baseline background during the scan process. Toprevent poor cropping, align the original straight against paper guides and ensure there isadequate space in front of the feeder for the originals to completely feed through. Scanningon a flat and uncluttered surface is recommended.The following example illustrates a 4”x6” original photo scanned with auto-crop:Original/Auto-crop on (default)If the original is fed slightly crooked, the original is only cropped a pre-defined maximumamount, as shown in the following illustration:Max. 1.5mmMax. 1.5mm3-5
3.7 Power off the ScannerWhen your scanning job is completed, move the Power switch to the [OFF] position to turnoff the scanner. The LCD display will be off. When the scanner is left idle for 3 minutes, the default Power Save mode automaticallypowers off the scanner.3.8 View or Download the Scanned ImagesConnect the scanner to your computer to access the scanned images from the scanner’sbuilt-in disk or from the inserted memory card without using an independent card reader.While connected, you can view your scanned image files, copy and paste files from onestorage area t
Consult the dealer or an experienced radio/TV technician for help. This device complies with Part 15 of the FCC Rules. Operation is subject to the following two conditions: (1) This device may not cause harmful interference, and (2) this device must accept any interference received, including interference that may cause undesired operation.