Transcription
Water DispenserUse & Care ManualModel 2202Modelo 2202
INTRODUCTION TO YOUR NEW HAMILTON BEACH WATER DISPENSER (model 2202)Congratulations, you have acquired a high quality Hamilton Beach Water Dispenser forbottled water. This unit is packed with many extra features that you will find convenient to use.Multi-temperature capability allows you to enjoy a cool drink, hot beverage or simply cook yourmeals. It will provide you with many years of trouble free use if you follow the safetyprecautions and operating instructions provided in this easy-to-use manual. Please take the timeto read it, and save these instructions for future use. Please also remember to record the modeland series code. They are on a label in back of the unit.Model numberSeries codeDate of purchaseREAD ALL INSTRUCTIONS BEFORE USING!IMPORTANT SAFEGUARDSWhen using electrical appliances, basic safety precautions should be followed, including thefollowing: or any other appliance. Do not operatedispenser with a damaged cord. Do notuse with an underrated extension cord.WARNING: BURN HAZARD. Thedispenser heats water to a temperature ofapproximately 190 F (88 C). Watertemperatures above 125 F (52 C) cancause severe burns or death fromscalding. Children, the disabled and theelderly are at highest risk of beingscalded. Children should be supervised byan adult when using this product.WARNING: CRUSH AND FALLHAZARD. Do not allow children toclimb, stand or hang on the outside of thedispenser, or on the shelves inside thestorage cabinet. They could tip thedispenser over or fall and seriouslyinjure themselves. Children should besupervised by an adult when using thisproduct.WARNING: FIRE HAZARD. Do notstore or use gasoline or other flammablevapors and liquids in the vicinity of this1 WARNING: SHOCK HAZARD. Unplugthe water dispenser before cleaning orwiping up spilled water on unit. Do notattempt to service the dispenser. Do notoperate dispenser with a damaged cord. WARNING: TOXIC SUBSTANCEHAZARD. Do not use with water that ismicrobiologically unsafe or of unknownquality. Do not dispense anything otherthan water of known quality. CAUTION: SPOILED FOOD HAZARD.The storage compartment in this unit isnot a refrigerator. Do not storeperishable food in compartment.
DANGER: CHILD ENTRAPMENT HAZARD.PROPERLY DISPOSE OF THE WATER DISPENSER ASDIRECTED BELOW.Child entrapment and suffocation are notproblems of the past. Junked or abandoneddispensers with storage areas are stilldangerous even if they will sit for “just afew days.” If you are getting rid of your oldwater dispenser, please follow theseinstructions to help prevent accidents.REFRIGERANT DISPOSAL:Your old water dispenser may have used aregulated refrigerant in its cooling system.These refrigerants are believed to harmstratospheric ozone. If you are throwingaway your old dispenser, make sure therefrigerant is removed and recovered forproper disposal by an EPA-certifiedtechnician. If you intentionally release thisrefrigerant, you can be subject to fines andimprisonment under provisions ofenvironmental legislation.BEFORE YOU THROW AWAY YOUROLD DISPENSER: Take off the doors and discardseparately.Leave the shelves in place so thatchildren may not easily climb inside.If the dispenser door has a lock, make itunusable.SAVE THESE INSTRUCTIONS!2
PROPER INSTALLATION AND LOCATION1) Dispenser is for indoor use only. Donot use outdoors.4) Place the dispenser on a level surfacethat can support its weight with a fullwater bottle on it.2) To prevent algae growth, find alocation for your dispenser that isprotected from direct sunlight andother sources of heat (e.g., radiators,baseboard heaters, cooking appliances,etc). Do not use when relativehumidity is greater than 90%.5) To ensure that your water dispenserworks at the maximum efficiency,leave at least 2 inches of clearancebetween all sides of the dispenser andany walls.6) To prevent damage to dispenser, donot plug dispenser into the poweroutlet until reading the instructionsfirst!3) Do not install the dispenser where thesurrounding air temperature will beabove 100 F (38 C) or below 50 F(10 C).GROUNDING INSTRUCTIONSWARNING – Improper use of the grounding plug can result in a risk ofelectric shock. This appliance must be grounded. In theevent of an electrical short circuit,grounding reduces the risk of electricshock.This appliance is equipped with a powercord having a grounding wire with agrounding plug. The plug must beplugged into an outlet that is properlyinstalled and grounded.Consult a qualified electrician if thegrounding instructions are not completelyunderstood, or if doubt exists as towhether the appliance is properlygrounded.If the outlet is a standard 2-prong walloutlet, it is your personal responsibilityand obligation to haveit replaced with a properly grounded 3prong wall outlet.3 Do not under any circumstances cut orremove the third (ground) prong from thepower cord. Do not use an adapter plug with thisappliance. Do not use an extension cord with thisappliance. If the power cord is too short,have a qualified electrician install anoutlet near the appliance For best operation, plug the applianceinto its own electrical outlet on adedicated circuit to prevent flickeringof lights, blowing of fuse, or trippingof circuit breaker.
GETTING FAMILIAR WITH YOUR HAMILTON BEACHWATER DISPENSERFeatures: Designed for in home or office use. Front panel has three indicator lights, to see if the power, heating and cooling are on. Two power switches are located on the back of the dispenser. One is for cooling and onefor heating. Designed with distinctive thermal isolation technology, this dispenser can minimizethermal exchange between hot and cold water. Both hot water tank and cooling tank are 304 stainless steel. Convenient, built-in, 0.50 cubic foot storage compartment for non-perishable items. Chilling compressor is quiet and durable. There are two high-flow faucets on the front of the unit. The faucet with the red childsafety button is for hot water and blue is for cold water. Hot water faucet has a child resistant hot water guard. To operate it, push the tabclockwise to disengage the locking device, then push the push button inward. Removable, easy-to-clean drip tray. The power cord has a grounded plug. Please make sure that your outlet is properlygrounded. Rated power is 420W for heating and 90W for cooling Fits 3 or 5 gallon bottles4
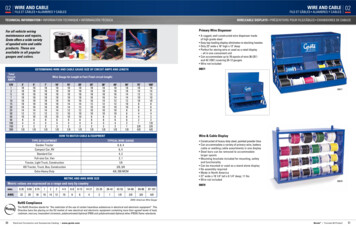
Parts Listing:12Part No.Part NameHB-BS-1003Bottle SupporterHB-SE-1004SeparatorHB-CT-1005Cold Water TankHB-GIL-1006 Green Indicator LightHB-RIL-1007 Red Indicator LightHB-BIL-1008 Blue Indicator LightHB-CWF-1009HB-HWF-1010HB-CAS-1011Cold Water FaucetHot Water FaucetCasingPart No. Shownon DiagramPart HB-CS-1016HB-TH-1017Part NameDrip TrayStorage DoorRemovable ShelfHeating SwitchCooling SwitchThermostat(Do not touch)HB-PC-1018Power CordHB-DOC-1019 Drain Outlet CapHB-SS-1020Silicon Stopper6785Part No. Shownon Diagram91010B111213(under panel)141515B
PREPARING, LOADING & OPERATING YOUR DISPENSER1)Make sure that the dispenser is not plugged into the electrical outlet and that both thehot and cold power switches (on the back of the dispenser) are set to the OFF position.2)Sanitize the dispenser water tanks prior to installing a full bottle of water for the firsttime (see “Proper Care and Cleaning of Dispenser”).3)The water bottle will have a cap. The cap may have a stopper that is intended to bepushed into the bottle. (Sometimes these stoppers are covered by a removablepaper/foil seal.) If your bottle has a cap with a stopper, simply hold the water bottlevertically straight upside down and place the water bottle into the support collar ontop of the water dispenser. The post in the collar will push the stopper into the bottle.If the water bottle cap does not have a stopper that is intended to be pushed into thebottle, first remove the support collar of the water dispenser by turning itcounterclockwise and pulling it straight up and off. Then remove the cap from thewater bottle. Quickly lift the water bottle, turn it upside down, and place the waterbottle onto the top of the water dispenser. Wipe up any water that spills on to thewater dispenser or floor.Rotate counterclockwiseand pull straight offa. Press the hot and cold dispenser buttons until water runs from all faucets.NOTICE: To avoid damage to the dispenser, do not plug in the power cord or turnon the heating switch (red) until water runs freely from the hot water faucet whenthe hot water faucet is activated.b. Plug in the dispenser into a grounded power outlet (see Grounding Instructions).c. Set the HOT and COLD power switch (located on the rear of the dispenser) to theON position. Indicators light up accordingly once the dispenser is functioning.NOTICE: To prevent damage to dispenser, give the dispenser four hours to warmup to room temperature before plugging it in if the dispenser is brought in fromoutside in the winter time.4)Allow 30 minutes for water to reach hot and cold temperatures.6
5)The hot water temperature is preset to 190 degrees Fahrenheit (88 degrees Celsius).The HOT dispenser button is equipped with a child safeguard that reduces the risk ofhot water being dispensed accidentally or by small children.WARNING: BURN HAZARD. The dispenser heats water to a temperature ofapproximately 190 F (88 C). Water temperatures above 125 F (52 C) cancause severe burns or death from scalding. Children, the disabled and the elderlyare at highest risk of being scalded. Children should be supervised by an adultwhen using this product.6)Before the dispenser leaves the factory, the cold water thermostat is properly set. Donot adjust the thermostat.7)When bottle is empty, vertically pull it out by two hands, then replace it with anotherbottle.8)The spilled water in the drip tray must be removed regularly and cleaned properly. Toremove it, slide tray out.Drip Tray GrilleDrip Tray9)In case hot or cold water is not needed for an extended period of time, turn off theswitch accordingly to save power.NOTICE: To prevent damage to dispenser, do not turn cold water switch back onwithin 3 minutes of having turned it off.PROPER CARE AND CLEANING OF DISPENSERWARNING: SHOCK HAZARD. Unplug the water dispenser before cleaning.Cleaning the Outside and Storage Compartment:IMPORTANT: Set both power switches (on the back of the dispenser) to the OFF position andunplug the water dispenser before cleaning.The inside and outside of the cabinet can be washed with mild soap and water. Rinse thoroughlywith clear water. Never use commercial cleaners or abrasive scouring powders.Sweep away or vacuum any dust from the condenser coils on the back of the unit. For best results,use a brush specially designed for this purpose. It is available at most appliance stores.Cleaning the Inside of the Storage Compartment:For prevention of odor, place an open box of baking soda in the storage compartment.7
IMPORTANT: Set both power switches (on the back of the dispenser) to the OFF position andunplug the water dispenser before cleaning.Use a solution of warm water and baking soda (approximately one tablespoon of baking soda toone quart of water). This will clean and neutralize odors. Then rinse and wipe dry.Other parts of the storage compartment including door gaskets and plastic parts can be cleaned inthe same manner.NOTICE: To prevent damage to the water dispenser, the plastic storage parts are not to bewashed in the dishwasher.Draining Instruction:The dispenser should be drained before cleaning the tanks and before leaving for long vacations orabsences.1)Set both power switches (on the back of the dispenser) to the OFF position and unplugthe dispenser.2)Dispense water from both buttons into container(s) until no more water can bedispensed (about 1 quart of water still remains in the dispenser). Put a container thatwill withstand hot water under the hot water faucet.3)Remove the water bottle from the dispenser.4)Place a large bucket beneath the drain outlet on the rear of the dispenser.5)Using a Phillips screwdriver, loosen the screws on the bracket covering the drain outletcap. Rotate the bracket out of the way to allow access to the cap.6)Remove the cap and silicon stopper from the drain outlet and allow water to drain.8
WARNING: BURN HAZARD. The dispenser heats water to a temperature ofapproximately 190 F(88 C). Water temperatures above 125 F (52 C) cancause severe burns or death from scalding. Children, the disabled and the elderlyare at highest risk of being scalded. Children should be supervised by an adultwhen using this product.After draining, replace the silicon stopper and cap.7)Rotate the bracket back into place and tighten screws.8)Make sure to install a full bottle and dispense water from both water faucets beforeplugging in and turning on the dispenser (see Preparing, Loading and Operating YourDispenser).Cleaning the Drip Tray and Grill:The drip tray is not self-draining. To reduce water spotting or deposits, the tray and its grill shouldbe emptied, cleaned and wiped dry regularly. Clean with mild soap or on the top rack in thedishwasher.Cleaning the Separator:1) IMPORTANT: Set both power switches (on the back of the dispenser) to the OFFposition and unplug the water dispenser before cleaning.2) Remove the water bottle and drain the dispenser (see Draining Instruction).3) Remove the support collar by turning counterclockwise and pulling straight off.Rotate counterclockwiseand pull straight off9
4) Remove the plastic separator by pulling straight out (you may need to twist slightly toloosen).5) Clean the separator with dish soap and water or in the top rack of the dishwasher.6) Dry the separator thoroughly on both sides.7) Using a clean cloth or paper towel, thoroughly dry the cold water reservoir.8) Place the separator back in the dispenser. Make sure the long, tapered end of the separatoris positioned firmly on the metal plug on the bottom of the reservoir.9) Replace the support collar and turn clockwise until it is firmly in place.10) Install a full water bottle on the dispenser (see Preparing and Loading Your Dispenser forUse).Sanitizing and Cleaning the Water Tanks:Important: Periodically the water dispenser tanks must be sanitized to prevent unpleasant tastes inthe water and cleaned to remove mineral deposits that can impair flow.To Sanitize:Important: Before cleaning, set both power switches (on the back of the dispenser) to the OFFposition and unplug the water dispenser. Note: For first time installation, skip next three steps.1) Empty the water bottle, then remove it from the dispenser.2) Drain the water tanks (see Draining Instruction)10
3) Reinstall the silicon stopper and drain cap (see Draining Instruction)4) DO NOT ADD BLEACH FIRST OR DIRECTLY TO THE DISPENSER.Concentrated bleach may damage plastic.5) Add ½ teaspoon (2.5 ml) of ordinary 6.0% maximum household bleach to a 2 quart (2 liter)pitcher filled with tap water.6) Pour the solution in the opening at the top of the dispenser.7) Repeat last two steps until the dispenser is full.8) Press the hot and cold dispenser buttons until the water just begins to flow from the faucets.9) Allow to sit for 15-20 minutes.10) Rinse out the bleach solution.11) Drain the water tanks into a large bucket (see Draining Instruction).12) Make sure that the silicon stopper is NOT installed.13) IMPORTANT: Remove the separator and wipe out the cold water reservoir(see Cleaning the Separator).14) Clean, then reinstall the separator and collar (see Cleaning the Separator).15) Pour approximately 1 gallon (4 quarts or 4 liters) of fresh tap water into the top and allowto drain into the bucket.16) Flush with an additional 1 gallon (4 quarts or 4 liters) of fresh tap water and allow to draininto the bucket.17) Reinstall the silicon stopper and drain cap (see Draining Instruction).18) Install a fresh water bottle (see Preparing and Loading Your Dispenser for Use).19) Dispense 1 quart (1 liter) of water from each faucet and taste to make sure the bleachsolution is completely removed.20) If you continue to taste the chlorine from the bleach solution, repeat steps 11 – 20 until thetaste is gone.21) Plug in the dispenser. Then turn on the hot and cold power switches (on the back of thedispenser).11
To Remove Mineral Deposits:Mix 2 quarts (2 liters) of water with two quarts of vinegar OR mix 1 gallon of water (4 liters) with16 ounces (454 g) of citric acid crystals. Bleach does not remove mineral deposits. Do this inplace of step 6 above when removing mineral deposits.Preparing for Vacation:For long vacations or absences, set both power switches (on back of the dispenser) to the OFFposition.Unplug the water dispenser.Remove the water bottle.Drain the water tanks (see Draining Instructions)Dry the separator thoroughly on both the top and bottom (see Cleaning the Separator).After returning from vacation, make sure to sanitize the water tanks before using the dispenser (seeSanitizing and Cleaning the Water Tank).TROUBLE SHOOTINGPROBLEMPOSSIBLE CAUSESNo hot or cold water1. over consumption of hot orcold water in short periodof time1. wait 30 minutesbefore using again2. no power supply2. connect plug to socket,turn on heating orcooling switch.Dispenser is unpluggedPush plug completely intooutletCooling switch not onCheck to be sure coolingswitch is turned to ONThe fuse is blown/circuitbreaker is trippedReplace house fuse or resetcircuit breaker.Water is not coolSOLUTIONIf too many items areplugged into a singlecircuit, move some itemsto a different circuit12
Water is not hotTemperature limiter trippedSet the hot and cold powerswitches to OFF position.Wait five minutes, then setswitches to ON position.Wait 30 minutes for waterto heat or cool.Dispenser is unpluggedPush plug completely intooutletHeating switch not onCheck to be sure heatingswitch is turned to ONThe fuse is blown/circuitbreaker is trippedReplace house fuse or resetcircuit breaker.If too many items areplugged into a singlecircuit, move some itemsto a different circuitTemperature limiter trippedSet the hot and cold powerswitches to OFF position.Wait five minutes, then setswitches to ON position.Wait 30 minutes for waterto heat or cool.PROBLEMPOSSIBLE CAUSESNo water runningout from faucets1. empty bottle2. inlet of bottle supporterblocked by bottle seal1. replace with new bottle2. clean out wasted paperand bottle seal, installbottle againWater dispenser doesnot work1. empty water bottle2. mineral deposits clogging tank1. replace with new bottle2. see Care and Cleaning.Water dispenser leaksfrom the outsidecrack or pin hole in bottlereplace with new bottleCompressor runs toofrequently1. room temperature is hotterthan normalThis may be necessary tomaintain a constanttemperature during hotand humid days2. dispenser does not haveproper clearanceCheck to be sure unit isproperly located to ensureadequate airflowimproper installationplace the machine on levelsurfaceNoisy operation13SOLUTION
Bottle making a gurgling noisethis is normalHot water boiling soundthis is normalDispenser or water bottleshakes when the coolingsystem cycles offthis is normalParticles floating inWaterWater has high mineralcontentfind a water source withlower hardnessWater in bottle is hotWater is boiling in the hottank and bubbling up intothe bottlepress the hot dispenserbutton until water flows toremove air from the hot tankFoul odor in air arounddispenserHot water tank is empty ornot completely fullpress the hot dispenserbutton until water flows toremove air from the hot tankWater has poor tasteSeparator needs cleaningSee Cleaning the SeparatorUnit needs to be sanitizedSee Cleaning and Sanitizingthe Water Tanks.or odor14
Consumer SupportQuestions? How to contact us:Telephone800-488-5080 (Monday – Friday 8:00AM-5:00 PM erdispensers.com15
LIMITED 1-YEAR WARRANTYWhat does this warranty cover?- Any defect in materials or workmanship in the manufacturedproductWhat does this warranty not cover?- Water Bottles- Service trips to your home to teach you how to use theproduct.- Improper installation.- Failure of the product if it is abused, misused, altered orused for other than the intended purpose.- Products that are used outside a residential or officeenvinronment.- Replacement of house fuses or resetting of circuitbreakers.- Use of this product where water is microbiologicallyunsafe or of unknown quality.- Damage to the product if used to dispense anything otherthan water.- Damage to the product caused by accident, fire, floods oracts of God.- Any service to the product- Incidental or consequential damage caused by possibledefects with this appliance, its installation or repair.For how long after the original purchase?- One (1) year.How do I make a warranty claim?- Return to the retailer from which it was purchased, along with acopy of the store receipt within the given period of time allowedfor returns by the retailer (i.e. 90 days). After this period of time,contact TTI Appliances at 1 800 579 7990. A refund will beprovided once the defective unit and a copy of the receipt has beenshipped to and received by TTI Appliances. This warrantyexcludes any cost of shipping to or from TTI Appliances.How does state law relate to this warranty?- This warranty is extended to the original purchaser andany succeeding owner for products purchased for homeor office use within the USA. Some states do not allowthe exclusion or limitation of incidental orconsequential damages. This warranty gives youspecific legal rights, and you may also have otherrights which vary from state to state. To know whatyour legal rights are, consult your local or stateconsumer affairs office or your state’s AttorneyGeneral.Exclusion of implied warranties: Except where prohibited orrestricted by law, there are no warranties, whether express,oral or statutory which extend beyond the description on theface hereof, including specifically the implied warranties ofmerchantability or fitness for a particular purpose.Warrantor: TTI Appliances, Los Angeles, CA -----------16
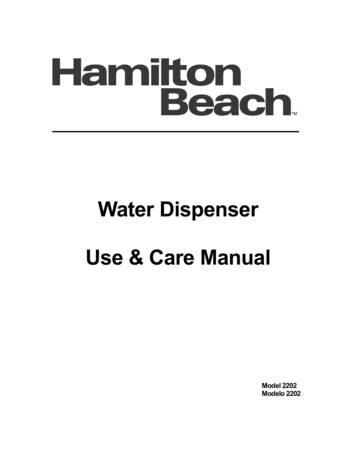
IMPORTANT NOTICESNOTA IMPORTANTE1. TO PREVENT DAMAGE TO WATERDISPENSER, LET UNIT STAND UPRIGHTFOR A MINIMUM OF FOUR HOURSBEFORE PLUGGING IN POWERCORD.PARA PREVENIR DAÑOS DEJE LAUNIDAD DE PIE POR UN MÍNIMO DECUATRO HORAS ANTES DE2. TO PREVENT DAMAGE TO WATERDISPENSER, DO NOT PLUG IN OR TURNON YOUR WATER DISPENSERUNLESS THERE IS WATERIN THE SYSTEM.PARA PREVENIR DAÑOS NO ENCHUFE OENCIENDA SU DISPENSADOR DE AGUAA NO SER QUE HAYA AGUA EN ELSISTEMA3. ODORS MAY RESULT IF THEWATER HEATER COMES ONWHEN THERE IS NO WATERIN THE TANK.PODRÍAN RESULTAR MALOS OLORESSI EL CALENTADOR DE AGUA ESENCENDIDO CUANDO NO HAYAGUA EN EL TANQUE4. PRIOR TO FIRST USE, PLEASEREMOVE CARBON ABSORBENT BAGATTACHED TO THE OUTSIDE OFCONDENSOR ON THE BACK OF YOURNEW DISPENSER, AND DISPOSE OFPROPERLY.ANTES DE USARLO POR PRIMERA VEZ,REMUEVA LA BOLSA DE CARBONABSORBENTE ADHERIDO A LA PARTEPOSTERIOR DE ESTE DISPENSADOR, YPONGALE EN LA BASURA.QUICK STARTINSTRUCTIONSCONECTAR EL CABLE ELÉCTRICO.INSTRUCCIONES RÁPIDAS1. ENSURE THE DISPENSERIS UNPLUGGED AND SWITCHED OFF.ASEGÚRESE DE QUE EL DISPENSADORESTA DESCONECTADO Y APAGADO2. CLEAN AND SANITIZETHIS DISPENSER BEFORE USE.NOTICE: TO PREVENT DAMAGE TODISPENSER, FOLLOW THE DIRECTIONSIN YOUR OWNER’S MANUAL.LIMPIE Y DESINFECTE ESTEDISPENSADOR ANTES DE USAR. NOTA:PARA PREVENIR DAÑOS SIGA LASINSTRUCCIONES EN SU MANUAL DEPROPIETARIO.3. LOAD A NEW BOTTLE.NOTICE: TO PREVENT DAMAGE TODISPENSER, FOLLOW THEDIRECTIONS IN YOUR OWNER’SMANUAL.4. DISPENSE A SMALL AMOUNTOF WATER FROM EACH FAUCET.HAMILTON BEACH WATERDISPENSER QUICK STARTGUIDEGUIA RAPIDA PARADISPENSADOR DE AGUAHAMILTON BEACH . . .WELCOME TO ANOTHERGREAT HAMILTON BEACH PRODUCTBIENVENIDO A OTROFABULOSO PRODUCTO DEHAMILTON BEACH OFFpositionPosicion APAGADO (OFF)COLÓQUESE UNA BOTELLALLENA. PARA PREVENIR DANOSSIGA LAS INSTRUCCIONES EN U SMANUAL DE PROPIETARIODEJE CORRER PEQUEÑA PORCIÓNDE AGUA DE CADA GRIFO.5. PLUG IN AND TURN ON YOURDISPENSERENCHUFE Y ENCIENDA SUDISPENSADORQUESTIONS? Call 1-800-488-5080PREGUNTAS? LLAME AL 1-800-488-5080ONpositionPosicion ENCENDIDO (ON)
Designed for in home or office use. Front panel has three indicator lights, to see if the power, heating and cooling are on. Two power switches are located on the back of the dispenser. One is for cooling and one for heating. Designed with distinctive thermal isolation technology, this dispenser can minimize