Transcription
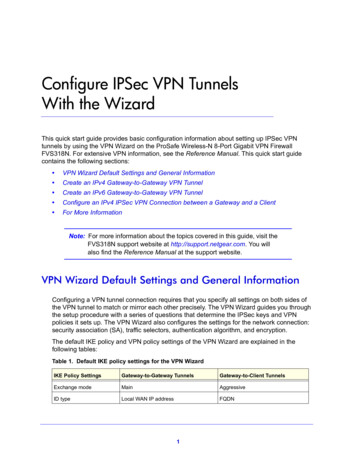
Configure IPSec VPN TunnelsWith the WizardThis quick start guide provides basic configuration information about setting up IPSec VPNtunnels by using the VPN Wizard on the ProSafe Wireless-N 8-Port Gigabit VPN FirewallFVS318N. For extensive VPN information, see the Reference Manual. This quick start guidecontains the following sections: VPN Wizard Default Settings and General Information Create an IPv4 Gateway-to-Gateway VPN Tunnel Create an IPv6 Gateway-to-Gateway VPN Tunnel Configure an IPv4 IPSec VPN Connection between a Gateway and a Client For More InformationNote: For more information about the topics covered in this guide, visit theFVS318N support website at http://support.netgear.com. You willalso find the Reference Manual at the support website.VPN Wizard Default Settings and General InformationConfiguring a VPN tunnel connection requires that you specify all settings on both sides ofthe VPN tunnel to match or mirror each other precisely. The VPN Wizard guides you throughthe setup procedure with a series of questions that determine the IPSec keys and VPNpolicies it sets up. The VPN Wizard also configures the settings for the network connection:security association (SA), traffic selectors, authentication algorithm, and encryption.The default IKE policy and VPN policy settings of the VPN Wizard are explained in thefollowing tables:Table 1. Default IKE policy settings for the VPN WizardIKE Policy SettingsGateway-to-Gateway TunnelsGateway-to-Client TunnelsExchange modeMainAggressiveID typeLocal WAN IP addressFQDN1
ProSafe Wireless-N 8-Port Gigabit VPN Firewall FVS318NTable 1. Default IKE policy settings for the VPN Wizard (continued)IKE Policy SettingsGateway-to-Gateway TunnelsGateway-to-Client TunnelsLocal WAN IDLocal WAN IP addressremote.comRemote WAN IDNot applicablelocal.comEncryption algorithm3DES3DESAuthentication algorithmSHA-1SHA-1Authentication methodPre-shared KeyPre-shared KeyKey groupDH-Group 2 (1024 bit)DH-Group 2 (1024 bit)Life time8 hours8 hoursTable 2. Default VPN policy settings for the VPN WizardVPN Policy SettingsGateway-to-Gateway TunnelsGateway-to-Client TunnelsEncryption algorithm3DES3DESAuthentication algorithmSHA-1SHA-1Life time1 hour1 hourKey groupDH-Group 2 (1024 bit)DH-Group 2 (1024 bit)NetBIOSEnabledDisabledTip: For DHCP WAN configurations, first set up the tunnel with IP addresses.After you have validated the connection, you can use the wizard tocreate new policies using the domain names, also referred to as fullyqualified domain names (FQDNs), for the WAN addresses.Tip: When using FQDNs and Dynamic DNS (DDNS) service, if the DDNSservice is slow to update its servers when your DHCP WAN addresschanges, the VPN tunnel will fail because the FQDNs do not resolve toyour new address. If you have the option to configure the update interval,set it to an appropriately short time.Tip: To ensure that tunnels stay active, after completing the wizard steps,manually edit the VPN policy to enable keep-alives, which periodicallysends ping packets to the host on the peer side of the network to keepthe tunnel alive. For more information, see the “Configure Keep-Alives”section in Chapter 6, “Virtual Private Networking Using IPSec and L2TPConnections,” of the Reference Manual.Configure IPSec VPN Tunnels With the Wizard2
ProSafe Wireless-N 8-Port Gigabit VPN Firewall FVS318NCreate an IPv4 Gateway-to-Gateway VPN Tunnel To set up an IPv4 gateway-to-gateway VPN tunnel using the VPN Wizard:1. Select VPN IPSec VPN VPN Wizard. In the upper right of the screen, the IPv4 radiobutton is selected by default. The VPN Wizard screen displays the IPv4 settings. (Thefollowing screen contains an example.) Figure 1.2. Complete the settings as explained in the following table:Table 3. IPSec VPN Wizard settings for an IPv4 gateway-to-gateway tunnel#SettingDescriptionAbout VPN Wizard This VPN tunnel will connectto the following peersSelect the Gateway radio button. The local WAN port’s IP address orInternet name automatically displays in the End Point Informationsection of the screen.Configure IPSec VPN Tunnels With the Wizard3
ProSafe Wireless-N 8-Port Gigabit VPN Firewall FVS318NTable 3. IPSec VPN Wizard settings for an IPv4 gateway-to-gateway tunnel (continued)#SettingDescriptionConnection Name and Remote IP Type What is the new ConnectionName?Enter a descriptive name for the connection. (The name is notsupplied to the remote VPN endpoint.)What is the pre-shared key?Enter a pre-shared key. The key needs to be entered both here andon the remote VPN gateway. This key needs to have a minimumlength of 8 characters and should not exceed 49 characters.End Point Information1 What is the Remote WAN’s IP Enter the IPv4 address or Internet name (domain name or FQDN) ofAddress or Internet Name?the WAN interface on the remote VPN tunnel endpoint. What is the Local WAN’s IPAddress or Internet Name?When you select the Gateway radio button in the About VPN Wizardsection of the screen, the IPv4 address of the wireless VPN firewall’sactive WAN interface is automatically entered.Secure Connection Remote AccessibilityWhat is the remote LAN IPAddress?Enter the LAN IPv4 address of the remote gateway.Important: The remote LAN IPv4 address needs to be in a differentsubnet from the local LAN IP address. For example, if the localsubnet is 192.168.1.x, then the remote subnet could be 192.168.10.xbut could not be 192.168.1.x. If this information is incorrect, thetunnel fails to connect.What is the remote LANSubnet Mask?Enter the LAN subnet mask for the remote gateway. 1. Both local and remote endpoints should be defined as either FQDNs or IP addresses. A combination ofan IP address and an FQDN is not supported.3. Click Apply to save your settings. The IPSec VPN policy is now added to the List of VPNPolicies table on the VPN Policies screen for IPv4. By default, the VPN policy is enabled. Figure 2.Configure IPSec VPN Tunnels With the Wizard4
ProSafe Wireless-N 8-Port Gigabit VPN Firewall FVS318N4. Configure a VPN policy on the remote gateway that allows connection to the wireless VPNfirewall.5. Activate the IPSec VPN connection:a. Select VPN Connection Status IPSec VPN Connection Status. The IPSec VPNConnection Status screen displays (see the following screen).b. Locate the policy in the table, and click the Connect table button. The IPSec VPNconnection becomes active. Figure 3.Create an IPv6 Gateway-to-Gateway VPN Tunnel To set up an IPv6 gateway-to-gateway VPN tunnel using the VPN Wizard:1. Select VPN IPSec VPN VPN Wizard.2. In the upper right of the screen, select the IPv6 radio button. The VPN Wizard screendisplays the IPv6 settings. (The following screen contains an example.)Configure IPSec VPN Tunnels With the Wizard5
ProSafe Wireless-N 8-Port Gigabit VPN Firewall FVS318N Figure 4.3. Complete the settings as explained in the following table:Table 4. IPSec VPN Wizard settings for an IPv6 gateway-to-gateway tunnel#SettingDescriptionAbout VPN Wizard This VPN tunnel will connectto the following peersSelect the Gateway radio button. The local WAN port’s IP address orInternet name automatically displays in the End Point Informationsection of the screen.Connection Name and Remote IP Type What is the new ConnectionName?Enter a descriptive name for the connection. (The name is notsupplied to the remote VPN endpoint.)What is the pre-shared key?Enter a pre-shared key. The key needs to be entered both here andon the remote VPN gateway. This key needs to have a minimumlength of 8 characters and should not exceed 49 characters.End Point Information1 What is the Remote WAN’s IP Enter the IPv6 address or Internet name (domain name or FQDN) ofAddress or Internet Name?the WAN interface on the remote VPN tunnel endpoint.Configure IPSec VPN Tunnels With the Wizard6
ProSafe Wireless-N 8-Port Gigabit VPN Firewall FVS318NTable 4. IPSec VPN Wizard settings for an IPv6 gateway-to-gateway tunnel (continued)#SettingDescription What is the Local WAN’s IPAddress or Internet Name?When you select the Gateway radio button in the About VPN Wizardsection of the screen, the IPv6 address of the wireless VPN firewall’sactive WAN interface is automatically entered.Secure Connection Remote AccessibilityWhat is the remote LAN IPAddress?Enter the LAN IPv6 address of the remote gateway.Important: The remote LAN IPv6 address needs to be different fromthe local LAN IPv6 address. For example, if the local LAN IPv6address is FEC0::1, then the remote LAN IPv6 address could beFEC0:1::1 but could not be FEC0::1. If this information is incorrect,the tunnel fails to connect.IPv6 Prefix LengthEnter the prefix length for the remote gateway. 1. Both local and remote endpoints should be defined as either FQDNs or IP addresses. A combination ofan IP address and an FQDN is not supported.4. Click Apply to save your settings. The IPSec VPN policy is now added to the List of VPNPolicies table on the VPN Policies screen for IPv6. By default, the VPN policy is enabled. Figure 5.5. Configure a VPN policy on the remote gateway that allows connection to the wireless VPNfirewall.6. Activate the IPSec VPN connection:a. Select VPN Connection Status IPSec VPN Connection Status. The IPSec VPNConnection Status screen displays:Configure IPSec VPN Tunnels With the Wizard7
ProSafe Wireless-N 8-Port Gigabit VPN Firewall FVS318N Figure 6.b. Locate the policy in the table, and click the Connect table button. The IPSec VPNconnection becomes active.Configure an IPv4 IPSec VPN Connection between aGateway and a Client Configure the Gateway Connection Configure the VPN Client Connection Using the VPN Client Configuration Wizard Test the NETGEAR VPN Client ConnectionNote: Although the wireless VPN firewall supports IPv6, the NETGEARProSafe VPN Client supports IPv4 only; an upcoming release of theVPN Client will support IPv6.To set up an IPSec VPN connection between a gateway and a NETGEAR VPN client, firstconfigure the gateway connection, and then configure the VPN client connection.Configure the Gateway Connection To set up a client-to-gateway VPN tunnel using the VPN Wizard:1. Select VPN IPSec VPN VPN Wizard. In the upper right of the screen, the IPv4 radiobutton is selected by default. The VPN Wizard screen displays the IPv4 settings. (Thefollowing figure contains an example.)Configure IPSec VPN Tunnels With the Wizard8
ProSafe Wireless-N 8-Port Gigabit VPN Firewall FVS318N Figure 7.2. Complete the settings as explained in the following table:Table 5. IPSec VPN Wizard settings for an IPv4 gateway-to-client tunnel#SettingDescriptionAbout VPN Wizard This VPN tunnel will connectto the following peersSelect the VPN Client radio button. The default remote FQDN(remote.com) and the default local FQDN (local.com) display in theEnd Point Information section of the screen.Connection Name and Remote IP Type What is the new ConnectionName?Enter a descriptive name for the connection. (The name is notsupplied to the remote VPN endpoint.)What is the pre-shared key?Enter a pre-shared key. The key needs to be entered both here andon the remote VPN gateway. This key needs to have a minimumlength of 8 characters and should not exceed 49 characters.Configure IPSec VPN Tunnels With the Wizard9
ProSafe Wireless-N 8-Port Gigabit VPN Firewall FVS318NTable 5. IPSec VPN Wizard settings for an IPv4 gateway-to-client tunnel (continued)#SettingDescriptionEnd Point Information1What is the Remote IdentifierInformation? When you select the Client radio button in the About VPN Wizardsection of the screen, the default remote FQDN (remote.com) isautomatically entered. Use the default remote FQDN, or enteranother FQDN.Note: The remote ID on the wireless VPN firewall is the local ID onthe VPN client. It might be less confusing to configure an FQDN suchas client.com as the remote ID on the wireless VPN firewall and thenenter client.com as the local ID on the VPN client.What is the Local IdentifierInformation? When you select the Client radio button in the About VPN Wizardsection of the screen, the default local FQDN (local.com) isautomatically entered. Use the default local FQDN, or enter anotherFQDN.Note: The local ID on the wireless VPN firewall is the remote ID onthe VPN client. It might be less confusing to configure an FQDN suchas router.com as the local ID on the wireless VPN firewall and thenenter router.com as the remote ID on the VPN client.Secure Connection Remote AccessibilityWhat is the remote LAN IPAddress?These fields are masked out for VPN client connections.What is the remote LANSubnet Mask?1. Both local and remote endpoints should be defined as either FQDNs or IP addresses. A combination ofan IP address and an FQDN is not supported.3. Click Apply to save your settings. The IPSec VPN policy is now added to the List of VPNPolicies table on the VPN Policies screen for IPv4. By default, the VPN policy is enabled. Figure 8.Configure IPSec VPN Tunnels With the Wizard10
ProSafe Wireless-N 8-Port Gigabit VPN Firewall FVS318N4. Collect the information that you need to configure the VPN client in your networkconfiguration. You can print the following table to help you keep track of this information(numbers 3, 4, and 5 relate to the same numbers in Table 5 on page 9; numbers 1 and 2of Table 5 are not applicable; numbers 6 and 7 do not relate to any previous samples inthis section).Table 6. Information required to configure the VPN client#ComponentEnter the information that you collectedExample Pre-shared keyI7!KL39dFG 8 Remote identifier informationremote.com Local identifier informationlocal.com Router’s LAN network IPv4 address192.168.1.0 Router’s WAN IPv4 address192.168.15.175Configure the VPN Client Connection Using the VPN ClientConfiguration WizardNote: Perform these tasks from a computer that has the NETGEARProSafe VPN Client installed. If you do not have a VPN client, re/VPN-client-software/default.aspx.The VPN client lets you set up the VPN connection with the integrated Configuration Wizard,which configures the default settings and provides basic interoperability so that the VPNclient can easily communicate with the wireless VPN firewall (or third-party VPN devices).The Configuration Wizard does not let you enter the local and remote IDs, so you need tomanually enter this information. To use the Configuration Wizard to set up a VPN connection between the VPN clientand the wireless VPN firewall:1. Right-click the VPN client icon in your Windows system tray, and select ConfigurationPanel. The Configuration Panel screen displays (see the left screen in the followingfigure).2. From the main menu on the Configuration Panel screen, select Configuration Wizard.The Choice of the remote equipment wizard screen (1/3) displays (see the right screen inthe following figure).Configure IPSec VPN Tunnels With the Wizard11
ProSafe Wireless-N 8-Port Gigabit VPN Firewall FVS318NFigure 9.3. Select the A router or a VPN gateway radio button, and click Next. The VPN tunnelparameters wizard screen (2/3) displays (see the left screen in the following figure).Note: The numbers that are shown in the following figure relate to the numbersthat are listed in Table 6 on page 11 and that are explained in Step 4. Figure 10.4. Specify the following VPN tunnel parameters: IP or DNS public (external) address of the remote equipment. Enter the remote IPaddress or DNS name of the wireless VPN firewall. For example, enter192.168.15.175. ( ) Preshared-key. Enter the pre-shared key that you already specified on the wirelessVPN firewall. For example, enter I7!KL39dFG 8. ( )Configure IPSec VPN Tunnels With the Wizard12
ProSafe Wireless-N 8-Port Gigabit VPN Firewall FVS318N IP private (internal) address of the remote network. Enter the remote private IPaddress of the wireless VPN firewall. For example, enter 192.168.1.0. ( ) This IPaddress enables communication with the entire 192.168.1.x subnet.5. Click Next. The Configuration Summary wizard screen (3/3) displays (see the rightscreen in Figure 10 on page 12).6. This screen is a summary screen of the new VPN configuration. Click Finish.7. Specify the local and remote IDs:a. In the tree list pane of the Configuration Panel screen, click Gateway (the defaultname given to the authentication phase). The Authentication pane displays in theConfiguration Panel screen, with the Authentication tab selected by default.b. Click the Advanced tab in the Authentication pane. The Advanced pane displays.Note: The numbers that are shown in the following figure relate to the numbersthat are listed in Table 6 on page 11 and that are explained in Table 7. Figure 11.c. Specify the settings that are explained in the following table.Table 7. VPN client advanced authentication settings#SettingDescriptionAdvanced featuresAggressive Mode Select this check box to enable aggressive mode as the mode of negotiationwith the wireless VPN firewall.NAT-TSelect Automatic from the drop-down list to enable the VPN client andwireless VPN firewall to negotiate NAT-T.Configure IPSec VPN Tunnels With the Wizard13
ProSafe Wireless-N 8-Port Gigabit VPN Firewall FVS318NTable 7. VPN client advanced authentication settings (continued)#SettingDescriptionLocal and Remote IDLocal ID As the type of ID, select DNS from the Local ID drop-down list because youspecified FQDN in the wireless VPN firewall configuration.As the value of the ID, enter remote.com as the local ID for the VPN client.Note: The remote ID on the wireless VPN firewall is the local ID on the VPNclient. It might be less confusing to configure an FQDN such as client.comas the remote ID on the wireless VPN firewall and then enter client.com asthe local ID on the VPN client.Remote ID As the type of ID, select DNS from the Remote ID drop-down list becauseyou specified an FQDN in the wireless VPN firewall configuration.As the value of the ID, enter local.com as the remote ID for the wirelessVPN firewall.Note: The local ID on the wireless VPN firewall is the remote ID on the VPNclient. It might be less confusing to configure an FQDN such as router.comas the local ID on the wireless VPN firewall and then enter router.com as theremote ID on the VPN client.8. Configure the global parameters:a. Click Global Parameters in the left column of the Configuration Panel screen. TheGlobal Parameters pane displays in the Configuration Panel screen.Figure 12.Configure IPSec VPN Tunnels With the Wizard14
ProSafe Wireless-N 8-Port Gigabit VPN Firewall FVS318Nb. Specify the default lifetimes in seconds: Authentication (IKE), Default. The default lifetime value is 3600 seconds.Change this setting to 28800 seconds to match the configuration of the wirelessVPN firewall. Encryption (IPSec), Default. The default lifetime value is 1200 seconds. Changethis setting to 3600 seconds to match the configuration of the wireless VPNfirewall.9. Click Apply to use the new settings immediately, and click Save to keep the settings forfuture use.The VPN client configuration is now complete.Test the NETGEAR VPN Client ConnectionThere are many ways to establish a connection. The following procedures assume that youuse the default authentication phase name Gateway and the default IPSec configurationname Tunnel. To establish a connection:Right-click the system tray icon (), and select Open tunnel 'Tunnel' (see the left screen).When the tunnel opens successfully, the Tunnel opened message displays above the systemtray (see the right screen).Figure 13.Once launched, the VPN client displays an icon in the system tray that indicates whether ornot a tunnel is opened, using a color code:Green icon:at least one VPN tunnel openedPurple icon:no VPN tunnel openedFigure 14.Configure IPSec VPN Tunnels With the Wizard15
ProSafe Wireless-N 8-Port Gigabit VPN Firewall FVS318NFor More InformationChapter 6, “Virtual Private Networking Using IPSec and L2TP Connections,” of theReference Manual provides information about the following security topics: Managing IPSec VPN policies Configuring extended authentication (XAUTH) Assigning IPv4 addresses to remote users (Mode Config) Configuring keep-alives and Dead Peer Detection (DPD) Configuring NetBIOS bridging with IPSec VPN Configuring the L2TP serverConfigure IPSec VPN Tunnels With the Wizard16
VPN Client will support IPv6. To set up an IPSec VPN connection between a gateway and a NETGEAR VPN client, first configure the gateway connection, and then configure the VPN client connection. Configure the Gateway Connection To set up a client-to-gateway VPN tunnel using the VPN Wizard: 1. Select VPN IPSec VPN VPN Wizard. In the upper .