Transcription
Faculty and Staff Development ProgramWelcomeMicrosoft Outlook 2013Fundamentals WorkshopComputing Services and Systems DevelopmentPhone: 412-624-HELP (4357)Last Updated: 04/01/15
Technology Help Desk412 624-HELP [4357]technology.pitt.eduMicrosoft Outlook 2013 WorkshopOverviewThis manual will help you learn many Microsoft Outlook features such as email options, inbox,contacts, calendar, and tasks. Topics include window options, email formatting, keeping emailorganized, entering contact information, scheduling individual appointments and groupmeetings, and tracking personal and group tasks.Table of ContentsI.Introductiona. Outlook Componentsb. View Options4II.Outlook Optionsa. Generalb. Advanced6III.Format Emaila. Select Message Formatb. Default Fontc. Using Stationeryd. Signatures Filese. Check spelling and Autocorrect8IV.Mail Optionsa. Set Importance Levelb. Set Sensitivity Levelc. Delay Sending Message15V.Organize Emaila. Categorize messagesb. Create foldersc. Create Rulesd. View Conversatione. Subscribe to RSS Feeds18File: Microsoft Outlook 2013 WorkshopPage 2 of 4904/01/15
VI.Contactsa. Create New Contactb. Edit Contact Informationc. Delete Contactd. Create Distribution Liste. Contact Viewsf. Print Contacts23VII.Mail Mergea. Add mail Merge Commandb. Create E-Mail Mergec. Send E-Mail Messages29VIII.Calendara. Calendar Screenb. Create Appointmentc. Recurring Appointmentsd. Create Meetinge. Create Eventsf. Print Calendarg. Calendar Permissions35IX.Taska. Create Taskb. Edit Taskc. Recurring Taskd. Mark Task Completee. Assignment Taskf. Reassign Declined Taskg. Reclaim Ownership of Declined Task44X.Account Informationa. Account Settingsb. Automatic Repliesc. Cleanup Tools49XI.Access Email from My Pitta. Log in52XII.Email Etiquettea. Dos and Don’ts Tips53File: Microsoft Outlook 2013 WorkshopPage 3 of 4904/01/15
I.IntroductionMicrosoft Outlook is a desktop information management program that helps you organize andshare information on your desktop and communicate with other people. You can use Outlookfor both personal and group activities such as e-mail, appointments, contacts and sharinginformation. The table below consists of the standard components in Outlook.A.Outlook ComponentsComponentMailDisplays mailbox folders and email list. Also, allows you to send andreceive email messages.CalendarProvides personal, group and resource scheduling.PeopleDisplays contact names, addresses, email and other information.TasksOrganizes personal and group to-do lists.NotesContains miscellaneous notes or copied text that you want to use inother places.Folder ListDisplays all mailbox folders.Shortcuts1.DescriptionDisplays and provides quick access to mail folders.Select each of the Outlook Components to view their screen layouts.You can add or remove Outlook Components on the Navigation pane.1. Click on the Navigation Options dots ( ) to add or remove options from the shortcutmenu bar.File: Microsoft Outlook 2013 WorkshopPage 4 of 4904/01/15
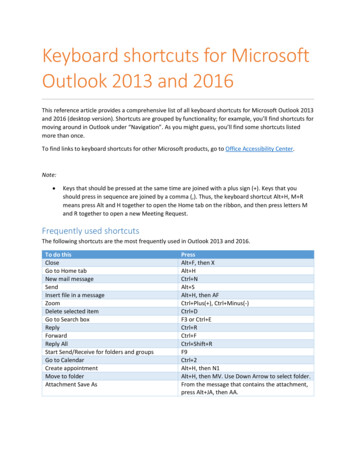
B.View OptionsWhile in your Inbox, as well as other Outlook components, there are various screen views,which may help you in viewing mail messages and generally working with Outlook. On the inboxemail screen, there are various view options for your Reading Pane. Also, you can choose toview or close the Navigation and To-Do List Panes on your screen as well.1.Change your email screen view.FoldersNavigation PaneReading PaneTo-Do List1. Click on the View tab, then on the Layout group, select your view options for NavigationPane, Reading Pane, and To-Do List.When selecting the Navigation and To-Do List Panes, you can choose the Normal view (seeabove), Minimized on screen or Off which removes from screen.When selecting the Reading Pane, you can choose the Right or Bottom options to have themessage preview to the right or bottom of the selected email line. Also, you can select the Offoption (see above), message preview will not appear.File: Microsoft Outlook 2013 WorkshopPage 5 of 4904/01/15
II.Outlook OptionsMicrosoft Outlook has many settings and feature options to help with your business andadministrative tasks.A.GeneralGeneral options enable you to select user interface and start up options to personalizing yourcopy of Microsoft Office. Many of your User Interface options are defaulted, but you candisable or select other options. (This section will be instructor led.)1.Click on the File tab, and then click on Options.2.The Outlook Options window will appear.B.AdvancedThe Advance option enables you to customize work panes and set up options for multipleOutlook features. Many of your Advanced options are defaulted, but you can disable or selectother options. (This section will be instructor led.)File: Microsoft Outlook 2013 WorkshopPage 6 of 4904/01/15
1.Click the on File tab, and then select the Options icon.2.The Outlook Options window will appear.3.Click on the Mail option, and then select Advanced.III.Format EmailOutlook provides the ability to setup and change format for your messages, stationery, andsignatures.File: Microsoft Outlook 2013 WorkshopPage 7 of 4904/01/15
A.Select Message Format4.Click the on the File tab, and then select the Options icon.5.The Outlook Options window will appear, and then select Mail.6.In the Compose message selection, click the drop-down arrow next to the Compose inthis message format box.7.Select one of the three formatting options:– HTML– Rich Text– Plain TextFormatHTMLRich TextPlain TextDescriptionDefault format in Outlook. Support various fonts, colors, bullet lists, and pictures.Support Microsoft Exchange Client 4.0 and 5.0 and all Microsoft Outlook versions.Don’t support bold, italic, colored fonts, or other text formatting and pictures.File: Microsoft Outlook 2013 WorkshopPage 8 of 4904/01/15
B.Default Font1.Click on the File tab, and then select the Options icon.2.The Outlook Options window will appear, and then select Mail.3.In the Compose message selection, click on the Stationery and Fonts button.4.The Signature and Stationery window will appear.5.Select the Personal Stationery tab.6.Click on the Font button, in the New mail messages section to change your desired font.7.Click on the OK button.8.You can also change your font in the Replying or forwarding messages section.File: Microsoft Outlook 2013 WorkshopPage 9 of 4904/01/15
C.Using StationeryOutlook stationery gives the email messages you send a special appearance, with colorfulbackgrounds and coordinated fonts. Recipients with Plain Text format are unable to seecolorful backgrounds and formatted font types.1.Click on the File tab, and then select the Options icon.2.The Outlook Options window will appear, and then click on the Stationery and Fontsbutton.3.The Signature and Stationery window will appear.4.Select the Personal Stationery tab.5.In the Theme or Stationery for new HTML e-mail message section, click on the Themebutton.6.The Theme or Stationery window will appear.File: Microsoft Outlook 2013 WorkshopPage 10 of 4904/01/15
7.In the Choose a Theme section, choose your desired theme (Once a Themes is selectedit will appear on the right-side of your screen in the Sample of stationery window).8.Click on the OK button. (Outlook will automatically use the stationery you selected innew email messages.)D.Signatures FilesYou can use the signatures option to automatically add text to the messages you send. Forexample, you can create a signature that includes your name, job title, and phone number. Youcan create multiple signatures, designate a default signature, and select a signature to insert ina message after you have created the message.1.Click on the File tab, and then click on the Options icon.2.The Outlook Options window will appear, and then select Mail.3.In the Compose messages section, click on the Signature button.File: Microsoft Outlook 2013 WorkshopPage 11 of 4904/01/15
4.The Signature and Stationery window will appear.5.With the E-mail Signature tab selected, click on the New button.6.The New Signature window will appear.7.In the Type a name for this signature box, type your desired signature filename.8.Click on the OK button.9.The filename will appear in the Select signature to edit window, then type yoursignature text in the Edit signature window, and then click on the OK button.File: Microsoft Outlook 2013 WorkshopPage 12 of 4904/01/15
E.Check Spelling and AutocorrectThe Check Spelling is a Microsoft feature that checks your spelling as you type text by place ared wavy line underline the misspelling, so you can correct the text before sending email. Alsothe Autocorrect feature will correct your commonly misspelled words automatically.1.Click on the File tab, and then click on the Options icon.2.The Outlook Options window will appear, and then select Mail.3.In the Compose messages section, click on the box next to Always check spelling beforesending.File: Microsoft Outlook 2013 WorkshopPage 13 of 4904/01/15
4.Click on the Spelling and AutoCorrection button, for additional options.5.The Editor Options window will appear.6.Click on the AutoCorrect Options button.7.The AutoCorrect: English (U.S.) window will appear.File: Microsoft Outlook 2013 WorkshopPage 14 of 4904/01/15
8.With the AutoCorrect tab select, click on the check box next to Replace text as youtype.9.In the Replace box, type the misspelling of the word you commonly misspell, andthen in the With box, type the correct word spelling.10.Click on the Add button.IV.Mail OptionsOutlook provides options that enable you to mark any message with priority status orsensitivity rating, so your words cannot be changed by anyone after the message is sent.A.Set Importance LevelThe Default Importance Level is set at Normal. When composing a message you can set theImportance Level to High or Low.1.The Importance Level options are located on the Message ribbon in the Tags group.2.Click on the High or Low Importance button, to indicate the message importance.Note: You can mark all messages you send with the same importance level. Click on the File tab,then click on the Options icon, and then select Mail. In the Send messages section, select yourDefault Importance Level.File: Microsoft Outlook 2013 WorkshopPage 15 of 4904/01/15
B.Set Sensitivity LevelThe Default Sensitivity Level is set at Normal. When composing a message you can set theSensitivity Level to Private, Personal or Confidential.1.In the Tabs group, click on the dialog box. The Properties window will appear.2.Go to the Settings section, and set your desired sensitivity level.Note: You can mark all messages you send with the same Sensitivity Level. Click on the File tab,then click on the Options icon, and select the Mail. In the Send messages section, select yourDefault Sensitivity Level.OptionDescriptionNormalIndicates that the message’s contents are standard or customary.PersonalSuggests that the message’s contents are of a personal nature.PrivatePrevents the message from being modified after you send it.ConfidentialDenotes that the message’s contents are restricted or private.File: Microsoft Outlook 2013 WorkshopPage 16 of 4904/01/15
C.Delay Sending messageWhen composing a message you can delay the email delivery. For example, you can schedulethe delivery of your email for a specified time or date, if you do not want to send itimmediately.1.Click on the Options tab, and then click on the Delay delivery button.2.The Properties window will appear.3.In the Delivery options section, click on the check box next to Do not deliver before,and select your desired date and time.4.Click on the Close button.File: Microsoft Outlook 2013 WorkshopPage 17 of 4904/01/15
V.Organize EmailMicrosoft Outlook allows you to change the defaults and setups to your email inbox accordingto your preference.A.Categorize MessagesThe column headings bar list email properties under the appropriate heading, these headingcan be rearranged according to your preference.1. Click on a column heading to sort messages by that associated heading title.2. For example, to view newest messages at the top of the list, click on the Receivedcolumn heading. A triangle icon pointing upward indicates an ascending sort (oldest tonewest). A downward-pointing triangle indicates a descending sort.3. You can add new columns by right-clicking in this list.4. You can move columns by dragging them to different locations.B.Create FoldersYour mail folders are located on the Navigation pane. You can create additional folders forspecific email from senders.1. In the Navigation pane where your folders are located, right-click and choose the NewFolder option.File: Microsoft Outlook 2013 WorkshopPage 18 of 4904/01/15
2. A rectangle box will appear under the parent folder you selected.3. In the rectangle box, type a name for the new folder.4. The new folder will automatically appear in alphabetical order under the parent folder.C.Create RulesYou are able to create a rule base on the sender, recipients or conversation topic of a messageto always move to a designated folder of your choice.1. Select the email which you want to base a rule.2. On the Home ribbon, click on the Rules button, and then select Create Rule.3. The Create Rule window will appear.File: Microsoft Outlook 2013 WorkshopPage 19 of 4904/01/15
4. Click on the check boxes next to From and Move the item to folder. The Rules andAlerts window will appear.5. Click on the Outlook folder where you would like future messages to be stored, andthen click on the OK button.D.View ConversationMicrosoft Office contains a feature that will allow you to arrange messages by conversations.1. Select a folder from your Mailbox where the email conversation string is located.2. Click on the View tab, and then click on the check box next to Show as Conversations.3. The Microsoft Outlook window will appear.4. Click on the This folder button.File: Microsoft Outlook 2013 WorkshopPage 20 of 4904/01/15
5. A triangle will appear next to email that has a conversation string.6. Click on the triangle, and then email conversations will appear under the triangle.E.Subscribe to RSS FeedsReally Simple Syndication (RSS)provides an easy way for you to read the latest postings toyour favorite Web sites. Many Web sites offer RSS Feed subscriptions, so that whenever newcontent is published, such as an updated news article you can receive a summary or the fullarticle automatically in Microsoft Outlook 2013.File: Microsoft Outlook 2013 WorkshopPage 21 of 4904/01/15
1.On your Folder pane, place the mouse pointer on the RSS Feeds folder, click on the rightmouse button, and then select the Add a New RSS Feed option.2.The New RSS Feed window will appear.3.Go to the Web site where you desire a RSS Feed, and click on the RSS Feedwhich will link you to the RSS Feed Web site.4.Copy the Web site address (select the URL from the web address box, then compressthe Ctrl key and click on the letter C key – Ctrl, C.). Go back to the New RSS Feedwindow, and then paste (Ctrl, V) the URL (Web address) in the Enter the location of theRSS Feed you want to add to Outllook box.5.Click on the Add button.VI.Contactsbutton,The Contacts component of Outlook allows you to store information, such as mailing and emailaddresses, for those people you frequently correspond with. Storing contact informationallows you to perform functions such as quickly addressing email messages and tracking contactactivities.File: Microsoft Outlook 2013 WorkshopPage 22 of 4904/01/15
A.Create New Contact1.Click on the People component on the Outlook Navigation pane.2.Click on the New Contactwindow appears:3.Type the contact’s name in the Full Name text box in the order First, Middle, and Last.Outlook uses an AutoName feature to automatically index the name. (Information canalso be copied and pasted into these fields.)4.Click on the Full Namecorrectly.File: Microsoft Outlook 2013 Workshopbutton, located on the Home ribbon. The Contactbutton to verify that the name has been indexedPage 23 of 4904/01/15
5.Make changes if necessary, then click on the OK button.6.Continue to enter the desired information for the contact. Notice that clicking the dropdown arrowbutton, beside E-mail, Phone numbers, and Addresses will allow you toenter more than one item.7.Click on the Save & Closebutton.Note: You can also create a contact from an email message you receive. When email is open,place mouse pointer in the From field, right click on the name you want to make a contact, andthen select Add to Outlook Contacts from the shortcut menu.B.Edit Contact InformationTo edit an individual from your contact list, double click on the contact name. The contactinformation window will appear. Make your edits, and then click on the Save button.C.Delete ContactSelect the contact you want to delete, and then click on the Deletebutton, located on theHome ribbon. You can select more than one contact by holding the Ctrl key, while you click onthe contact names. You can use the Edit, Undo command to restore a contact that was deletedby mistake.File: Microsoft Outlook 2013 WorkshopPage 24 of 4904/01/15
D.Create Distribution ListYou are able to create a distribution list using names from Outlook Contacts, Address Book, orNew Email Contact.1.When in Contact, click on the New Contact Groupribbon. The Contact Group window will appear.button, located on the Home2.Click on the Add Members drop-down arrow. A shortcut menu with appear.3.Select your desired option.a) From Outlook Contacts: Your personal outlook contact window will appear to selectindividuals.b) From Address Book: The Global Address List window will appear to selectindividuals.c) New E-mail Contact: The Add New Member window will appear to add individual’sname and email. (Use this option when an individual is not in your outlook contactsor the global address list.)4.After new contacts are added, in the Name box of the Contact Group window, type yourdistribution list name.5.Click on the Save & Close button.File: Microsoft Outlook 2013 WorkshopPage 25 of 4904/01/15
E.Contact ViewsThere are several different ways to view your contacts on screen. Views only change the wayyour information is displayed.1.To change the view, click on your desired option button.ViewDescriptionPeopleList contacts in alphabetical order with picture next to it, if inserted.Business CardOne individual business card for each contact.CardOne individual card with one mailing address and business and homephone numbers.PhoneIn a list with company name, business phone number, business faxnumber, and home phone number.ListOne line entry for each contact.F.Print ContactsYou can print an individual or a group of contacts. To print when in Contacts, select File, andthen click on the Print option. Before printing your output, you can select Setting for a desiredstyle, and then click on the Print Options button for a print range.File: Microsoft Outlook 2013 WorkshopPage 26 of 4904/01/15
VII.E-Mail Using Mail MergeA. Add Mail Merge CommandBefore starting your E-Mail Merge the Mail Merge button must be added to yourQuick Access Toolbar or within any Ribbon of your choosing. In this exercise theMail Merge button will be added to the Quick Access Toolbar.1.Click on the drop-down arrow on the right-side of the Quick AccessToolbar.2.Select the More Commands option.3.The Outlook Options window will appear.4.Click on the drop-down arrow in the Choose commands from selection,and select the All Commands option.5.In the Separator window all commands will be listed in alphabetical order.File: Microsoft Outlook 2013 WorkshopPage 27 of 4904/01/15
6.Scroll down on the Separator window to find Mail Merge. Click on the MailMerge option in order to highlight text, and then click on the Add button inbetween the Separator and Customize Quick Access Toolbar windows.This will place the Mail Merge button in the Customize Quick AccessToolbar window.7.Click on the OK button.8.The Mail Merge button will appears on the Quick Access Toolbar.Note: The above screen shots are from Outlook 2013, due to the University’sMy Pitt Email Upgrade.B. Create E-Mail Merge from OutlookThe E-Mail Merge contains your e-mail message with identical text for eachrecipient. Field codes are also inserted where you want the information from theOutlook Contacts in order to customize your e-mail messages.1. To start your E-Mail Merge, open your Contacts List in Microsoft Outlook.2. If you will not be e-mailing your entire contacts, then select only the contactsyou desire. When selecting contacts, click on your first contact, and then holddown the Ctrl key on the keyboard while selecting other contacts.3. Click on the Mail Merge button.4. The Mail Merge Contacts window will appear.File: Microsoft Outlook 2013 WorkshopPage 28 of 4904/01/15
5. In the Contacts section, make sure the Only selected contacts radio buttonis selected, when contacts have been selected.6. In the Document file section, make sure the New document radio button isselected. (If you desire to use an existing document other than OutlookContacts, then select the Existing document radio button, and click on theBrowse button to locate file.)7. In the Merge options section, make sure the Form Letters option is selectedin the Document type area. In the Merge to area, click on the drop-downarrow, and select the E-mail option. In the Message subject line box, typeyour subject text (example: Workshop Confirmation).8. Click on the OK button.9. A blank document screen will appear.File: Microsoft Outlook 2013 WorkshopPage 29 of 4904/01/15
10. Type your e-mail message as seen below.DearThis e-mail is confirmation to your workshop registration. Your session will be held in theScience Center Lecture Hall on November 14th at 9am. If you have any questions before yoursession date, please do not hesitate to contact me.Sincerely,Workshop Coordinator11. Select the Dear text on the first line, and then press the Delete key on thekeyboard.12. Click on the Greeting Line, located in the Write & Insert Fieldsgroup on the Mailings ribbon.13. The Insert Greeting Line window will appear.File: Microsoft Outlook 2013 WorkshopPage 30 of 4904/01/15
14. In the Greeting line format section, click on the first drop-down arrow toselect a desired greeting, click on the second drop-down arrow to select arecipient’s name format, and then click on the third drop-down arrow to selectthe punctuation.15. In the Preview section, your Greeting line will appear on your e-mailmessage. You can click on the advance arrow above the Preview box toview other selected recipients.16. Click on the OK button.17. The GreetingLine field code will appear on your e-mail message.18. Place the mouse pointer after the inserted field code, and then press theSpace bar once on the keyboard to add a space.Note: The Insert Merge Field options contain each field name contained in yourOutlook Contacts. This way you can select whatever field code desiredthroughout your e-mail message.Click on the Preview Results button to remove the field codes, soyou can view the actual field information. You can also click on theadvance arrow to view the field information that will be on each letter.Before executing your E-Mail Merge, deselect the Preview Resultsbutton to replace the field codes back onto your e-mail message.File: Microsoft Outlook 2013 WorkshopPage 31 of 4904/01/15
C. Send E-mail MessagesYou are now ready to send your e-mail messages. Click on the Finish & Mergebutton, located in the Finish group on the Mailings ribbon.1. Click on the Send E-mail Messages option to send your customizede-mail messages.File: Microsoft Outlook 2013 WorkshopPage 32 of 4904/01/15
VIII. CalendarThe Outlook Calendar has been designed to simplify maintenance of your schedule. TheCalendar categorizes your schedule using three different classifications: appointments,meetings, and events. Your schedule can be viewed by day, work week, week, month orschedule view.A.Calendar ScreenTo open the Calendar, click on the Calendar option from the Outlook navigation pane. Bydefault the Calendar will be displayed in day view.Date NavigatorView ButtonsWeather IndicatorDay View1.Practice changing views using the Day, Work Week, Week and Month buttons. You canalso change views by selecting the View ribbon, and choosing your desired view.2.Practice using the Date Navigator to view past and future dates. To select a differentdate, single click the date.File: Microsoft Outlook 2013 WorkshopPage 33 of 4904/01/15
Prior Month NavigatorMinimizeAdvance Month Navigator3.Practice scroll through prior and advance months, and then minimize and maximizenavigation pane. (Options may vary depending on the view you are using.)B.Create AppointmentAppointments are activities you schedule in your calendar; unlike meetings they do not involveinviting other people or reserving resources. When an appointment is scheduled you canreserve a day, a time and a location that the appointment will occur. You can also setreminders for appointments and schedule recurring appointments. You can specify how othersview your Calendar by designating the time an appointment takes as busy, free, tentative, orout of office.You can create an appointment by just typing in a block, by double clicking a block, or byselecting a block of time, right clicking, and then selecting New Appointment on the shortcutmenu.1.On the Home ribbon, click on the Day2.Select today’s date. Notice that the current date is always shaded with a blue box3.On the Home ribbon, click on the New Appointment button.File: Microsoft Outlook 2013 Workshopbutton to return to Day view.Page 34 of 49.04/01/15
4.The Appointment window will appear.5.In the Subject box, type Lunch with William Buckner.6.In the Location box, type University Club.7.Click the drop-down arrow next to Start and End time to select the duration of yourappointment.8.On the Appointment ribbon the Reminder default is 15 minutes.9.Change the Reminder time to 30 minutes. Click on the drop down arrow next to the 15minutes default and select 30 minutes.File: Microsoft Outlook 2013 WorkshopPage 35 of 4904/01/15
10.Below the Start and End times, click in the Notes box, and then type Remember to takea copy of the project plans.11.Click on the Save and CloseC.Recurring Appointmentsbutton, located on the Appointment ribbon.A recurring appointment repeats on a regular basis. For example, a monthly meeting thatalways occurs on the second Friday of each month.1.Click on the Recurrence button, located on the Appointment ribbon.2.The Appointment Recurrence window will appear.3.In the Range of recurrence section, click on the End after button. In the Occurrencesbox, type 10.4.Click on the OK button.File: Microsoft Outlook 2013 WorkshopPage 36 of 4904/01/15
5. Notice that a Recurrence icon now appears on the right-hand side end of the appointmentbox.Lunch with William Buckner; University ClubD.Create MeetingA meeting is an appointment you invite people to or reserve resources for (e.g., conferenceroom, computer). The Outlook Meeting Planner allows you to look at other people’s timesduring the day and select the best meeting time for the attendees. You can then send an emailto everyone announcing the meeting and inviting them to attend. The attendees have theoption to accept, decline or tentatively respond to your invitation.1.For this exercise each class participant will work with a partner. One person shouldselect today’s date; the other should select tomorrow’s date.2.On the Home ribbon, click on the New Meeting button.3.The Meeting window will appear.4.In the To box, type the email address of your invitee(s) (email of class partner) or click onthe To button to add email address by using the Global Address List.5.In the Subject box, type Staff Meeting.6.In the Location box, type Conference Room A.7.Click on the drop-down arrow next to the Start and End time and select the meetingduration.File: Microsoft Outlook 2013 WorkshopPage 37 of 4904/01/15
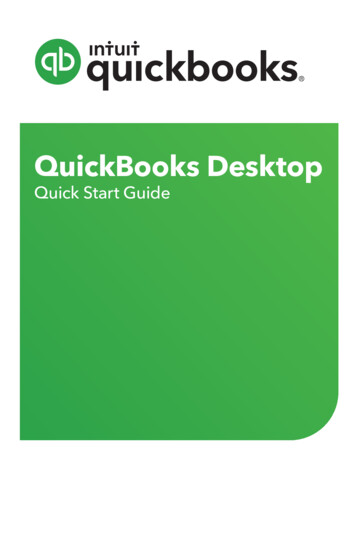
8.Click on the Scheduling Assistant button, located in the Show group. The All Attendeeswindow will display the availability for your invitee(s).Tom SmithCarol JonesCindy JenkinsPaul AdamsNote: Shaded areas represent attendee unavailability. Select different meeting time duration atthe bottom of the All Attendees area to find non-shaded area for attendee availability.9.Click on the Send button.10.When the invitee receives the message they can respond to your invitation by Accept,Tentative, or Decline. A message will be sent to the initiator of the meeting and he orshe can change the time of the meeting, if necessary and send a message again.File: Microsoft Outlook 2013 WorkshopPage 38 of 4904/01/15
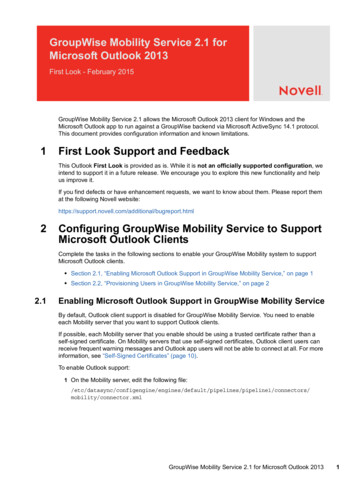
E.Print CalendarYou can print daily, weekly, and monthly views of your calendar. Outlook provides severalpreset page options that can be inserted into Day Timer’s or pocket calendar books.1.Select File, and then click on the Print option.2.From the Settings section, select your print style. The Print Preview of the chosen stylewill appear on the right side of the screen.3.Click on the Print Option to choose a Print range, if you desire multiple days or months.4.Click on the Print button, after you have selected all your options.File: Microsoft Outlook 2013 WorkshopPage 39 of 4904/01/15
F.Calendar PermissionsYou can give someone sharing permission to open and read the contents of your folders byselecting the reviewer permission when you share a folder. (For the Outlook Inbox folder,reviewer permission lets the other person delete your mail as well.) In addition, for Outlook,you can give another person sharing permission to schedule appointments and meetings foryou in Calendar and to create and modify tasks for you in Tasks, depending on the permissionlevel you specify for the person.1.Click on the Calendar button on your Outlook Component pane.2.Click on the Home tab, and then click on t
General options enable you to select user interface and start up options to personalizing your copy of Microsoft Office. Many of your User Interface options are defaulted, but you can disable or select other options. (This section will be instructor led.) 1. Click on the File tab, and then click on Options. 2. The Outlook Options window will .