Transcription
INSTRUCTION MANUAL
IMPORTANT SAFETY INSTRUCTIONSThis sewing machine is not a toy. Do not allow children to play with this machine.The machine is not intended for use by children or mentally infirm persons without supervision.This sewing machine is designed and manufactured for household use only.Read all instruction before using this sewing machine.DANGER – To reduce the risk of electric shock:1. An appliance should never be left unattended when plugged in. Always unplug this sewingmachine from the electric outlet immediately after using and before cleaning.2. Always unplug before replacing a sewing machine bulb. Replace bulb with same type rated 15 watts.3. Do not reach for the appliance that has fallen into water. Unplug immediately.4. Do not place or store appliance where it can fall or be pulled into a tub or sink. Do not place in or drop intowater or other liquid.WARNING – To reduce the risk of burns, fire, electric shock, or injury to persons:1. Do not allow children to play with the machine. The machine is not intended for use by children or infirmepersons without proper supervision.Do not allow to be used as a toy. Close attention is necessary when this sewing machine is used by or nearchildren.2. Use this appliance only for its intended use as described in this owner’s manual.Use only attachments recommended by the manufacturer as contained in this owner’s manual.3. Never operate this sewing machine if it has a damaged cord or plug, if it is not working properly, if it has beendropped or damaged, or dropped into water.4. Never operate the appliance with any air opening blocked. Keep ventilation opening of this sewing machine andfoot controller free from accumulation of lint, dust and loosen cloth.5. Never drop or insert any object into any opening.6. Do not use outdoors.7. Do not operate where aerosol (spray) products are being used or where oxygen is being administered.8. To disconnect, turn all controls to the off (“O”) position, then remove plug from outlet.9. Do not unplug by pulling on cord. To unplug, grasp the plug, not the cord.10. Keep fingers away from all moving parts. Special care is required around the sewing machine needle.11. Always use the proper needle plate. The wrong plate can cause the needle to break.12. Do not use bent needles.13. Do not pull or push fabric while stitching. It may deflect the needle causing it to break.14. Switch this sewing machine off (“O”) when making any adjustment in the needle area, such as threading theneedle, changing the needle, threading the bobbin or changing the presser foot, and the like.15. Always unplug this sewing machine from the electrical outlet when removing covers, lubricating, or whenmaking any other adjustments mentioned in this owner’s manual.SAVE THESE INSTRUCTIONSThe design and specifications are subject to change without a prior notice.Please note that on disposal, this product must be safely recycled in accordance with relevant Nationallegistlation relating to electrical/electronic products. If in doubt please contact your retailer for guidance.(European Union only.)
TABLE OF CONTENTSSECTION 1. KNOW YOUR MACHINESECTION 4. UTILITY STITCHESName of Parts . 2Basic Zigzag . 18Standard Accessories . 3Overcasting . 18Accessory storage . 3Knit Stitch . 19Extension Table . 3Tricot Stitch (Multiple Zigzag Stitch) . 19Free-arm sewing . 4Straight Stretch Stitch . 20Zigzag Stretch Stitch . 20SECTION 2. GETTING READY TO SEWButton Sewing . 21Connecting the Power Supply . 44-Step Buttonhole . 22Controlling the Sewing Speed . 5To adjust buttonhole stitch density . 22Reverse Stitch Lever . 5Corded Buttonhole . 23Dropping the Feed Dog . 5Zipper Application . 24Raising and Lowering the Presser Foot . 6Blind Hemming . 27Changing the Presser Foot . 6Removing and Attaching the Foot Holder . 6SECTION 5. DECORATIVE STITCHESChanging Needles . 7Decorative Satin Stitches . 28Needle and Thread Chart . 7Decorative Stretch Stitches . 28Winding the Bobbin . 8Smocking . 29Setting the spool . 8Pin Tucking . 30Removing the bobbin . 8Shell Tucking . 30Winding the bobbin . 9Fagoting . 31Inserting the bobbin . 10Patchwork . 31Threading the Machine . 11Drawing up the Bobbin Thread . 12SECTION 6. CARE AND MAINTENANCESelecting the Stitch Pattern . 13Cleaning the Hook Race and Feed Dogs . 32Pattern selector dial . 13Replacing the Bobbin Holder . 33Stitch Length Dial . 13Replacing the Light Bulb . 33Adjusting stretch stitch balance . 14Troubleshooting . 34Stitch Width Dial . 14Variable needle position . 14Balancing Needle Thread Tension . 15SECTION 3. BASIC SEWINGStraight Stitch Sewing . 16Starting to sew . 16Changing the sewing direcitionFinishing sewing . 16Seam guides on the needle plate . 17Truning a square corner . 171
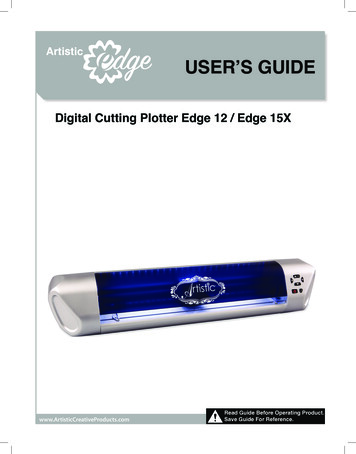
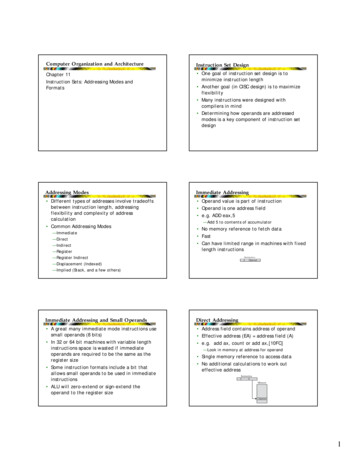
SECTION 1. KNOW YOUR MACHINEytr ewquNames of 2Bobbin winder stopperBobbin winder spindleHole for additional spool pinSpool holderSpool pinBobbin winder thread guideThread take-up leverFace plateThread cutterNeedle plateExtension table (Accessory storage)Hook cover plateHook cover plate release buttonThread tension dialReverse stitch leverStitch length dialPattern selector dialStitch width dialPresser footNeedleNeedle clamp screwFoot holderSetscrewCarrying handleHandwheelPower switchMachine socketDrop feed leverFree-armFoot lifter
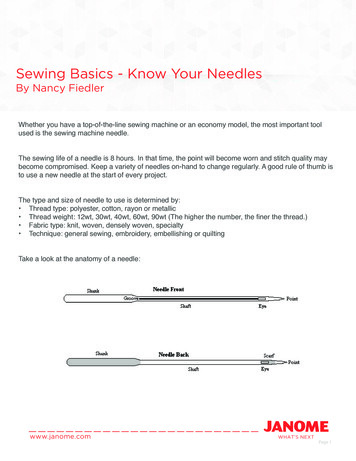
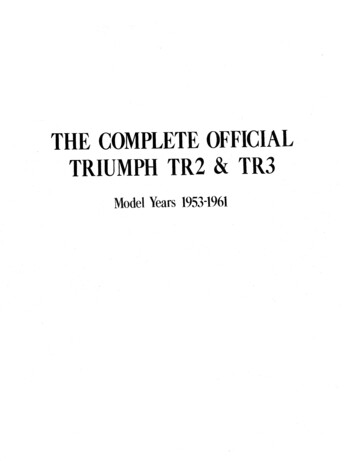
wqrtui!0!1Standard Accessorieseqwertyuio!0!1!2yo!2Zipper foot EBlind hemming stitch foot GSliding buttonhole foot JNeedlesBobbinsScrewdriverLint brushSeam ripper (buttonhole opener)Spool holder (large)Spool holder (small)Additional spool pinFelt cushionAccessory storageThe standard accessories can be stored in theaccessory storage box under the extension table.Draw out the storage box from the table asshown.q Accessory storage boxqExtension TableTo detach:Pull the extension table to the left.To attach:Insert the pin into the hole and push the extensiontable to snap it in place.q Pinw Holewq3
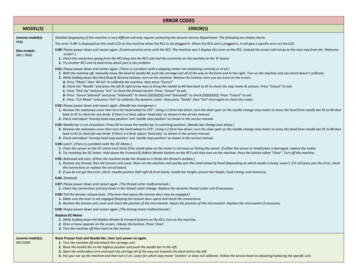
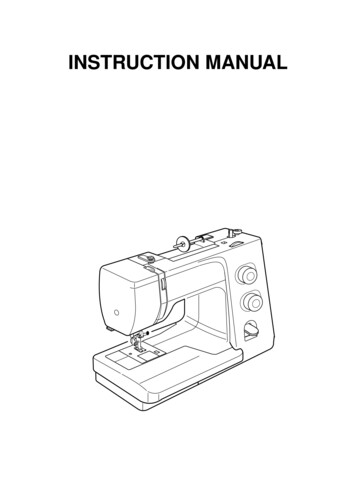
Free-arm sewingFree-arm sewing is used for stitching sleeves,waistbands, pant legs or any other tubulargarments.It is also useful for darning socks or mending kneesor elbows.SECTION 2. GETTING READY TO SEWqConnecting the Power Supplyrz Turn the power switch off.x Insert the machine plug into the machinesocket.c Insert the power supply plug into the walloutlet.v Turn the power switch on.q Power switchw Machine pluge Machine socketr Power supply plugt Wall outlettewNOTE:Before connecting to the power supply, makesure the voltage shown on the machineconforms to your electrical power.Operating Instructions:The symbol "O" of a switch indicates the "off"position of a switch.For an appliance with a polarized plug (one bladewider than the other):To reduce the risk of electrical shock, this plug isintended to fit in a polarized outlet only one way.If it does not fit fully in the outlet, reverse theplug. If it still does not fit, contact a qualifiedelectrician to install the proper outlet. Do notmodify the plug in any way.WARNING:While in operation, always keep your eyes onthe sewing area, and do not touch any movingparts such as the thread take-up lever,handwheel or needle.Always turn off the power switch and unplugfrom the power supply:- when leaving the machine unattended.- when attaching or removing parts.- when cleaning the machine.Do not place anything on the foot control,otherwise the machine will run intermittently.The foot controller Model YC-482J or TJC-150 isused with the sewing machine Model 7318 (USAmarket only).4
Controlling the Sewing SpeedFoot controlSewing speed can be varied by the foot control.The harder you depress the foot control, thefaster the machine runs.Reverse Stitch LeverPush the reverse stitch lever down to sew inreverse.The machine will sew in reverse while the lever ispushed.Dropping the Feed DogThe drop feed lever is located underneath thefree-arm bed on the backside of the machine.qTo drop the feed dog, push the lever in thedirection of the arrow, as illustrated.To raise the feed dog, push the lever in thedirection of the arrow, as illustrated, and turn thehandwheel toward you.The feed dog must be up for regular sewing.q Drop feed leverw Raised positione Lowered positionwe5
Raising and Lowering the Presser FootThe presser foot lifter raises and lowers thepresser foot.eYou can raise the foot about 1/4" (0.6 cm) higherthan the normal up position for easy removal ofthe presser foot, or to help you place heavy fabricunder the foot.q Lowered positionw Normal up positione Extra up positionewwqChanging the Presser FootTo remove:Raise the needle to its highest position by turningthe handwheel counterclockwise. Raise thepresser foot, and press the lever on the back ofthe foot holder.q LeverqCAUTION:Turn OFF the power switch before changing thefoot. Always use the proper foot for the selectedpattern. The wrong foot can cause the needle tobreak. Do not push the lever down to prevent itfrom being broken.To attach:Place the desired presser foot, so that the pin onthe foot lies just under the groove on the footholder. Lower the presser foot lifter to lock thefoot in place.w Groovee PinewRemoving and Attaching the Foot HolderqwWARNING:Turn OFF the power switch before detaching orattaching the foot holder.To remove:Remove the setscrew by turning itcounterclockwise with a screwdriver and removethe foot holder.To attach:Match the hole in the foot holder with thethreaded hole in the presser bar. Fit the setscrewinto the hole. Tighten the screw by turning itclockwise with a screwdriver.q Setscreww Foot holdere Holer Threaded holere6
Changing NeedlesCAUTION:w qAlways make sure to turn the power switch offand disconnect the machine from power supplybefore changing the needle.Raise the needle by turning the handwheel andlower the presser foot.Turn off the power switch.z Loosen the needle clamp screw by turning itcounterclockwise.Remove the needle from the clamp.q Needle clamp screwx Insert a new needle into the needle clamp withthe flat side of the needle to the rear.When inserting the needle into the needleclamp, push it up against the stopper pin andtighten the needle clamp screw firmly.w Stopper pine Flat sideTo check needle straightness, place the flat sideof the needle onto something flat (a needle plate,glass etc.) The gap between the needle and theflat surface should be consistent.Never use a blunt needle.r GapqerNeedle and Thread ChartWEIGHTFABRICTYPE of NEEDLENEEDLE SIZEVery LightChiffon, Georgette, Fine Lace, OrgandyNet, TulleUniversalBall Point9 (65)9 (65)LightBatiste, Voile, Lawn, Pure Silk, Crepe de Chine,Sheer Crepe, Chambray, Handkerchief Linen,Gingham, Challis, Percale, Wool Crepe, Peau de Soie,Taffeta, Satin, Silk Surah, Satin-backedCrepe, QianaBlue Tipped Needle 11 (75)Universal11 (75)12 (80)Single Knits, Jersey, Swimwear, and TricotBlue Tipped Needle 11 (75)Ball Point11 (75)Leather, SuedeWedge PointLeather Needle11 (75)Flannel, Velour, Velvet, Muslin, Velveteen,Poplin, Corduroy, Broadcloth, Linen, Chintz,Gabardine, Felt, Terry, Burlap, Quilted FabricsUniversal14 (90)Double Knits, (synthetic and natural) StretchVelour, Stretch Terry, Sweater KnitsBall Point14 (90)Leather, Vinyl, SuedeWedge PointLeather Needle14 (90)Denim, Sailcloth, TickingDenim Needle16 (100)Double Faced Wool, Heavy Coating, Fake Fur,Drapery FabricsUniversal16 (100)Leather, SuedeWedge PointLeather Needle16 (100)18 (110)Canvas, Duck, Upholstery FabricsUniversal16 (100)Topstitching for Special FinishesTopstitching Needle 14 (90)MediumHeavyVery Heavy7
Winding the Bobbin(A)Setting the spoolPlace a spool of thread on the spool pin with thethread coming off the spool as illustrated.A: Press the large spool holder firmly against thespool of thread.q Large spool holderq(B)B: For a small spool, use the small spool holder.w Small spool holderwAdditional spool pinThe additional spool pin is for bobbin windingwithout unthreading the machine.Insert the additional spool pin into the hole.Place the felt and a spool on the pin.e Additional spool pinr Spool pin feltt Spool pin holeertRemoving the bobbinz Push the hook cover plate release button tothe right and remove the cover plate.q Hook cover plate release buttonw Hook cover plateqwx Lift out the bobbin.e Bobbine8
Winding the bobbinwezxqwz Pull out the handwheel to disengage theclutch.q Handwheelcx Draw the thread from the spool. Guide thethread around the bobbin winder thread guide.w Bobbin winder thread guideevbc Thread through the hole in the bobbin fromthe inside to the outside.Put the bobbin on the bobbin winder spindlewith the free end of the thread coming out atthe top.e Bobbin winder spindlenmv Push the bobbin to the right.NOTE:Do not move the bobbin winder spindle while themachine is running.b With the free end of the thread held in yourhand, depress the foot control. Stop themachine when the bobbin has been wound afew layers, and cut the thread close to thebobbin.n Depress the foot control again. When thebobbin is fully wound, it will stop automatically.Return the bobbin winder to its originalposition by moving the spindle to the left, andcut the thread as illustrated.m Push in the handwheel to engage the clutch.9
Inserting the bobbinqzz Place the bobbin in the bobbin holder with thethread running off as illustrated.q Threadxx Guide the thread into the front notch on thefront side of the bobbin holder. Draw thethread to the left, sliding it between thetension spring blades.w Front notche Tension spring bladewecc Continue to draw the thread lightly until thethread slips into the side notch.r Side notchrvv Pull out about 4 (10 cm) of thread. Attach thehook cover plate. Check the threading byreferring to the chart shown on the hook coverplate.t Thready Hook cover platety10
cThreading the MachinezTo set the needle thread:Raise the thread take-up lever to the highestposition by turning the handwheel.Raise the presser foot.xvbqzz Draw the thread from the spool and pass itunder the thread guide. Then draw it downalong the right channel.q Thread guidew Right channelwxx Draw the thread up around the bottom of thethread guide plate.Pull the thread up along the left channele Thread guide plater Left channelrecc Firmly draw the thread from right to left overthe thread take-up lever and down into thetake-up lever eye.t Thread take-up levertvbv Draw the thread down along the left channeland slip the thread behind the needle barthread guide from the left.y Needle bar thread guideb Pass the thread through the needle eye fromthe front or use the needle threader (refer tothe next page).y11
Drawing up the Bobbin Threadzz Raise the presser foot and hold the needlethread lightly with your left hand.q Needle threadqx Turn the handwheel slowly toward you onecomplete turn. Bring the bobbin thread up bypulling the needle thread as illustrated.q Needle threadw Bobbin threadxwqcc Pull 4 (10 cm) of both threads back andunder the presser foot.wq12
Selecting the Stitch PatternRaise the needle to its highest position.ePattern Selector DialwTurn the pattern selector dial to set the symbol ofthe desired stitch pattern at the setting mark.q Pattern selector dialw Setting markCAUTION:Do not turn the pattern selector dial while theneedle is in the fabric, otherwise the needle maybend or break.qTo select the stretch stitch patterns, set the stitchlength dial at S.S.e Stretch stitch patternsStitch Length DialrTurn the stitch length dial to set the desired stitchlength number at the setting mark.The higher the number, the longer the stitchThe “” mark shows the adjustment rangewhen sewing the buttonhole.r Setting markt Stitch length dialt13
Adjusting stretch stitch balanceIf the stretch stitch patterns are uneven when yousew on a particular fabric, correct them by turningthe stitch length dial.“–”“ ”If the patterns are drawn out, correct them bysetting the dial to the “–” side.If the patterns are compressed, correct them bysetting the dial to the “ ” side.Stitch Width DialqTurn the stitch width dial to set the desired stitchwidth number at the setting mark.The higher the number, the wider the stitchq Stitch width dialw Setting markwCAUTION:Do not turn the stitch width dial while the needleis in the fabric, otherwise the needle may bendor break.Variable needle positionThe needle drop position of the straight stitchescan be moved between the center (5) and left (0)with the stitch width dial.14
Balancing Needle Thread TensionThe thread tension should be adjusted dependingon the sewing materials, layers of fabric andsewing method.To adjust the thread tension, turn the tension dial.q Tension dialqwtBalanced tension:rThe ideal straight stitch has threads lockedbetween two layers of fabric, as illustrated.eFor an ideal zigzag stitch, the bobbin thread doesnot show on the right side (top side) of the fabric,and the needle thread shows slightly on thewrong side (bottom side) of the fabric.w Needle thread (Top thread)e Bobbin thread (Bottom thread)r Right side (Top side) of fabrict Wrong side (Bottom side) of fabricwNeedle thread tension is too tight:The bobbin thread (bottom thread) will appear onthe right side (top side) of the fabric.Loosen the needle thread tension by moving thedial to a lower number.Needle thread tension is too loose:The needle thread (top thread) will form loops onthe wrong side (bottom side) of the fabric.Tighten the needle thread tension by moving thedial to a higher number.15
wrSECTION 3. BASIC SEWINGeStraight Stitch SewingMachine setting:q Stitch pattern: Aw Stitch width:0 or 5e Stitch length: 1.5 – 4r Thread tension: 2 – 6t Presser foot: Zigzag foot AtStarting to sewRaise the presser foot and place the fabric underthe foot.Lower the needle into the fabric.Lower the presser foot and smooth the threadstoward the back. Depress the foot control.NOTES:Draw the threads to the left when sewing with thebuttonhole foot.To fasten the beginning of the seam, first sewseveral stitches in reverse then sew forward.Changing the sewing directionStop the machine and turn the handwheel towardyou to bring the needle down into the fabric.Raise the presser foot.Pivot the fabric around the needle to changesewing direction as desired. Lower the presserfoot and continue sewing in the new direction.Finishing sewingPress the reverse stitch lever and sew severalstitches in reverse at the end of the seam.Raise the presser foot and remove the fabric,drawing the threads to the back.qDraw the threads up and into the thread cutter.The threads are cut the proper length for startingthe next seam.q Thread cutter16
Seam guides on the needle plateThe seam guides on the needle plate help you tomeasure seam allowance.The numbers indicate the distance between thecenter needle position and the seam guide.q Seam guidesNumberSpacing (cm)qSpacing (inch)15204/8 5/86/81.52.0 1.3 1.61.91/2 5/83/4Turning a square cornerThe cornering guide helps you maintain a 5/8 (1.6 cm) seam allowance when sewing a corner.When the fabric edge facing you lines up with thecornering guide as illustrated, stop stitching andlower the needle into the fabric by turning thehandwheel toward you.Raise the presser foot and pivot the fabric so theedge of the fabric will align with the 5/8 (1.6 cm)seam guide.Lower the presser foot and start stitching in thenew direction.w Cornering guidew17
wqrSECTION 4. UTILITY STITCHESeBasic ZigzagMachine settingq Stitch pattern: Cw Stitch width:1–5e Stitch length: 0.5 – 3r Thread tension: 2 – 5t Presser foot: Zigzag foot AtSimple zigzag stitching is widely used forovercasting, sewing on buttons etc.Adjust the stitch length to suit your sewing needs.NOTE:Use a stabilizer for stretch fabrics such as tricotand knits to prevent puckering.qrwOvercastingeMachine settingq Stitch pattern: Cw Stitch width:5e Stitch length: 1 – 2r Thread tension: 3 – 7t Presser foot: Zigzag foot AtOvercasting is used to prevent fabrics fromraveling at raw edges. It can be used to finish ahem edge.18
Knit StitchqwreMachine settingq Stitch pattern: Gw Stitch width:5e Stitch length: S.S.r Thread tension: 3 – 7t Presser foot: Zigzag foot AtThis stitch is ideal for finishing edges of stretchfabrics. It seams and finishes the fabric edgessimultaneously.Tricot Stitch (Multiple Zigzag Stitch)qwreMachine settingq Stitch pattern: Dw Stitch width:3–5e Stitch length: 0.5 – 1.5r Thread tension: 3 – 6t Presser foot: Zigzag foot AtThis stitch is used to finish a raw edge onsynthetics and other fabrics that tend to pucker.Place the fabric to leave a 5/8 (1.6 cm)allowance.Trim the extra allowance after sewing.It is also used for mending tears.19
qrwStraight Stretch StitcheMachine settingq Stitch pattern: Aw Stitch width:0 or 5e Stitch length: S.S.r Thread tension: 2 – 5t Presser foot: Zigzag foot AtThe pattern is sewn with two stitches forward andone stitch backward, forming a seam that doesnot rip easily.Use it to reinforce areas such as crotch andarmhole seams.Also use it when constructing items such asbackpacks for extra strength.Carefully guide the fabric while sewing as thefabric moves back and forth.qrZigzag Stretch StitchweMachine settingq Stitch pattern: Cw Stitch width:2–5e Stitch length: S.S.r Thread tension: 2 – 5t Presser foot: Zigzag foot AtSew on stretch fabrics in any area that you mightuse a zigzag stitch.This stitch is used as a decorative topstitch aswell.20
qButton SewingwerMachine settingq Stitch pattern: Cw Stitch width:Adjust as necessarye Stitch length: Anyr Thread tension: 3 – 7t Presser foot: Zigzag foot Ay Feed dog:LoweredtyUnthread the needle. Adjust the stitch width tomatch it with the span of the holes in the button.Turn the handwheel to check if the needle entersinto each hole in the button.Lower the foot to hold the button in place.The holes in the button should align with the slotof the foot.A pin can be placed on the foot to form a shank.Make sure to check if the needle enters into bothholes in the button.q PinRe-thread the needle and sew about 10 stitchesand cut the needle and bobbin threads at thebeginning.qRaise the presser foot and remove the fabric. Cutthe needle and bobbin threads leaving 8 (20 cm)tails.Bring the needle thread between the button andfabric through the holes in the button.Pull the needle thread to pick bobbin thread up tothe right side of the fabric.Wind the threads to from a shank and tie themtogether.w Needle threade Bobbin threadweNOTE:Raise the feed dog after sewing.21
q4-Step ButtonholewMachine settingq Stitch pattern:w Stitch width:4–5e Stitch length: 0.5–1r Thread tension: 1 – 5t Presser foot: Sliding buttonhole foot Jetrz Set the pattern selector dial at “ ”.Carefully mark buttonhole length on fabric.Place the fabric under the foot with thebuttonhole marking running toward you.Draw both of needle and bobbin thread to theleft. Move the slider toward you so that the topmark w on the slider meets the start mark q.q Start markw Top marke Needle threadr Bobbin threadzqewrNOTE:The scale on the slider is engraved incentimeters.xcvbx Sew forward until you reach the front markingof your buttonhole. Stop sewing at a left stitch.c Raise the needle to its highest position.Set the pattern selector dial at “ ”. Sew 5stitches, then stop sewing at a right stitch.v Raise the needle to its highest position.Set the pattern selector dial at “ ”. Sew untilthe needle reach the back marking of buttonhole.tnb Raise the needle to its highest position.Set the pattern selector dial at “ ”.Sew 5 stitches, then stop sewing. Set the stitchlength dial to “0” and the pattern selector dial atstraight sewing.Sew a few locking stitches.yun Raise the needle and presser foot. Remove thefabric from the machine and cut the sewingthread. Insert a pin inside the bartack.Then cut the opening with a seam ripper.Take care not to cut the stitches.t Needle thready Bobbin threadiTo adjust buttonhole stitch density:Set the stitch length dial between “adjust the buttonhole stitch density.u Denser buttonholei Coarser buttonhole22” to
Corded ButtonholeMachine settingq Stitch pattern:w Stitch width:4–5e Stitch length: 0.5–1r Thread tension: 1 – 5t Presser foot: Sliding buttonhole foot Jwqertz With the buttonhole foot raised, hook the fillercord on the spur at the back of the foot.Bring the ends toward you under the foot,clearing the front end.Hook the filler cord into the forks on the front ofthe foot to hold them tight.q Spurw Forkszqwxx Draw both of needle and bobbin thread to theleft. Move the slider toward you so that the topmark r on the slider meets the start mark e.e Start markr Top markt Needle thready Bobbin threadertLower the needle into the fabric at the settingpoint and lower the foot.Depress the foot control gently and sew thebuttonhole over the cord.The sewing sequence is the same as the 4step buttonhole.ycc Pull the left end of the filler cord to tighten itand cut the excess tails.To cut the buttonhole opening, refer to theinstructions on page 22.23
Zipper ApplicationwqeMachine settingq Stitch pattern: Aw Stitch width:5e Stitch length: 1.5 – 4r Thread tension: 3 – 6t Presser foot: Zipper foot EtrAttaching the zipper footA: To sew the left side of the zipper, attachzipper foot with the right side pin.wq(A)B: To sew the right side of zipper, attach thezipper foot with the left side pin.q Groovew PinFabric preparation(B)oz Add 3/8 (1 cm) to the zipper size.This is the overall opening size.q Right side of the fabricw 3/8 (1 cm)e Opening sizer Zipper sizet Slidery Zipper teethu Zipper tapei Wrong side of the fabrico End of the openinguzyie rwqtx Place the right (top) sides of the fabrictogether. Sew a bottom seam 5/8 (2 cm) fromthe right edge to the zipper bottom stopposition. Sew a few stitches in reverse to lock.Increase the stitch length to “4”, set needlethread tension to “1”, and baste the entirelength of the fabric.!0 5/8 (2 cm)!1 Basting!2 Reverse stitch!3 End of the opening!4 Bottom seam!4x!2!3!1!024
To sewqzz Attach zipper foot with the right side pin.Fold back the upper layer seam allowance.Fold back the lower layer seam allowance toleave a 1/8 (0.4 cm) margin of fabric.q Lower layerw End of the openinge Zipper teethr 1/8 (0.4 cm) margint Upper layery Opening sizeu Folded edgei Bastingewrytuix Place zipper teeth next to margin edge andbaste the zipper tape to the lower fabric layer.Align zipper foot with margin edge. Returnthread tension and stitch length to originalsettings.Sew a seam the entire length of zipper tape.xetc Stop the machine 2 (5 cm) before reachingthe slider, with needle in the fabric and raisethe foot, then unzip a few inches to clear apath for stitching.o Slider!0 2 (5 cm)co!0v Remove fabric and close zipper. Take theupper fabric layer and lay it flat over thezipper.Baste the zipper tape to the upper fabric layer.!1 Basting!2 Zipper tapevo!1!225
b Raise and release the foot, and re-attach itwith the left side pin.Starting just below zipper bottom stop, sewacross fabric to about 3/8 (1 cm) distancefrom the basting line.Turn fabric 90 degrees and sew a seam theentire length of the zipper tape. Beforereaching the slider, stop the machine withneedle in fabric and raise the foot. Use seamripper to open a few inches of basting stitch.!3 Unstitch basting!4 3/8 (1 cm)b!4!3n Unzip a few inches to clear a path forstitching.At end of seam, sew a few stitches in reverseto lock. Once both sides of zipper are sewn,use the seam ripper to open the basting stitch.n26
qBlind HemmingwreMachine settingq St
4 r t q e w Free-arm sewing Free-arm sewing is used for stitching sleeves, waistbands, pant legs or any other tubular garments. It is also useful for darning socks or mending knees