Transcription
INSTRUCTION BOOKModel DC 3050
IMPORTANT SAFETY INSTRUCTIONSWhen using an electrical appliance, basic safety precautions should always be followed, including thefollowings:Read all instructions before using this appliance.DANGER— To reduce the risk of electric shock:1.2.An appliance should never be left unattended when plugged in. Always unplug this sewing machinefrom the electric outlet immediately after using and before cleaning.Always unplug before replacing a sewing machine bulb. Replace bulb with same type rated 12 Volts,5 Watts.WARNING— To reduce the risk of burns, fire, electric shock, or injury to persons:1. Do not allow to be used as a toy. Close attention is necessary when this sewing machine is used byor near children.2. Use this appliance only for its intended use as described in this owner’s manual.Use only attachments recommended by the manufacturer as contained in this owner’s manual.3. Never operate this sewing machine if it has a damaged cord or plug, if it is not working properly, if ithas been dropped or damaged, or dropped into water.Return this sewing machine to the nearest authorized dealer or service center for examination,repair, electrical or mechanical adjustment.4. Never operate the appliance with any air opening blocked. Keep ventilation openings of this sewingmachine and foot controller free from accumulation of lint, dust and loose cloth.5. Never drop or insert any object into any opening.6. Do not use outdoors.7. Do not operate where aerosol (spray) products are being used or where oxygen is beingadministered.8. To disconnect, turn all controls to the off (“O”) position, then remove plug from outlet.9. Do not unplug by pulling on cord. To unplug, grasp the plug, not the cord.10. Keep fingers away from all moving parts. Special care is required around the sewing machineneedle.11. Always use the proper needle plate. The wrong plate can cause the needle to break.12. Do not use bent needles.13. Do not pull or push fabric while stitching. It may deflect the needle causing it to break.14. Switch this sewing machine off (“O”) when making any adjustment in the needle area, such asthreading the needle, changing the needle, threading the bobbin or changing the presser foot, andthe like.15. Always unplug this sewing machine from the electrical outlet when removing covers, lubricating, orwhen making any other adjustments mentioned in this owner’s manual.SAVE THESE INSTRUCTIONSThe design and specifications are subject to change without a prior notice.
TABLE OF CONTENTSKNOW YOUR MACHINEButton Sewing .Darning .To sew a shorter darning .To adjust the evenness of darning .Zipper Sewing .Attaching the zipper foot .Fabric preparation for zipper sewing .To sew .Blind Hem .Name of Parts . 2Standard Accessories . 3Extension table . 3GETTING READY TO SEWConnecting the Power Supply . 4Controlling Sewing Speed . 4Speed control slider . 4Foot control . 4Function Buttons and Keys . 5Reverse button . 5Auto-Lock button . 5Up/Down needle button . 5Mode key . 6Direct pattern selection . 6Dropping the Feed Dog . 7Changing the Presser Foot . 7Detaching and Attaching the Foot Holder . 7Raising and Lowering the Presser Foot . 8Balancing Thread Tension . 8Auto tension . 8Manual tension adjustment . 8Changing Needles . 9Winding the Bobbin . 10Removing the bobbin . 10Setting the spool of thread . 10Additional spool pin . 10Threading for bobbin winding . 10Inserting the bobbin . 11Threading the Machine . 12Built-in Needle Threader . 13Drawing Up the Bobbin Thread . 13DECORATIVE STITCHESKnit stitch .Shell Tucking .Satin Stitches .Applique Sewing .Scallop Stitch .Patchwork .Smocking .Fagoting .Cross Stitch .Pattern Combination .Correcting Distorted Stretch Patterns .3232323333333434343536CARE AND MAINTENANCEReplacing the Light Bulb .Cleaning the Hook Race .Inserting the bobbin holder .Problems and Warning Signals .Troubleshooting .BASIC STITCHESStraight Stitch .To sew .Changing sewing direction .Securing a seam .Altering the stitch length .Altering the needle drop position .Using the seam guide lines .To sew from the edge of thick fabric .Variety of Straight Stitches andRecommended Feet .Zigzag Stitches .Altering the stitch width .Altering the stitch length .Variety of Overcasting Stitches .Overcasting with zigzag stitch .Multiple zigzag stitches (Tricot stitch) .Overcasting stitch .Double overedge stitch .Buttonholes .Variety of buttonholes .Square buttonhole .Altering the buttonhole width .Altering buttonhole stitch density .Double layer buttonhole .Round end and keyhole buttonholes .Altering the buttonhole width .Corded buttonhole 92021212124242425252613637373839
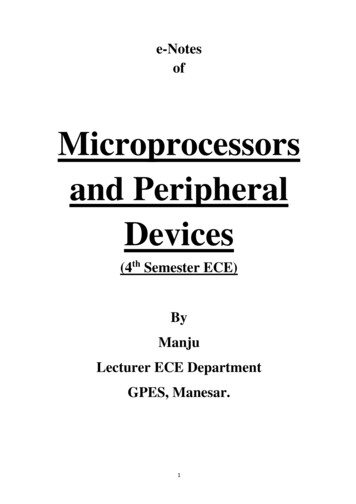
KNOW YOUR MACHINEName of 8.29.30.31.32.33.34.35.36.37.38.39.40.Direct pattern selection buttonsMode selection buttonPlus ( ) buttonMinus (–) buttonIndicator windowSpool holder (large)Spool pinBobbin winding thread guideThread guideThread take-up leverTension regulating dialFace plateThread cutterNeedle threaderNeedle plateExtension table (accessory storage)Hook cover plateHook cover plate release buttonStitch balance adjusting dialReverse buttonAuto-lock buttonUp/down needle buttonSpeed control sliderNeedle clamp screwNeedleZigzag foot AFoot holderCarrying handleBobbin winder spindleBobbin winder stopperHand wheelPower switchMachine socketsDrop-feed leverFree armButtonhole leverPresser foot lifterHole for additional spool pinPower supply cordInstruction book
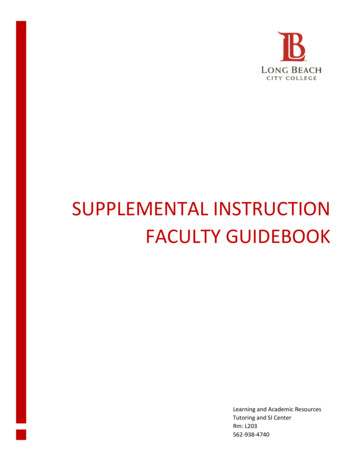
Standard AccessoriesThe standard accessories are stored in theextension table.q Extension tablew Standard 11Zipper Foot ESatin Stitch Foot FAutomatic Buttonhole Foot RScrewdriverBobbinsSet of NeedlesSeam RipperAdditional spool pinSpool Holder (Large)Spool Holder (Small)Spool standFelt912Extension tableqThe extension table provides an added sewingsurface and can be easily removed for free armsewing.w Detaching extension tablePull the table away from the machine, asillustrated. Free arm sewingFree arm sewing is useful for darning socks ormending knees, elbows or areas of wear inchildren’s clothes. Attaching extension tablePush the extension table until it snaps into themachine.123ProjectionHole
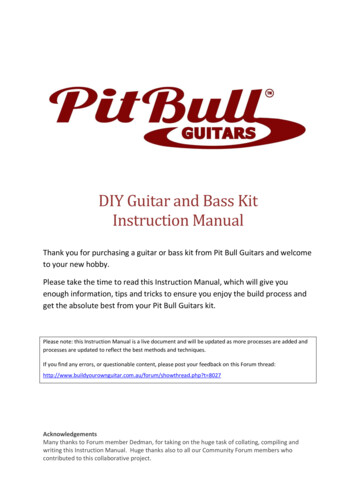
GETTING READY TO SEWConnecting the Power SupplyTurn off the power switch.Insert the foot control plug into the machine socket.Insert the machine plug into the machine socket.Insert the power supply plug into the wall outlet.Turn on the power switch.qerywtqwqwertyPower SwitchFoot Control PlugMachine SocketMachine PlugPower Supply PlugWall OutletFor Your Safety:While in operation, always keep your eyes on thesewing area, and do not touch any moving parts suchas the thread take-up lever, handwheel or needle.Always turn off the power switch and unplug from thepower supply:- when leaving the machine unattended.- when attaching or removing parts.- when cleaning the machine.Do not place anything on the foot control, otherwisethe machine will run intermittently.When the power is turned on, the indicator window willshow a test pattern then will indicate 01.Operating Instructions:The symbol "O" of a switch indicates the "off" position of a switch.For appliances with a polarized plug (one blade wider than the other). To reduce the risk of electric shock, thisplug is intended to fit in a polarized outlet only one way. If it does not fit fully in the outlet, reverse the plug. If itstill does not fit, contact a qualified electrician to install the proper outlet. Do not modify the plug in any way.Controlling Sewing SpeedSpeed control sliderYou can limit the maximum sewing speed with thespeed control slider according to your sewing needs.To increase sewing speed, slide it to the right.To decrease sewing speed, slide it to the left.Foot controlPressing on the foot control can vary sewing speed.The harder you press the foot control, the faster themachine runs.NOTES:The machine runs at the maximum speed set by thespeed control slider when the foot control is fullydepressed.Keep the foot control free from accumulation of lint,dust and loose cloth.Do not place anything on the foot control.Operating Instructions:Foot controller Model 21371 is for use with sewingmachine model DC3050.4
rewqtFunction Buttons and Keysqq Reverse buttonWhen stitch pattern 01, 02, 10 or 11has beenselected, the machine will sew in reverse while the reversebutton is pressed.If you press the reverse button when sewing any otherstitches, the machine will immediately sew locking stitchesand automatically stop.w Auto-Lock buttonweWhen stitch pattern 01, 02, 10 or 11has beenselected, the machine will immediately sew locking stitchesand automatically stop when the auto-lock button ispressed.When sewing any other stitches, the machine will sewlocking stitches at the end of the pattern being sewn andautomatically stop.e Up/Down needle buttonPress this button to bring the needle up or down.The machine will stop with the needle up or downdepending on the needle position determined by thisbutton.5
r Mode keyrEach time you press this key the mode will change inthe following order:(1) Pattern selection modeThe green light on the top will be on.To select the pattern, press thekey until thepattern number of the desired stitch is indicated (seethe stitch chart FAFFFFFFFF(2)(2) Stitch width adjusting modeThe green light in the middle will light up.The stitch width of the selected pattern will beindicated.To alter the stitch width, press thekey.(3)(3) Stitch length adjusting modeThe green light on the bottom will light up.The stitch length of the selected pattern will beindicated.To alter the stitch length, press thekey.t Direct pattern selectiontThe 4 most commonly used stitches can be directlyselected by pressing the button under the patternicon.6
Dropping the Feed DogThe feed dog can be lowered with the drop-feed leverfor sewing on buttons etc.qShift the drop-feed lever to the right to lower the feeddog.ewShift the lever to the left to raise the feed dog, it willreturn to the up position when the machine is started.q Down positionw Up positione Feed dogr Hand wheelrNOTE:The feed dog should be in the up position for regularsewing. Turn the handwheel toward you to check ifthe feed dog comes up after setting the lever in theup position.Changing the Presser FootCAUTION:Turn OFF the power switch before changing the foot.Always use the proper foot for the selected pattern.The wrong foot can cause the needle to break.To snap off:Raise the needle and presser foot.Press the red button on the back of the foot holderand the foot will drop.q Red ButtonqrewTo snap on:Place the presser foot so the pin on the foot lies justunder the groove of the foot holder.Lower the foot holder to lock the foot in place.w Groovee PinEach foot is marked with a letter for identification.r Identification LetterDetaching and Attaching the Foot HolderWARNING:Turn OFF the power switch before detaching orattaching the foot holder.qTo detach:Raise the presser bar and turn the setscrewcounterclockwise to remove the foot holder.q Setscreww Foot holderwTo attach:Align the hole in the foot holder with the threadedhole in the presser bar and insert the setscrewthrough the hole.Tighten the setscrew by turning it clockwise.q7
Raising and Lowering the Presser FootThe Presser foot lifter raises and lowers the presserfoot.You can raise the presser foot about 6 mm (1/4")higher than the normal up position by exerting morepressure when lifting the presser foot lifter. Thisallows for easy removal of the presser foot and helpsyou to place thick fabric under the foot.ew123wqePresser foot lifterNormal up positionExtra liftBalancing Thread TensionAuto tensionThis machine features an Auto setting in the tensioncontrol, which covers a wide range of sewingconditions. Set the tension regulating dial at "A" forgeneral sewing, unless specifically indicated in thismanual.qq Tension regulating dialw Setting markwteBalanced tension:The ideal straight stitch has threads locked betweentwo layers of fabric.For an ideal zigzag stitch, the bobbin thread does notshow on the right side of the fabric, and the needlethread shows slightly on the wrong side of the fabric.yertyrtNeedle threadBobbin threadRight side of the fabricWrong side of the fabricManual tension adjustmentManual tension adjustment may be neededdepending on the sewing materials, layers of fabricand other sewing conditions.yNeedle thread tension is too tight:-if the bobbin thread appears on the right side of thefabric.Loosen the needle thread tension by moving the dialto a lower number.tyNeedle thread tension is too loose:-if the needle thread appears on the wrong side of thefabric.Tighten the needle thread tension by moving the dialto a higher number.8
Changing NeedlesCAUTION:Always make sure to turn the power switch off anddisconnect the machine from power supply beforechanging the needle. Raise the needle by pressingthe up/down needle button and lower the presser foot.Turn off the power switch.q121 Loosen the needle clamp screw by turning itcounterclockwise.Remove the needle from the clamp.wq Needle clamp screw2 Insert a new needle into the needle clamp with theflat side of the needle to the rear.When inserting the needle into the needle clamp,push it up against the stopper pin and tighten theneedle clamp screw firmly.ew Stopper pine Flat sideTo check needle straightness, place the flat side of theneedle onto something flat (a needle plate, glass etc.)The gap between the needle and the flat surfaceshould be consistent.Never use a blunt needle.rr GapWEIGHTFABRICTYPE of NEEDLENEEDLE SIZEVery LightChiffon, Georgette, Fine Lace, OrgandyNet, TulleUniversalBall Point9 (65)9 (65)LightBatiste, Voile, Lawn, Pure Silk, Crepe de Chine,Sheer Crepe, Chambray, Handkerchief Linen,Gingham, Challis, Percale, Wool Crepe, Peau deSoie, Taffeta, Satin, Silk Surah, Satin-backedCrepe, QianaBlue Tipped NeedleUniversal11 (75)11 (75)12 (80)Single Knits, Jersey, Swimwear, and TricotBlue Tipped NeedleBall Point11 (75)11 (75)Leather SuedeWedge PointLeather Needle11 (75)Flannel, Velour, Velvet, Muslin, Velveteen,Poplin, Corduroy, Broadcloth, Linen, Chintz,Gabardine, Felt, Terry, Burlap, Quilted FabricsUniversal14 (90)Double Knits, (synthetic and natural) StretchVelour, Stretch Terry, Sweater KnitsBall Point14 (90)Leather, Vinyl, SuedeWedge PointLeather Needle14 (90)Denim, Sailcloth, TickingDenim Needle16 (100)Double Faced Wool, Heavy Coating, Fake Fur,Drapery FabricsUniversal16 (100)Leather, SuedeWedge PointLeather Needle16 (100)18 (110)Canvas, Duck, Upholstery FabricsUniversal16 (100)Topstitching Needle14 (90)MediumHeavyVery HeavyTopstitching for Special Finishes9
Winding the Bobbin1qRemoving the bobbin21 Slide the hook cover plate release button to theright, and remove the hook cover plate.q Hook cover plate release buttonw Hook cover plateew2 Lift out the bobbin from the bobbin holder.e BobbinSetting the spool of threadLift up the spool pin. Place the spool of thread on thespool pin with the thread coming off the spool asshown.q Large spool holderqAttach the large spool holder, and press it firmlyagainst the spool of thread.Use the small spool holder to hold narrow or smallspools of thread.w Small spool holderwAdditional spool pinUse the additional spool pin when you need to windthe bobbin without unthreading the machine whileworking on a sewing project.qwrInsert the additional spool pin into the spool standand then into the hole in the machine.Place the felt on the spool pin and place a spool ofthread on it as shown.q Additional spool pinw Felte Holer Spool stande21Threading for bobbin winding1Set the speed control lever at.Guide the thread around the thread guide.q Thread guide2 Pass the thread through the hole in the bobbinfrom the inside to the outside. Put the bobbin onthe bobbin winder spindle.w Bobbin winder spindle3 Push the bobbin winder spindle to the right.The indicator will show.4 Hold the free end of the thread in your hand anddepress the foot control.Stop the machine after the bobbin has spunseveral times, and cut the thread close to the holein the bobbin.5 Depress the foot control again. When the bobbinis fully wound, it will stop automatically.Release the foot control and return the bobbinwinder spindle to its original position by moving itto the left, and cut the thread with a pair ofscissors. Remove the bobbin from the bobbinwinder spindle.NOTE:The machine will not sew until the spindle has beenreturned to the left.q23w4510
Inserting the bobbin1 Place the bobbin in the bobbin holder with thethread running off counterclockwise.q Threadw Bobbin holderq1w22 Guide the thread into the notch on the front of thebobbin holder.e Notch on the fronte33 Draw the thread to the left, sliding it betweenthe tension spring blades.r Spring bladesr44 Continue to draw the thread lightly until the threadslips into the notch on the side.t Notch on the sidet5y5 Pull out about 10 cm (4") of thread to the rear.Reattach the hook cover plate.NOTE:A threading chart is shown on the hook cover platefor your reference.y Threading chart11
Threading the MachineRaise the presser foot.Press the Up/Down needlebutton to raise the threadtake-up lever to its highestposition.q1241 Draw the thread from the spool. Hold the upperthread at the spool with your finger.q Hold the thread352 Slip the thread under the thread guide from theright and down along the right channel.Be sure that the thread passes between thetension disks.w Thread guidee Right channelr Tension disks2wer33 Then draw the thread around the bottom of thethread guide plate.t Thread guide platet4 Firmly draw the thread up along the left channel tothe take-up lever and down into its eye from theright to the left.y Thread take-up levery345 Then down through the lower thread guide.u Lower thread guide5 6 76 Slide the thread behind the needle bar threadguide on the left.i Needle bar thread guideui7 Thread the needle from front to back by hand oruse the built-in needle threader (see page 13).12
Built-in Needle Threader1 Raise the needle to its highest position by turningthe hand wheel toward you.Turn the power switch off.Lower the presser foot.Depress the needle threader knob as far as it willgo. The hook comes out through the needle eyefrom behind.q Needle threader knobw Hook1qw2 Draw the thread down around the threader guideand under the hook.e Threader guide23 Release the threader knob slowly while holding thethread end with your hand. A loop of the thread ispulled up through the needle eye.e3 4r4 Remove the loop from the threader and pull out thethread end from the needle eye.NOTES:The automatic threader works well with the threads#50-90 and needles #11-16, as well as the blue tippedneedle.Drawing Up the Bobbin Thread11 Raise the Presser Foot Lifter.Turn the power switch on.2 Hold the needle thread with your finger and pressthe Up/Down needle button twice to pick up thebobbin thread.Draw up the needle thread to bring up a loop of thebobbin thread.2wqq Needle threadw Bobbin threade Up/Down needle buttone3q3 Slide 10 cm (4") of both threads to the back underthe presser foot.w13
BASIC STITCHESStraight StitchwqMachine Settingsq Pattern:#01w Presser foot: Zigzag foot ATo sewRaise the presser foot and position the fabric next toa seam guide line on the needle plate. Lower theneedle into the fabric where you wish to start.Pull the needle and bobbin threads to the back.Lower the presser foot.Depress the foot control to start sewing. Gently guidethe fabric along the seam guide line.Changing sewing direction:Stop the machine a few stitches before the end of aseam. Press the up/down needle button a few timesuntil the needle falls on the end of the seam.q Up/Down needle buttonRaise the presser foot.Pivot the fabric around the needle to change thesewing direction as desired.Lower the presser foot and start sewing in a newdirection.qSecuring a seamFor fastening the beginning of a seam, press thereverse button and sew several reverse stitches.Release the reverse button to sew forward.w Reverse buttonFor fastening the ends of a seam, press the reversebutton at the end of the seam.Sew a few stitches in reverse to fasten the seam.wRaise the presser foot and pull the fabric to the backto remove it.To cut the threads, pull the fabric to draw the threadsup to the thread cutter as shown.The threads are cut a proper length to start the nextseam.e Thread cuttereWhen pattern #03 (lock-a-matic stitch)is selected:The machine will sew reverse stitches at thebeginning of a seam automatically, and at the end ofthe seam by pressing the reverse button once.14
Altering the stitch lengthThe stitch length can be altered between 0.0 and 5.0.Press the mode keyto activate stitch lengthadjustment (the bottom green light lights up).The preset value 2.2 will be indicated.Press the plus ( ) key to increase the stitch length.Press the minus (–) key to decrease the stitch length.Altering the needle drop positionThe needle drop position of the following stitches canbe altered:Press the mode keyto activate stitch widthadjustment (the middle green light lights up).The preset value "3.5" will be indicated.Press the plus ( ) key to move the needle drop to theright.Press the minus (–) key to move the needle drop tothe left.15
Using the seam guide linesThe seam guides on the needle plate and hook coverhelp you to measure seam allowances.weNOTE:The number indicates the distance from the centerneedle position.q Guide linesw Center needle positione Edge of the /85/86/84/85/86/8To sew from the edge of thick fabric:The black button on the zigzag foot locks the foot inthe horizontal position.This is helpful when starting sewing from the extremeedge of thick fabrics or sewing across a hem.Lower the needle into the fabric at the point where youwish to start sewing.qLower the foot while pushing in the black button.The foot will be locked in the horizontal position toavoid slipping.The foot will be unlocked after sewing a few stitches.q Black button16
Variety of Straight Stitches and Recommended Feet#01, #02 Straight stitch: Zigzag foot APattern #01 is for seaming and for zipper sewing.Pattern #02is for seaming edge of fabrics.#03 Lock-a-matic stitch: Zigzag foot AUse this stitch to secure the beginning and the end of a seam withbackstitching.When you reach the end of the seam, press the Reverse Button once.The machine will sew four reverse stitches, four forward stitches, andthen stop sewing automatically.#04 Locking stitch: Zigzag foot AThis unique stitch is used where an invisible locking stitch is needed.Lower the needle close to the front edge of the fabric.The machine will sew several locking stitches in place and continuesewing forward.When you press the reverse button at the end of the seam, the machinewill sew several locking stitches in place, then stop sewing automatically.#05 Stretch stitch: Zigzag foot AThis is a narrow stretch stitch designed to eliminate puckering on knitfabrics and bias seams, while allowing the seam to be pressedcompletely open flat.#18 Triple stretch stitch: Zigzag foot AThis strong, durable stitch is recommended for areas where bothelasticity and strength are needed to ensure comfort and durability.Use it to reinforce areas such as crotch and armhole seams.Also use it when constructing items such as backpacks for extrastrength.#19 New sculpture stitch: Satin stitch foot FThis stitch is used for topstitches and outline-stitches enhancing thedesign appearance.#20 Sculpture stitch: Satin stitch foot FThis stitch is used for topstitches and outline-stitches enhancing thedesign appearance.#21 Saddle stitch: Zigzag foot AThis saddle stitch is formed with one stitch forward, two stitches backward,and a fourth stitch forward.You can achieve an attractive hand-worked look when topstitching suits,blazers, jumpsuits, and denim outfits with the saddle stitch.17
Zigzag StitchMachine Settingsq Pattern:#10w Presser foot: Zigzag foot AwqThe zigzag stitch is used for various sewing needsincluding overcasting. It can be used on most wovenfabrics.A dense zigzag stitch can also be used for appliqué.Altering the stitch widthThe stitch width can be altered between 0.0 and 7.0.Press the mode keyto activate stitch lengthadjustment (the middle green light lights up).The preset value "5.0" will be indicated.Press the plus ( ) key to increase the stitch width.Press the minus (–) key to decrease the stitch width.q Stitch widthqAltering the stitch lengthThe stitch length can be altered between 0.0 and 5.0.Press the mode keyto activate stitch lengthadjustment (the bottom green light lights up).The preset value 2.0 will be indicated.Press the plus ( ) key to increase the stitch length.Press the minus (–) key to decrease the stitch length.w Stitch lengthNOTE:The stitch length and width can be altered whilestitching.w18
Variety of Overcasting StitchesCAUTION:When you use the overedge foot C, you must set the zigzag width at 5.0or wider to prevent the needle from hitting the wires on the foot.Overcasting with zigzag stitchqwMachine Settingsq Pattern:#10w Presser foot: Zigzag foot A orOveredge foot C (optional item)Place the fabric edge next to the guide of the foot andthen sew.q GuideNOTES:The overedge foot is an optional item.When overcasting with the zigzag foot, carefully guidethe fabric so the needle falls off the edge when itswings to the right.qMultiple zigzag stitch (Tricot stitch)qwMachine Settingsq Pattern:#11w Presser foot: Zigzag foot AThis stitch is used to finish a raw edge of syntheticsand other stretch fabrics that tend to pucker.Sew along the fabric edge leaving an adequate seamallowance.After sewing, trim the seam allowance close to thestitches.qOvercasting stitchMachine Settingsq Pattern:#12w Presser foot: Zigzag foot A orOveredge foot C (optional item)wThis stitch can be used to simultaneously seam andovercast edges of fabrics.Use this stitch when you do not need to open seams flat.Place the fabric edge next to the guide of the foot andthen sew.q GuideNOTES:The overedge foot is an optional item.When overcasting with the zigzag foot, c
repair, electrical or mechanical adjustment. 4. Never operate the appliance with any air opening blocked. Keep ventilation openings of this sewing machine and foot controller free from accumulation of lint, dust and loose cloth. 5. Never drop or inser