Transcription
book.book Page 1 Thursday, July 4, 2013 10:56 AMInspiron 17/17ROwner’s ManualComputer model: Inspiron 3721/5721/3737/5737Regulatory model: P17ERegulatory type: P17E001/P17E002
book.book Page 2 Thursday, July 4, 2013 10:56 AMNotes, Cautions, and WarningsNOTE: A NOTE indicates important information that helps you make betteruse of your computer.CAUTION: A CAUTION indicates potential damage to hardware or loss ofdata if instructions are not followed.WARNING: A WARNING indicates a potential for property damage,personal injury, or death. 2013 Dell Inc.Trademarks used in this text: Dell , the DELL logo, and Inspiron are trademarks of Dell Inc.;Microsoft , Windows , and the Windows start button logo are either trademarks or registeredtrademarks of Microsoft Corporation in the United States and/or other countries;Bluetooth is a registered trademark owned by Bluetooth SIG, Inc. and is used by Dell underlicense.2013 - 06Rev. A00
book.book Page 3 Thursday, July 4, 2013 10:56 AMContentsBefore Working Inside Your ComputerBefore You Begin . . .Recommended Tools .Safety Instructions . . . . . . . . . . .9. . . . . . . . . . . . . . . . . . . . . . .9910. . . . . . . . . . . . . . . . . . . . . . . . . . . . . . . . . . . . . . . . . . . .After Working Inside Your Computer . . . . . . . . .11. . . . . . . . . . . . . . . . . . . . . .12. . . . . . . . . . . . . . . . . . . . . . . . . . . . . .12Removing the BatteryProcedureReplacing the BatteryProcedure. . . . . . . . . . . . . . . . . . . . . .13. . . . . . . . . . . . . . . . . . . . . . . . . . . . . .13Removing the Optical DrivePrerequisites.Procedure . . . . . . . . . . . . . . . . . .14. . . . . . . . . . . . . . . . . . . . . . . . . . . .1414. . . . . . . . . . . . . . . . . . . . . . . . . . . .Replacing the Optical DriveProcedure . . .Postrequisites . . . . . . . . . . . . . . . . .16. . . . . . . . . . . . . . . . . . . . . . . . . . .1616. . . . . . . . . . . . . . . . . . . . . . . . . . .Removing the KeyboardPrerequisites.Procedure . . . . . . . . . . . . . . . . . . . . .17. . . . . . . . . . . . . . . . . . . . . . . . . . . .1717. . . . . . . . . . . . . . . . . . . . . . . . . . . .Replacing the KeyboardProcedure . . .Postrequisites . . . . . . . . . . . . . . . . . . . .19. . . . . . . . . . . . . . . . . . . . . . . . . . .1919. . . . . . . . . . . . . . . . . . . . . . . . . . .Removing the Base Cover .Prerequisites.Procedure . . . . . . . . . . . . . . . . . . .20. . . . . . . . . . . . . . . . . . . . . . . . . . . .2020. . . . . . . . . . . . . . . . . . . . . . . . . . . .Replacing the Base CoverProcedure . . .Postrequisites . . . . . . . . . . . . . . . . . . .21. . . . . . . . . . . . . . . . . . . . . . . . . . .2121. . . . . . . . . . . . . . . . . . . . . . . . . . .Contents 3
book.book Page 4 Thursday, July 4, 2013 10:56 AMRemoving the Memory Module(s).Prerequisites.Procedure . . . . . . . . . . . . .22. . . . . . . . . . . . . . . . . . . . . . . . . . . .2222. . . . . . . . . . . . . . . . . . . . . . . . . . . .Replacing the Memory Module(s) .Procedure . . .Postrequisites . . . . . . . . . . . .23. . . . . . . . . . . . . . . . . . . . . . . . . . .2323. . . . . . . . . . . . . . . . . . . . . . . . . . .Removing the Hard DrivePrerequisites.Procedure . . . . . . . . . . . . . . . . . . . .24. . . . . . . . . . . . . . . . . . . . . . . . . . . .2424. . . . . . . . . . . . . . . . . . . . . . . . . . . .Replacing the Hard Drive.Procedure . . .Postrequisites . . . . . . . . . . . . . . . . . . .26. . . . . . . . . . . . . . . . . . . . . . . . . . .2626. . . . . . . . . . . . . . . . . . . . . . . . . . .Removing the Coin-Cell Battery .Prerequisites.Procedure . . . . . . . . . . . . . .27. . . . . . . . . . . . . . . . . . . . . . . . . . . .2727. . . . . . . . . . . . . . . . . . . . . . . . . . . .Replacing the Coin-Cell Battery .Procedure . . .Postrequisites . . . . . . . . . . . . .28. . . . . . . . . . . . . . . . . . . . . . . . . . .2828. . . . . . . . . . . . . . . . . . . . . . . . . . .Removing the Palm RestPrerequisites.Procedure . . . . . . . . . . . . . . . . . . . . .29. . . . . . . . . . . . . . . . . . . . . . . . . . . .2929. . . . . . . . . . . . . . . . . . . . . . . . . . . .Replacing the Palm RestProcedure . . .Postrequisites . . . . . . . . . . . . . . . . . . . .32. . . . . . . . . . . . . . . . . . . . . . . . . . .3232. . . . . . . . . . . . . . . . . . . . . . . . . . .Removing the Wireless Mini-CardPrerequisites.Procedure . . . . . . . . . . . . .33. . . . . . . . . . . . . . . . . . . . . . . . . . . .3333. . . . . . . . . . . . . . . . . . . . . . . . . . . .Replacing the Wireless Mini-CardProcedure . . .Postrequisites .4 Contents. . . . . . . . . . . .35. . . . . . . . . . . . . . . . . . . . . . . . . . .3535. . . . . . . . . . . . . . . . . . . . . . . . . . .
book.book Page 5 Thursday, July 4, 2013 10:56 AMRemoving the I/O BoardPrerequisites.Procedure . . . . . . . . . . . . . . . . . . . . .36. . . . . . . . . . . . . . . . . . . . . . . . . . . .3636. . . . . . . . . . . . . . . . . . . . . . . . . . . .Replacing the I/O BoardProcedure . . .Postrequisites . . . . . . . . . . . . . . . . . . . .37. . . . . . . . . . . . . . . . . . . . . . . . . . .3737. . . . . . . . . . . . . . . . . . . . . . . . . . .Removing the System Board .Prerequisites.Procedure . . . . . . . . . . . . . . . . .38. . . . . . . . . . . . . . . . . . . . . . . . . . . .3839. . . . . . . . . . . . . . . . . . . . . . . . . . . .Replacing the System Board .Procedure . . .Postrequisites . . . . . . . . . . . . . . . .42. . . . . . . . . . . . . . . . . . . . . . . . . . .4243. . . . . . . . . . . . . . . . . . . . . . . . . . .Removing the FanPrerequisites.Procedure . . . . . . . . . . . . . . . . . . . . . . . . . . . . . . . . . . . . . . . . . . . . . . . . . . . . . . . . . . . . . . . . . . . . . . . . . . . . . . .Replacing the Fan .Procedure . . .Postrequisites .45. . . . . . . . . . . . . . . . . . . . . . . . . . .4545. . . . . . . . . . . . . . . . . . . . . . . . . . . . . . . . . . . . . . . . . . . . . .46. . . . . . . . . . . . . . . . . . . . . . . . . . . .4646. . . . . . . . . . . . . . . . . . . . . . . . . . . .Replacing the Heat Sink.Procedure . . .Postrequisites . . . . . . . . . . . . . . . . . . . .47. . . . . . . . . . . . . . . . . . . . . . . . . . .4747. . . . . . . . . . . . . . . . . . . . . . . . . . .Removing the Hard-Drive Interposer BoardPrerequisites.Procedure . .4444. . . . . . . . . . . . . . . . . . . . . . . . .Removing the Heat SinkPrerequisites.Procedure . .44. . . .48. . . . . . . . . . . . . . . . . . . . . . . . . . . .4848. . . . . . . . . . . . . . . . . . . . . . . . . . . .Replacing the Hard-Drive Interposer BoardProcedure . . .Postrequisites . . . .49. . . . . . . . . . . . . . . . . . . . . . . . . . .4949. . . . . . . . . . . . . . . . . . . . . . . . . . .Contents 5
book.book Page 6 Thursday, July 4, 2013 10:56 AMRemoving the Speakers .Prerequisites.Procedure . . . . . . . . . . . . . . . . . . . . .50. . . . . . . . . . . . . . . . . . . . . . . . . . . .5051. . . . . . . . . . . . . . . . . . . . . . . . . . . .Replacing the Speakers .Procedure . . .Postrequisites . . . . . . . . . . . . . . . . . . . .52. . . . . . . . . . . . . . . . . . . . . . . . . . .5252. . . . . . . . . . . . . . . . . . . . . . . . . . .Removing the Display Assembly .Prerequisites.Procedure . . . . . . . . . . . . . .53. . . . . . . . . . . . . . . . . . . . . . . . . . . .5354. . . . . . . . . . . . . . . . . . . . . . . . . . . .Replacing the Display Assembly .Procedure . . .Postrequisites . . . . . . . . . . . . .55. . . . . . . . . . . . . . . . . . . . . . . . . . .5555. . . . . . . . . . . . . . . . . . . . . . . . . . .Removing the Display BezelPrerequisites.Procedure . . . . . . . . . . . . . . . . . .56. . . . . . . . . . . . . . . . . . . . . . . . . . . .5657. . . . . . . . . . . . . . . . . . . . . . . . . . . .Replacing the Display BezelProcedure . . .Postrequisites . . . . . . . . . . . . . . . . .58. . . . . . . . . . . . . . . . . . . . . . . . . . .5858. . . . . . . . . . . . . . . . . . . . . . . . . . .Removing the Display Hinges .Prerequisites.Procedure . . . . . . . . . . . . . . . .59. . . . . . . . . . . . . . . . . . . . . . . . . . . .5960. . . . . . . . . . . . . . . . . . . . . . . . . . . .Replacing the Display HingesProcedure . . .Postrequisites . . . . . . . . . . . . . . . .61. . . . . . . . . . . . . . . . . . . . . . . . . . .6161. . . . . . . . . . . . . . . . . . . . . . . . . . .Removing the Display PanelPrerequisites.Procedure . . . . . . . . . . . . . . . . . .62. . . . . . . . . . . . . . . . . . . . . . . . . . . .6263. . . . . . . . . . . . . . . . . . . . . . . . . . . .Replacing the Display PanelProcedure . . .Postrequisites .6 Contents. . . . . . . . . . . . . . . . .64. . . . . . . . . . . . . . . . . . . . . . . . . . .6464. . . . . . . . . . . . . . . . . . . . . . . . . . .
book.book Page 7 Thursday, July 4, 2013 10:56 AMRemoving the Camera Module .Prerequisites.Procedure . . . . . . . . . . . . . . .65. . . . . . . . . . . . . . . . . . . . . . . . . . . .6566. . . . . . . . . . . . . . . . . . . . . . . . . . . .Replacing the Camera ModuleProcedure . . .Postrequisites . . . . . . . . . . . . . . .67. . . . . . . . . . . . . . . . . . . . . . . . . . .6767. . . . . . . . . . . . . . . . . . . . . . . . . . .Removing the Power-Adapter PortPrerequisites.Procedure . . . . . . . . . . . .68. . . . . . . . . . . . . . . . . . . . . . . . . . . .6869. . . . . . . . . . . . . . . . . . . . . . . . . . . .Replacing the Power-Adapter PortProcedure . . .Postrequisites . . . . . . . . . . .70. . . . . . . . . . . . . . . . . . . . . . . . . . .7070. . . . . . . . . . . . . . . . . . . . . . . . . . .Flashing the BIOS . . . . . . . . . . . . . . . . . . . . . . . . .71Contents 7
book.book Page 8 Thursday, July 4, 2013 10:56 AM8 Contents
book.book Page 9 Thursday, July 4, 2013 10:56 AMBefore Working Inside Your ComputerBefore You BeginCAUTION: To avoid losing data, save and close all open files and exit all openprograms before you turn off your computer.1Save and close all open files, exit all open programs, and turn off your computer. Windows 8: Point to the lower/upper-right corner of the screen to open theCharms sidebar and click Settings Power Shut down. Windows 7: Click Start Shut down.NOTE: If you are using a different operating system, see the documentationof your operating system for shut-down instructions.2After the computer shuts down, disconnect it from the electrical outlet.3Disconnect all cables — such as power and USB cables — from your computer.4Disconnect all peripherals from your computer.Recommended ToolsThe procedures in this document may require the following tools: Phillips screwdriver Plastic scribeBefore Working Inside Your Computer 9
book.book Page 10 Thursday, July 4, 2013 10:56 AMSafety InstructionsUse the following safety guidelines to protect your computer from potential damage andmake sure your personal safety.WARNING: Before working inside your computer, read the safetyinformation that shipped with your computer. For additional safety bestpractices information, see the Regulatory Compliance Homepage atdell.com/regulatory compliance.WARNING: Disconnect all power sources before opening the computer cover orpanels. After you finish working inside the computer, replace all covers, panels,and screws before connecting to the power source.CAUTION: Only a certified service technician is authorized to remove thecomputer cover and access any of the components inside the computer.CAUTION: To avoid damaging the computer, make sure that the work surface isflat and clean.CAUTION: To disconnect a network cable, first unplug the cable from yourcomputer and then unplug the cable from the network device.CAUTION: When you disconnect a cable, pull on its connector or on its pull-tab,not on the cable itself. Some cables have connectors with locking tabs orthumb-screws that you must disengage before disconnecting the cable.When disconnecting cables, keep them evenly aligned to avoid bending anyconnector pins. When connecting cables, make sure that the connectors andports are correctly oriented and aligned.CAUTION: Before touching anything inside your computer, ground yourself bytouching an unpainted metal surface, such as the metal at the back of thecomputer. While you work, periodically touch an unpainted metal surface todissipate static electricity, which could harm internal components.CAUTION: To avoid damaging the components and cards, handle them by theiredges and avoid touching pins and contacts.10 Before Working Inside Your Computer
book.book Page 11 Thursday, July 4, 2013 10:56 AMAfter Working Inside Your ComputerCAUTION: Leaving stray or loose screws inside your computer may severelydamage your computer.1Replace all screws and make sure that no stray screws remain insideyour computer.2Connect any cables, peripherals, and any other part(s) you removed beforeworking on your computer.3Connect your computer to the electrical outlet.4Turn on your computer.After Working Inside Your Computer 11
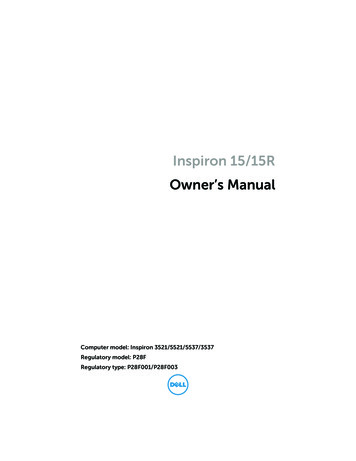
book.book Page 12 Thursday, July 4, 2013 10:56 AMRemoving the BatteryWARNING: Before working inside your computer, read the safety information thatshipped with your computer and follow the steps in "Before Working Inside YourComputer" on page 9. After working inside your computer, follow the instructionsin "After Working Inside Your Computer" on page 11. For additional safety bestpractices information, see the Regulatory Compliance Homepage atdell.com/regulatory compliance.Procedure1Close the display and turn the computer over.2Slide the battery latches outward to unlock the battery. You hear a click when thebattery is unlocked.3Lift and remove the battery off the computer base.121battery2battery latches (2)4Turn the computer over and open the display as far as possible.5Press and hold the power button for 5 seconds, after the computer is unplugged,to ground the system board.12 Removing the Battery
book.book Page 13 Thursday, July 4, 2013 10:56 AMReplacing the BatteryWARNING: Before working inside your computer, read the safety information thatshipped with your computer and follow the steps in "Before Working Inside YourComputer" on page 9. After working inside your computer, follow the instructionsin "After Working Inside Your Computer" on page 11. For additional safety bestpractices information, see the Regulatory Compliance Homepage atdell.com/regulatory compliance.ProcedureAlign the tabs on the battery with the slots on the battery bay and snap the batteryinto place.Replacing the Battery 13
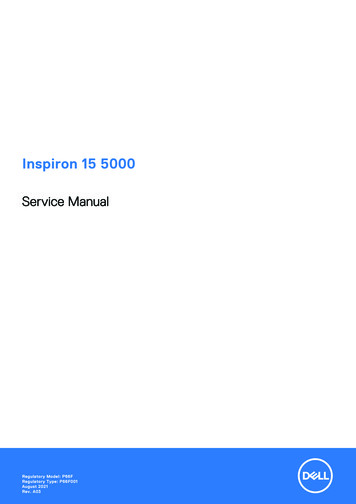
book.book Page 14 Thursday, July 4, 2013 10:56 AMRemoving the Optical DriveWARNING: Before working inside your computer, read the safety information thatshipped with your computer and follow the steps in "Before Working Inside YourComputer" on page 9. After working inside your computer, follow the instructionsin "After Working Inside Your Computer" on page 11. For additional safety bestpractices information, see the Regulatory Compliance Homepage atdell.com/regulatory compliance.PrerequisitesRemove the battery. See "Removing the Battery" on page 12.Procedure1Remove the screw that secures the optical-drive assembly to the computer base.2Using your fingertips, slide the optical-drive assembly out of the optical-drive bay.12114 screwRemoving the Optical Drive2optical-drive assembly
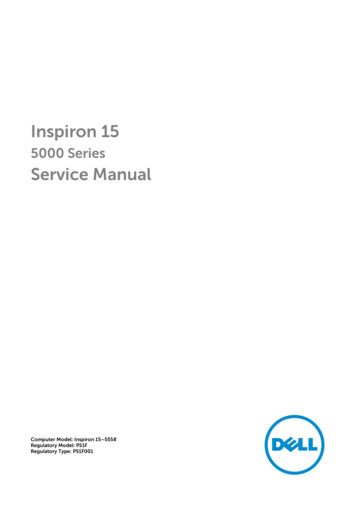
book.book Page 15 Thursday, July 4, 2013 10:56 AM3Remove the screw that secures the optical-drive bracket to theoptical-drive assembly and remove the optical-drive bracket.4Carefully pull the optical-drive bezel and remove it from the optical drive.21341optical-drive bezel2optical drive3screw4optical-drive bracketRemoving the Optical Drive 15
book.book Page 16 Thursday, July 4, 2013 10:56 AMReplacing the Optical DriveWARNING: Before working inside your computer, read the safety information thatshipped with your computer and follow the steps in "Before Working Inside YourComputer" on page 9. After working inside your computer, follow the instructionsin "After Working Inside Your Computer" on page 11. For additional safety bestpractices information, see the Regulatory Compliance Homepage atdell.com/regulatory compliance.Procedure1Align the tabs on the optical-drive bezel with the slots on the optical drive and snapthe optical-drive bezel into place.2Align the screw hole on the optical-drive bracket with the screw hole onthe optical-drive assembly and replace the screw that secures the optical-drivebracket to the optical-drive assembly.3Slide the optical-drive assembly into the optical-drive bay and align the screw holeon the optical-drive bracket with the screw hole on the computer base.4Replace the screw that secures the optical-drive assembly to the computer base.PostrequisitesReplace the battery. See "Replacing the Battery" on page 13.16 Replacing the Optical Drive
book.book Page 17 Thursday, July 4, 2013 10:56 AMRemoving the KeyboardWARNING: Before working inside your computer, read the safety information thatshipped with your computer and follow the steps in "Before Working Inside YourComputer" on page 9. After working inside your computer, follow the instructionsin "After Working Inside Your Computer" on page 11. For additional safety bestpractices information, see the Regulatory Compliance Homepage atdell.com/regulatory compliance.PrerequisitesRemove the battery. See "Removing the Battery" on page 12.Procedure1Open the display as far as possible.2Using a plastic scribe, pry the keyboard from the tabs on the palm rest.1231tabs (4)3keyboard2plastic scribeRemoving the Keyboard 17
book.book Page 18 Thursday, July 4, 2013 10:56 AM3Turn the keyboard over and place it on the palm rest.4Lift the connector latch and disconnect the keyboard cable from thekeyboard-cable connector.5Lift the keyboard off the palm rest.1234181keyboard cable2connector latch3keyboard4palm rest Removing the Keyboard
book.book Page 19 Thursday, July 4, 2013 10:56 AMReplacing the KeyboardWARNING: Before working inside your computer, read the safety information thatshipped with your computer and follow the steps in "Before Working Inside YourComputer" on page 9. After working inside your computer, follow the instructionsin "After Working Inside Your Computer" on page 11. For additional safety bestpractices information, see the Regulatory Compliance Homepage atdell.com/regulatory compliance.Procedure1Slide the keyboard cable into the keyboard-cable connector and press down on theconnector latch to secure the cable.2Slide the tabs at the bottom of the keyboard into the slots on the palm-rest andplace the keyboard on the palm rest.3Gently press around the edges of the keyboard to secure the keyboard under thetabs on the palm rest.4Replace the screws that secure the keyboard to the computer base.PostrequisitesReplace the battery. See "Replacing the Battery" on page 13.Replacing the Keyboard 19
book.book Page 20 Thursday, July 4, 2013 10:56 AMRemoving the Base CoverWARNING: Before working inside your computer, read the safety information thatshipped with your computer and follow the steps in "Before Working Inside YourComputer" on page 9. After working inside your computer, follow the instructionsin "After Working Inside Your Computer" on page 11. For additional safety bestpractices information, see the Regulatory Compliance Homepage atdell.com/regulatory compliance.PrerequisitesRemove the battery. See "Removing the Battery" on page 12.Procedure1Loosen the captive screws that secure the base cover to the computer base.2Using your fingertips, lift the base cover out of the slots on the computer base.12120 captive screws (2)Removing the Base Cover2base cover
book.book Page 21 Thursday, July 4, 2013 10:56 AMReplacing the Base CoverWARNING: Before working inside your computer, read the safety information thatshipped with your computer and follow the steps in "Before Working Inside YourComputer" on page 9. After working inside your computer, follow the instructionsin "After Working Inside Your Computer" on page 11. For additional safety bestpractices information, see the Regulatory Compliance Homepage atdell.com/regulatory compliance.Procedure1Slide the tabs on the base cover into the slots on the computer base and snap thebase cover into place.2Tighten the captive screws that secure the base cover to the computer base.PostrequisitesReplace the battery. See "Replacing the Battery" on page 13.Replacing the Base Cover 21
book.book Page 22 Thursday, July 4, 2013 10:56 AMRemoving the Memory Module(s)WARNING: Before working inside your computer, read the safety information thatshipped with your computer and follow the steps in "Before Working Inside YourComputer" on page 9. After working inside your computer, follow the instructionsin "After Working Inside Your Computer" on page 11. For additional safety bestpractices information, see the Regulatory Compliance Homepage atdell.com/regulatory compliance.Prerequisites1Remove the battery. See "Removing the Battery" on page 12.2Remove the base cover. See "Removing the Base Cover" on page 20.Procedure1Use your fingertips to carefully spread apart the securing-clips on each end of thememory-module connector until the memory module pops up.2Slide and remove the memory module from the memory-module connector.13221memory-module connector3memory module Removing the Memory Module(s)22securing-clips (2)
book.book Page 23 Thursday, July 4, 2013 10:56 AMReplacing the Memory Module(s)WARNING: Before working inside your computer, read the safety information thatshipped with your computer and follow the steps in "Before Working Inside YourComputer" on page 9. After working inside your computer, follow the instructionsin "After Working Inside Your Computer" on page 11. For additional safety bestpractices information, see the Regulatory Compliance Homepage atdell.com/regulatory compliance.Procedure1Align the notch on the memory module with the tab on thememory-module connector.2Slide the memory module firmly, at a 45-degree angle, into the connectorand press the memory module down until it clicks into place.NOTE: If you do not hear the click, remove the memory module and reinstall it.Postrequisites1Replace the base cover. See "Replacing the Base Cover" on page 21.2Replace the battery. See "Replacing the Battery" on page 13.Replacing the Memory Module(s) 23
book.book Page 24 Thursday, July 4, 2013 10:56 AMRemoving the Hard DriveWARNING: Before working inside your computer, read the safety information thatshipped with your computer and follow the steps in "Before Working Inside YourComputer" on page 9. After working inside your computer, follow the instructionsin "After Working Inside Your Computer" on page 11. For additional safety bestpractices information, see the Regulatory Compliance Homepage atdell.com/regulatory compliance.CAUTION: To avoid data loss, do not remove the hard drive while the computer isin Sleep or On state.CAUTION: Hard drives are extremely fragile. Exercise care when handling thehard drive.Prerequisites1Remove the battery. See "Removing the Battery" on page 12.2Remove the base cover. See "Removing the Base Cover" on page 20.Procedure1Remove the screws that secure the hard-drive assembly to the computer base.2Using the pull tab, slide the hard-drive assembly to disconnect it fromthe system board.3Using the pull tab, lift the hard-drive assembly off the computer base.321241pull-tab3screws (3) Removing the Hard Drive2hard-drive assembly
book.book Page 25 Thursday, July 4, 2013 10:56 AM4Remove the screws that secure the hard-drive bracket to the hard drive.5Using the pull-tab, lift the hard-drive bracket off the hard drive.1231hard drive3hard-drive bracket2screws (4)Removing the Hard Drive 25
book.book Page 26 Thursday, July 4, 2013 10:56 AMReplacing the Hard DriveWARNING: Before working inside your computer, read the safety information thatshipped with your computer and follow the steps in "Before Working Inside YourComputer" on page 9. After working inside your computer, follow the instructionsin "After Working Inside Your Computer" on page 11. For additional safety bestpractices information, see the Regulatory Compliance Homepage atdell.com/regulatory compliance.CAUTION: Hard drives are extremely fragile. Exercise care when handling thehard drive.Procedure1Align the screw holes on the hard-drive bracket with the screw holes onthe hard drive.2Replace the screws that secure the hard-drive bracket to the hard drive.3Place the hard-drive assembly in the hard-drive bay.4Using the pull tab, slide the hard-drive assembly towards the connector to connectthe hard-drive assembly to the system board.5Replace the screws that secure the hard-drive assembly to the computer base.Postrequisites1Replace the base cover. See "Replacing the Base Cover" on page 21.2Replace the battery. See "Replacing the Battery" on page 13.26 Replacing the Hard Drive
book.book Page 27 Thursday, July 4, 2013 10:56 AMRemoving the Coin-Cell BatteryWARNING: Before working inside your computer, read the safety information thatshipped with your computer and follow the steps in "Before Working Inside YourComputer" on page 9. After working inside your computer, follow the instructionsin "After Working Inside Your Computer" on page 11. For additional safety bestpractices information, see the Regulatory Compliance Homepage atdell.com/regulatory compliance.CAUTION: Removing the coin-cell battery resets the BIOS settings to default.It is recommended that you note the BIOS settings before removing thecoin-cell battery.Prerequisites1Remove the battery. See "Removing the Battery" on page 12.2Remove the base cover. See "Removing the Base Cover" on page 20.ProcedureUsing a plastic scribe, gently pry out the coin-cell battery out of the battery socket on thesystem board.1231plastic scribe3battery socket2coin-cell batteryRemoving the Coin-Cell Battery 27
book.book Page 28 Thursday, July 4, 2013 10:56 AMReplacing the Coin-Cell BatteryWARNING: Before working inside your computer, read the safety information thatshipped with your computer and follow the steps in "Before Working Inside YourComputer" on page 9. After working inside your computer, follow the instructionsin "After Working Inside Your Computer" on page 11. For additional safety bestpractices information, see the Regulatory Compliance Homepage atdell.com/regulatory compliance.WARNING: The battery may explode if installed incorrectly. Replace the batteryonly with the same or equivalent type. Discard used batteries according to themanufacturer’s instructions.ProcedureWith the positive-side facing up, snap the coin-cell battery into the battery socket on thesystem board.Postrequisites1Replace the base cover. See "Replacing the Base Cover" on page 21.2Replace the battery. See "Replacing the Battery" on page 13.28 Replacing the Coin-Cell Battery
book.book Page 29 Thursday, July 4, 2013 10:56 AMRemoving the Palm RestWARNING: Before working inside your computer, read the safety information thatshipped with your computer and follow the steps in "Before Working Inside YourComputer" on page 9. After working inside your computer, follow the instructionsin "After Working Inside Your Computer" on page 11. For additional safety bestpractices information, see the Regulatory Compliance Homepage atdell.com/regulatory compliance.Prerequisites1Remove the battery. See "Removing the Battery" on page 12.2Remove the base cover. See "Removing the Base Cover" on page 20.3Remove the keyboard. See "Removing the Keyboard" on page 17.Procedure1Remove the screws that secure the palm rest to the computer base.11screws (12)Removing the Palm Rest 29
book.book Page 30 Thursday, July 4, 2013 10:56 AM2Turn the computer over and open the display as far as possible.3Lift the connector latches and, using the pull-tabs, disconnect the power-buttoncable and touchpad cable from the system board.1423301power-button cable2pull-tabs (2)3connector latches (2)4touchpad cable Removing the Palm Rest
book.book Page 31 Thursday, July 4, 2013 10:56 AM4Remove the screws that secure the palm rest to the computer base.5Using a plastic scribe, gently lift and release the tabs on the palm rest from the slotson the computer base.CAUTION: Separate the palm rest from the display assembly carefully to avoiddamage to the display assembly.6Lift the palm rest off the computer base.1231screws (5)3plastic scribe2palm restRemoving the Palm Rest 31
book.book Page 32 Thursday, July 4, 2013 10:56 AMReplacing the Palm RestWARNING: Before working inside your computer, read the safety information thatshipped with your computer and follow the steps in "Before Working Inside YourComputer" on page 9. After working inside your computer, follow the instructionsin "After Working Inside Your Computer" on page 11. For additional safety bestpractices information, see the Regulatory Compliance Homepage atdell.com/regulatory compliance.Procedure1Align the palm rest to the computer base.2Press down on the edges of the palm rest to snap it into place.3Replace the screws that secure the palm rest to the computer base.4Slide the touchpad cable and the power-button cable into the system-boardconnectors and press down on the connector latches to secure the cables.5Close the display and turn the computer over.6Replace the screws that secure the palm rest to the computer base.Postrequisites1Replace the keyboard. See "Replacing the Keyboard" on page 19.2Replace the base cover. See "Replacing the Base Cover" on page 21.3Replace the battery. See "Replacing the Battery" on page 13.32 Replacing the Palm Rest
book.book Page 33 Thursday, July 4, 2013 10:56 AMRemoving the Wireless Mini-CardWARNING: Before
3 screw 4 optical-drive bracket 4 1 3 2 book.book Page 15 Thursday, July 4, 2013 10:56 AM. 16 Replacing the Optical Drive Replacing the Optical Drive WARNING: Before working inside your computer, read the safety information that shipped with your computer and follow the steps in "Before Working Inside Your