Transcription
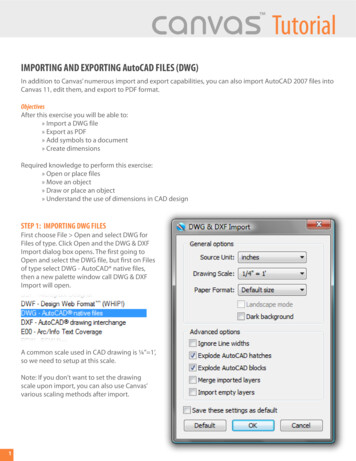
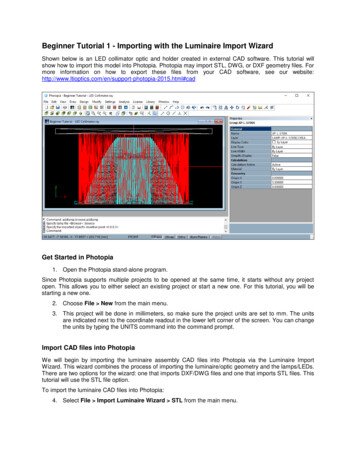
Beginner Tutorial 1 - Importing with the Luminaire Import WizardShown below is an LED collimator optic and holder created in external CAD software. This tutorial willshow how to import this model into Photopia. Photopia may import STL, DWG, or DXF geometry files. Formore information on how to export these files from your CAD software, see our ia-2015.html#cadGet Started in Photopia1. Open the Photopia stand-alone program.Since Photopia supports multiple projects to be opened at the same time, it starts without any projectopen. This allows you to either select an existing project or start a new one. For this tutorial, you will bestarting a new one.2. Choose File New from the main menu.3. This project will be done in millimeters, so make sure the project units are set to mm. The unitsare indicated next to the coordinate readout in the lower left corner of the screen. You can changethe units by typing the UNITS command into the command prompt.Import CAD files into PhotopiaWe will begin by importing the luminaire assembly CAD files into Photopia via the Luminaire ImportWizard. This wizard combines the process of importing the luminaire/optic geometry and the lamps/LEDs.There are two options for the wizard: one that imports DXF/DWG files and one that imports STL files. Thistutorial will use the STL file option.To import the luminaire CAD files into Photopia:4. Select File Import Luminaire Wizard STL from the main menu.
Beginner Tutorial 1 – Import a Luminaire5. Navigate to the folder to where the STL files were exported. For this tutorial, find the STL files inC:\Users\Public\Public Documents\LTI Optics\Photopia\Sample Projects\LED Collimator\.6. Hold the Shift key and click to select all the STL files with names starting with LED Collimator.7. Click the Open button. Photopia then displays the Import Model screen.2
Beginner Tutorial 1 – Import a LuminaireThe layer list box in the upper-left corner contains a list of the STL files, where each becomes a layer inPhotopia. Layers that are checked will be imported and are shown in the CAD view. Make sure that alllayers beginning with LED Collimator. are checked.Also notice that each of these layers includes a type designation specified in parentheses (scroll to theright). The "LED CREE XPL" layer should remain Non Optical. We need to use a Photopia lamp model forthe lamp (rather than this imported CAD lamp layer).8. The "Collimator" layer will refract and totally internally reflect (TIR) light, so change the layer typeby clicking that layer and changing the item in the Layer Type list box to Refractive.9. Since the “Holder” and “PCB” layers will reflect light, change the layer type for these layers toReflective. You can use the Shift and Ctrl keys to select multiple layers.3
Beginner Tutorial 1 – Import a Luminaire10. The Units for the drawing are shown in the list box below the list of layers. Be sure that thedrawing units are set to Millimeters.The geometry that will be imported is shown in the CAD view on the right side of the screen. You canmanipulate the CAD view with the mouse. Right clicking in the CAD view exposes a pop-up menu withnumerous display options.11. Right click in the CAD view and choose Dynamic Views Orbit. Now you can change your viewof the luminaire by left clicking and dragging the mouse in the CAD view. Find the origin, which isindicated by a circle with crosshairs.It looks like the luminaire needs to be translated and rotated to make it centered at the origin with the lightaimed in the negative z direction, which would be the correct position and rotation.4
Beginner Tutorial 1 – Import a Luminaire12. Under Translation, click Set Origin @ Geo Center and then click Apply.13. Right click in the CAD view and choose Zooming Zoom Extents.The luminaire is now centered at the origin.5
Beginner Tutorial 1 – Import a Luminaire14. Right click in the CAD view and choose Standard Views Right View. The luminaire is aimingthe light to the left, but it should aim downward, in the negative z direction.15. Under Rotation, select X for Axis, enter 90 for Angle, and click Apply. The luminaire is now aimingthe light downward. Click Next.6
Beginner Tutorial 1 – Import a LuminaireThe Orient Surfaces screen will open. Here you can specify the method that Photopia will use todetermine surface orientation. When importing closed meshes (as in this tutorial), Photopia willautomatically orient the surfaces correctly and the surface orientation functions are not necessary. Youcan use the CAD view to examine the orientation of the surfaces.16. Right click in the CAD view and choose Dynamic Views Orbit. Surfaces will be rendered intheir layer color when viewed from their “front” side and the opposite color when viewed from their“back” side. The layers are currently white, so all of the surfaces should appear white. You canalso hold the Ctrl key and click the lens layer to deselect it from the Layers To Orient list. This willallow you to view the surfaces behind the lens.17. Click Next to go to the Add Lamp window. You may insert lamps in this screen or in the PhotopiaCAD view after we end the wizard. Click Finish to end the wizard and add the LED later.18. A question may pop up in the screen asking how to handle geometry on duplicate layers (if somesame-named layers already existed in the new project). Since the new project had no geometry,there is no risk of overwriting geometry. Click No.19. A save dialog may automatically pop up if the project has not yet been saved. Save the project asBeginner Tutorial - LED Collimator.ray in a location of your preference.7
Beginner Tutorial 1 – Import a Luminaire20. The Design Properties screen will automatically pop up. It is better to go through the DesignProperties after we have added the lamps, so click OK for now and we will come back to thisscreen later.Import the LampNow that all of the luminaire geometry is imported, we can import the lamp model into the luminaire. The“LED CREE XPL” layer included in the imported geometry indicates the LED location. We can give eachlayer its own color and we can isolate the “LED CREE XPL” layer so that we can easily see where thelamp model needs to be located.21. Choose Settings Layers from the main menu. Here you can see a list of all of the layers in theproject, along with their individual properties. Change some of the layer colors by clicking on alayer's color and then choosing a color from the drop-down menu that appears.22. To isolate the “LED CREE XPL” layer, use the Ctrl or Shift keys while clicking to select all of thelayers except that layer. Click on one of the selected layer's "On" indication for the drop-downmenu to turn those layers Off. Click OK.The CAD view now shows just the LED geometry.8
Beginner Tutorial 1 – Import a Luminaire23. Choose File Import Lamp from the main menu. Find and click the XP-L-5700K.LAMP file, andclick Open. (Note that a detailed list of the lamp models available is located under Library Lamp List in the main menu.)24. You are now able to click a lamp center location for the new lamp model. Click near the center ofthe displayed LED geometry. We will come back to refine the position.9
Beginner Tutorial 1 – Import a Luminaire25. Click the new LED model to select it, being careful not to select the previous CAD model as well.The selected model will display as pink.You can adjust the LED location in the property control screen, located to the right of the CAD view.26. Under Geometry, change the Origin X value to 0 and the Origin Y value to 5.5.10
Beginner Tutorial 1 – Import a LuminaireNow the new LED model appears to be located in the proper position.27. Choose Settings Layers. Turn On all of the layers. Turn the “LED Collimator – LED CREEXPL-1” layer Off now that we have imported and located the Photopia lamp model.28. Click the Zoom Extents iconto view the model.11
Beginner Tutorial 1 – Import a LuminaireDesign PropertiesNow that the lamp is included in the project, we can return to the Design Properties screen by choosingEdit Design Properties. The Design Properties screen contains a summary of the optical componentsof the project.The Lamp tab shows the LED lamp location listed. Here you may alter the initial lamp lumens, the radiantwatts, the electrical wattage for the lamp, or the ballast/driver wattage.The other tabs allow you to complete the specification of the optical geometry you have imported byassigning materials to the different layers.Assign MaterialsPhotopia provides a library of reflective, refractive, and transmissive materials, depending upon the editionpurchased. You must assign materials to the specific layers of your design before an analysis can be12
Beginner Tutorial 1 – Import a Luminairecompleted. Multiple layers of the same type (e.g. multiple Reflective layers) must be used if differentmaterials are to be assigned to those components.This tutorial contains only reflective and refractive layers, thus there will be no layers listed in theTransmissive tab. Note that the Refractive tab will not be visible unless purchasing Photopia Premium. Toassign materials to the reflective layers:29. Select the Reflective tab from the Design Properties screen.Some layers already have materials assigned to them; these are layers that were imported with the LEDlamp model.30. Select the “LED Collimator – PCB-1” layer and click the Assign Material button. This displays theMaterial Selection screen.31. Scroll down the list of materials to the Generic section and choose White PCB. Click OK.13
Beginner Tutorial 1 – Import a Luminaire32. Select the “LED Collimator – Holder-1” layer and click the Assign Material button. This displaysthe Material Selection screen.33. Scroll down the list of materials to the Generic section and choose PAINT007, a white paint that is87% reflective. Click OK.34. Click the Refractive tab at the top of the Design Properties screen.35. Click the "LED Collimator – Collimator-1" layer and click Assign Material. Choose GenericACRYLIC1 for the lens material. Click OK.36. Now that the materials have been assigned, click OK to close the Design Properties screen.37. Save the project by choosing File Save.14
tutorial will use the STL file option. To import the luminaire CAD files into Photopia: 4. Select File Import Luminaire Wizard STL from the main menu. Beginner Tutorial 1 - Import a Luminaire 2 5. Navigate to the folder to where the STL files were exported. For this tutorial, find the STL files in