Transcription
ESP32Hardware Design GuidelinesVersion 3.2Espressif SystemsCopyright 2021www.espressif.com
About This DocumentThe guidelines outline recommended design practices when developing standalone or add-on systems based onthe ESP32 series of products, including ESP32 SoCs, ESP32 modules and ESP32 development boards.Document UpdatesPlease always refer to the latest version on ments.Revision HistoryFor the revision history of this document, please refer to the last page.Documentation Change NotificationEspressif provides email notifications to keep customers updated on changes to technical documentation. Pleasesubscribe at www.espressif.com/en/subscribe. Note that you need to update your subscription to receive notifications of new products you are not currently subscribed to.CertificationDownload certificates for Espressif products from www.espressif.com/en/certificates.
Contents1 Overview12 Schematic Checklist22.132.2Power Supply2.1.1 Digital Power Supply32.1.2 Analog Power Supply4Power-on Sequence and System Reset42.2.1 Power-on Sequence42.2.2 Reset52.3Flash (compulsory) and PSRAM (optional)52.4Crystal Oscillator62.4.1 External Clock Source (compulsory)62.4.2 RTC (optional)72.5RF82.6ADC82.7External Capacitor92.8UART92.9SDIO102.10 Touch Sensor103 PCB Layout Design113.111Standalone ESP32 Module3.1.1 General Principles of PCB Layout113.1.2 Positioning an ESP32 Module on a Base Board123.1.3 Power Supply133.1.4 Crystal Oscillator153.1.5 RF163.1.6 Flash & PSRAM173.1.7 External RC173.1.8 UART173.1.9 Touch Sensor183.2ESP32 as a Slave Device203.3Typical Layout Problems and Solutions213.3.1 Q: The current ripple is not large, but the TX performance of RF is rather poor.213.3.222Q: The power ripple is small, but RF TX performance is poor.3.3.3 Q: When ESP32 sends data packages, the power value is much higher or lower than the targetpower value, and the EVM is relatively poor.3.3.4 Q: TX performance is not bad, but the RX sensitivity is low.22224 Hardware Development235 Applications245.124ESP32 Smart Audio Platform
5.1.1 ESP32-LyraT Audio Development Board245.1.2 ESP32-LyraTD-MSC Audio Development Board255.2ESP32 Touch Sensor Application—ESP32-Sense Kit265.3ESP-Mesh Application—ESP32-MeshKit27Revision History28
List of Figures1ESP32 Schematics (ESP32-D0WD used as an example for all illustrations in this section)22ESP32 Digital Power Supply Pins33ESP32 Analog Power Supply Pins44Connections of ESP32 with Flash and PSRAM65ESP32 Crystal Oscillator66Schematic for ESP32’s External Crystal (RTC)77Schematic of External Oscillator88ESP32 RF Matching Schematics89ESP32 External Capacitor910ESP32 UART911ESP32 PCB Layout1112ESP32 Module Antenna Position on Base Board1213Keepout Zone for ESP32 Module’s Antenna on the Base Board1314ESP32 Power Traces in a Four-layer PCB Design1415Nine-Grid Design for EPAD1416ESP32 Power Traces in a Two-layer PCB Design1517ESP32 Crystal Oscillator Layout1618ESP32 RF Layout in a Four-layer PCB Design1719ESP32 RF Layout in a Two-layer PCB Design1720ESP32 Flash and PSRAM Layout1821ESP32 UART Design1822A Typical Touch Sensor Application1923Electrode Pattern Requirements1924Sensor Track Routing Requirements2025PAD/TV Box Layout2126Top View of ESP32-LyraT2427Bottom View of ESP32-LyraT2528ESP32-LyraTD-MSC2629ESP32-Sense Kit2630ESP32-MeshKit-Light 2731ESP32-MeshKit-Sense Development Board27
1. OVERVIEW1. OverviewESP32 is a single 2.4 GHz Wi-Fi and Bluetooth combo chip designed with TSMC ultra-low-power 40 nm technology. It is designed to achieve the best power and RF performance, robustness, versatility, and reliability in a widevariety of applications and different power profiles.ESP32 is a highly-integrated solution for Wi-Fi Bluetooth applications in the IoT industry with around 20 externalcomponents. ESP32 integrates the antenna switch, RF balun, power amplifier, low noise receive amplifier, filters,and power management modules. As such, the entire solution occupies minimal Printed Circuit Board (PCB)area.ESP32 uses CMOS for single-chip fully-integrated radio and baseband, and also integrates advanced calibrationcircuitries that allow the solution to dynamically adjust itself to remove external circuit imperfections or adjust tochanges in external conditions. As such, the mass production of ESP32 solutions does not require expensive andspecialized Wi-Fi test equipment.The ESP32 series of chips includes ESP32-D0WD-V3, ESP32-D0WDQ6-V3, ESP32-D0WD(Not RecommendedFor New Designs), ESP32-D0WDQ6(Not Recommended For New Designs), ESP32-S0WD, and ESP32-U4WDH,among which, ESP32-D0WD-V3, ESP32-D0WDQ6-V3, and ESP32-U4WDH are based on ECO V3 wafer. Fordetails of part number and ordering information, please refer to ESP32 Series Datasheet. For details on ECO V3instructions, please refer to ESP32 ECO V3 User Guide.Espressif Systems1Submit Documentation FeedbackESP32 Hardware Design Guidelines v3.2
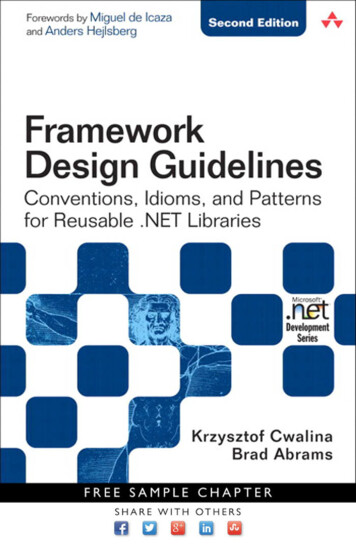
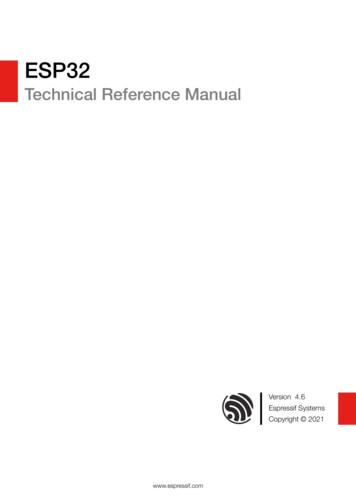
2. SCHEMATIC CHECKLIST2. Schematic ChecklistESP32’s integrated circuitry requires only 20 resistors, capacitors and inductors, one crystal and one SPI flash chip.ESP32 integrates the complete transmit/receive RF functionality including antenna switches, RF balun, power amplifier, low noise receive amplifier, filters, power management module, and advanced calibration circuitries.J11ThecapacitanceC1 design.and C2 ThisvariesESP32’s high integration allows forsimpleperipheral ofcircuitchapter details ESP32 schematics andwith the selection of the crystal.CON1PCB layout design. ESP32 schematic is shown in Figure ND0R 40MHz AP1CAP2VDDAXTAL PXTAL NVDDAGPIO21U0TXDU0RXDGPIO22GNDVDD331C4PCB ANTTBDC15C14TBDTBDGND GNDGNDGND1234C16SENSOR VP 5270pF(NC)67270pF(NC) SENSOR VN8CHIP LNA INVDD3P3VDD3P3SENSOR VPSENSOR CAPPSENSOR CAPNSENSOR VNCHIP PUVDET 1VDET 232K XP32K 24U2GPIO19VDD3P3 CPUGPIO23GPIO18GPIO5SD DATA 1SD DATA 0SD CLKSD CMDSD DATA 3SD DATA 2GPIO17VDD SD2GPIO171VDD DO/WP5SDI/SD12SDO/SD03SWP/SD3J281FLASHGPIO16C18 VDD 15GPIO2GPIO0GPIO4L4GPIO26GPIO27MTMSMTDIVDD3P3 RTCMTCKMTDOGPIO2GPIO0GPIO4GND GND GND 3100pFCON1GND C19CON10.1uFJ351GNDCON1Figure 1: ESP32 Schematics (ESP32-D0WD used as an example for all illustrations in this section)J371CON1Any basic ESP32 circuit design may be broken down into 10 major sections: Power supply Power-on sequence and system reset Flash and PSRAM (optional) Crystal oscillator RF ADC External capacitors UART SDIO Touch SensorEspressif Systems52Submit Documentation Feedback4ESP32 Hardware Design Guidelines v3.23
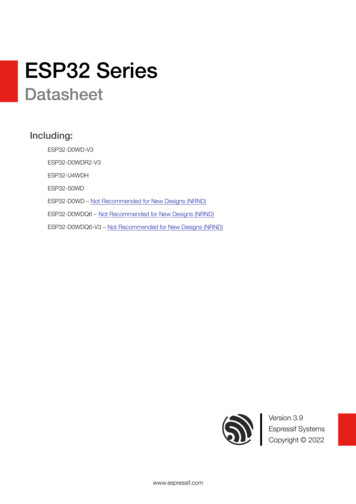
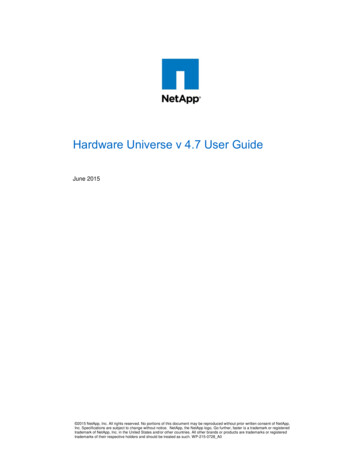
2. SCHEMATIC CHECKLIST2.1 Power SupplyFor further details of using the power supply pins, please refer to Section Power Scheme in ESP32 Series Datasheet.2.1.1 Digital Power SupplyPin19 and pin37 are the power supply pins for RTC and CPU, respectively. The digital power supply operates ina voltage range of 1.8 V 3.6 V. We recommend adding extra filter capacitors of 0.1 µF close to the digital powersupply pins.J11The capacitance of C1 and C2 varieswithworkstheasselectionof fortheVDD SDIO (pin26)the power supplythe crystal.related IO, and also for an external device.CON1 When VDD SDIO operates at 1.8 V, it can be generated from ESP32’s internal LDO. The maximum currentthis LDO can offer is 40 mA, and theGND output voltage range is 1.65 V 2.0 V. When the VDD SDIO outputsGND XOUTGND2 kΩ ground resistor and a 4.7 µF filterU1capacitor close to VDD SDIO.C1XINCON1J71CON1C2 When VDD SDIO operates at 3.3 V, it is driven directly by VDD3P3 RTC through a 6 Ω resistor, therefore,TBD1GND3GND41.8 V, the value of GPIO12 should be set to 1 when the chip boots and it is recommended that users add aJ4J101TBDC3100pF21there will be some voltage drop from VDD3P3 RTC. When the VDD SDIO outputs 3.3 V, the value of GPIO12is 0C20(default) whenthe chip boots and it is recommended that users add a 1 µF capacitor close to VDD SDIO.GND1uFR120K(5%)R2GND0R 40MHz /-10ppmVDD SDIOcan alsodriven by an external power supply. The schematic for ESP32 digital power supply pins isC5 be .1uFNCJ19GND1C4C14TBDTBDGNDGND1234C16SENSOR VP 5270pF(NC)67270pF(NC) SENSOR VN8CHIP LNA INVDD3P3VDD3P3SENSOR VPSENSOR CAPPSENSOR CAPNSENSOR VNCHIP PUVDET 1VDET 232K XP32K XNGPIO25U2GPIO19VDD3P3 CPUGPIO23GPIO18GPIO5SD DATA 1SD DATA 0SD CLKSD CMDSD DATA 3SD DATA 2GPIO17VDD O171VDD PIO16C18 VDD GPIO2GPIO0GPIO4C15GNDGPIO26GPIO27MTMSMTDIVDD3P3 4GPIO26GPIO27GPIO14GPIO12D GND GND 148474645444342414039GNDL5CAP1CAP2VDDAXTAL PXTAL NVDDAGPIO21U0TXDU0RXDGPIO22490.1uFGNDGNDshown in Figure N10.1uFJ351GNDCON1Figure 2: ESP32 Digital Power Supply PinsJ371CON1Notice: When using VDD SDIO as the power supply pin for the external 3.3 V flash/PSRAM, the supply voltage shouldbe 3.0 V or above, so as to meet the requirements of flash/PSRAM’s working voltage.Espressif Systems3Submit Documentation FeedbackESP32 Hardware Design Guidelines v3.2
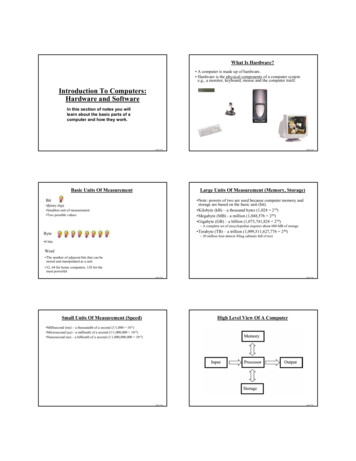
2. SCHEMATIC CHECKLISTThe capacitance of C1 and C2 vwith the selection of the crys2.1.2 Analog Power SupplyPin1, pin3, pin4, pin43 and pin46 are the analog power supply pins. It should be noted that the sudden increasein current draw, when ESP32 is in transmission mode, may cause a power rail collapse. Therefore, it is highlyGNDrecommended to add another 10 µF capacitor to the power trace, which can work in conjunction with the 0.1 µFGND e schematic for ESP32 analog power supply pins is shown in Figure 3.U1GNDThe inductor’s rated current is preferably 500 mA and above.3GND4capacitor. LC filter circuit needs to be added near the power pin so as to suppress high-frequency .3V(10%)R2GND0R 40MHz /-10ppmR3499RC9C13C12C11C10C2110uFNC1uF0.1uFNCGND GND GND GNDANT12.0nHGNDL5CAP1CAP2VDDAXTAL PXTAL 14039GND490.1uFGND1GPIO192 VDDAVDD3P3 CPU3 LNA INGPIO234 VDD3P3C15C14C16GPIO18SENSOR VP 5 VDD3P3PCB ANTGPIO5TBDTBD270pF(NC)6 SENSOR VPSD DATA 17 SENSOR CAPPFigure 3: ESP32AnalogSENSOR VNPower SupplyPinsSD DATA 08 SENSOR CAPN270pF(NC)SENSOR VNSD CLKGND GNDGNDCHIP PU9SD CMDC1710 CHIP PUGPIO34SD DATA 311 VDET 1GPIO35SD DATA 2Notice:12 VDET 2GPIO32GPIO1713 32K XPGPIO3332K XNVDD SDIO The recommended voltage of the power supply for ESP32is 3.3 V, andrecommended output current is 500 mA14 itsGPIO25GPIO25GPIO16TBDor more. It is suggested that users add an ESD protection diode at the power entrance.U2GPIO26GPIO27MTMSMTDIVDD3P3 ESP32-D0WD2.2.1 Power-on O14GPIO122.2 Power-on Sequence and System ResetESP32 uses a 3.3 V system power supply. The chip should be activated after the power rails have stabilized. Thisis achieved by delaying the activation of CHIP PU (Pin9) after the 3.3 V rails have been brought up. More detailscan be found in Section Power Scheme in ESP32 Series Datasheet.Espressif Systems4Submit Documentation FeedbackESP32 Hardware Design Guidelines v3.2
2. SCHEMATIC CHECKLISTNotice:To ensure the power supply to the ESP32 chip during power-up, it is advised to add an RC delay circuit at theCHIP PU pin. The recommended setting for the RC delay circuit is usually R 10 kΩ and C 1 µF. However,specific parameters should be adjusted based on the power-up timing of the power supply and the power-up andreset sequence timing of the chip.2.2.2 ResetCHIP PU serves as the reset pin of ESP32. The input level (VIL nRST ) for resetting the chip should be low enoughand remain so for a period of time. More details can be found in Section Power Scheme in ESP32 Series Datasheet.To avoid reboots caused by external interferences, the CHIP PU trace should be as short as possible and routedaway from the clock lines. A pull-up resistor and a ground capacitor are highly recommended.Notice:CHIP PU pin must not be left floating.2.3 Flash (compulsory) and PSRAM (optional)ESP32 can support up to 16 MB external flash and 8 MB external SRAM. The example module described in thisdocument uses a 4 MB flash by default (a SOP8 package, U3 on Figure 4). The VDD SDIO acts as the powersupply pin. Make sure to select the appropriate flash according to the power voltage on VDD SDIO.Note: Some ESP32 chip variants (e.g. ESP32-U4WDH and ESP32-PICO) have flash already embedded in the chippackage and adding external flash is not required. For details please see ESP32 and ESP32-PICO datasheets. For the supported flash chips, see Section SPI Flash API in ESP-IDF Programming Guide.On PSRAM, all pins except for the CS pin, can be multiplexed with flash. For example, PSRAM CLK andFLASH CLK share the same SCK/CLK pin of ESP32 to use the pins efficiently, as shown in Figure 4. But in someESP32 module, such as ESP32-WROVER-E, flash has its own clock pin: SCK/CLK, and PSRAM uses GPIO17.For more information, please see ESP32-WROVER-E Datasheet. The schematic of connections of ESP32 withflash and PSRAM is shown in Figure 4. Note that the connection shown in Figure 4 is not the only way to connectflash and PSRAM.Espressif Systems5Submit Documentation FeedbackESP32 Hardware Design Guidelines v3.2
499R(1%)U0TXDU0RXDGPIO222. SCHEMATIC SDO/SD0SWP/SD3CS#VDDSO/SIO1 SIO3SIO2SCLKVSSSI/SIO08765SHD/SD2SRAM CLKSDI/SD1PSRAM (Optional)GNDC111uF0.1uF/6.3V(10%)CLKC1310uFGND GND GND GNDL4C19Figure 4: Connections of ESP32 with Flash and PSRAM2.4 Crystal OscillatorC3GND100pFL5C10GND1234C16SENSOR VP 5270pF(NC)67270pF(NC) SENSOR VN8CHIP FTBDC14TBDGNDND7SHD/SD2/CSVDD33ANT1FLASH CLK 6C15VDD330R(5%) SRAM CLKU31SCS/CMD12TBDNDR16VDD SDIOPCB ANTGND GND2K(5%)(NC)0R(5%) FLASH CLKVDD SDIOGPIO16VDD SDIOR4R17GNDGND2.0nHFLASH CLKR12There are twoclock0R(5%)sourcesfor the ESP32, that is, an external crystal oscillator clock source and an RTC clockSCK/CLKC20R130R(5%) SRAM CLK2.4.1 ExternalClock Source (compulsory)GPIO17GNDThe capacitance of C1 and C2 varieswith the selection of the source.GNDVDDALNA INVDD3P3VDD3P3SENSOR VPSENSOR CAPPSENSOR CAPNSENSOR VNCHIP PUVDET 1VDET 232K XP32K XNGPIO25C5Currently, the ESP32 Wi-Fi/BT firmware only supports 40 MHz crystal oscillator. In circuit design, capacitors C1 andC2 which connect to the ground are added to the input and output terminals of the crystal oscillator respectively.49R1C63.3nF/6.3V(10%)GNDThe specific capacitive valuesdepend on further testing of, and adjustment to, the overall performance of the wholecircuit. It is recommended that users reserve a series resistor of 0 Ω on the XTAL P clock trace to reduce the drive20K(5%)strength of the crystal, as well as to minimize the impact of crystal harmonics on RF performance. Note that theaccuracy of the selected crystal is 10 ppm. The schematic for crystal oscillator is shown in Figure 5.GND4U12GND XOUTGNDC2TBD3837363534333231302928272625Figure 5: ESP32 Crystal Oscillator3GNDXINGND1C1TBD499RGPIO19VDD3P3 CPUGPIO23GPIO18GPIO5SD DATA 1SD DATA 0SD CLKSD CMDSD DATA 3SD DATA 2GPIO17VDD P/SD3SHD/SD2GPIO17GPIO163Espressif SystemsR2GND0R 40MHz /-10ppmRTC48474645444342414039R3CAP1CAP2VDDAXTAL PXTAL 2SCS/CSCK/CSHD/SSubmit Documentation FeedbackESP32 Hardware Design Guidelines v3.2Document Num Doc Wednesday, June
C15 2.2pF,L4 1.2nH,C14 3.0pF,R2 51R(5%)U1Notice:C1C2 If an oscillator is used, its output should be connected to XTAL P on the chip througha DC blocking capacitor22pF/6.3V(10%)XINVDD33GNDGND XOUTGNDGND3GND4IPEX:2. SCHEMATICPCB ANT: CHECKLISTC15 2.4pF,L4 2.0nH,C14 3.3pF,R2 51R(5%)22pF/6.3V(10%)C202C31(about 10 pF). XTAL N can be floating. Please make sure that the oscillator output is stable and its accuracy iswithin 10 ppm. The amplitude into XTAL P can not exceed 1.1 V. It is also recommended that the circuit design100pF/6.3V(10%) 1uF/10V(20%)for the oscillator is compatible with the use of crystal, in case that if there is a defect in the circuit design,users canR2VDD33GNDGNDGNDstill use the C6GND51R(5%)40MHz /-10ppm Defects in the craftsmanship of the crystal oscillators (for example, frequency deviation more than 10 ppm) andR3.3nF/6.3V(10%)unstable operating temperature may lead to the malfunction of ESP32, resulting in a decrease of the overall per-321R14 0R(5%)/NCC12 C11C1310uF/6.3V(10%) NCJ39GND2.4.2RTC (optional)GNDC10C211uF/10V(20%) 0.1uF/6.3V(10%) NCGND GND48474645444342414039GNDGCAP1CAP2VDDAXTAL PXTAL NVDDAGPIO21U0TXDU0RXDGPIO22IPEXGND2.0nH( 5C142.4pF 0.25pF3.3pF 0.25pFFigure 6 shows the schematic GNDfor the external32.768 kHzGNDGNDC17TBD1GND4SENSOR VP 567crystal.SENSOR VN 8CHIP DD3P3SENSOR VPSENSOR CAPPSENSOR CAPNSENSOR VNCHIP PUVDET 1VDET 232K XP32K Csleep clock.PCB ANTGPIO26GPIO27MTMSMTDIVDD3P3 RTCMTCKMTDOGPIO2GPIO0GPIO4R15 0R(5%)L4ESP3212 supportsan external 32.768kHz 2.0nH( 0.1nH)crystal or an external 32.768 kHz23 signaltheLNA IN(e.g., an oscillator) to act asVDD3P3 CPUGPIO23GPIO18GPIO5SD DATA 1SD DATA 0SD CLKSD CMDSD DATA 3SD DATA 2GPIO17VDD 4Figure 6: Schematic for ESP32’s External Crystal (RTC)GPIO26GPIO27GPIO14GPIO12TBDC18Notice: Please note the requirements for the 32.768 kHz crystal.– Equivalent series resistance (ESR) 70 kΩ.– Load capacitance at both ends should be configured according to the crystal’s specification. The parallel resistor R18 is used for biasing the crystal circuit (5 MΩ R18 10 MΩ). When ESP32-D0WD-V3 connects to an external 32.768 kHz crystal, the parallel resistor must be populated. Forother ESP32 series chips, the resistor can be reserved. If the RTC source is not required, then pin12 (32K XP) and pin13 (32K XN) can be used as GPIOs.Figure 7 shows the schematic of the external signal.The value of C1 should be larger than 200 pF. The signal should meet the following requirements:32K XN inputAmplitude (Vpp, unit: V)Sine wave or square wave0.6 Vpp VDDEspressif Systems38373635343332313029282726257Submit Documentation FeedbackESP32 Hardware Design Guidelines v3.2G
2. SCHEMATIC CHECKLIST32 768 kHz signal32K XNESP3232K XPC1Figure 7: Schematic of External Oscillator2.5 RFThe output impedance of the RF pins of ESP32 (QFN 6*6) and ESP32 (QFN 5*5) are (30 j10) Ω and (35 j10) Ω,respectively. A π-type matching network is essential for antenna matching in the circuit design. CLC structure isrecommended for the matching network. The schematic for ESP32 RF circuitry is shown in Figure 8.ANT112PCB ANT1234C15C14C16SENSOR VP 5TBDTBD270pF(NC)67270pF(NC) SENSOR VN8GND GNDGNDCHIP PU9C1710GPIO3411Figure 8: ESP32 RF MatchingGPIO35Schematics12GPIO32L4TBDVDDALNA INVDD3P3VDD3P3SENSOR VPSENSOR CAPPSENSOR CAPNSENSOR VNCHIP PUVDET 1VDET 2Note:The parameters of the components in the matching network are subject to the actual antenna and PCB layout.2.6 ADCIt is recommended that users add a 0.1 µF filter capacitor to a pad when using the ADC function. Pins SENSOR VP or SENSOR VN will trigger an input glitch lasting for 80 ns once SARADC1, or SARADC2,or Hall sensor is initialized. Pins SENSOR VP or SENSOR VN is recommended for use as ADC. If SENSOR VP and SENSOR VN are used as GPIOs, while ADC is supported by other pins in the circuitdesign, users need to do settings in software to avoid the input glitch. ADC1 is recommended over ADC2 as the latter cannot be used when Wi-Fi function is enabled. Currently, high-precision ADCs are not supported. The two 270 pF sampling resistors between SENSOR VPand SENSOR CAPP, SENSOR VN and SENSOR CAPN, can be removed. In such case, the four pins canbe used as general ADCs or GPIOs.Espressif Systems8Submit Documentation FeedbackESP32 Hardware Design Guidelines v3.2
2. SCHEMATIC CHECKLIST The recommended input voltage of the ADC is below 2450 mV, and preferably within the range of 100 to950 mV for higher calibration accuracy. For details, please refer to Section ADC in ESP32 Series Datasheet.2.7 External CapacitorFigure 9 shows the schematic of components connected to pin47 CAP2 and pin48 CAP1. C5 (10 nF) that connectsto CAP1 should be of 10% tolerance and is required for proper operation of ESP32. RC circuit between CAP1and CAP2 pins may be omitted under certain conditions. This circuit is used when entering Deep-sleep mode.During this process, to minimize power consumption, the voltage to power ESP32 internals is dropped from 1.1V to around 0.7 V. The RC circuit is used to minimize the period of the voltage drop. If removed, this process willtake longer and the power consumption in Deep-sleep will be higher. If particular application of ESP32 is not usingDeep-sleep mode, or power consumption is less critical, then this circuit is not 10%)484746CAP1CAP2VDDAGND49GNDFigure 9: ESP32 External Capacitor2.8 UARTUsers need to connect a 499 Ω resistor to the U0TXD line in order to suppress the 80 MHz harmonics. Theschematic for ESP32 UART is shown in Figure 9R3Figure 10: ESP32 UARTEspressif Systems9Submit Documentation FeedbackESP32 Hardware Design Guidelines v3.2
2. SCHEMATIC CHECKLIST2.9 SDIOThere are two sets of GPIOs (slot0 and slot1) that can be assigned to SDIO on ESP32, as shown in the table below.When ESP32 works as an SDIO host or slave, connect GPIOs in slot1 to signal 12GPIO13Used to connect flash by default. Notrecommended for other use.Multiplexed with JTAG, touch, EMAC,and strapping functions.Note that when connecting GPIOs in slot1: When ESP32 works as SDIO host, add pull-up resistors on used pins, unused pins can be used for otherpurposes. When ESP32 works as an SDIO slave, add pull-up resistors on all pins, whether these pins are used for SDIOor not; unused pins cannot be used for other purposes.For more information on SDIO configuration, please refer to API References.2.10Touch SensorWhen using the touch function, it is recommended to reserve a series resistor at the chip side to reduce the couplingnoise and interference on the line, and to strengthen the ESD protection. The recommended resistance is 470 Ω 2 kΩ, preferably 510 Ω. The specific value also depends on the testing of the product.Espressif Systems10Submit Documentation FeedbackESP32 Hardware Design Guidelines v3.2
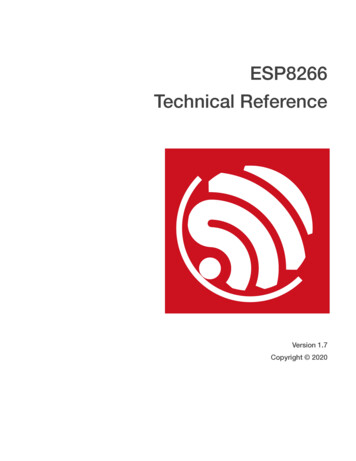
3. PCB LAYOUT DESIGN3. PCB Layout DesignThis chapter introduces the key points of designing ESP32 PCB layout with the example of ESP32-WROOM32D.While the high level of integration makes the PCB design and layout process simple, the performance of the systemstrongly depends on system design aspects. To achieve the best overall system performance, please follow theguidelines specified in this document for circuit design and PCB layout. All the common rules associated withgood PCB design still apply and this document is not an exhaustive list of good design practices.The PCB layout design guidelines are applicable to cases when the ESP32 module functions as a standalone device, and when the ESP32 functions as a slave device.The ESP32 PCB layout design is shown in Figure 11.Figure 11: ESP32 PCB Layout3.1 Standalone ESP32 Module3.1.1 General Principles of PCB LayoutWe recommend a four-layer PCB design. The first layer is the TOP layer for signal traces and components.Espressif Systems11Submit Documentation FeedbackESP32 Hardware Design Guidelines v3.2
3. PCB LAYOUT DESIGN The second layer is the GND layer without signal traces being routed so as to ensure a complete GND plane. The third layer is the POWER layer where a GND plane should be applied to better isolate the RF and crystaloscillator part. It is acceptable to route signal traces on this layer, provided that there is a complete GNDplane under the RF and crystal oscillator. The fourth layer is the BOTTOM layer, where power traces are routed. Placing any components on this layeris not recommended.Below are the suggestions for a two-layer PCB design. The first layer is the TOP layer for traces and components. The second layer is the BOTTOM layer. Please do not place any components on this layer and keep tracesto a minimum. Ideally, it should be a complete GND plane.3.1.2 Positioning an ESP32 Module on a Base BoardIf users adopt on-board design, they should pay attention to the layout of the module on the base board. The interference of the base board on the module’s antenna performance should be reduced as much as possible.The module should be placed as close to the edge of the base board as possible. The PCB antenna area shouldbe placed outside the base board whenever possible. In addition, the feed point of the antenna should be closestto the board, as Figure 12 shows.If there is base board under the antenna area, it is recommended to cut it off to minimize its impact on the antenna.When designing the whole device, pay attention to the impact of the device shell on the antenna. As shown inFigure 12, positions 3 and 4 are highly recommended on the base board, while positions 1, 2, and 5 are notrecommended.13 2Base Board4 5Figure 12: ESP32 Module Antenna Position on Base BoardEspressif Systems12Submit Documentation FeedbackESP32 Hardware Design Guidelines v3.2
3. PCB LAYOUT DESIGNIf the positions recommended are not suitable, please make sure that the module is not covered by any metalshell. The antenna area of the module and the area 15 mm outside the antenna should be kept clean, (namely nocopper, routing, components on it) as shown in Figure 13.Clearance15 mm15 mm15 mmBase BoardFigure 13: Keepout Zone for ESP32 Module’s Antenna on the Base Board3.1.3 Power Supply Four-layer PCB design– Four-layer PCB design is recommended over two-layer design. Route the power traces on the fourth(bottom) layer whenever possible. Vias are required for the power traces to go through the layers andget connected to the pins on the top layer. There should be at least two vias where the main powertraces cross layers. The drill diameter on other power traces should be no smaller than the width of thepower traces.– The 3.3 V power traces, highlighted in yellow, are routed as shown in Figure 14. The width of the mainpower traces should be greater than 25 mil. The width of the power traces for pin3 and pin4 should beat least 20 mil. The width of other power traces should be within the range of 12 15 mil.– As shown in Figure 14, an ESD protection diode is placed close to the power port (marked in red circle).A 10 µF capacitor is required before the power trace connects the ESP32 chip, to be used in conjunctionwith a 0.1 µF capacitor. Then the power routing is divided into two ways. The power rails of pin3 andpin4 should be routed together to reduce the coupling between different power pins.– It is required to place C (capacitor) and L (inductor) near the power pins pin3 and pin4. As shown inFigure 14, C13 (10 µF) is placed at the entrance of the power, and C10, L5, and C21 are placed nearthe chip’s analog power pins. When possible, add a 0.1 µF capacitor to each digital power supply pin.Note that all decoupling capacitors should be placed close to the power pin, and ground vias shouldbe added adjacent to the ground pin for the decoupling capacitors to ensure a short return path.– The ground pad at the bottom of the chip should be connected to the ground plane through at leastnine ground vias.Espressif Systems13Submit Documentation FeedbackESP32 Hardware Design Guidelines v3.2
3. PCB LAYOUT DESIGNNote:If you need to add a thermal pad EPAD under the chip on the bottom of the module, it is recommended to employa nine-grid on the EPAD, cover the gaps with ink, and place ground vias in the gaps, as shown in Figure 15. Thiscan avoid tin leakage when soldering the module EPAD to the substrate.Figure 14: ESP32 Power Traces in a Four-layer PCB DesignFigure 15: Nine-Grid Design for EPAD Two-layer PCB designIn a two-layer PCB design, the 3.3 V power traces are routed as shown labelled with VDD33 in Figure 16.In contrast to the design practices for a four-layer PCB design, the power traces in a two-layer PCB designshould be routed on the top layer, thus requiring a reduced size of a thermal pad in the center of the chip.Route the power traces between the thermal pad and its surrounding signal pins. Employ vias only when theEspressif Systems14Submit Documentation FeedbackESP32 Hardware Design Guidelines v3.2
3. PCB LAYOUT DESIG
1. OVERVIEW 1. Overview ESP32 is a single 2.4 GHz Wi-Fi and Bluetooth combo chip designed with TSMC ultra-low-power 40 nm technol-ogy. It is designed to achieve the best power and RF performance, robustness, versatility, and reliability in a wide