Transcription
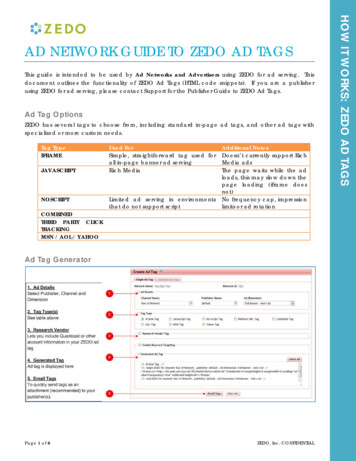
Publishing A-B PLC Tags to MQTT with groov Box Quick StartTECHNICAL NOTEForm 2258-201002PAGE 1This technical note shows you how to publish tag data from your Allen-Bradley PLCsusing the Ignition Edge MQTT Transmission module in a groov Edge Appliance (groovBox). For groov EPIC or groov RIO, see form 2350, Getting Started with MQTT in groovProducts. Or check out our how-to videos for groov Box or for groov EPIC.ContentsStep 1. Install and configure the MQTT Transmission module . . . . . . . . . . . . . . . page 1Step 2. Enable Ignition Edge Designer in the groov Box. . . . . . . . . . . . . . . . . . . . page 2Step 3. Create folders for MQTT Transmission . . . . . . . . . . . . . . . . . . . . . . . . . . . page 3Step 4. Start publishing tag data to the broker . . . . . . . . . . . . . . . . . . . . . . . . . . . page 4Step 5. Test the subscription . . . . . . . . . . . . . . . . . . . . . . . . . . . . . . . . . . . . . . . . . page 5Step 1. Install and configure the MQTT Transmission moduleIn this step, you use Ignition Edge in the groov Box to install and configure the MQTTTransmission module. The module sends messages to the MQTT broker when tag valueschange.1.In a browser window, open Ignition Edge on your groov Box (port 8043).Example: https://opto-99-xx-99:80432.3.Sign in to Ignition Edge. If you haven’t already done so, we strongly recommend youchange the default username (admin) and password (password).Click Configure, and then select System Modules.4.Scroll to the bottom to find MQTT Transmission, and then click its install button.What you need The IP address or domain name of a computer running an MQTT broker. An MQTTbroker (also known as an MQTT server) is software that receives MQTT messages andsends them to systems that have subscribed to the messages. If you don’t have anMQTT broker, ask your IT department to help you get one. For testing purposes, youcan find free public MQTT brokers on the internet.A GROOV-AR1 Box with groov Admin v1.570.47 or higher, already configured withIgnition Edge and its internal OPC-UA server.For help setting up Ignition Edge in your groov Box, see our Ignition Workshop videos or thegroov Box User’s Guide (form 2104). Any of the following Allen-Bradley PLCs, accessible to the groov Box via Ethernet:–Logix: ControlLogix and CompactLogix with firmware v21 and higher–ControlLogix with firmware v20 and lower–CompactLogix with firmware v20 and lower–SLC 5/05–PLC-5 –MicroLogix 1100, 1200, 1400, 1500Note: If you see a restart button instead of the install button, it means MQTT Transmissionhas already been installed. Continue to step 2.OPTO 22 800-321-6786 1-951-695-3000 www.opto22.com sales@opto22.com 2018-2020 Opto 22. All rights reserved. Dimensions and specifications are subject to change. Brand or product names used herein are trademarks or registered trademarks of their respective companies or organizations.
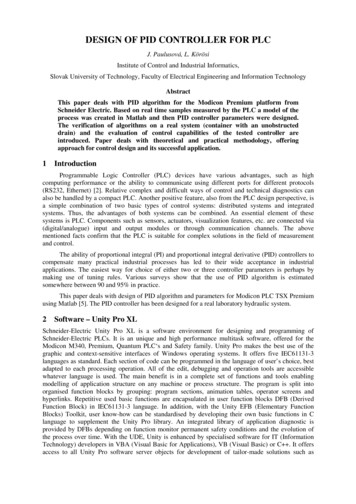
TECHNICAL NOTEForm 2258-201002PAGE 25.6.7.8.Click Confirm. Next, select the license terms check box, and then click Accept License.Scroll to the bottom of Ignition Edge’s left navigation bar, and selectMQTT Transmission Settings.Click the Servers tab, and then click Create New MQTT Server.On the New MQTT Server page:a. In the Name field, enter a name for the MQTT server hosting your MQTT broker.b. In the URL field, type the MQTT server’s URL or domain er.com:8883Step 2. Enable Ignition Edge Designer in the groov BoxThe MQTT Transmission module looks for tag data in a predefined folder structure. You createthe folders in Ignition Edge Designer—but first, you need to enable Designer in the groov Box.IMPORTANT: By enabling Designer, you are opening an unsecure TCP port on the groov Box.When you’ve finished using Designer, you should use groov Admin to disable access toDesigner (which closes the port).1.https://opto-99-xx-99:100002.In the left navigation bar, click Ignition Edge, and then select “Enable access toIgnition Edge Designer and Edge Panel.”3.4.5.Click Save.When prompted, click the Back button, and then click the link to open Ignition Edge.In Ignition Edge, click Launch Designer.c. In the Server Type field, select a type. If you’re not sure, select Third Party.d. If the server requires authentication, type the username in the Username field,9.In a browser window, open groov Admin (port 10000 on the groov Box). Example:and the password in both of the Password fields.e. If the server requires a security certificate, select and install it in the Certificatesfield.Click Create New MQTT Server.Clicking “Launch Designer” downloads designer.jnlp, a small file that starts Designer.OPTO 22 800-321-6786 1-951-695-3000 www.opto22.com sales@opto22.com 2018-2020 Opto 22. All rights reserved. Dimensions and specifications are subject to change. Brand or product names used herein are trademarks or registered trademarks of their respective companies or organizations.
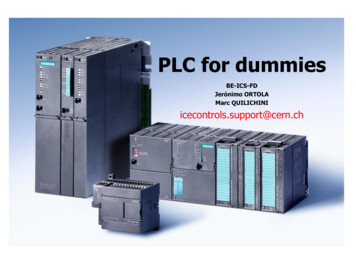
TECHNICAL NOTEForm 2258-201002PAGE 3If prompted, download and install Java, and then click Launch Designer.Step 3. Create folders for MQTT TransmissionTo launch Designer:The required tag folder structure consists of three nested folders: Group ID, Edge Node ID, andDevice ID. You create the folders in Designer’s Tag Browser pane.a. Click (or double-click) designer.jnlp, and then click through the security dialogboxes to get to the login page.1.Open the Tag Browser (View Panels Tag Browser), and expand the All Providersfolder until you see the Edge Nodes folder (All Providers edge Edge Nodes).You can reposition the panes; in this image, we’ve docked them side-by-side.2.Right-click the Edge Nodes folder, and then select New Folder from the pop-upmenu. This will be the Group ID folder. You can name this folder anything you like,but it’s typically named for the device or vendor.b. On the login page, enter your username and password, and then click Login.6.Open the OPC Browser (View Panels OPC Browser), and expand the Devices folder.Note the name of the folder containing the tags you want to publish; in this example,we want tags in the AB Logix folder.NOTE: If you can’t see your PLCs in OPC Browser, it’s possible they or the OPC-UA server (orboth) haven’t been configured in your groov Box. For instructions, see our IgnitionWorkshop videos or the groov Box User’s Guide (form 2104).Type a name for the Group ID (for example, groovEdgeBox).3.Right-click the Group ID folder. In the pop-up menu, select New Folder. This will bethe Edge Node ID folder. You can name it anything you like, but typically it’s namedfor the device’s location.Type a name for the Edge Node ID (for example, MixingRoom).OPTO 22 800-321-6786 1-951-695-3000 www.opto22.com sales@opto22.com 2018-2020 Opto 22. All rights reserved. Dimensions and specifications are subject to change. Brand or product names used herein are trademarks or registered trademarks of their respective companies or organizations.
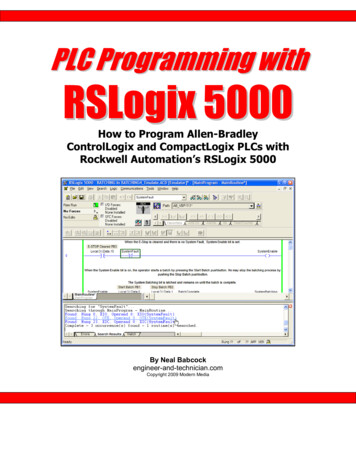
TECHNICAL NOTEForm 2258-201002PAGE 44.Choose between two options to create the last folder (the Device ID folder, whichwill contain the tags to publish). For best performance, use Option 2.Option 1: If the tag folder in OPC Browser has 500 tags or less, you can drag anddrop the tag folder into the Edge Node ID folder in Tag Browser.Designer creates the Device ID folder (adding underscores to its name), and displaysall the device’s folders and tags in Tag Browser.Step 4. Start publishing tag data to the brokerYou need to enable read/write mode to start publishing tag data to the MQTT broker.NOTE: If the folder or tag structure changes (for example, if you add new devices or changetagnames), you will need to repeat this step.1.In Tag Browser’s All Providers folder, collapse folders (or scroll down) until you see theMQTT Transmission folder.Option 2: For best performance—or if the OPC Browser folder has more thanIgnition Edge’s limit of 500 tags—you can select the specific tags to publish.a. In Tag Browser, right-click the Edge Node ID folder. In the pop-up menu, selectNew Folder. This will be the Device ID folder. You can name it anything you like,but we recommend you give it the same name as the tag folder in OPC Browser.b. In OPC Browser, click the tags you want, and then drag and drop them into theDevice ID folder.Tip: To select multiple tags at one time, hold down the Ctrl key while clicking the tags.OPTO 22 800-321-6786 1-951-695-3000 www.opto22.com sales@opto22.com 2018-2020 Opto 22. All rights reserved. Dimensions and specifications are subject to change. Brand or product names used herein are trademarks or registered trademarks of their respective companies or organizations.
TECHNICAL NOTEForm 2258-201002PAGE 52.3.Expand the MQTT Transmission folder, and then expand the TransmissionControl folder. Then, select the Refresh check box. A prompt is displayed.Click Write Once (or click Enable Read/Write Mode to prevent this prompt fromappearing again).Another way to test is to use a desktop MQTT client and debugger (such as MQTTfx). AnMQTT client can verify whether data is being published—but it’s not very helpful forgetting real values, since MQTT clients display values in binary format.The Refresh check box is cleared. That’s normal.NOTE: When you’ve finished using Designer, you should use groov Admin to disable access toDesigner (which closes the unsecure TCP port on the groov Box.).Step 5. Test the subscriptionIf you aren’t getting data and you’re running the trial version of Ignition Edge, make sure that thetrial hasn’t expired. (If it has, open Ignition Edge in the groov Box and click the Reset Trial button.)There are several ways to test that the tags you’re publishing are being sent to subscribers.One way is to use the desktop version of Ignition (available to download free from theInductive Automation website) to view tag values. The setup is quite a bit different fromusing Ignition Edge in the groov Box: among other things, you’ll need to download andinstall the MQTT Engine module and configure it to subscribe to your broker. Thismethod works best if you are already familiar with Ignition; if you aren’t, the Cirrus Linkwebsite provides instructions for installing and configuring the MQTT Engine module.OPTO 22 www.opto22.com43044 Business Park Dr. Temecula, CA 92590-3614For more tips, help, and code samples, visit the Opto 22 Developer Portal athttp://developer.opto22.com.SALES sales@opto22.com800-321-6786 1-951-695-3000 2018-2020 Opto 22. All rights reserved. Dimensions and specifications are subject to change. Brand or product names used herein are trademarks or registered trademarks of their respective companies or organizations.SUPPORT support@opto22.com800-835-6786 1-951-695-3080
– CompactLogix with firmware v20 and lower – SLC 5/05 –PLC-5 – MicroLogix 1100, 1200, 1400, 1500 Contents Step 1. Install and configure the MQTT Transmission module In this step, you use Ignition Edge in the groov Box to install and configure the MQTT Transmission module. The module sends messages to the MQTT broker when tag values change. 1. In a browser window, open Ignition .