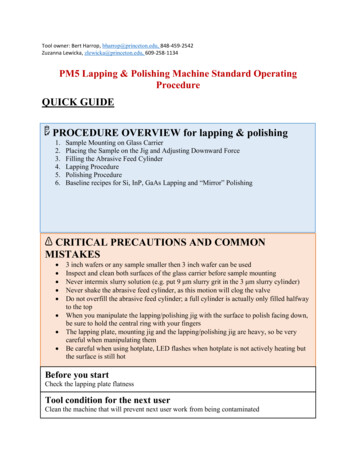
Transcription
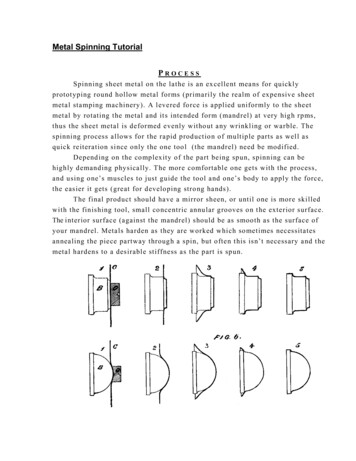
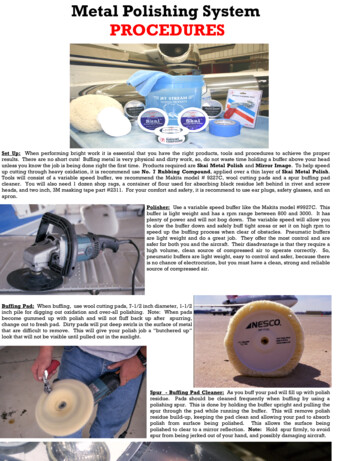
Metal Polishing SystemPROCEDURESSet Up: When performing bright work it is essential that you have the right products, tools and procedures to achieve the properresults. There are no short cuts! Buffing metal is very physical and dirty work, so, do not waste time holding a buffer above your headunless you know the job is being done right the first time. Products required are Skai Metal Polish and Mirror Image. To help speedup cutting through heavy oxidation, it is recommend use No. 7 Rubbing Compound, applied over a thin layer of Skai Metal Polish.Tools will consist of a variable speed buffer, we recommend the Makita model # 9227C, wool cutting pads and a spur buffing padcleaner. You will also need 1 dozen shop rags, a container of flour used for absorbing black residue left behind in rivet and screwheads, and two inch, 3M masking tape part #2311. For your comfort and safety, it is recommend to use ear plugs, safety glasses, and anapron.Polisher: Use a variable speed buffer like the Makita model #9927C. Thisbuffer is light weight and has a rpm range between 800 and 3000. It hasplenty of power and will not bog down. The variable speed will allow youto slow the buffer down and safely buff tight areas or set it on high rpm tospeed up the buffing process when clear of obstacles. Pneumatic buffersare light weight and do a great job. They offer the most control and aresafer for both you and the aircraft. Their disadvantage is that they require ahigh volume, clean source of compressed air to operate correctly. So,pneumatic buffers are light weight, easy to control and safer, because thereis no chance of electrocution, but you must have a clean, strong and reliablesource of compressed air.Buffing Pad: When buffing, use wool cutting pads, 7-1/2 inch diameter, 1-1/2inch pile for digging out oxidation and over-all polishing. Note: When padsbecome gummed up with polish and will not fluff back up after spurring,change out to fresh pad. Dirty pads will put deep swirls in the surface of metalthat are difficult to remove. This will give your polish job a “butchered up”look that will not be visible until pulled out in the sunlight.Spur - Buffing Pad Cleaner: As you buff your pad will fill up with polishresidue. Pads should be cleaned frequently when buffing by using apolishing spur. This is done by holding the buffer upright and pulling thespur through the pad while running the buffer. This will remove polishresidue build-up, keeping the pad clean and allowing your pad to absorbpolish from surface being polished. This allows the surface beingpolished to clear to a mirror reflection. Note: Hold spur firmly, to avoidspur from being jerked out of your hand, and possibly damaging aircraft.
Step 1: Taping: Using 3M two inch masking tape, part # 2311, tape all painted surfaces adjacent to metal being polished. Taping willprotect the painted surfaces from black polish residue that forms when polishing metal. Do not use low quality masking tape. It willleave behind a sticky residue, making clean up considerably more difficult and time consuming. Note: Covering aircraft surfaces withpaper or plastic will be a mandatory requirement by some aircraft operators. The only time that it will be a necessary requirement iswhen working on an aircraft that has oxidized paint. Oxidized paint will allow the black residue to be absorbed down into the paint.Chances are the stain will not come out. When in doubt, do the safe thing and cover the aircraft with paper or plastic.Step 2: Applying Polish: Apply Skai Metal Polish sparingly with a damp, clean, soft cloth. Apply polish to a 4 to 6 foot sections ofleading edge. Buff out each section before applying polish to next sections. Note: If metal is heavily oxidized, apply a second layer of No7 Rubbing Compound to the already applied layer of Skai Metal Polish. The No 7 Rubbing Compound will add an aggressive layeror abrasives which will speed up the process of removing heavy oxidation from aluminum surfaces. No 7 Rubbing Compound hasbeen around for ever. It is a very unique product when polishing aluminum because it will not leave a cloud in the surface of the metal.It clears to a mirror finish when used with Skai Metal Polish.
STEP 3: Buffing: Now that this sections of leading edge has been made ready, it’s time to begin polishing. Using a machine polisher,buff the metal surface until you have a clear reflection of yourself in the surface of the metal, free of all blemishes. Bottoms can bedifficult because you will be supporting the weight of the buffer plus using additional pressure required to cut through oxidation andaccumulations of dried bugs. It is important that you carefully follow the previous outlined procedures, and are using the proper toolsand products to achieve desired results.EP 4: Removing Swirls: Swirls give polished metal a butchered up or hacked up appearance. Swirls are the end result of using abuffer. They have the appearance of cat tails as you can see in adjoining photo. To remove swirls, use a two to three inch piece ofMirror Image and apply by hand to the newly polished surface. As you apply Mirror Image, a black residue will appear and coverthe newly polished metal surface. Using a folded micro fiber, towel begin breaking down and removing this residue before it dries.During this process, the swirls are being removed from the surface of the metal. As the metal begins clearing under your micro fiberswitch to a fresh towel and finish polishing out the metal surface. You have now completed your first section of leading edge. Thesurface of the metal should be free of all oxidation, blemishes, bug marks, and swirls as shown in bottom picture.STEP 5: Applying Flour: To help remove any black residue left on themetal surface, rivets or screw heads, apply a small amount of household flourto a clean micro fiber towel and rub across polished surfaces. The flour willabsorb any black residue left on the surface of the metal. Note: Swirls areremoved when Mirror Image is being broken down and removed asdescribed in step four. If you remove the Mirror Image too soon byabsorbing it with the flour, you will not achieve the desired results.Note: If you have followed all directions up to this point, you will besuccessfully polishing metal. You will need to repeat the first five steps oneach section of metal you polish. The following directions will provide youwith helpful hints that will allow you to safely position yourself to polish themetal on a Challenger 601. These same basic guidelines will be used onother aircraft when polishing metal.
Polish Engine Intakes: Once you have finished polishing the leading edges on the wings, move to the engine intakes. On theCanadair Challenger aircraft, you will need a pump up stand (B-2 pump up stand) to position yourself in front of the engine intakes. It ispossible to place a 6” ladder on top of a mat placed at the back of the wing to polish the intake. It is awkward and unsafe due to theslope at the back of the wing on the Challenger. For safety, have someone hold the ladder. Always place rubber mats down whereyou will be laying tools down and standing. Now that you are in position, tape the intake and begin polishing. Engine intakes will haveheavy accumulations of bugs that will require extra attention when buffing. Once you have cut through all oxidation and bug stains,continue with steps four and five. Before you know it, you will be making your final wipe and inspection and ready to move on to theengine cones.Polish Engine Cones: Not all Challenger’s have cones. If the plane does now will be the time to polish them. When standing on top ofthe engine pylons, you will want to place a mat down to protect the aircraft as seen in the picture. Once everything is in position andtaped, begin polishing. You can expect the cones to be oil and carbon stained. To remove these stains, it will require an additional cutby using the No 7 Rubbing Compound applied over a thin layer of Skai Metal Polish. Follow steps one through five to complete thepolishing of the engine cones.Polish Leading Edges On Tail: You will need a scissor lift to reach the vertical and horizontal leading edges on the tail of the aircraft.Most flight departments that operate the larger corporate jets will own or have access to a scissor lift. They usually have no problemallowing you to use their lift when they have requested your detailing services. The leading edges on the tail will be no different thanthe rest of the metal on the aircraft. Follow the detailed procedures outlined in steps one through five and you will have no problemsfinishing the bright work job on this Challenger or any other aircraft.Use extreme caution when operating the scissor lift around
finishing the bright work job on this Challenger or any other aircraft.Use extreme caution when operating the scissor lift aroundaircraft. We recommend using a spotter below the lift when positioning the lift next to an aircraft. When polishing the bottom section ofthe vertical leading edge, you will be required to stand on top of the fuselage to position yourself for buffing. For personal safety, werecommend using a body harness securely latched to the lift with a safety lanyard.Aircraft Clean Up: Buffing metal makes quite a mess. Wool buffing pads will give off a black woolfuzz that will cover the aircraft and hangar floor. You will need to dust off the aircraft using a towelwrapped around a squeegee as shown in picture on left. If you will not be cleaning the aircraftafter polishing the brightwork, we recommend covering the aircraft with plastic or paper beforebuffing.Hangar floor Clean-Up: You will need to sweep the hangar floor using a large push broom.Take caution not to track the black fuzz into the aircraft or hangar offices. If you are providingan aircraft detailing service, sweeping the hangar floors will not be an option. Cleaning upyour mess shows the customer that you provide a responsible service that leaves their facilitylooking as good if not better than when you arrived.
polishing spur. This is done by holding the buffer upright and pulling the spur through the pad while running the buffer. This will remove polish residue build-up, keeping the pad clean and allowing your pad to absorb polish from surface being polished. This allows the surface being polished to clear to