Transcription
P O L I S H I N GA L U M I N U MA L L O YH A R L E YP A R T SPOWERPUBSPLANO, TX1
P O L I S H I N GA L U M I N U MA L L O YH A R L E YP A R T SPOWERPUBSPolishing Aluminum Alloy Harley PartsThis anniversary publication is dedicated to the memory of:William Harley and Arthur DavidsonWalter DavidsonWilliam DavidsonAnd all those dedicated to the pride and enjoymentof the most unique of experiences: a Harley-DavidsonThis first edition is copyright free and may be used and reproduced by anyone byany means that is in the interest of Harley-Davidson motorcycle enthusiasts.2004 Country Club Drive Plano TX 75074nodawgs1@attbi.com2
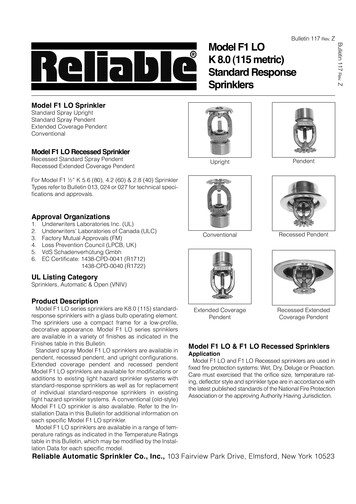
P O L I S H I N GA L U M I N U MA L L O YH A R L E YP A R T SAbout the Front CoverThis immaculate, fully polished chopper was designed and built by Doug Card. The frame is a 1956 "K" model with abolted on hardtail section. The engine is a 1964 Sportster with .080 removed from the jugs. Cams are stock “P” cams andthe carb is a modified Keihin butterfly with a Thunderjet. The front wheel is a 1957 BSA Goldstar that’s been chromedand re-laced with stainless spokes. The rear wheel is a Hallcraft with chrome spokes. The rear brake is a homemade discsetup using a Hurst/Airhart caliper. The seat is homemade using "K" model internal seat post springs and Big Twin buddyseat springs on the outside. The wheel spacers and magneto advance/retard base are also homemade.Trademark AcknowledgementsAll terms mentioned that are known to be trademarks or service marks have been appropriately capitalized. The use of aterm in this manual should not be regarded as affecting the validity of any trademark or service mark.AcknowledgementsSpecial thanks are extended to contributors noted herein for their contributions used to graphically depict various aspectsof aluminum alloy polishing.DisclaimerEvery effort has been made to make this document as complete and accurate as possible, but no warranty or fitness isimplied. This information is provided on an “as is” basis. The author, PowerPubs, and any business entity mentionedherein shall have neither liability nor responsibility to any person or entity with respect to any loss or damages arisingfrom the information contained in this document.About the Author“Nodawgs” is an electrical and mechanical engineering generalist, technical writer, watermelon hauler, and exotic dancerthat found his way out of the Tennessee hills only by falling off a turnip truck making a hard right turn. The writing theauthor normally does is politically correct, formal business writing that is subjected to the whims of editors, resulting inthick hernia books no one gives a rat’s ass about reading, anyway. Having written a zillion corporate documents whenmost folks of today still had tan poop, the author is even more convinced that crappy grammar, his native hayseed talk,and a little humor can communicate better to an audience of any level and they actually like and use the stuff.3
P O L I S H I N GA L U M I N U MA L L O YH A R L E YP A R T S(Unintentionally left blank)4
P O L I S H I N GA L U M I N U MA L L O YH A R L E YP A R T SPolishing Aluminum Alloy Harley PartsDoing a frame-up rebuild of an old vintage Harley or building a custom chopper?Perhaps, just polishing stock finishes to a mirror luster? For any of these, this manualreveals the metal finishing industries’ secrets of polishing except we go one better!Polishing aluminum alloy castings and machined parts takes a ton of time, is extremelylabor intensive, and has got to be one of the messiest jobs on the planet. Matter of fact,if you want to know the truth, the best thing to use for polishing aluminum alloy partsis a pen and checkbook. However, if you’re still up to it, keep reading but don’t say Ididn’t tell you.What we’re going to do here is show you how to do professional level polishing in your own garageor home-based shop. We’re approaching this knowing that some folks might not know squat aboutpolishing, so you people that have had a prior hand at this bear with me on the monkey-see, monkeydo part.We’re going to cover the tools, materials, polishing techniques, and routine maintenance of polished,bare aluminum alloy, mirror luster finishes: Surface preparation and cleaning Sanders and sanding Buffer motors Buffing wheels and accessories Polishing compounds Polishing Techniques Polishing Tips and Tricks Dust control Safety Precautions Retarding oxidation of finished work Periodic maintenance of mirror finishes5
P O L I S H I N GA L U M I N U MA L L O YH A R L E YP A R T S1POLISHING AND BUFFING AT A GLANCE .9Figure 1. General Polishing and Buffing Process for Aluminum AlloyHarley Parts.92SURFACE CLEANING.92.1 Inspection .103SANDING .103.1 Sanders .10Figure 2. Typical Electric Orbital Palm Sanders .113.2 Sandpaper .113.2.1Sandpaper Grits . 11Figure 3. Sandpaper Selection.123.2.2Sanding Out the Dings . 14Figure 4. Sanding Out Dings.154POLISHING AND BUFFING MATERIALS AND TOOLS .164.1 Buffer Motors .174.1.1Makeshift, Rinky-dink, Thin-wallet, Buffer Motor. 17Figure 5. Half-inch Arbor for ¼-inch Drill .18Figure 6. Makeshift Buffer Motor Using a High-Speed Hand Drill .184.1.2General Purpose Motor Fitted with an Arbor . 19Figure 7. Arbor Extensions for Motor Shafts .204.1.3Specialized Buffer Motors . 20Figure 8. Buffer Motors .214.1.4Buffer Motor Stands. 22Figure 9. Full Clearance Buffer Motor Stand .23Figure 10. Home-made Buffer Motor Stand Dimensions .244.2 Polishing and Buffing Wheels .244.3 Polishing and Buffing Compounds .254.4 Buffing Wheel and Compound Sources of Supply .254.4.1Southwest Metal Finishing Supply Company. 25Figure 11. Southwest Metal Finishing Motorcycle Kit.264.4.2Formax Manufacturing Company. 27Figure 12. Formax Polishing and Buffing Materials .275POLISHING AND BUFFING OPERATIONS .285.1 The Polishing and Buffing Process .295.1.1Differences in Buffs. . 31Figure 13. Full Disc Buffs, a Loose Ply (left) and a Circle Sewn (Right) .31Figure 14. Wear Pattern of Full Disc Buffs, new (left) and worn (right) .32Figure 15. Bias Cut Buffs .336
P O L I S H I N GA L U M I N U MA L L O YH A R L E YP A R T SFigure 16. Flanges for Use with Bias Cut Buffs.335.2 Loading the Buff.34Figure 17. Loading the Buff.345.3 Using a Rake .35Figure 18. Buffing Wheel Rake .355.4 Avoiding Cross-contamination of Compounds .365.4.15.4.25.4.35.4.45.4.5A Different Buffing Wheel for Each Operation. 36Clean Your Hands or Gloves between Operations. 37Clean Parts between Operations. 37Protecting Buffing Wheels . 38Protecting Finished Parts. 385.5Polishing Technique Tips and Tricks .385.5.1Cutting and Coloring Strokes. 38Figure 19. Cutting and Coloring Strokes.395.5.25.5.35.5.4Part Orientation Relative to the Buffing Wheel. 39Part Temperature . 40Polishing with Sets of Strokes at 90-Degrees. 40Figure 20. Cam Cover from a 1978 Glide.415.6 Problem Parts: High Porosity Castings .41Figure 21. Problem Part.42Figures 22. First and Second Sandpaper Cuts .43Figures 23. Third and Fourth Sandpaper Cuts .445.6.1Trick Number 1, Intentionally “Overloading” the Buff. 44Figure 24. A Single Surface Pore after Wet-sanding .45Figure 25. Filling Surface Pores with Compound.46Figure 26. After 1st Polishing Operation (cutting down) with Emery Cake475.6.2Problem Part Cleaning . 47Figure 27. Finally!.Starting to Take a Shine .48Figure 28. Finished with the Tripoli .48Figure 29. Part They Say Won’t Polish .49Figure 30. Effects of Surface Flow.506DUST CONTROL .50Figure 31. Garage or Shop without Dust Collection.516.1 Dust Control.516.2 Homemade, El Cheapo Dust Collector .51Figure 32. El-Cheapo Box Fan Dust Collector .52Figure 33. Box Fan Dust Collection, Conventional Motor Stand.54Figure 34. Homemade Dust Collection.55Figure 35. Buffing Wheel Shield .566.3 Dust Collectors .57Figure 36. Dust Collectors.577
P O L I S H I N GA L U M I N U MA L L O YH A R L E YP A R T S7Safety Precautions .577.1.17.1.27.1.37.1.4Hand Protection . 58Use a Dust Mask . 58Eye Protection . 58Around Buffer Motors. 598SEALING.59Figure 37. Alcoa Bare Aluminum Sealant .609MAINTENANCE OF POLISHED SURFACES.609.1 Deoxidizing and Cleaning .61Figure 38. Using Cleaners Not Compatible with Bare Aluminum Alloys .61Figure 39. Cleaner Compatible for Bare Aluminum Alloys .629.2 Scratches and other Blemishes .62Figure 40. Shank-mounted Buffs .639.3 Sealing the Finish .6310Harley Aluminum and other Precious Metals .63Figure 41. 1964 Sportster Engine (bike featured on the cover) .6410.1 Something that Chaps my Butt .648
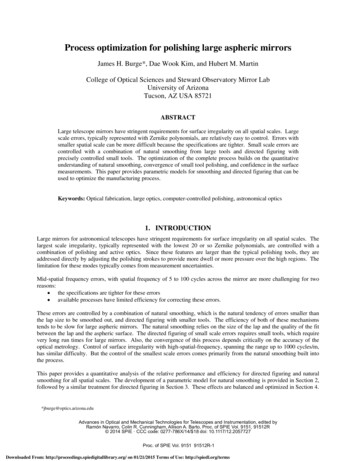
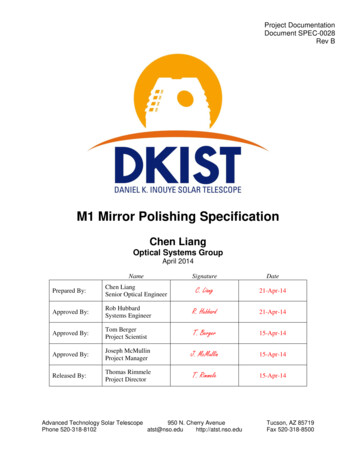
P O L I S H I N GA L U M I N U MA L L O YH A R L E YP A R T S1 POLISHING AND BUFFING AT A GLANCEThe following Figure 1 is a general overview of the process for polishing and buffing Harley barealuminum alloy cast and machined parts to a chrome-like, mirror luster. Enjoy Figure 1 because this isabout as fancy as it’s going to get.Clean PartLight scratches onlyInspectNew part with stock, semi-shinefinish. No dings or scratchesModerate dings1st Operationand scratchesDeep Dings,gouges, etc.(cutting down)Black Emery Cake1st Sanding CutCoarse Grit2nd Operation(cutting/coloring)2nd Sanding CutOrBrown TripoliMedium Grit3rd Sanding Cut3rd OperationFine Grit(coloring)White Rouge4th Sanding CutVery Fine Grit4th OperationSeal Part(ultra-coloring)Red or Pink RougeFigure 1. General Polishing and Buffing Process for Aluminum Alloy Harley PartsYeah, I know. That’s a lot of sanding, polishing, and buffing. However, starting with coarse, 1st cutsanding is for worse case stuff, like some old vintage, beat up, old rat bike you found and are doing aframe-up rebuild or maybe a part with road rash. On some parts you can skip sanding altogether andon new, unblemished parts you can likely skip both the sanding and the 1st polishing operation, goingstraight to brown Tripoli. We’ll get into that later, but it’s all going to depend on part condition.2 SURFACE CLEANINGOf course, you’ve got to start by getting the parts off the bike and giving them a good cleaning. Forcrying out loud, don’t use some brand-x concoction cleaner intended for chrome plated surfaces!Otherwise, you could wind up with a chemically etched doorstop needing the sanding and polishing9
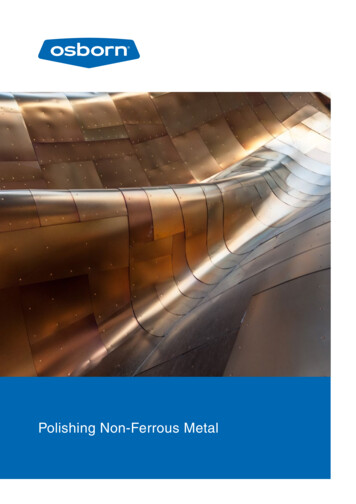
P O L I S H I N GA L U M I N U MA L L O YH A R L E YP A R T Semergency room for more reasons than one. If you think I’m pulling your leg, temporarily jump toSection 9.l and take a gander at a prior patient in Figure 38.Clean off any dirt, road grime, and oil residue with clean kerosene. Afterward, wash the part withordinary dish detergent such as liquid Palmolive or Dawn and rinse thoroughly. If the part is a camcover, tranny cover, primary cover, rocker cover, etc., it will have engine oil residue on the gasketside. All oil must go. Otherwise, when handling the part under a buffing wheel, the slightest amountof oil residue that gets on your hands or gloves, will wind up as a black, oily mess all over the workpiece. Not good, folks.2.1 InspectionNow that the part is clean, inspect the surface closely for pits, dings, gouges, and scratches. You’llprobably see dings you didn’t even notice earlier. The depth and quantity of dings, gouges, andscratches, etc., will determine what grit sandpaper you need to use for a first cut.3 SANDINGOkay, we now have a clean part and are ready to boogie. If the part is pretty well dinged up, scored,pitted, and heavily scratched, you’re going to have to hit it with some serious sandpaper cuts beforepolishing. You can skip sanding if: It’s an old part completely free of pits, dings, and deep scratches (unlikely) A new, completely unblemished, stock part you’re merely polishing to a chrome-like luster You’re willing to live with a shiny part that still has dings, pits, scores, and deep scratchesFor severely damaged parts, the quality of the final mirror finish is heavily dependent on the sandingpreparation. You cannot compound out deep dings, gouges, and deep scratches. Believe me on thatone. If you blow off the sanding and just jump in and start polishing say, in the July you’ll still bepolishing when you’re singing Jingle Bells and will merely have a shiny part with the same dings,scores, and gouges detracting from the mirror finish you really wanted. Matter of fact, depending onthe buff and compound, you can actually make some types of dings even deeper. If it’s dinged up, wegotta sand, folks.3.1 SandersFirst, let’s get a sander. What seems to work best for Harley size and shape castings and most otherHarley parts is a small, orbital, ¼-sheet, palm sander. Typically, these haul buns and crank out fromaround 8,000 to 14,000 orbits/minute, depending on the brand. The little red Milwaukee shown inFigure 2 screams at 14,000. Don’t use one of those little 115-volt vibrator sanders. They’re primarilyfor wood and as far as removing material, they work about as well with the power switch off as on.Also, detail sanders are handy for getting in tight places you can’t reach otherwise. Using the cornersof the pad for tight places, a small palm sander, whether air or electric, will do 99% of it. For placesyou just can’t reach, there’s another sander out there called “hand.” It comes in two types left andright, often accompanied with sweat. Figure 2 shows typical orbital palm sanders. Look about 12inches or so down from your elbow for an example of a hand sander.10
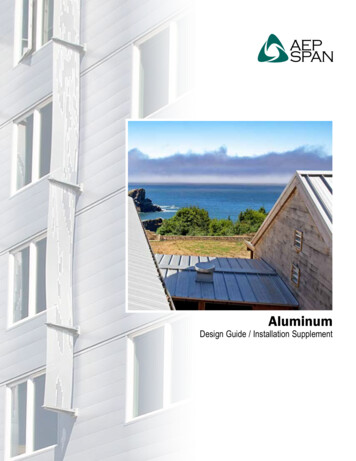
P O L I S H I N GA L U M I N U MA L L O YH A R L E YP A R T SFigure 2. Typical Electric Orbital Palm SandersThere are a zillion brands of ¼-sheet orbital palm sanders out there, all of them pretty good for whatwe’re doing here. The sanders in Figure 2 are merely two I pulled out of the air.3.2 SandpaperOkay, we now have a cleaned part and a palm sander. Now, let’s find the right sandpaper for sanding.If you start with a grit that’s too fine, you’ll know. When you’ve been sanding until you’re blue in theface and realize you’re not making enough headway on removing material to eliminate the dingsduring this century, you need to gear down to a coarser grit. That’s okay that’s the way to do it. It’salways better to try a finer grit and then gear down if necessary. A coarse grit cuts the material downquickly and you can come back on the next cuts, working your way back up with progressively finergrits, getting the scratches out from the cut prior. When you’ve done a bunch of this, you’ll be able totake a look at a part and tell at a glance which grit you need to initially start using to get the job donequickly and looking good at the same time.Another reason to gear down to a coarser grit is to keep from sanding so long in one spot to get out aproblem ding. If you keep sanding in the same spot, you’ll be sanding a low place in the part that’sgoing to show up as a visible hollow swag after it’s polished. Keep the surface uniform and free oflow places that would otherwise become obvious after it’s polished. Remember, we’re going for achrome-like, mirror luster and a hollow place will stick out like a sore thumb later.3.2.1 Sandpaper GritsNorton, for instance, makes a good mixed-pack of metal-sanding emery grits. I’m sure 3M makes asimilar pack as well, and of course, there are others. Personally, when sanding with coarse grits, Isand dry, then wet sand when I get into the finer grits. Sandpaper for metal sanding is commonlyavailable in local do-it-yourself mega-retail stores, automotive supply stores, and suppliers ofproducts to the auto body repair industry. One commonly available Norton product is a metal sandingpack of assorted, coarse, medium, and fine 9 x 11 inch sheets of emery bonded with resin to a clothbacking.11
P O L I S H I N GA L U M I N U MA L L O YH A R L E YP A R T SFigure 3. Sandpaper SelectionAs an example, this mixed pack is locally available at Home Depot stores, plus you might want tothrow in a sheet of 280 grit as I have here, or maybe a “very fine” sanding sponge.You’ll find that emery sanding packs of assorted grits are vaguely labeled “course,” “medium,” and“fine.” They equate to the grit shown in the following section. A quarter of a 9 x 11 sheet perfectlyfits standard ¼-sheet palm sanders. Just fold to crimp and tear off in quarters. To take the cloak ofsecrecy out of this grit business, I’ve included a grit guide in the following section.3.2.1.1 Grit GuideThis “coarse,” “medium,” and “fine” business has always made me wonder what grit we’re talkingabout, here. It’s like the folks that made the stuff aren’t real sure themselves. I know what promptsthis, but it doesn’t really make any difference because we still have the same problem as a user nonumber for a point of reference to numerical grit grades. Although a broad brush of sorts, here’s a gritguide I came across from one of the leading abrasives manufacturers:Table 1. Grit GuideDescriptionGrit GradeExtra coarse30, 40, 50Coarse68, 80Medium100, 120Fine150, 180Very fine220, 240, 280Super fine400Ultra fine600, 800, 1000, 1200, 150012
P O L I S H I N GA L U M I N U MA L L O YH A R L E YP A R T SWhat’s really happening here is that variations in the backing, the adhesive system used to bond thegrit to the backing, the grit material itself, whether it’s dry sanding or wet, and endless variables insanding dynamics, can result in a dramatic difference in the scratch. This variation is so wide that it’spossible for a coarser grit of one construction and use to actually sand smoother than a finer grit of adifferent construction and use. The metal-sanding sandpaper we’re recommending here is naturalemery, resin bonded to a cloth or waterproof paper backing.3.2.1.2 Grit ChartPersonally, I prefer grit designations that get to the point, like: rougher than a cob, coarse, sortacourse, happy medium, fine, mighty fine, dang fine, and plumb smooth. However, the abrasive folksseem to want to count molecules. You might want to memorize this little chart real quick for handyreference:Table 2. Grit ChartFEPA(P-Grade)CAMIFinishingScaleAverage ParticleSize (inches)Micron Scale 127.0141.013
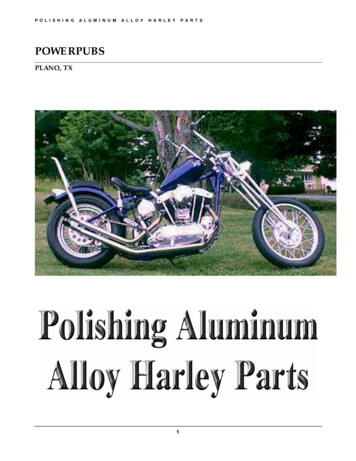
P O L I S H I N GA L U M I N U MA L L O YH A R L E YP A R T STable 2. Grit ChartFEPA(P-Grade)CAMIFinishingScaleAverage ParticleSize (inches)Micron Scale .0715.0740.03.2.2 Sanding Out the DingsGot all that? Good! We’re sandpaper experts, now. As I mentioned earlier, ¼-sheet palm sanders willget almost every nook and cranny on most Harley aluminum alloy parts. At the same time, a palmsander has a large enough sanding surface area to avoid sanding in hollows caused by sanding toolong in one spot. Tight places you can’t reach can be gotten by hand or with a detail sander. However,when detail sanding, spread the sanding out enough to avoid hollows and blend it into areas sandedwith the palm sander. If you want a ding-free surface after polishing, it must be ding-free aftersanding. Figure 4 represents possible cross sections of the work piece. It should pretty much show youwhat we’re faced with, here.14
P O L I S H I N GA L U M I N U MA L L O YH A R L E YP A R T SDeepest Ding .005Material that mustbe removedSanding too longin one spotSandedcorrectlyFigure 4. Sanding Out DingsNot that we’re going to actually get down and measure the depth of a darn ding, but if the deepestding is, say, .005 of an inch deep, we need to remove .005 inches of material to remove all dings.Figure 4 is highly exaggerated scale, so don’t let the figure make you think you’re removing a ton ofmaterial that will weaken the part. Put it this way, the average human hair is .001 of an inch indiameter except maybe for big Betty Lou Buford back in my home state of Tennessee and whather species may actually be is debatable, anyway. A rather stout Harley part is not even going to knowthe difference if the thickness of a mere 5 hairs is missing.Following the instructions in Table 3 will pretty much keep you out of trouble. If in doubt when onyour first shot at this, start with one of the finer grits and work your way back to a coarser grit if itturns out to be a slow go by not removing material fast enough for the condition of the part. Yearsago, on my first go at this, I was bored one evening and started sanding late, late one evening close tomidnight. I started out with 320 grit paper because I was scared to death to use something coarser on a35-year old irreplaceable Harley part. I was still sanding past 2:30 AM and still staring at the samedarn dings. They were microscopically shallower and that’s about it. The only other time I was everup at such an ungodly hour was back in Tennessee when my Aunt Miranda got a shot glass hung inher throat at 3:00 AM in the morning.Unlike me back then, you likely won’t need to start with the coarsest grit shown for the 1st cut unlessyour part has a real bad case of the uglies like butt ugly or road rash. A coarse grit is for severelyabused basket case parts only. It rapidly removes a lot of material, leaving scratches consistent withthe grit that you have to get out with the next finer grit. See Section 1, Figure 1 as a sandingreference, then use the following Table 3.15
P O L I S H I N GA L U M I N U MA L L O YH A R L E YP A R T STable 3. Sanding Out DingsCutSandpaperSandingFinish Appearance1stCoarseIf you have some seriously deep dings, scratches, and gouges, you’ll haveto start with this grit. Usually, this is confronted during a re-build of an oldbike or one that’s been badly abused or has been horizontal and has a caseof road rash. Sand the dings out, making sure you also sand quite adistance away from the problem areas as well. This avoids creatinghollows that will show up when the surface achieves a mirror finish. If youhave doubts about needing to start with something this coarse, start withthe grit shown for the 2nd cut below, or even the 3rd cut. You can alwayscome back.Flow with clean water and inspect closely. Itshould be pretty darn scratchy from the coarsegrit, but uniformly scratchy. Make sure thatall deep dings, etc., are now gone. Of course,if you have a ding that’s unusually deep youjudge to be completely impractical to remove,just live with it and go to the next cut. Afterremoving other dings, it will at least beshallower and less noticeable.2ndMediumYou have to get out all scratches made from the 1st cut. That’s extremelyimportant! a “have-to.” It’s not likely that the 3rd cut is going to do it ifyou don’t do it here.Flow with clean water and inspect closely. Allscratches made by the 1st cut have beenreplaced with finer scratches of the 2nd cut.The part has a uniform, flat, brushed look.3rdFineYou’ve heard this before, but again, you have to get out all scratches madefrom the 2nd cut before going to the third. Extremely important and again,a “have-to.” If you don’t, they’ll still be there, later. I suggest wet sandingwith this grit.Looking pretty good. It now has no scratchesleft from the 2nd cut. It has a clean, smoothfinish having a uniform texture left from thegrit of this third cut only.4thVery FineWet sand by hand with an extra fine sanding sponge or sheet.say, 280 or300. It’s not that big of a deal because it goes quickly. Further smooth thealready smooth texture left from the previous cut. What you do heredepends on how the part is going to respond when we start polishing.You should start seeing a satin smooth finish,even a slight hint of a shine, free of anyscratches visible with the naked eye. Wash thepart thoroughly! We’re ready to polish!Caution: Unless you want some Harley bookends, do not allow sandpaper to come in contact with amat
polishing, so you people that have had a prior hand at this bear with me on the monkey-see, monkey-do part. We re going to cover the tools, materials, polishing techniques, and routine maintenance of polished, bare aluminum alloy, mirror luster finishes: Surface prepa