Transcription
ESSENTIAL MICROSOFT OFFICE 2010: Tutorials for TeachersCopyright Bernard John Poole, 2010. All rights reserved.1INTRODUCTION TO WORDWriting a Conference Call letterBEFORE YOU BEGINLesson 1 makes the assumption that you are already familiar with the Windows computingenvironment, though you may not be an expert in its use. If you are using a computer in a lab atschool, you'll also know: where to find the computer lab on campus;how to turn the computer on;how to log on to the system (using your login name and password).You also should be familiar with the Windows, Icons, Menus, and Pointers (the so-calledWIMP interface) with which you interact with the computer. If not, your instructor will makethis clear to you before you proceed with these tutorials.Lesson 1 assumes that you have a copy of the set of work files that accompany thesetutorials. These files should be stored on your hard drive and/or on a USB Flash drive. Whatevertype of disk drive you are using, be sure it is labeled (named) appropriately.The work files that accompany these tutorials should be stored on the drive in three foldersnamed Work Files, PowerPoint Files, and Access Files. You also will need a fourth folder for thedata files that you will be creating while working your way through the tutorials. This fourthfolder will be called Data Files.Ideally, you should have a second backup copy of the four folders mentioned above (WorkFiles, PowerPoint Files, Access Files, and Data Files).If you do not have these folders and files ready, prepare them now before proceeding withthis tutorial. Here are the steps to take:If necessary (if you received a zipped copy of the work files with these tutorials),unzip the set of Work Files for Office 2010 (your instructor will help you with this ifyou are working with a class)Copy onto your disk (USB drive or hard drive) the folder titled Work Files for Office2010, which includes the three sets of files that accompany these tutorials (WorkFiles, PowerPoint Files, Access Files)Double click on the Work Files for Office 2010 folder to open it, and, inside theWork Files for Office 2010 folder, create a new, fourth, folder called Data Files4
Lesson 1: Introduction to Word 2010(one way to do this is to click on the Organize menu of the Work Files for Office2010 folder, select New Folder from the drop-down menu, and, in the sub-menu,select Folder. The system will create a new folder for you and wait for you to give ita name of your choice. Call it Data Files.A caveat (warning) before you begin: You'll find it easiest to use this tutorial if you follow thedirections carefully. On computers there are always other ways of doing things, but if youwander off on your own be sure you know your way back!LEARNING OUTCOMESWords are crucial tools of a teacher's trade. As a teacher, you owe it to yourself and to yourstudents to use words well. The Office 2010 word processor will help you improve your writingskills because it makes revision easy and thus encourages you—and your students—to correcterrors in grammar, spelling, and style.In this tutorial, along with some helpful hints to bear in mind when word processing, you willlearn the steps required to produce a word processed document from scratch and carry out basicformatting and editing functions. These include: opening and naming a new word processor documententering and saving a documentupdating and simple formatting of a documentchecking a document for spelling and grammar errorsprinting a documentmaking a backup copy of a documentIt is likely you are not a beginner to word processing, so you may think you don't need tocomplete this tutorial. That would be a mistake. Most computer users learn no more than theminimum they think they need to know to use a program such as Word, without taking thetrouble to learn other useful features of the software. In other words, even if you've used a wordprocessor for a while, there's a good chance that you will still benefit from completing thisbeginner's tutorial.So, with this in mind, please conscientiously work your way through the tutorial with a viewto learning new things. You'll be surprised what you’ll discover!1.1OVERVIEW OF MICROSOFT OFFICE 2010Office 2010 differs from previous versions of Microsoft’s Office software in two respects. First,Microsoft introduces what it calls the Backstage view, which is what you see when you pulldown the File menu. In Office 2007, in place of the File menu Microsoft introduced the colorfulOffice Button. In Office 2010, the Office Button is gone and replaced by the more familiar Filemenu, which gives the user a Backstage view on the document or file that the user is developing.In the Backstage view, you do things TO a file (such as save it or open it or print it) that you donot do IN the file. Actually, the File menu is no different than it was in earlier versions of Office;Microsoft just decided to give it a fancy name—the Backstage view.5
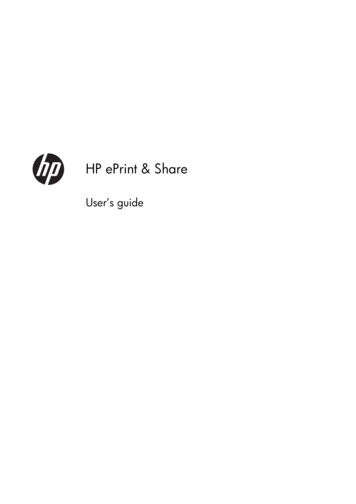
ESSENTIAL MICROSOFT OFFICE 2010: Tutorials for TeachersCopyright Bernard John Poole, 2010. All rights reserved.Also, in previous releases of Microsoft Office, people used a system of menus, toolbars, taskpanes, and dialog boxes to get their work done. In Office 2010 you will continue to use menusand dialog boxes, but, as with Office 2007, Office 2010 also uses what Microsoft calls Ribbons.A Ribbon is a strip that runs across the top of a window which presents commands organizedinto a set of Tabs (Fig. 1.1). For each Tab there is a different Ribbon in which you will findGroups of commands (Fig. 1.1 again).The Home Tab, which lets you use the tools in the Home RibbonThe File menuThe Font GroupParagraph, Styles, andEditing GroupsFig. 1.1 The features of the Office 2010 User InterfaceEach Group contains sets of commands that are closely related from the point of view offunctionality. For example, in the Home Ribbon you will find the most frequently used functions,including the Font Group, which has all the tools you need that deal with fonts and text sizes andstyles and colors and so forth. In the Paragraph Group are all the tools for line spacing, textalignment, bullets and numbering, indentation, and borders. And so it goes.On a related matter, the author has prepared a chart that breaks down the most used OfficeWord 2010 quick keyboard commands. You will find this chart handy when you are learning touse the software for the first time. The chart is available as a separate download at the end of thelist of contents on the download site for these Office 2010 tutorials(http://www.pitt.edu/ edindex/Office2010frame.html).1.2 OPENING AND NAMING A NEW WORD DOCUMENTBefore you can use Microsoft Word 2010, you must first open the program. If this is your firsttime using Word for Windows1, here's what you need to do:Click on the Start menu in the lower left corner of the screen then, from theAll Programs menu, select Microsoft Office Word 2010—you may need tochoose from the Word Processing or Microsoft Office submenuIf you can find Microsoft Word by yourself, open the program now; otherwiseget help from a friend, or your instructor, or from the lab supervisorAfter you have opened Word, you should have a new blank document open on your screen.1For the purposes of this book, all illustrations are created using Microsoft Windows Vista running Office 20106
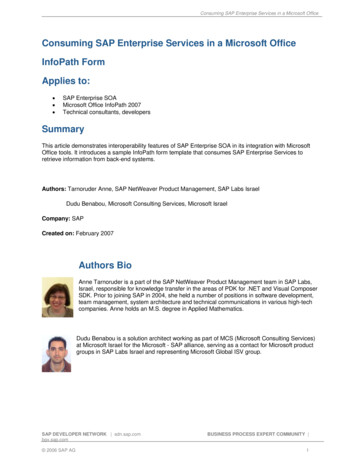
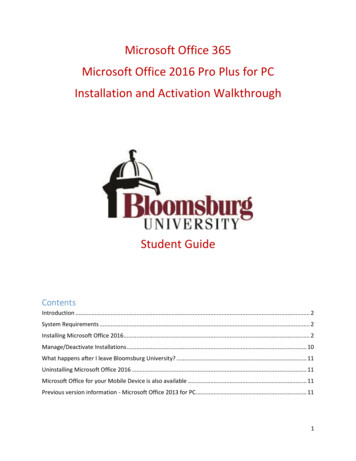
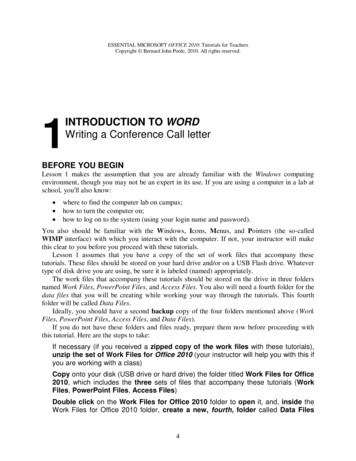
Lesson 1: Introduction to Word 2010If this is not the case, from the File menu select New and double click onBlank document (Fig. 1.2)Fig. 1.2 The Office 2010 New Document windowNow take a moment to look at each of the Ribbons for Office Word 2010—the Home Ribbon, the Insert Ribbon, the Page Layout Ribbon, theReferences Ribbon, the Mailings Ribbon, the Review Ribbon, and theView RibbonThe Ruler at the top of the page is an essential tool when you’re word processing. This isbecause it is in the Ruler that you set tab stops and indents. If your version of Office Word 2010does not show the ruler at the top of the page (see Fig. 1.3 below), you need to show it beforeproceeding with this tutorial.TheRuler barThe Show GroupTool for settingTab StopsIndent MarkersFig. 1.3 The Office 2010 rulerClick on the View tab to bring up the View Ribbon (Fig. 1.3 above), thenlocate the Show Group and click to put a check mark (tick) in the box nextto Ruler (see Fig. 1.3 above)You may also need to set the line spacing before you proceed because the default setting on thecomputer you are using may be other than single spaced. Here’s how you do this.In the Home Ribbon, in the Paragraph Group, click on the Line andParagraph Spacing tool (Fig. 1.4 on the next page) and, in the drop downmenu of spacing options, make sure there is a check mark (tick) next to 1.07
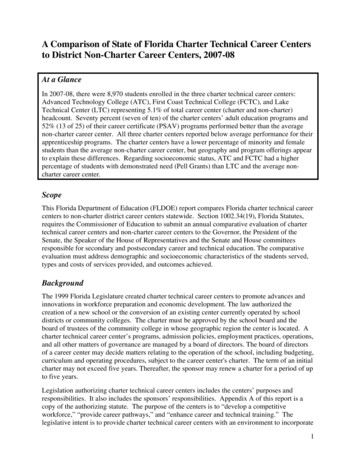
ESSENTIAL MICROSOFT OFFICE 2010: Tutorials for TeachersCopyright Bernard John Poole, 2010. All rights reserved.Fig. 1.4 The Line and Paragraph Spacing toolNow you’re ready to proceed with the tutorial. Fig. 1.3 on the previous page illustrates the Ruler,along with the tool for setting tab stops and the tools for setting indents—called indent markers.Most users of Microsoft Word never figure out how to use these tab stops and indent markers;many users do not even know they exist!Check out the tool for setting Tab stops at the left edge of the window (Fig.1.3), on the same line as the ruler bar—it’s so small you could easily miss it(and a lot of Word users do!)You’ll be practicing using this Tab Stop tool later in the tutorial.Last, make a mental note of the Indent Markers on the left and right side ofthe Ruler bar (Fig. 1.3)You'll have the opportunity in this lesson to become familiar with each of these essential wordprocessing tools.Saving a new Word documentLook at the new document’s name (Document1 or Document2) in the topcenter of the windowThe document is given the default name (Document1 or Document2, etc.) by the system becauseyou haven't yet given it a name of your own. It is ALWAYS a good idea to thoughtfully name anew document immediately, before you even enter any data, and save it on the drive on whichyou intend to keep it. It is not a bad idea, at the same time, to save a backup copy on another diskdrive (though you’ll also have the opportunity to create backups at the end of each lesson ofthese tutorials).There are two good reasons for naming your files thoughtfully:1. You will easily be able to identify the contents of a document if you give it anappropriately descriptive name (such as Letter to Mom 3-8-04).2. You will more easily find a document at a later date if you are careful to save it in alocation of your choice—and a thoughtful name will also help you find a document youmay have misplaced because you can use the name to have the system search for it.When you select the Save option, the system will prompt you to identify the location of8
Lesson 1: Introduction to Word 2010your choice. So, when it does, be sure to select where you want the document to be saved(on which disk drive and in which folder).This is easy enough to do. Here are the steps in case you don't already know what to do.Make sure your USB Flash drive or other disk is inserted in your computerFrom the File menu select Save AsWord displays the Save As dialog box (Fig. 1.5).Click this down arrow to listall the places you can savefiles on your computerNew Folder toolIn the Favorite Links frame,click on the Computer optionFile name:data entry boxFig. 1.5 The Save As dialog boxThe Save As dialog box prompts you, among other things, (1) to select the disk on which youwant to save the document, (2) to create or select a folder in which to save it, and (3) to type aname for the document.In the Favorite Links frame, click on the Computer option to see the variousdevices and drives on your computer systemDouble click on the icon for the disk drive/flash drive you are using to open itand you should now see a list of the four folders you created on the drivewhen you prepared it for use with these tutorials9
ESSENTIAL MICROSOFT OFFICE 2010: Tutorials for TeachersCopyright Bernard John Poole, 2010. All rights reserved.Double click to open the folder named Data FilesCreating a new folder on a diskNow you need to create a new folder inside the Data Files folder to store all your Worddocuments.In the Save As dialog box, click on the New Folder tool (see Fig. 1.5 on theprevious page)The system immediately creates a New Folder (Fig. 1.6) and you need to give it an appropriatename.You need to give the newfolder an appropriate nameReplace Doc1 withConference Call LetterFig. 1.6 New Folder dialog boxType Word Documents for the new folder’s name and hit the Enter key (orclick on Open)1Word opens the new folder so that you can save the new document inside it.1Most every Windows dialog box has a default response when you hit the Enter key on your keyboard. If you lookcarefully at the buttons in the Save As dialog box, you'll see that one of them (the Open button in this case) has aheavier, bluish border around it. When you hit the Enter key, this is the button that is activated by default.10
Lesson 1: Introduction to Word 2010In the File name: data entry box (Fig. 1.6), type Conference Call Letter toreplace the default name (doc1, say) and press Enter (or click on the Savebutton)The Save As option thus allows you to name your documents and at the same time determine thelocation (the folder, on a particular disk) on which you want to store them. In effect, by namingthe document and specifying the location on which it will be stored, you are reserving a space forthe document on the disk.1.3 SOME HELPFUL HINTS WHILE USING WORD 2010You will shortly type the text of the Conference Call Letter. But before you start, take note of thehelpful hints that follow.Word processing is not the same as using a typewriterNext to no one uses a typewriter anymore. But if you happen to be one of those who never used acomputer before but you did used to use a typewriter, read on. As you type at the computerkeyboard, the letters appear on the screen. When you use a typewriter, however, the lettersappear directly on the paper.Also, when using a typewriter you have to move the carriage back at the end of every line soyou can start typing at the beginning of the next line on the page. This is called a carriage return.When you use a word processor, however, the system takes care of the end of each line. As youtype away in word processing, the program is aware that you are getting to the end of the line,and it will automatically move a word to the beginning of the next line if it doesn't fit completelyon the end of a line. The technical term for this is “wrap around.” You don't have to worry abouthyphenating words that are broken up over two lines—unless you want to, of course.So, when you are using a computer, the only time you need to hit the Enter key is at the endof a paragraph, whether the paragraph be one word, one line, or several lines.Type the following passage so you can practice this now—remember, don'tpress the Enter key until you get to the end of the paragraph, and don’t worryif the end of each line on your computer is different than shown here1And though he tried to look properly severe for his students, Fletcher Seagull suddenlysaw them all as they really were, just for a moment, and he more than liked, he lovedwhat he saw. No limits, Jonathan? he thought, and he smiled. His race to learn hadbegun. 2Now press Enter at the end of the paragraphNotice how the word processor took care of the end of each line.1The lines on your screen may be longer or shorter.the book "Jonathan Livingston Seagull: a story" by Richard Bach. New York, NY: Avon, 1970. And yes, thegrammar is correct, so don’t worry if it seems odd to you here and there!2From11
ESSENTIAL MICROSOFT OFFICE 2010: Tutorials for TeachersCopyright Bernard John Poole, 2010. All rights reserved.There are two cursors you need to know aboutWhen you are word processing, there are two independent cursors you need to know about. Oneis called the I–beam cursor and the other is called the Insertion point cursor (Fig. 1.7).Fig. 1.7 The two kinds of cursorsThe I–beam cursor is so called because it looks a bit like an uppercase "I" and not unlike an Ibeam used in construction. It becomes an arrow when positioned in the left margin of the page orwhen rolled outside the edges of the page. Try the following for practice.Roll the mouse around and notice how the I–beam cursor follows along andchanges to an arrow pointing to the left each time you cross the edge of thepage on either side, or into an arrow pointing to the right if you slide over intothe left margin of the pageThe Insertion point cursor (which blinks on and off on the screen and is not directly controlledby the mouse) is so called because it indicates exactly where characters will appear in the textwhen you type at the keyboard.The I–beam cursor, on the other hand, is under the control of the mouse and allows you, byclicking on the left mouse button, to position the insertion point cursor anywhere in the text ofyour document. Practice will help you understand how this works.Use the mouse to move the I–beam cursor on the screen so it is positionedimmediately before the word "Fletcher", then click the left mouse button onceand roll the mouse away to your rightThe insertion point cursor, which originally was positioned at the end of the Livingston Seagullquote, should now be blinking on and off right in front of the word "Fletcher." Notice how youused the mouse and the I–beam cursor to change the position of the insertion point cursor.Now position the I–beam cursor immediately before the word "though" in thefirst line and click the left mouse button so as to position the insertion pointcursor thereType the word "even" followed by a space, then click at the end of theparagraph (after the final period)So much for how to move the cursor from one place to another in your document. This takessome getting used to, but the more you practice the more natural it becomes.12
Lesson 1: Introduction to Word 2010Correcting errors while entering textIf you see you've made a mistake and you want to fix it before you go on, you can use either theBackspace key or the Del(ete) key (Fig 1.8).Fig. 1.8 The difference between the Backspace and Del(ete) keysThe Backspace key removes text that is left of the cursor, while the Del(ete) key removes textthat is to the right of the cursor. Try the following example using the Backspace key.Use the mouse to put the insertion point cursor immediately after the word“even”Press the Backspace key as many times as necessary to remove the word“even” then click at the end of the paragraph to position the cursor thereYou can use the Del(ete) key for this purpose, too. To use this key you would position the cursorimmediately before (to the left of) the character(s) you want to delete. So the Backspace keyworks backwards and the Del(ete) key works forwards (see Fig. 1.8 above).After you’ve deleted the text, you would use the mouse to click at the point in the documentwhere you want to resume typing. Try the following example.Position the cursor right before the word "though" in the first linePress the Del key till the word "though" and the following space have beendeletedYou get the idea? Now hit ctrl-z as many times as necessary to restore theword “though” and the following spaceRemoving unwanted Returns (using the Show ¶ option)You can have Word show you exactly where, in your document, you hit the Enter key (say, at theend of paragraphs). The easiest way to do this is to click on the Show ¶ icon in the ParagraphGroup of the Home Ribbon (Fig. 1.9).Show ¶Fig. 1.9 The Show ¶ icon on the Standard toolbarClick on the Show ¶ tool now13
ESSENTIAL MICROSOFT OFFICE 2010: Tutorials for TeachersCopyright Bernard John Poole, 2010. All rights reserved.The ¶ symbol is the standard mark used by editors to indicate the need for a paragraph break inrunning text. In the Conference Call Letter that you’ll be typing shortly, the ¶ symbol, if youhave the option turned on, would appear where you hit Enter at the end of each paragraph.Another ¶ symbol would appear on an empty line because, strictly speaking, the empty line isanother paragraph break.The Show ¶ tool also puts a dot to show wherever there is a space in the running text. This isuseful for you to see if, for example, you have typed extra spaces here and there that you maywant to remove. I’m not sure how useful this particular aspect of the Show ¶ tool is, but at leastyou now know what those dots everywhere are.Position the cursor immediately before the sentence that begins “No limits,Jonathan?.”, then hit the Enter key twiceNotice the ¶ symbols that show you where you hit the Enter key—one at the end of the previousline, and the other on the empty line ahead of the cursor.Now remove the Paragraph marks you just entered by pressing theBackspace key twiceFinally, click on the Show ¶ icon in the Paragraph Group of the HomeRibbon to turn off the paragraph marks and all the dots between the wordsUndoing unintended actionsIf you do something you didn't intend to do, or you made a mistake, you'll select Undo from theQuick Access toolbar which is located right above the File menu in the top left corner of theWord window (Fig. 1.10). This is a lifesaver that you will use often!Quick Access toolbarUndo/RedotoolsFig. 1.10 Undo/Redo toolsCheck out this Undo option in the Quick Access toolbar now so you cansee where to find itA quicker way to Undo is to use the shortcut Ctrl Z on your keyboard. You also can undo anynumber of specific recent actions by clicking on the arrow next to the Undo tool in the QuickAccess toolbar (Fig. 1.10), which will drop down a menu or list of the various actions you havetaken since the last Undo. Be careful when you use this feature, however, because if you undo,say, 10 actions, all the actions you did prior to that will also be undone!Scrolling through a documentWe need to open a longer document so you can practice different ways of scrolling.14
Lesson 1: Introduction to Word 2010From the File menu select Open, locate the Work Files for Office 2010folder and open it, then open the Work Files folder, then in the Practicefolder, open the document called Term PaperNow, with the Term Paper document open on the screen, take a look at the scroll bars. On theright of the screen you have a vertical scroll bar and, inside it, the vertical scroll box. At thebottom of the screen you have a horizontal scroll bar and horizontal scroll box (Fig. 1.11).Verticalscroll boxHorizontalscroll boxFig. 1.11 The scroll boxesAt either end of the scroll bars are arrows pointing in opposite directions (left and right, or upand down). As you might expect, clicking on these arrows will scroll a document left or right orup and down. Scrolling from left to right or right to left is simpler than scrolling up or down,since you only have the width of the page to deal with. But the process is the same for scrollingup and down, too.Try scrolling now from side to side—left to right and back again—by clickingon the scroll arrows to move the scroll box in the horizontal scroll barTry scrolling now up and down by clicking on the scroll arrows to move thescroll box in the vertical scroll bar15
ESSENTIAL MICROSOFT OFFICE 2010: Tutorials for TeachersCopyright Bernard John Poole, 2010. All rights reserved.You can scroll a lot faster by positioning the mouse arrow on the scroll box itself, holding downthe left mouse button, and dragging the box left or right, up or down, in the scroll bars.Try this, tooIf you click either side of the scroll box inside the horizontal or vertical scroll bars, this causesthe document to scroll in jumps from side to side or up and down.Try this as wellYou also can scroll and position the cursor very precisely across a line of text, character bycharacter, or up and down from line to line, by using the arrow keys on the lower right of thekeyboard.Try this as wellFinally, yet another vertical scrolling option is available if you have a mouse with a rubberizedwheel between the buttons, as illustrated in Fig. 1.12.Fig. 1.12 The scrolling wheel on the mouseTry this, tooWhen you have finished experimenting with the scroll bars, close (File Close) the Term Paper documentShortcuts or quick keyboard commandsThe quickest way to save your work is to press Ctrl S on the keyboard. The Ctrl (Control) keyis in the lower left corner of the keyboard. Locate it now. You'll be using it a lot as you becomemore familiar with the Office programs. It is always used in combination with one or two otherkeys. Ctrl S, for example, is executed by holding down the Ctrl key and, while holding the Ctrlkey down, simultaneously pressing the S key.You'll learn more shortcuts as you work your way through the tutorials. The author hasprepared a chart that breaks down the most used Office Word 2010 quick keyboard commands.You will find this chart handy when you are learning to use the software for the first time. The16
Lesson 1: Introduction to Word 2010chart is available as a separate download at the end of the list of contents on the download sitefor these Office 2010 tutorials (http://www.pitt.edu/ edindex/Office2010frame.html). For readyreference, print out the Quick Keyboards Commands sheet which lists the most frequently usedOffice 2010 shortcut keyboard commands.Renaming a documentYou will sometimes want to rename a document that you've already saved on your disk. Oneway you can do this from the desktop is by right-clicking on the icon for the document you wantto rename. Then, from the context menu that pops up whenever you right-click on an object onthe screen, select the option to Rename , which highlights the document’s name so that you cantype a new name for it.To rename a document which you already have open in Word, or in any other Office 2010application, you would choose Save As from the File menu. This will give you the opportunity tosave the document with a new name of your choice. Bear in mind, though, that when you do this,the document with the original name will still be on your disk—a second copy, if you like. If youdon't want to keep this copy, you should delete it right away so as to remove unwanted clutterfrom your disk drives.1.4 CREATING AND SAVING A DOCUMENTPractice makes perfectYou still should have open the Conference Call Letter, with the Jonathan Livingstone Seagullquote. You need to clear the Seagull quote from the document, so here are the steps to remove it.In the Home Ribbon Editing Group choose Select All from the Selectmenu (or press ctrl-A, or drag to highlight the whole paragraph, or tripleclick on it), then press the Backspace key once to remove the highlightedtext from the documentNotice that the Backspace key removes all highlighted text. The Del(ete) key does the same.Typing the Conference Call letterYou should now have a blank page with the cursor waiting in the top left corner, ready for you totype in the Conference Call Letter. Fig. 1.13 on the next page has the full text of the ConferenceCall letter.The Figure also shows where all the Paragraph marks (¶) are. This is to help you rememberto hit the Enter key only where necessary, not at the end of every line.As you type, Word is set to automatically warn you of any spelling or grammar errors it finds(by underlining them in red or green on your screen). This will occur as you type the contents ofFig. 1.13. Don’t worry about these warnings for now. Word also may guess that you are writing aletter once you type the first address at the top of the page. Just ignore this, too, and click onCancel if and when prompted by the Office 2010 Help icon in the lower right corner of thescreen.17
ESSENTIAL MICROSOFT OFFICE 2010: Tutorials for TeachersCopyright Bernard John Poole, 2010. All rights reserved.A momentary loss of power is enough for you to lose all your work, so be sure to get into thehabit of saving frequently as you go along. It takes a second to lose your work; and it only takesa second to hit Ctrl-S at the end of every paragraph or whenever you switch to another taskwhile at the computer, or leave the keyboard to do something else.Fig. 1.13 First version of the Conference Call LetterFirst, type your name at the top of the letter immediately above the linethat reads “Hodge Road Elementary School” (so your instructor knows whoyou are)Now go ahead now and type in the text of the Conference Call Letter fromFig. 1.13, saving every few lines as you go along (from the File menu selectSave—or press Ctrl-S)Once you have typed in the whole document and saved it, you should go back and correct anyerrors you may have made, and then save the document again. Remember: when you save adocument with the same name as before, you are replacing the earlier version. You won't becreating a second copy.18
Lesson 1: Introduction to Word 20101.5UPDATING AND SIMPLE FORMATTING OF A DOCUMENTNow that your letter is saved on disk, you can make any revisions you want.Word processing allows you to treat text like modeling clay. You can easily mold your wordsand ideas. You can change margins, put in underlines, italics, boldface, and so forth. You cancorrect errors, move text around, lay it out on the page—all at the touch of a few buttons. In thenext lesson (Lesson Two) you will have an opportunity to become quite sophisticated in thisregard. But let's keep it simple for now.Refer back to Fig. 1.13 while you complete the next few sections of the tutorial.Inserting the dateThere is no date on the Conference Call Letter in Fig. 1.13. A letter is incomplete without adate, so here are the steps to have Word put today's date in the letter.Use the I–beam cursor to position the insertion point cursor right after thezip code in the first address at the top of the page, then press EnterThe cursor should now be waiting at the beginning of the next line.In the Insert Ribbon locate the T
Lesson 1: Introduction to Word 2010 7 If this is not the case, from the File menu select New and double click on Blank document (Fig. 1.2) Fig. 1.2 The Office 2010 New Document window Now take a moment to look at each of the Ribbons for Office Word 2010— the Home Ribbon, the Insert Ribbon, the Page Layout Ribbon,