Transcription
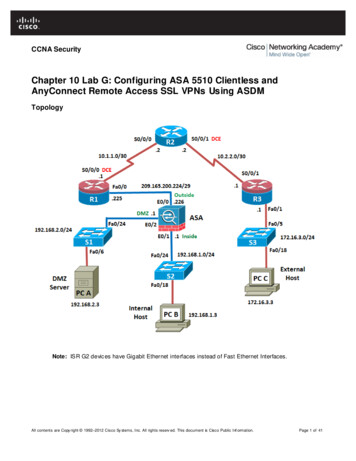
CCNA SecurityChapter 10 Lab G: Configuring ASA 5510 Clientless andAnyConnect Remote Access SSL VPNs Using ASDMTopologyNote: IS R G2 devic es have Gigabit Ethernet interfaces instead of Fast Ethernet Interfaces.All contents are Copy right 1992–2012 Cisco Sy stems, Inc. All rights reserv ed. This document is Cisco Public Inf ormation.Page 1 of 41
CCNA SecurityIP Addressing TableInterfaceFA0/0IP Address209.165.200.225Subnet Mask255.255.255.248DefaultGatewayN/ASwitch PortASA E0/0S0/0/0 5.255.255.252N/AN/AS0/0/1 55.255.255.0N/AS3 FA0/5S0/0/110.2.2.1255.255.255.252N/AN/AE0/0 (outside)209.165.200.226255.255.255.248NAR1 FA0/0E0/1 (inside)192.168.1.1255.255.255.0NAS2 FA0/24E0/2 (dmz)192.168.2.1255.255.255.0NAS1 FA0/24PC-ANIC192.168.2.3255.255.255.0192.168.2.1S1 FA0/6PC-BNIC192.168.1.3255.255.255.0192.168.1.1S2 FA0/18PC-CNIC172.16.3.3255.255.255.0172.16.3.1S3 FA0/18DeviceR1R2R3ASAObjectivesPart 1: Lab Setup Cable the network as shown in the topology. Configure hostnames, and interface IP addresses for routers, switches, and PCs. Configure static routing, including default routes, between R1, R2, and R3. Verify connectivity between hosts, switches, and rout ers.Part 2: Acce ssing the AS A Console and Preparing for VPN configuration Access the ASA console. Clear previous configuration settings. Load the ASA CLI command script to configure basic settings. Access ASDM.Part 3: Configuring Clientless SSL VPN Remote Acce ss Using AS DM Configure the SSL VPN interface connection profile. Configure Local AAA user authentication. Configure the group policy. Configure a bookmark list for intranet URLs. Verify access to the VPN portal. Monitor the clientless SSL VPN connection.Part 4: Configuring AnyConnect Client SSL VPN Remote Acce ss Using ASDM Clear Clientless SSL VPN configuration from Part 3. Configure the SSL VPN interface connection profile. Configure the VPN encryption prot ocol.All contents are Copy right 1992–2012 Cisco Sy stems, Inc. All rights reserv ed. This document is Cisco Public Inf ormation.Page 2 of 41
CCNA Security Configure the AnyConnect client image to upload. Configure Local AAA user authentication. Configure the client address pool. Configure the DNS server and NA T exempt. Configure AnyConnect client deployment. Verify VPN access and Any Connect client upload. Monitor the AnyConnect SSL VPN connection.Background / ScenarioIn addition to statefull firewall and ot her security features, the ASA can provide both site-to-site and remoteaccess VPN functionality. The ASA provides two main deployment modes that are found in Cisco SSL remot eaccess VPN solutions. Clientless SSL VPN: Clientless, browser-based VP N that lets users establish a secure, remote -accessVPN tunnel to the ASA using a web brows er and built-in SSL to protect VPN traffic. After authentication,users are presented with a portal page and can access specific, predefined internal resources from theportal. Client-Ba sed SSL VPN: Provides full-tunnel SSL VPN connection but requires a VPN client applicationto be installed on the remote host. After aut hentication, users can access any internal resource as if theywere physically on the local network. The ASA supports both SSL and IPsec client-based VPNs.In Part 1 of the lab you will configure the topology and non -ASA devices. In Part 2 you will prepare the ASAfor ADSM access. In Part 3 you will us e the ASDM VPN wizard to configure a clientless SSL remote accessVPN and verify access using a remote PC with a browser. In Part 4 you will configure an A nyConnect clientbased SSL remote access VPN and verify connectivity .Your company has two locations connected to an ISP. Router R1 represents a CPE device managed by theISP. Rout er R2 represents an intermediate Internet router. Rout er R3 connects users at the remot e branchoffice to the ISP. The ASA is an edge CPE security device that connects the internal corporate network andDMZ to the ISP while providing NA T services to inside hosts.Management has asked you to provide VPN access, using the ASA as a VPN concentrator, to teleworkers.They want you to test both the clientless access model, using SSL and a brows er for client access, and theclient-bas ed model using SSL and the Cisco AnyConnect client.Note: The routers used with this lab are Cisco 1841 with Cisco IOS Release 12.4(20)T (Advanced IP image).The switches are Cisco WS-C2960-24TT-L with Cisco IOS Release 12.2(46)SE (C2960-LANBASEK9-Mimage). Other routers, switches, and Cisco IOS versions can be used. However, results and output may vary.The ASA used with this lab is a Cisco model 5510 with four FastEthernet routed interfaces, running OSversion 8.4(2) and ASDM version 6.4(5), and comes with a Base license that allows a maximum of 50 VLA Ns.Note: Make sure that the routers and switches have been erased and have no startup configurations.Required Resources 3 rout ers (Cisco 1841 with Cisco IOS Release 12.4(20)T1 or comparable) 3 switches (Cisco 2960 or comparable) 1 ASA 5510 (OS version 8. 4(2) and ASDM version 6.4(5) and Base license or comparable) PC-A: Windows XP, Vista, or Windows 7 with CCP, PuTTy SSH client (Web server optional) PC-B: Windows XP, Vista, or Windows 7 with PuTTy SSH client and Java 6 (ASDM loaded on the PCis optional) PC-C: Windows XP, Vista, or Windows 7 with Internet Explorer, CCP, PuTTy SSH clientAll contents are Copy right 1992–2012 Cisco Sy stems, Inc. All rights reserv ed. This document is Cisco Public Inf ormation.Page 3 of 41
CCNA Security Serial and Ethernet cables as shown in the topology Rollover cables to configure the routers and ASA via the consoleNote: Us e of a browser other than Internet Explorer 7 or newer on remote PC-C may produce resultsdifferent from those shown in this lab. It may be necessary to create an exception when connecting to theASA over the remote access VPN.Part 1: Basic Router/Switch/PC ConfigurationIn Part 1 of this lab, you will set up the net work topology and configure basic settings on the routers suchas interface IP addresses and static routing.Note: Do not configure any ASA settings at this time.Step 1: Cable the network and clear previous device settings.Attach the devices shown in the topology diagram and cable as necessary. Make sure that the rout ersand switches have been erased and have no startup configurations.Step 2: Configure basic settings for routers and switches.a.Configure host names as shown in the topology for each router.b.Configure router int erface IP addresses as shown in the IP Addressing Table.c.Configure a clock rate for routers with a DCE serial cable attached to their serial interface.d.Configure the host name for the switches. Other than host name, the switches can be left in theirdefault configuration state. Configuring the VLAN management IP address for the switches isoptional.Step 3: Configure static routing on the routers.a.Configure a static default route from R1 to R2 and from R3 to R2.R1(config)# ip route 0.0.0.0 0.0.0.0 Serial0/0/0R3(config)# ip route 0.0.0.0 0.0.0.0 Serial0/0/1b.Configure a static route from R2 to the R1 Fa0/0 subnet (connected to ASA interface E0/0) and astatic route from R2 to the R3 LA N.R2(config)# ip route 209.165.200.224 255.255.255.248 Serial0/0/0R2(config)# ip route 172.16.3.0 255.255.255.0 Serial0/0/1Step 4: Enable the HTTP server on R1 and set the enable and vty passwords.a.Enable HTTP access to R1 using the ip http server command in global config mode. Also setthe VTY password to cisco.b.Configure the same settings on R2 and R3. Router R1 is shown here as an example.R1(config)# ip http serverR1(config)# enable password classR1(config)# line vty 0 4R1(config-line)# password ciscoR1(config-line)# loginR1(config)# line con 0All contents are Copy right 1992–2012 Cisco Sy stems, Inc. All rights reserv ed. This document is Cisco Public Inf ormation.Page 4 of 41
CCNA SecurityR1(config-line)# password ciscoR1(config-line)# loginStep 5: Configure PC host IP settings.Configure a static IP address, subnet mask, and default gateway for P C-A, PC-B, and PC-C as shown inthe IP Addressing Table.Step 6: Verify connectivity.Because the ASA is the focal point for the network zones and it has not yet been configured, there will beno connectivity between devices connected to it. However, PC-C should be able to ping the R1 interfaceFa0/0. From PC-C, ping the R1 Fa0/0 IP address (209.165.200.225). If these pings are not successful,troubleshoot the basic device configurations before continuing.Note: If you can ping from PC-C to R1 Fa0/0 you have demonstrated that static routing is configured andfunctioning correctly.Step 7: Save the basic running configuration for each router and switch.Part 2: Accessing the ASA Console and ASDMStep 1: Access the ASA console.a.Accessing the ASA via the console port is the s ame as with a Cisco router or switch. Connect to theASA Console port with a rollover cable.b.Use a terminal emulation program such as TeraTerm or HyperTerminal to access the CLI, and usethe serial port settings of 9600 baud, eight data bits, no parity, one stop bit, and no flow cont rol.c.If prompted to enter Interactive Firewall configuration (Setup mode), answer no.d.Enter privileged mode with the enable command and password (if set). By default the password isblank so you can just press Enter. If the password has been changed to that specified in this lab, thepassword will be cla ss. In addition, the hostname and prompt will be CCNAS-ASA , as shown here.The default ASA hostname and prompt is ciscoasa .CCNAS-ASA enablePassword: class (or press Enter if none set)Step 2: Clear the previous ASA configuration settings.a.Use the write erase command to remove the startup-config file from flash memory.CCNAS-ASA# write eraseErase configuration in flash memory? [confirm][OK]CCNAS-ASA#Note: The IOS command erase startup-config is not supported on the ASA.b.Use the reload command to restart the ASA. This will cause the ASA to come up in CLI Setupmode. If you see the message System config has been modified. Save? [Y]es/[N]o:,respond with “N”.CCNAS-ASA# reloadProceed with reload? [confirm] enter CCNAS-ASA#***All contents are Copy right 1992–2012 Cisco Sy stems, Inc. All rights reserv ed. This document is Cisco Public Inf ormation.Page 5 of 41
CCNA Security*** --- START GRACEFUL SHUTDOWN --Shutting down isakmpShutting down File system****** --- SHUTDOWN NOW --Process shutdown finishedRebooting.CISCO SYSTEMSEmbedded BIOS Version 1.0(12)13 08/28/08 15:50:37.45 output omitted Step 3: Bypass setup mode.When the ASA completes the reload process, it should detect that the startup -config file is missing and gointo Setup mode. If it does not come up in this mode, repeat Step 2.a.When prompted to pre-configure the firewall through interactive prompts (Setup mode), respond with“no.”Pre-configure Firewall now through interactive prompts [yes]?b.noEnter privileged E XE C mode with the enable command. The password should be blank (nopassword) at this point.ciscoasa enablePassword: enter Step 4: Configure the ASA by using the CLI script.In this step you will use the modified running-config from Lab 10E to preconfigure basic settings, thefirewall and DMZ.a.Other than the defaults that the ASA automatically inserts, ensure with the use of the show runcommand that there is no previous configuration in the ASA.b.Enter CLI global configuration mode. When prompted to enable anonymous call -home reporting,respond “no.”ciscoasa# conf tciscoasa(config)#c.Copy and paste the Pre-VPN Configuration Script commands listed below at the ASA global configmode prompt to bring it to the point where you can start configuring the SSL VPNs.d.Observe the messages as the commands are applied to ensure that there are no warnings or errors.If prompted to replace the RSA keypair, respond “ye s.”e.After script commands have been applied, issue the write mem (or copy run start) command tosave the running configuration to the startup configuration and the RSA keys to non-volatile memory.All contents are Copy right 1992–2012 Cisco Sy stems, Inc. All rights reserv ed. This document is Cisco Public Inf ormation.Page 6 of 41
CCNA SecurityLab 10G Pre-VPN Configuration Script:hostname CCNAS-ASA!domain-name ccnasecurity.com!enable password classpasswd cisco!interface Ethernet0/0nameif outsidesecurity-level 0ip address 209.165.200.226 255.255.255.248no shut!interface Ethernet0/1nameif insidesecurity-level 100ip address 192.168.1.1 255.255.255.0no shut!interface Ethernet0/2nameif dmzsecurity-level 70ip address 192.168.2.1 255.255.255.0no shut!object network inside-netsubnet 192.168.1.0 255.255.255.0!object network dmz-serverhost 192.168.2.3!access-list OUTSIDE-DMZ extended permit ip any host 192.168.2.3!object network inside-netnat (inside,outside) dynamic interface!object network dmz-servernat (dmz,outside) static 209.165.200.227!access-group OUTSIDE-DMZ in interface outside!route outside 0.0.0.0 0.0.0.0 209.165.200.225 1!username admin password cisco123!aaa authentication telnet console LOCALaaa authentication ssh console LOCALaaa authentication http console LOCAL!http server enablehttp 192.168.1.0 255.255.255.0 insidessh 192.168.1.0 255.255.255.0 insidetelnet 192.168.1.0 255.255.255.0 insidetelnet timeout 10ssh timeout 10!class-map inspection defaultmatch default-inspection-trafficpolicy-map type inspect dns preset dns mapparametersmessage-length maximum client autoAll contents are Copy right 1992–2012 Cisco Sy stems, Inc. All rights reserv ed. This document is Cisco Public Inf ormation.Page 7 of 41
CCNA Securitymessage-length maximum 512policy-map global policyclass inspection defaultinspect icmp!prompt hostname contextno call-home reporting anonymous!crypto key generate rsa modulus 1024Step 5: Access ASDM.a.Open a browser on P C-B and test HTTPS access to the ASA by entering https://192. 168. 1.1.Note: Be sure to specify the HTTPS prot ocol in the URL.b.After entering the URL above, you should see a security warning about the website sec uritycertificate. Click Continue to thi s website. Click Yes for any other security warnings. At the ASDMwelcome page, click the Run ASDM button. The AS DM-IDM Launcher will display. Login as useradmin with password ci sco123. ASDM will load the current configuration into the GUI.All contents are Copy right 1992–2012 Cisco Sy stems, Inc. All rights reserv ed. This document is Cisco Public Inf ormation.Page 8 of 41
CCNA SecurityPart 3: Configuring Clientless SSL VPN Remote Access Using ASDMStep 1: Review the Remote Access VPN ASDM Assistant.a.From the menu bar, choose the Configuration button and click Remote Access VP N to display theIntroduction screen. From here you can access information on how to create any of the three types ofremot e access VPNs.All contents are Copy right 1992–2012 Cisco Sy stems, Inc. All rights reserv ed. This document is Cisco Public Inf ormation.Page 9 of 41
CCNA Securityb.Click the button Clientless SSL VPN Remote Acce ss (using Web Brow ser) to access the ASDMAssistant. Read through the information provided to get a better understanding of the process forcreating this type of VPN.Step 2: Start the VPN wizard.a.From the AS DM main menu at the top of the browser window, select the Wizards VPN Wizards Clientless SSL VPN wizard. The SSL VPN wizard Clientless SSL VPN Connection screen isdisplayed.b.Review the on-screen text and topology diagram, and then click Next to continue.Step 3: Configure the SSL VPN user interface.a.On the SSL VPN Interface screen, configure ClientlessVP N-Con-Prof as the Connection ProfileName, and specify outside as the interface to which outside users will connect.Note: By default, the ASA will use a self-signed certificate to send to the client for authentication.Optionally, the ASA may be configured to use a third-party certificate that is purchased from a well -knowncertificate authority, such as VeriSign, to connect clients. In the event that a certificate is purchased, itmay be selected in the Digital Certificate drop-down menu.The SSL VPN Interface screen provides links in the Information section. These links identify the URLsthat need to be used for the SSL VPN service access (login) and for Cisco ASDM access (to access theCisco ASDM software).b.Click Next to continue.All contents are Copy right 1992–2012 Cisco Sy stems, Inc. All rights reserv ed. This document is Cisco Public Inf ormation.Page 10 of 41
CCNA SecurityStep 4: Configure AAA user authentication.On the User Authentication screen, click Authenticate using the local user database, enter the us ername VP N-User with a password of remote. Click Add to create the new user and click Next to continue.All contents are Copy right 1992–2012 Cisco Sy stems, Inc. All rights reserv ed. This document is Cisco Public Inf ormation.Page 11 of 41
CCNA SecurityStep 5: Configure the VPN group policy.On the Group Policy screen create a new group policy named ClientlessVPN-Grp-Pol. When configuringa new policy, the policy name cannot contain any spaces. Click Next to continue.Note: By default, the created user group policy will inherit its settings from the DfltGrpPolicy. Thesesettings may be modified aft er the wizard has been completed by navigating to the Configuration Remote Acce ss VPN Clientless SSL VP N Acce ss Group Policies submenu.All contents are Copy right 1992–2012 Cisco Sy stems, Inc. All rights reserv ed. This document is Cisco Public Inf ormation.Page 12 of 41
CCNA SecurityStep 6: Configure the bookmark list (clientless connections only).A bookmark list is a set of URLs that is configured to be used in the clientless SSL VPN web port al. If thereare bookmarks already listed, use the Bookmark List drop-down menu, select the bookmark of choice andclick Next to continue with the SSL VPN wizard. However, there are no configured bookmark lists by defaultand therefore they must be configured by the network administrator.a.From the Clientless Connections Only – Bookmark List screen, click the Manage button to create anHTTP server bookmark in the bookmark list. In the Configure GUI Customization Objects window,click Add to open the Add B ookmark List window. Name the list Web-Server.Note: If the Web-Server bookmark list is shown as available from a previous configuration, you can delete itin ASDM and recreate it.All contents are Copy right 1992–2012 Cisco Sy stems, Inc. All rights reserv ed. This document is Cisco Public Inf ormation.Page 13 of 41
CCNA SecurityAll contents are Copy right 1992–2012 Cisco Sy stems, Inc. All rights reserv ed. This document is Cisco Public Inf ormation.Page 14 of 41
CCNA Securityb.From the Add Bookmark List window, click Add to open the Add Bookmark window. Enter Web-Mailas the Bookmark Title. Enter the server destination IP address or hostname as the URL to be usedwith the bookmark entry. In this example, the internal IP address of the DMZ server is specified. If thisserver has HTTP web services and web mail installed and functional, the outside users will be able toaccess the server from the ASA portal when they connect.All contents are Copy right 1992–2012 Cisco Sy stems, Inc. All rights reserv ed. This document is Cisco Public Inf ormation.Page 15 of 41
CCNA Securityc.When the Bookmark Title and URL are entered, click OK in the Add Bookmark window to return tothe Configure GUI Customization Objects window. Select the desired bookmark and click OK toreturn to the Bookmark List window. Click Next to continue.Step 7: Review the configuration summary and deliver the commands to the ASA.a.The Summary page is displayed next. Verify that the information configured in the SSL VPN wizard iscorrect. You can click the Back button to mak e changes or click Cancel and restart the VPN wizard.b.Click Finish to complet e the process and deliver the commands to the ASA.All contents are Copy right 1992–2012 Cisco Sy stems, Inc. All rights reserv ed. This document is Cisco Public Inf ormation.Page 16 of 41
CCNA SecurityStep 8: Verify the ASDM SSL VPN connection profile.In ASDM choose Configuration Remote Access VPN Clientless SSL VPN Acce ss ConnectionProfiles. From this window the VP N configuration can be verified and edited.All contents are Copy right 1992–2012 Cisco Sy stems, Inc. All rights reserv ed. This document is Cisco Public Inf ormation.Page 17 of 41
CCNA SecurityStep 9: Verify VPN access from the remote host.a.Open the browser on PC-C and ent er the login URL for the SSL VPN into the address field(https://209.165.200.226). Be sure to us e secure HTTP (HTTPS) as SSL is required to connect to theASA. After entering the URL, you should see a security warning about the website security certificate.Click Continue to thi s website. Click Ye s for any other security warnings.b.The Logon window should appear. Enter the previously configured user name VPN-Use r andpassword remote and click Login to continue.All contents are Copy right 1992–2012 Cisco Sy stems, Inc. All rights reserv ed. This document is Cisco Public Inf ormation.Page 18 of 41
CCNA SecurityStep 10: Access the Web Portal window.Once the user authenticates, the ASA SSL Web portal webpage will be displayed listing the variousbookmarks previously assigned to the profile. If the Bookmark points to a valid server IP address orhostname that has HTTP web services installed and functional, the outside user will be able to access theserver from the ASA portal. In this lab the web mail server is not installed.All contents are Copy right 1992–2012 Cisco Sy stems, Inc. All rights reserv ed. This document is Cisco Public Inf ormation.Page 19 of 41
CCNA SecurityStep 11: View the clientless remote user VPN session using ASDM Monitor.While the remote user at PC-C is still logged in and on the ASA portal page, you can view the sessionstatistics using ASDM monitor.From the menu bar, click the Monitoring button and then choose VPN VPN Stati stics Se ssions.Click the Filter By pull-down menu and choose Clientless SSL VPN. You should see the VPN-Usersession logged in from P C-C (172.16.3.3).Note: You may need to click the Refresh button on the menu bar to display the remote user session.All contents are Copy right 1992–2012 Cisco Sy stems, Inc. All rights reserv ed. This document is Cisco Public Inf ormation.Page 20 of 41
CCNA SecurityStep 12: Logout.The user should log out of the web portal window using the Logout button when done (See Step 10).However, the web portal will also time out if there is no activity. In either case a logout window will bedisplayed informing users that for additional security, they should clear the browser cache, delete thedownloaded files, and close the browser window.All contents are Copy right 1992–2012 Cisco Sy stems, Inc. All rights reserv ed. This document is Cisco Public Inf ormation.Page 21 of 41
CCNA SecurityPart 4: Configuring AnyConnect SSL VPN Remote Access Using ASDMStep 1: Clear the ASA configuration and access ASDM.a.Before beginning Part 4 of this lab, use the procedure that is described in Part 2 to remove thecurrent VPN settings, return the ASA to its base configuration, and verify ASDM access.b.Open a browser on P C-B and test the HTTPS access to the ASA by entering https://192.168.1. 1.Note: Be sure to specify the HTTPS prot ocol in the URL.c.After entering the URL above, you should see a security warning about the security certificate of thewebsite. Click Continue to thi s website. The ASDM welcome page will display. Click the RunASDM button. When prompted, login as admin with a password of ci sco123.Step 2: Review the Remote Access VPN ASDM Assistant.a.From the AS DM menu bar, click the Configuration button and choose Remote Acce ss VPN todisplay the Introduction screen. From here you can access information on how to creat e each of thethree types of remote access VPNs that are supported by the ASA.All contents are Copy right 1992–2012 Cisco Sy stems, Inc. All rights reserv ed. This document is Cisco Public Inf ormation.Page 22 of 41
CCNA Securityb.Click the button SSL or IPsec(IKEv2) VPN Remote Acce ss (using Ci sco AnyConnect Client) toaccess the ASDM Assistant. Read through the information provided to get a better understanding ofthe process for creating this type of VPN.Step 3: Start the VPN wizard.a.From the AS DM main menu, choose the Wizards VPN Wizards AnyConnect VPN wizard.b.Review the on-screen text and topology diagram, and then click Next to continue.All contents are Copy right 1992–2012 Cisco Sy stems, Inc. All rights reserv ed. This document is Cisco Public Inf ormation.Page 23 of 41
CCNA SecurityStep 4: Configure the connection profile.On the Connection Profile Identification screen, enter AnyC-SSL-VP N-Con-Prof as the ConnectionProfile Name and specify the outside interfac e as the VPN Access Interface. Click Next to continue.All contents are Copy right 1992–2012 Cisco Sy stems, Inc. All rights reserv ed. This document is Cisco Public Inf ormation.Page 24 of 41
CCNA SecurityStep 5: Specify the VPN encryption protocol.On the VPN Protocols screen, unc heck the IPsec protocol and leave the SSL check box checked. Do notspecify a device certificate. Click Next to continue.Step 6: Specify the client image to upload to AnyConnect users.a.On the Client Images screen, click Add to specify the AnyConnect client image filename. In the AddAnyConnect Client Image window, click the Brow se Flash button.All contents are Copy right 1992–2012 Cisco Sy stems, Inc. All rights reserv ed. This document is Cisco Public Inf ormation.Page 25 of 41
CCNA Securityb.From the Brows e Flash window, select the AnyConnect package file for Windows. Click OK to ret urnto the AnyConnect Client Images window and then click OK again. On the Client Images screen, clickNext to continue.All contents are Copy right 1992–2012 Cisco Sy stems, Inc. All rights reserv ed. This document is Cisco Public Inf ormation.Page 26 of 41
CCNA SecurityStep 7: Configure AAA local authentication.a.On the Authentication Methods screen, ensure that the AAA Server Group is specified as LOCAL.b.Enter a new user named VPN-User with a password of remote. Click Add to create the new user.Click Next to continue.Step 8: Configure the client address assignment.a.On the Client Address Assignment screen, click New to create an IP v4 address pool named AnyCVPN-Client-Pool. Enter a starting IP address of 192. 168. 1.33, an ending IP address of 192.168.1. 62and subnet mask of 255. 255.255.224. Click OK to close the Add IP Pool window.b.Click Next to continue.All contents are Copy right 1992–2012 Cisco Sy stems, Inc. All rights reserv ed. This document is Cisco Public Inf ormation.Page 27 of 41
CCNA SecurityStep 9: Configure network name resolution.On the Network Name Resolution Servers screen, enter the IP address of a DNS server. Leave thecurrent domain name as ccnasecurity.com. Click Next to continue.All contents are Copy right 1992–2012 Cisco Sy stems, Inc. All rights reserv ed. This document is Cisco Public Inf ormation.Page 28 of 41
CCNA SecurityStep 10: Exempt address translation for VPN traffic.a.On the NA T Exempt screen, select the checkbox for Exempt VPN traffic from network addresstranslation.b.Leave the default entries for the Inside Interfac e (inside) and the Local Network (any ) as they are.Click Next to continue.All contents are Copy right 1992–2012 Cisco Sy stems, Inc. All rights reserv ed. This document is Cisco Public Inf ormation.Page 29 of 41
CCNA SecurityStep 11: AnyConnect client deployment.On the AnyConnect Client Deployment screen, read the text describing the options and then click Next tocontinue.All contents are Copy right 1992–2012 Cisco Sy stems, Inc. All rights reserv ed. This document is Cisco Public Inf ormation.Page 30 of 41
CCNA SecurityStep 12: Review the Summary screen and apply the configuration to the ASA.On the Summary screen, review the configuration description and then click Finish to send thecommands to the ASA.All contents are Copy right 1992–2012 Cisco Sy stems, Inc. All rights reserv ed. This document is Cisco Public Inf ormation.Page 31 of 41
CCNA SecurityStep 13: Verify the AnyConnect client profile.After the configuration is delivered to the ASA, the AnyConnect Connection Profiles screen is displayed.All contents are Copy right 1992–2012 Cisco Sy stems, Inc. All rights reserv ed. This document is Cisco Public Inf ormation.Page 32 of 41
CCNA SecurityStep 14: Log in from the remote host.Initially you will establish a clientless SSL VPN connection to the ASA in order to download theAnyConnect client software.Open a web browser on PC-C and ent er the login URL https://209.165.200.226 for the SSL VPN into theaddress field. Because SSL is required to connect to the AS A, be sure to use secure HTTP (HTTPS).After entering the URL, you should see a security warning about the website security certificate. ClickContinue to thi s website. Click Yes for any other security warnings. Enter the previously createdusername VPN-User with password remote and click Login to continue.All contents are Copy right 1992–2012 Cisco Sy stems, Inc. All rights reserv ed. This document is Cisco Public Inf ormation.Page 33 of 41
CCNA SecurityStep 15: Accept the security certificate (if required).The ASA may request confirmation that this is a trusted site. If requested, then click Yes to proceed.Step 16: Perform platform detection (if required).The ASA will begin a software auto-download proc ess consisting of a series of compliance checks for thetarget system. The ASA performs the platform detection by querying the client system in an attempt toidentify the type of client connecting to the security appliance. Based on the plat form that is identified, theproper software package may be auto
VPN and verify access using a remote PC with a browser. In Part 4 you will configure an AnyConnect client-based SSL remote access VPN and verify connectivity. Your company has two locations connected to an ISP. Router R1 represents a CPE device managed by the ISP. Router R2 rep