Transcription
1SETTI N G U P FO R YOU RADV E NTU R EBefore you can start making cool Pythonprograms for your Minecraft world, youneed to set up Minecraft, Python, and a fewother things on your computer. In this chapter,I’ll show you how to install and run all the requiredsoftware. Installing the software and setting up your computer is the hardestpart of this book, so grab an adult or technical friend if you need help. Takeit slow and follow each step closely or things might not work as expected.The original Minecraft development team did us all a favor by makingthe nuts and bolts of the game accessible to the users, allowing us to do suchcool things using Python. The team are constantly adding more cool stuffto the game too, which keeps it fresh, even for those who’ve been playing foryears—but which also makes it hard to stay on top of all the new versions.If you have any issues during setup, see the appendix on page 289 fortroubleshooting help.NOTEFor more information and updates to these instructions, visit the book’s website athttps://www.nostarch.com/programwithminecraft/.
To get started using this book, you have a few options. Depending onwhat kind of computer you have, you can use Minecraft: Java Edition on yourWindows PC or Mac, or you can use Minecraft: Pi Edition on a Raspberry Picomputer. If you’re using a Windows PC, just keep reading. If you’re using aMac, flip to “Setting Up Your Mac” on page 13. If you’re using a RaspberryPi, flip to “Setting Up Your Raspberry Pi” on page 24.Setting Up Your Windows PCYou need to install five things so you can control Minecraft with Python: MinecraftPython 3JavaMinecraft Python APISpigot Minecraft ServerIn this section, I’ll guide you through installing each of these on yourcomputer. Let’s start with Minecraft.Installing MinecraftIf you already own Minecraft and have the Java Edition installed on your PC,skip ahead to “Installing Python” on page 3. If you’re not sure whetheryou have the correct version of Minecraft, follow the steps in this section toinstall the latest version of Minecraft: Java Edition.If you don’t already own the game, you can buy a copy from the officialMinecraft website, https://minecraft.net/. You might need to grab a grown-upto help you with that! Remember to note the username and password youuse when you purchase Minecraft—you’ll need it to log in later. If you’repurchasing Minecraft for the first time, follow these steps.NOTEUse of this book requires the Java Edition of Minecraft, which is available to anyonewho has purchased Minecraft for Windows. These instructions might be slightlydifferent in the future! If you get stuck, check the troubleshooting guide at .3.4.5.Go to https://minecraft.net/ and click the big green Get Minecraft button.When the next page asks “How do you want to play?”, select Computer.At the page that asks “What platform do you prefer?”, select PC.At the page that asks you to select your edition, click Minecraft: JavaEdition.If you’ve already bought Minecraft but still need to download it, clickthe “Download it again” hyperlink; otherwise, click Buy Minecraft.If you’re buying Minecraft for the first time you’ll need to create aMojang account by following the instructions on the site. Minecraft might2Chapter 1
send you an email for you to verify your account, so make sure to use anemail address you can access. Once you’ve verified your account, you’ll needto enter some details to buy the game. You may need an adult to help at thispoint. Next we’ll download and install Minecraft: Java Edition.1.2.3.4.Click the button to download. Once it has downloaded to your computer, you should find a file called Minecraft.msi in your Downloads folder;open it. If a dialog pops up asking whether you want to run this file,click Run. Don’t worry, we know this file is safe!When the Minecraft Setup Wizard opens, click Next until you get theoption to install. Then click Install.You might be asked whether you want to install Minecraft. Of courseyou do! Click Yes. Wait a bit while Minecraft installs. I got a glass ofwater and a cookie while the game installed.After the installation completes, click Finish.Minecraft should now be installed. You know what would be a great idea?Playing Minecraft, of course. Take a few minutes to get it up and running:1.2.3.4.5.To open Minecraft, click the Start Menu (or press the Windows key onyour keyboard), find Minecraft in the list of programs, and click the icon.Minecraft will start up and might install updates.The login window should open next. Enter the username and passwordyou used when you purchased Minecraft and click Log In.Click Play. Minecraft should download a couple more updates beforeopening.Finally, click Single Player4 Create New World. Name your world whatever you want and click Create New World. The world will generate,and you can play to your heart’s content.Have some fun! If you’ve never played Minecraft before, try playingaround for a while, until it gets dark in your Minecraft world. Watch out formonsters! Note that when you use Minecraft with Python, you’ll be using amultiplayer game world, which will be different from this world. We’ll get tothat in “Running Spigot and Creating a Game Profile” on page 7.Back to work! It’s time to install Python. To free your cursor from Minecraft, just press esc on your keyboard. Close Minecraft before continuingthe rest of the installation.Installing PythonPython is the programming language you’ll learn in this book. Let’s installit now.1.2.Go to http://www.python.org/downloads/.Click the button Download Python 3.9.0. (This is the latest version ofPython 3 at the time of this writing, but you might see a later version.Install the most recent version.)Setting Up for Your Adventure3
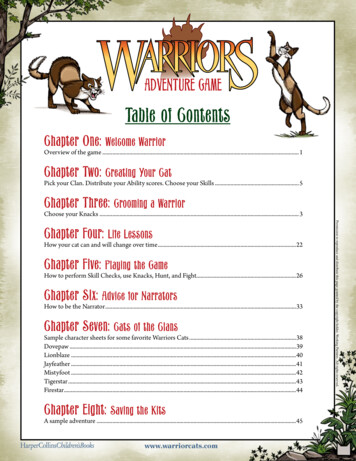
3.4.5.Python should begin to download. If you’re asked to choose betweensaving or opening the file, select Save File.When the installer has downloaded, click it. If a dialog pops up askingwhether you want to run the file, click Run.When the installer opens, select the Add Python 3.9 to PATH checkbox,as shown at the bottom of Figure 1-1. Then click Install Now.Figure 1-1: Make sure you select Add Python 3.9 to PATH.6.7.A dialog might ask whether you want to allow the program to installsoftware on the computer. Click Yes and then wait for Python to install.I stood up to close the window while it was installing, and the installation had finished when I sat back down.Click Close. Python is now installed.Installing JavaNow that Minecraft and Python are both installed, you’ll have to set thingsup so that they can talk to each other. You’ll use a program called Spigot todo that, but in order for Spigot to work, you first need to make sure Java isinstalled on your computer. Let’s do that now.First, check whether Java is already installed:1.2.4Chapter 1Click the Start Menu (or press the Windows key on your keyboard) andenter cmd in the search box. Open the program called cmd.You’ll see a window with a black background and a prompt where youcan type (mine says C:\Users\Craig ). At the prompt, type java -versionand press enter.
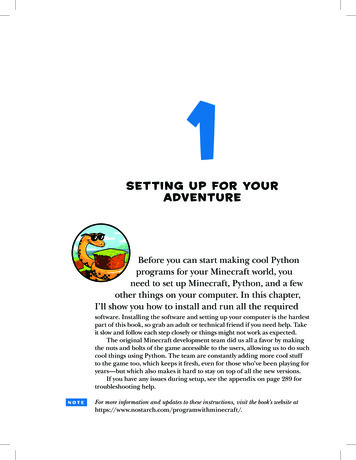
3.4.If you see a message like the one in Figure 1-2 and the Java version(that’s the number after the first period) is 8 or newer, the correct Javaversion is already installed. Skip ahead to “Installing the MinecraftPython API and Spigot” on page 6.If you get a message that says that Java is not recognized or the versionis older than 8, install it using the following instructions.Figure 1-2: After entering the java -version command, I can see that Java is installed.To install Java, follow these steps:1.2.3.4.5.6.7.Go to http://www.java.com/en/download/.Click the Agree and Start Free Download button.When the installer has downloaded, click it. If a dialog pops up askingwhether you want to let the program make changes to your computer,choose Yes.When the installer opens, click Install.This bit is super important! If a page opens that asks if you want toinstall another program, such as the Ask Search App, a Yahoo! searchbar, or something else, uncheck the box so that this extra program willnot install. That’s just another program that you don’t need.You might be asked if you want to set Yahoo! as your homepage. Youprobably don’t. Select Do not update browser settings and click Next.Wait while Java installs. I wrote a short message to a friend before itinstalled. Click Close when it finishes.Now let’s check whether Java has installed properly. If your cmd box isstill open, close it now:1.2.3.Click the Start Menu and enter cmd in the search box. Open the cmdprogram.In the cmd window, type java -version at the prompt and press enter.If you see a message like the one in Figure 1-2, Java installed correctly. Ifyou get an error that says “‘Java’ is not recognized as an internal or external command, operable program or batch file,” Java hasn’t installedproperly. To fix this, try reinstalling Java and running it again. If youstill get this error after reinstalling, go to http://www.java.com/en/download/help/path.xml for more information.Setting Up for Your Adventure5
That’s it! Java is set up and ready to run the Minecraft server! Let’s getto that next.Installing the Minecraft Python APIand SpigotNext you need to install the Minecraft Python API and the Spigot Minecraftserver on your computer.API stands for application programming interface. It lets programs communicate with applications that other people have created. In this case, theMinecraft Python API allows programs that you write in Python to communicate with Minecraft. For example, you could write a Python program thatuses the API to tell Minecraft to make a block in the game or to change theposition of the player.A standard Minecraft single-player game doesn’t support an API.Instead, your programs will interact with a Minecraft server, which allowsthe use of APIs. Minecraft servers are mostly used online so that manypeople can play together in a single game world. But you can also run aserver on your own computer and play by yourself. Both multiplayer andsingle-player Minecraft servers allow you to use an API with Minecraft. Inthis book, you’ll be using a single-player Minecraft server called Spigot onyour computer, which will allow you to interface with the Minecraft PythonAPI, and do all the cool things you will learn to do in this book.Now that you know what an API and a server do, let’s get them installedon your computer. I’ve created a handy download so you can get these setup quickly. Just follow these steps:1.2.3.4.5.6.NOTE6Chapter 1Go to https://www.nostarch.com/programwithminecraft/ and click the “download the setup files for Windows (Minecraft Tools.zip)” link. This will takeyou to a download page at SourceForge. Click the green Download button. If you’re given the option to save or open the file, select Save File.When the file has downloaded, right-click it and choose the Extract.option. You’ll be asked where you want to put the extracted files. Clickthe Browse button and go to your Documents folder. Then click the NewFolder button and call the new folder Minecraft Python. Select this folderand click OK. If prompted to, click Extract to extract the files.Go to the Minecraft Python folder in your Documents folder, where youshould see the extracted files.Open the Minecraft Tools folder. Its contents are shown in Figure 1-3.Double-click the file called Install API. This will open a new windowand install the Minecraft Python API. If you get a warning message,click Run Anyway.When the installation completes, press any key to finish.If you get an error message that says pip is not recognized, that means you didn’tinstall Python correctly. Go back to “Installing Python” on page 3 and reinstallPython. Make sure you select the checkbox that says Add Python 3.9 to PATH.
Figure 1-3: The Minecraft Tools folderThe Minecraft Python API and Minecraft server are now installed. Thefinal step is to run the server. We’ll do that in the next section.Running Spigot and Creating a GameProfileWhen Spigot runs for the first time, it’ll create a Minecraft world for you,but you need to do some setup before you can use it for the first time. You’llneed to set up a profile to make sure Spigot and Minecraft are always running the same version. This step is extremely important; the folks at Mojangare constantly updating the game, so the Minecraft launcher may default toa newer version of Minecraft than your server is set to. Here we’ll make surethe server version matches the Minecraft version.To start Spigot, follow these steps:1.2.3.Go to your Minecraft Python folder and open your Minecraft Tools folder.In the Minecraft Tools folder, double-click the Start Server file. If you geta message asking whether you want to allow access, click Allow.A window should appear and begin to set up the server. If you see a message that says the server is out of date, don’t worry; you do not need toupdate the server for it to work. It might take a couple of minutes for theserver to fully start; during that time, it will print messages to the screenlike “Preparing spawn area” and “Carrot Growth Modifier,” letting youknow all the things it is doing in the background to get Minecraft readyfor you to play it. You’ll know it is finished setting up the server when itsays something like “Done (39.483s)! For help, type ‘help’.”Setting Up for Your Adventure7
4.5.6.Once the setup is finished, scroll to the top of the text in the window.Near the top (around the ninth or tenth line), you should see text saying Starting minecraft server version x.x.x. For example, in Figure 1-4,the server version is 1.16.3.Make a note of the version number shown on your screen, and keep thiswindow open.When you start the server, a second Java server window opens—makesure to keep both these windows open. You can find the version ineither server window.Figure 1-4: Look for the line that says “Starting Minecraft server version ”The version of this server is 1.16.3.Choosing the Right Minecraft VersionNow that you know which server version you’re using, you can set up thegame profile:1.2.3.4.8Chapter 1Open the Minecraft launcher, but don’t click the green PLAY buttonquite yet (make sure you leave the server windows open when you dothis). Make sure you have Minecraft: Java Edition selected in the leftsidebar.At the top of the Minecraft launcher, click the Installations tab. Youshould see a list of versions of Minecraft there (you might have just onelisted). If the version listed does not match your server version, click theNew button to create a new configuration.In the Name field, type Learn to Program with Minecraft.In the Version drop-down menu, select the version of the server thatyou’re using. For example, in Figure 1-5, I’m using version 1.16.3.
5.Click the Create button. Your profile has now been set up. Click thePlay tab at the top of the screen to get back to the launcher’s homescreen (if you’re in a big hurry, you can hover over the “Learn toProgram with Minecraft” line in the list right here, and click thegreen Play button from here).From now on, every time you want to use Minecraft with this book,click the drop-down arrow next to the Minecraft launcher’s PLAY button.Select the Learn to Program with Minecraft option to use the correct version for the server (see Figure 1-6). You can swap back to the latest versionof Minecraft at any time by changing this drop-down menu to the LatestRelease option. Once you have selected the correct version, click PLAY!Figure 1-5: I’ve created a profile called Learn to Program with Minecraft thatuses version 1.16.3.Figure 1-6: Notice that the version I am choosing isnot the latest release (1.16.4), but the version thatmatches my server (1.16.3).Setting Up for Your Adventure9
Creating the WorldNow that you have a profile set up, it’s time to get into your new Minecraftworld:1.2.3.4.From the Minecraft launcher, click the PLAY button, and when thewelcome screen opens, click Multiplayer. You might get a warningabout playing with a third-party server. Feel free to read it if you’d like;but as we mentioned before, when you use the Spigot server with theMinecraft Python API, you will actually be in a single-player server, sofeel confident that you can click Proceed.Click the Add Server button.In the Server Name box, name your server Minecraft Python World, andin the Server Address box, type localhost, as shown in Figure 1-7. Thenclick Done.Double-click Minecraft Python World, and the world created by Spigotwill open.Let’s have a quick look at your new Minecraft world on the Spigotserver. The world is set up in Creative Mode so you can fly around. Doubletap the spacebar to fly. Holding the spacebar will make you fly higher, andholding shift will lower you toward the ground. If you want to stop flying,just double-tap the spacebar again.Figure 1-7: Setting up the serverStarting Over with a New WorldYou might get bored with the world you created on your server, and want tostart over again with a new one. Luckily, this is simple. Creating a brand-newMinecraft world with a server is a little different from creating a new worldin single-player mode. First, you need to disconnect from the current server:1.10Chapter 1Press esc in the game and then click Disconnect to return to yourserver list.
2.Stop your server by entering the command stop, and then when yourcursor is at the command prompt again, type in the command exit andpress enter. Make sure you are closed out of your current game as well!.First we need to make a copy of the server, and then we can create anew world. Follow these instructions:1.2.3.4.5.Go to the Minecraft Python folder. Right-click the Minecraft Tools folderand click Copy.Right-click anywhere in the Minecraft Python folder and click Paste. Thiswill create a copy of the Minecraft Tools folder with the name MinecraftTools - Copy.Right-click the Minecraft Tools - Copy folder and click Rename. I namedthe new folder New World, but you can name yours anything you want.Open the New World folder (or whatever you named it) and then openthe server folder.In the server folder, select the world, world nether, and world the endfolders, as shown in Figure 1-8. To select three folders at once, holddown ctrl and click on each one. Press delete to delete these.Figure 1-8: I’ve highlighted the folders that you need to delete.6.7.Still in the server folder, click the start.bat file. (Note that it’s important to click this start file inside of the server folder, not the originalStart Server file!) This will start the server again and generate a newworld. You might get a window telling you Windows is protecting yourPC, with only a button saying “Don’t run.” If you click the link that says“More info,” it will show another button that says “Run anyway”—goahead and click that button. This is standard behavior from Windowswhen we start a Java application downloaded from the Internet.Now when you open Minecraft and open the Minecraft Python World,you will see a newly generated world.Setting Up for Your Adventure11
Repeat this process to create a new world as many times as you want tocreate as many worlds as you want. If you want to open the first world, youcan still run it by clicking the Start Server file in the Minecraft Tools folder.To delete a world and replace it with a new one, just delete the world,world nether, and world the end folders in the folder of the world you wantto replace.Playing OfflineIf you don’t have access to an Internet connection, you’ll get an error whenyou try to connect to the Minecraft server from your Minecraft game. Bydefault, the Spigot server is set to online mode. You can fix this by changing the server’s properties. First, shut your game of Minecraft down andclose the server window. Then open the Minecraft Python folder, then theMinecraft Tools folder, and then the server folder. Open the server.propertiesfile in a text editor, such as Notepad, and change the online-mode setting(Figure 1-9) from true to false. Save the changes. Then go back to yourMinecraft Tools folder and double-click Start Server to start the server again.Now you’ll be able to play offline. If you’ve already created more than oneworld, keep in mind that whatever changes you make in the server.propertieswill apply only to that folder’s server.Figure 1-9: Change the highlighted setting from true to false.Switching to Survival ModeI’ve set the default game mode for your Minecraft server to Creative Mode.This will make things easier for you when you’re writing and runningPython programs because you won’t have to worry about the player losinghealth, getting hungry, or being attacked.12Chapter 1
But you might want to test some programs in Survival Mode just forfun. It’s easy to switch the server from Creative Mode to Survival Modeand back.To switch the server from Creative Mode to Survival Mode, followthese steps:1.2.Open the Minecraft Tools folder. Inside this folder open the server folder.Remember, you can follow these steps in any of the Minecraft worlds wehave created! For now, find the server.properties file in the current folderand open it with a text editor, such as Notepad.In the file, find the line that says gamemode creative and change it togamemode survival, as shown in Figure 1-10.Figure 1-10: I’ve switched to Survival Mode by setting gamemodeto survival.3.4.Save the file and close it.Start the server by clicking the Start Server file in the Minecraft Toolsfolder. When you join the Minecraft Python World game, it will nowbe in Survival Mode.You can change back to Creative Mode at any time. Just repeat thesesteps, but in step 3, change gamemode survival to gamemode creative in theserver.properties file.Now you’re set up on your PC! Next let’s meet IDLE, which is whereyou’ll be writing your code. Skip ahead to “Getting to Know IDLE” onpage 25.Setting Up Your MacYou need to install five things so you can control Minecraft with Python: Minecraft: Java EditionPython 3Java Development KitSetting Up for Your Adventure13
Minecraft Python APISpigot Minecraft ServerIn this section, I’ll guide you through installing each of these on yourcomputer. Let’s start with Minecraft.Installing MinecraftIf you already own Minecraft: Java Edition and have the latest version installedon your Mac, skip ahead to “Installing Python” on page 16. If you’re notsure whether you have the correct version of Minecraft, follow the steps inthis section to install the latest version of Minecraft: Java Edition.If you don’t already own the game, you can buy a copy from the officialMinecraft website, https://minecraft.net/. You might need to grab a grown-upto help you with that! Remember to note the username and password youuse when you purchase Minecraft—you’ll need it to log in later. If you’repurchasing Minecraft for the first time, follow these steps.NOTEUse of this book requires the Java Edition of Minecraft, which is available to anyonewho has purchased Minecraft for Windows. These installation steps change sometimes, so might be slightly different in the future! If you get stuck, check the troubleshooting guide at .3.4.5.6.Go to https://minecraft.net/ and click the big green Get Minecraft button.When the next page asks “How do you want to play?”, select Computer.If the next page asks “What platform do you prefer?”, select Mac.At the page that asks you to select your edition, click Minecraft: JavaEdition.If you’ve already bought Minecraft but still need to download it, clickthe “Download it again” hyperlink; otherwise, click Buy Minecraft.When the site asks you to select your edition, click Minecraft: JavaEdition.If you’re buying Minecraft for the first time you’ll need to create aMojang account by following the instructions on the site. Minecraft mightsend you an email for you to verify your account, so make sure to use anemail address you can access. Once you’ve verified your account, you’llneed to enter some details to buy the game. You may need an adult to helpat this point. Find the “Download for MacOS” link (it might be under the“Need a different flavor?” heading) and click it.7.14Chapter 1Wait for the file Minecraft.dmg to download (I looked out the windowfor a moment) and then open it. When the window pops up, drag theMinecraft icon to the Applications folder as shown in Figure 1-11.
Figure 1-11: Drag the Minecraft icon intothe Applications folder to install it.Minecraft should now be installed. When the computer indicates thatthe installation is complete, you can close the installer window and eject theinstaller. Do this by dragging the icon that looks like a white disc drive intothe trash.You know what would be a great idea? Playing Minecraft, of course.Take a few minutes to get it up and running:1.2.3.To open Minecraft, click the Finder icon on the Dock to open the filebrowser.In the sidebar, click Applications.Find Minecraft in the Applications folder as shown in Figure 1-12.Double-click it and select Open.Figure 1-12: Find Minecraft in the Applications folder.4.5.6.You might be asked whether you want to open Minecraft, because it wasdownloaded from the Internet. Click Open.Minecraft should start up and might install updates.The login window should open next. Enter the username and passwordyou used when you purchased Minecraft and click Log In.Setting Up for Your Adventure15
7.8.Click Play. Minecraft should download a couple more updates, thenopen.Finally, click Single Player4 Create New World. Name your world whatever you want and click Create New World. The world will generate,and you can play to your heart’s content.Have some fun! If you’ve never played Minecraft before, try playingaround for a while, until it gets dark in your Minecraft world. Watch out formonsters! Note that when you use Minecraft with Python, you’ll be using amultiplayer game world, which will be different from this world. We’ll get tothat in “Running Spigot and Creating a Game Profile” on page 19.Back to work! It’s time to install Python. To free your cursor from Minecraft, just press esc on your keyboard. Close Minecraft before continuingthe rest of the installation.Installing PythonPython is the programming language you’ll learn in this book. Let’s installit now.1.2.3.4.5.Go to https://www.python.org/downloads/mac-osx/. Mouse over theDownloads tab, find the button for Python 3.6.2 (or whatever thelatest version of Python is), and click it. If you are prompted to saveor open the file, select Save File. Python will begin to download.When the installer has downloaded, click it.When the installer opens, click Continue until you get to the screenwhere you’re asked to agree to the terms of the software license agreement. Click Agree.If prompted to, click Continue one more time, then click Install, enteryour admin password, and then wait for Python to install. I checked theweather forecast while I waited.Click Close. Python is now installed.Installing JavaNow that Minecraft and Python are both installed, you’ll have to set thingsup so that they can talk to each other. You’ll use a program called Spigotto do that, but for Spigot to work, you first need to install the latest JavaDevelopment Kit (JDK) on your computer. Let’s do that now:1.2.16Chapter 1Go to k8-downloads.htmland scroll down to the list of downloads titled Java SE Development Kit8u271. Scroll down the list until you find the macOS x64 installer andclick the download link in that row. At the time of writing, the file wascalled jdk-8u271-macosx-x64.dmg. If you don’t already have an Oracleaccount, you might be prompted to create a new, free account.Select the Accept License Agreement radio button (the small circle)and then click the download file listed for Mac OS X.
3.4.5.When the installer has downloaded, click it.When the installer opens, double-click the Install icon. Click Continueand Install, and when asked for your password, enter it.Wait for Java to install. Click Close when it finishes.Now let’s test whether the JDK has installed properly:1.2.Open System Preferences (the icon that looks like a gear).You should see a Java icon under System Preferences, as shown inFigure 1-13.Figure 1-13: Java is installed.That’s it! Java is set up and ready to run the Minecraft sever! Let’s get tothat next.Installing the Minecraft Python APIand SpigotNext you need to install the Minecraft Python API and the Minecraft serveron your computer.API stands for application programming interface. It lets programs communicate with applications that other people have created. In this case, theMinecraft Python API allows programs that you write in Python to communicate with Minecraft. For example, you could write a Python program thatuses the API to tell Minecraft to make a block in the game or to change theposition of the player.Setting Up for Your Adventure17
A standard Minecraft single-player game does not support an API.Instead, your programs will interact with a Minecraft server, which allows theuse of APIs. Minecraft servers are mostly used online so that many peoplecan play together in a single game world. You can also run a server on yourown computer and play by yourself. Both multiplayer and single-player Minecraft servers allow you to use an API with Minecraft. In this book, you’ll beusing a single-player Minecraft server called Spigot on your computer.Now that you know what an API and a server do, let’s get them installedon your computer. I’ve created a handy download so you can get these setup quickly. Just follow these steps:1.2.3.4.5.6.7.Go to https://www.nostarch.com/programwithminecraft/ and click the“download the setup files for Mac OS (MinecraftTools.zip)” link. This willtake you to a download page at SourceForge. Click the green Downloadbutton. If you’re given the option to save or open the file, select Save.When the file ha
single-player Minecraft servers allow you to use an API with Minecraft. In this book, you’ll be using a single-player Minecraft server called Spigot on your computer, which will allow you to interface with the