Transcription
Official Guide:MAINTAINING & CLEANING SURGICAL INSTRUMENTS813-889-9614www.sharn.com
Official Guide:MAINTAINING & CLEANING SURGICAL INSTRUMENTSTable of ContentsContact Sharn813-889-9614Email: mailbox@sharn.com18Bone Cutter Inspection3Causes of Corrosion, Staining, Pitting and Marking4Cleaning and Sterilization24Customer Service2Enemies of Surgical Instruments15Hemostat Inspection6Instrument Lubrication7Instrument Staining8Instrument Stringers, Repair Tags, Tip Protectors9Instrument Marking/ Identification Tape1Introduction, Proper Care of Instuments17Laminectomy and Cervical Rongeur Inspection19 – 23Lap Instrument Inspection, Testing, and Cleaning12Needleholder Inspection14Retractor Inspection10Stainless Steel Instrument Brush Study11Scissor Testing and Inspection13Suction Device Inspection16Tissue and Dressing Forcep Inspection5–6Ultrasonic Cleaningwww.sharn.com4517 George Road Suite 200Tampa, FL 33634i
Official Guide:MAINTAINING & CLEANING SURGICAL INSTRUMENTSAbout This GuideAs a medical professional, you want to ensure the utmost qualityand integrity of your surgical instruments at all times. You also wantto protect your considerable investment in these high-grade medicaldevices.The cost of replacing surgical instruments is far greater than the costof maintaining them. For this reason, a comprehensive maintenanceprogram is extremely important. This guide provided by Sharn willhelp.Proper Care and Scheduled PreventativeMaintenanceProper care of surgical instruments begins with proper cleaning.This guide discusses proper washing, cleaning and sterilization ofmany types of surgical instruments. Proper care also meansmaintenance of German-made instruments on a regular basis,consisting of sharpening and restoration. A general rule of thumbfor busy O.R.’s is to schedule maintenance quarterly. Instrumentsthat may require this maintenance include: scissors, needleholders,bone cutters, hemostats, osteotomes, rongeurs, chisels, bonecurettes, knives and punches. German-made surgical instrumentsare designed to be re-sharpened and restored. Performing thismaintenance will allow the instruments to last for many years andperform flawlessly.1
Official Guide:MAINTAINING & CLEANING SURGICAL INSTRUMENTSThe Look and Feel of New InstrumentsStained and pitted instrumentsMost professionals will recognize that new instruments feel different.New instruments tend to be harder and have a stiffer feel to them.As instruments age, they soften with use and sterilization. Withproper care, these instruments can last a lifetime. It is important torealize that all surgical instruments will experience softening overtime. Remember, new instruments are designed to be stiff at theonset of use. The idea is to use them for their designed purposeand always properly clean, lubricate, and perform preventativemaintenance.Enemies of Surgical InstrumentsIn addition to giving tips on the care and cleaning of instruments,this guide will discuss several enemies of surgical instruments. Waterand moisture of any kind (especially blood, pus, surgical debris andchlorhexidine solutions) are the primary causes of staining andpitting of surgical instruments. Allowing any type of moisture toair-dry on your instruments will cause severe damage. Otherenemies include cold soaking or washing instruments withinappropriate solutions. Examples of these solutions are dish orlaundry soap, bleach, iodine-type solutions, general disinfectants,surgeon’s hand scrub and most importantly, any solution thatcontains chlorhexidine or is a chloride-based solution. Surgicalinstruments are made from 300 and 400 series stainless steel.Despite it’s name, stainless steel definitely stains and it can also rustand become pitted.2
Official Guide:MAINTAINING & CLEANING SURGICAL INSTRUMENTSCauses of Corrosion–Staining, Pitting and MarkingTIP: Extend the drying cycleof your autoclave, especiallywhen a sterilizing tray is fullyloaded. This will help toreduce condensation on theinstruments.Spectra-Soap Order # SS2Surgical residues such as blood, pus and other secretions containchloride ions which lead to corrosion most often appearing as darkspots. If blood is left on the instruments for any period of time (20minutes or longer), the instrument will mark and stain, especially ifthese residues are allowed to dry. Therefore, always clean and dryevery instrument thoroughly after use. Only sterilize a cleaninstrument. The most damaging procedure is to allow dried-onblood to become baked-on stains in the autoclave. Thetemperature of the autoclave (250º–270ºF or 121º–132ºC) willcause chemical reactions that can make the stain permanent.Remember, an autoclave does not clean; it will only sterilize.The cleansers and cleaning agents you use could also be a sourceof corrosion. Strong substances, as well as those containing achemical make-up of acid or alkaline-based solutions, can leadto pitting and staining. Wash instruments with a neutral pH soap(between 7pH - 8pH) that is designed for surgical instruments foroptimal results. Anything with a higher pH may damage theinstrument. Do not use dish soap, Iodine, bleach, cold-soaksolution, chlorhexidine-based solutions, laundry soap or surgeonshand scrub. These products will cause spotting and corrosion.Using an instrument cleaning brush is recommended, especially forjaw serrations, teeth and hinged areas.A Word on Cannula Cleaning Brush Tips Nylon bristle cleaning brushOrder # 45-303NStainless steel bristle brushOrder # 45-303SSDouble-ended nylon bristle brushOrder # M-16Double-Headed brushOrder # 45-202NSBox-lock instrument brushOrder # 45-7000Instrument brushOrder # 45-8000Fan-tipAcrylic-tipScraper-tip(Helps remove baked-on bioburden)3
Official Guide:MAINTAINING & CLEANING SURGICAL INSTRUMENTSCleaning After SurgeryTIP: If more time is needed,keep post-op instrumentsmoist so that blood, tissueand other debris does not dryon the instruments. The bestway to keep your instrumentsmoist is to place a wet towelover the instruments, or useSpectra-Moist available fromSharn. This wetting-agentkeeps blood from drying forhours.The washing process should begin within 20 minutes after surgery,even if sterilization will take place much later. Washing instrumentswithin a few minutes of surgery prevents blood from drying and isyour best defense against corrosion, pitting and staining.Only use approved solutions for washing, disinfecting, andlubricating. Non-approved solutions are any that do not specificallystate, “for surgical instruments” on the label.Approved solutions are specifically designed for surgical instrumentsand the sterilization cycle. Their product labels will state this use.SterilizationSpectra-Moist Order # SS6All surgical instruments must be sterilized prior to surgery to preventinfection. But even sterilization can leave contaminants behind if notproperly cleaned. Sterilize instruments with the ratchets open. Thisallows for better steam penetration. Plus, it prevents the box locks(hinge area) from cracking. If using a pan or tray, we recommendone with perforations. This will also enable better steam penetrationand aids in more effective drying as well. For efficiency, place heavyinstruments at the bottom and lighter, more delicate instruments ontop. If sterilizing in paper or plastic pouches, do not stack poucheson top of one another during sterilization. When possible, pouchesshould be sterilized on their side, leaning against a pack or sterilizerchamber wall.Sterilize with the ratchets open4
Official Guide:MAINTAINING & CLEANING SURGICAL INSTRUMENTSUltrasonic CleaningTIP: A heated tank does notsignificantly improve cleaning.Generally speaking, there is nomeasurable improvement incleaning when heat is applied tothe solution.Spectra-Sonic Order # SS1A method of cleaning that is a necessity is ultrasonic cleaning. Thismethod is the most efficient and effective available today. In fact,ultrasonic cleaning is 16 times more efficient than manual cleaningalone. Place instruments in the ultrasonic unit for 10-15 minutes anduse a neutral pH ultrasonic solution. Here are a few tips forultrasonic cleaning:1) Before placing into the ultrasonic unit, clean instruments of allvisible debris by hand-washing them in a neutral pH soap.2) Before placing instruments into the ultrasonic unit, turn on theultrasonic machine and let it run for 10 minutes to de-gas thesolution. This process removes any gas or air bubbles in thesolution.3) The cleaner the instruments go into the ultrasonic cleaner, thecleaner they will come out.4) As with all types of cleaning, open all instruments so ratchets andbox locks are fully exposed to the cleaning process.5) Make sure instruments have plenty of room. Don’t overload yourultrasonic cleaner.6) Do not mix dissimilar metals (such as aluminum and stainless) inthe same cycle to prevent cross-plating.7) Upon completion of the cycle, remove instruments immediatelyand rinse them.8) Dry instruments thoroughly with a towel, ensuring that nomoisture is left on the instruments.Use distilled water or tap water with a neutral pH ultrasonicsolution to properly fill the tank of your ultrasonic cleaner. Never usea manual soap in the ultrasonic cleaner and always follow properdilution. A neutral pH ultrasonic cleaning solution, when properlymixed, effectively reduces the surface tension of the solution andincreases the ultrasonic cavitation process. The solution shouldbe changed at least daily or sooner if the solution appears dirty ormurky. Only plug an ultrasonic machine into a GFI outlet.UltrasonicCleaning KitOrder # 1235KIT5
Official Guide:MAINTAINING & CLEANING SURGICAL INSTRUMENTSTesting Your Ultrasonic Cleaning MachineTo determine if your machine is working properly, simply put waterand properly mixed ultrasonic solution in the tank. Turn on machineand view the surface of the water. If you see “sonic” waves (photoA) your machine is working. If the surface of the water is totally flat,your machine may have a problem with the transducer(s).(Photo A)The second test is called the foil test. Simply place a small piece ofaluminum foil (photo B) in the bottom of a filled tank and run for 5-8minutes. Remove foil and it should be pelted with small holes anddents (photo C). This verifies that the ultrasonic machine is workingproperly.Lubrication(Photo B)One of the easiest, yet most effective ways to keep instruments inexcellent condition is to lubricate them after every cleaning. Properlubrication keeps the moving parts of instruments from rubbing andscraping, thus preventing dulling and strain to joints and hinges.Moving parts on instruments, such as joints, box locks, ratchets,and screw joints, should be lubricated regularly. Before autoclaving,lubricate all instruments that have moving parts. Only use waterbased surgical lubricants because they are steam penetrable.(Photo C)Spectra-Lube Order # T2Q6
Official Guide:MAINTAINING & CLEANING SURGICAL INSTRUMENTSRust vs. StainsStained instrumentStains can be removed, whereas rust will leave permanent damage.To determine if a brown/orange discoloration is a stain or rust, usethe eraser test. Rub a pencil eraser aggresively over the discoloration. If the discoloration is removed with the eraser and the metalunderneath is smooth and clean, this is a stain. If a pit mark appearsunder the discoloration, this corrosion is rust.Trouble Shooting Stain GuideEraser testBrown/Orange Stains - Most brown/orange stains are not rust. This staincolor is the result of high pH surface deposits caused by any of thefollowing: chlorhexidine usage, improper soaps and detergents, cold-sterilization solution, baked-on blood, soaking in saline or using laundry soap.Dark Brown/Black Stains - Low pH (less than 6) acid stain. May becaused by improper detergents and soaps and/or dried blood.Spectra-Scrub Stain RemoverOrder # SS7Bluish-Black Stains - Reverse plating may occur when two different typesof metals are ultrasonically processed together. For example, stainless steelinstruments processed with chrome instruments may cause a stain colorreaction. Exposure to saline, blood or potassium chloride will cause thisbluish-black stain to occur.Multi-Color Stains - Excessive heat caused by a localized “hot spot” inthe autoclave.Light and Dark Spots - Water spots from allowing instruments to air-dry.With slow evaporation, minerals from water are left on the instrument’ssurface.Nylon bristle cleaning brushOrder # 45-303NStainless steel bristle brushOrder # 45-303SSDouble-ended nylon bristle brushOrder # M-16Bluish-Gray Stains - Cold sterilization solution being used outsidemanufacturer guidelines.Black Stains - Possible exposure to ammonia.Double-Headed brushOrder # 45-202NSStain RemovalBox-lock instrument brushOrder # 45-7000Instrument brushOrder # 45-8000To remove localized staining, dip a moistened cleaning brush inSpectra-Scrub and brush the stain away. Use tap water ordistilled water to rinse, then dry with a towel.7
Official Guide:MAINTAINING & CLEANING SURGICAL INSTRUMENTSInstrument StringersInstrument stringers allow for safer handling of instruments, fasterset-up of sterile field, and more efficient organization of the trayassembly process. Instrument stringers are produced in variouswidths and lengths. The most common width is 2.5 inches and themost common length being 10 inches. After selecting size, there areseveral stringer closure styles to choose from.10” Quick Rack StringerOrder # 10QRRepair TagsThe use of repair tags facilitates precise communication between theoperating room and the sterile processing department. Placing 3 – 5new repair tags in each set prior to sterilization allows the tags tobe available on the sterile field. Once a dull or damaged instrumentis discovered during a procedure, a sterile repair tag can then beplaced on the instrument. This system clearly identifies the defectiveinstrument and prevents unnecessary repairs.Sharpen / Repair TagsOrder # HL-4 (Blue)Order # HL-4R (Red)Assortment of vented tip protectorsTip ProtectorsThe use of tip protectors is a good practice that protects valuableinstruments and scopes from damage. Many times the damage toan instrument from not using tip protectors is not repairable, makingit necessary to replace the instrument. Tip protectors are availablein vented (with holes) or non-vented (without holes) styles. Ventedtip protectors are safer to use due to the fact that they are easier toremove from the instrument, which reduces possible finger injuries.The other advantage of the vented tip protector is the improvedexposure of the device surface to the sterilant. Tip protectors canbe used on the tips of pointed scissors and sharp instruments, skinhooks, distal tips of rigid scopes and to guard the cutting edges ofosteotomes.8
Official Guide:MAINTAINING & CLEANING SURGICAL INSTRUMENTSInstrument Etching / MarkingVibrating engraving devices are not recommended because:1) They scratch off the protective surface of the instrument.2) The box lock area is weakened.3) Engraving creates a “bed” for bacteria.4) Interferes with restoration / refinishing.Acid-base etching is recommended. You may purchase an etchingmachine kit from Sharn to perform your own instrument marking(Order # 256ASC).Complete etching kitOrder # 256ASCInstrument Marking Tape ApplicationHow to properly apply:1) Clean fingers with alcohol to remove oils, grease and dirt.2) Wipe tape site with alcohol to remove any lubricant.3) Tape length should be only enough to wrap 1 to 1½ times aroundinstrument.4) After tape is applied, autoclave instruments. The heat will assistwith the bonding of the tape.5) Tape the shanks of all instruments. Avoid instrument rings.Wrapping tape 1 to 1½ times around will not interfere with theclosing of most scissor tips.Marking tape on instrument shanks9
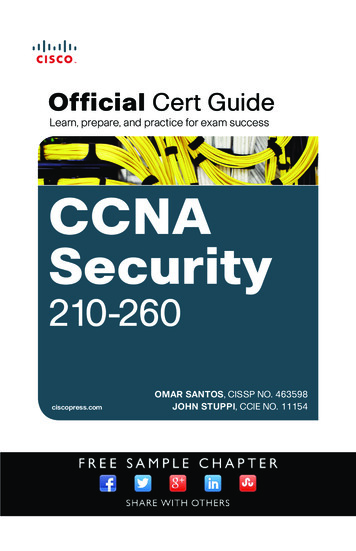
Official Guide:MAINTAINING & CLEANING SURGICAL INSTRUMENTSThe Facts about Sharn’s Stainless SteelInstrument Cleaning BrushesLaboratory Test ResultsBEFORE brushingHemostat Close-UpScissors Close-UpLaboratory Test ResultsAFTER brushingHemostat Close-UpScissors Close-UpIt has been reported for years that the use of stainless steel cleaningbrushes will damage an instrument’s surface or passivation layer. Todispel this myth, we hired an independent testing lab to testinstruments before and after brushing with a Sharn stainless steel,bristled instrument cleaning brush (order # 45-303SS). The testemployed before and after photos, taken with an electronmicroscope at 200X magnification. In addition, we examined themetallurgical properties of the stainless steel before and afterbrushing. During the test, the instrument’s surface was brushed 60times. As you can see from the photos below, the stainless steelbristles did not harm the instrument’s surface, proving thatusing Sharn’s stainless steel-bristled cleaning brushes WILL NOTHARM your stainless surgical instruments.Test:Laboratory:Date conducted:Method:Metallurgical Laboratory StudyAnalytical Services, Inc.2003Scanning Electron MicroscopeEnergy Dispersive SpectroscopyA few words on wire brushes Demonstrates softness of wire bristlesNewAfter several usesThe stainless steel brush is designed to remove baked-on debrisand stains that the nylon brush cannot remove. The design of thesoft stainless steel bristles allows the bristles to bend and removedebris atraumatically. Previously, wire brushes that damaged surgicalinstruments were bone cement brushes. These very stiff bristlesoccasionally caused damage, which led to the negative opinion ofwire brushes. The recommendation is to use a nylon bristle brushfirst. If the debris is not removed, then use a stainless steel bristledbrush. This brush is intended for use on bone files, needleholderjaws, burs, reamers, vascular instrument serrations and stubbornstains.Notice: Insulated, coated, plated, or chrome instruments will bedamaged by using a stainless steel-bristled brush.10
Official Guide:MAINTAINING & CLEANING SURGICAL INSTRUMENTSScissor Testing, Inspection, and Quality AssuranceTest Your Scissors:1 Using right hand thumb andmiddle (or ring) finger, makesure that scissors are heldlike a surgeon.CORRECTVisually inspect cutting blades for burrs, chips or corrosion. Thedistal tips should meet evenly. Inspect sharp tips for bending ordamage.The cutting action of a scissor should be smooth as thescissor closes and the scissor should not grind, “jump, feel loose ortoo tight. Use the guide at left to test scissor sharpness. For scissors longer than 4 ½” use Sharn’s Standard Scissor TestMaterial (Order # 621431 or non-latex, order # 621531). For scissors shorter than 4 ½” length, use Sharn’s Thin ScissorTest Material (Order # 621430 or non-latex, order # 621530).INCORRECT2 Cut through material using½ of blade to cut all the waythrough to the distal tip.3 After several cuts, extractscissors. If scissors do notpinch or grab material,scissors are sharp.Recommended Brushes: 45-202NS, M-16, 45-7000Post-Operative Care4 The final test is how thescissors feel. Scissorsshould open and closesmoothly and should not“jump”, grind, or feel loose.Separate the rings and begin the decontamination process within20 minutes after surgery.The use of spray-on moisturizers such asSpectra-Moist (Order # SS6) is also a very effective way to preventthe blood from drying. Soak the instruments in an enzymatic solution(Spectra-Matic Order # SS9) or place a moist towel saturated withwater over the instruments.11
Official Guide:MAINTAINING & CLEANING SURGICAL INSTRUMENTSNeedleholder Inspection and Quality AssuranceWorn needleholder jaw inserts1. Visually inspect jaws for signs such as partial smoothness orinconsistent wear. If worn schedule for repair.2. Hold needleholder to a light source and close jaws all the way. Ifyou can see light between the jaws, this needleholder is in needof repair.3. Inspect jaws and box locks for cracks.4. Check jaws for burrs.5. The shanks of the instrument should be straight.6. Check ratchet to see if jaws stay closed on last ratchet. Testratchet by opening and closing. With needleholder ratchetsclosed completely all edges should meet evenly.Replacement needleholder jaw insertsAcceptableconditionIn need of replacementNylon bristle cleaning brushOrder # 45-303NStainless steel bristle brushOrder # 45-303SSDouble-ended nylon bristle brushOrder # M-16Double-Headed brushOrder # 45-202NSRecommended Brushes: 45-202NS, 45-303SS, 45-303N, M-16, 45-7000Post-Operative CareBox-lock instrument brushOrder # 45-7000Instrument brushOrder # 45-8000Separate the rings and begin the decontamination process within20 minutes after surgery.The use of spray-on moisturizers such asSpectra-Moist (Order # SS6) is also a very effective way to preventthe blood from drying. Soak the instruments in an enzymatic solution(Spectra-Matic Order # SS9) or place a moist towel saturated withwater over the instruments.12
Official Guide:MAINTAINING & CLEANING SURGICAL INSTRUMENTSSuction Device Inspection and Quality Assurance1. Visually inspect all areas of suction tubes for sharp edges, dentsand trapped surgical debris.2. Inspect shaft for dents as a result of bending.3. Inspect the tubing union of the suction control area for cracksand proper soldering. Verify there is no breakdown of the union.4. Inspect stylette and see that stylette can be inserted smoothlyinto proximal end. Note: Stylette should not be inserted duringsterilization.TIP: Brush of proper sizeshould completely exit suctiontube when cleaning.Recommended cleaning brushes:Baron Suction Tube BrushesOrder #45-90445-905Diameter3 french (1.0 mm)5 french (1.6 mm)Length9.75”9.75”Frazier Suction Tube BrushesOrder r6 french (2.0 mm)7 french (2.3 mm)8 french (2.6 mm)9 french (3.0 mm)10 french (3.3 mm)11 french (3.6 mm)12 french (4.0 �9.75”Cleaning InstructionsCleaning Brush ScaleAvailable from SharnOrder # 45-0001Use a cleaning brush that is the proper size for each suction tube.Always allow brush to enter and completely exit suction channel,and then draw brush back through device.13
Official Guide:MAINTAINING & CLEANING SURGICAL INSTRUMENTSRetractor Inspection and Quality Assurance1. Visually inspect retractor for chipping or flaking of surface.2. Inspect visually and by feel for dents, burrs, bent blades orprongs.3. If retractor has release lever, flick the lever and see that it springsback into place. Lever should open and close smoothly.4. If retractor has a spring and screw area, inspect closely forcracks.5. If retractor is chrome-plated and finish is flaking, removeinstrument from service and replace.Recommended Brushes: 45-303N, 45-303SS, M-16, 45-7000, 45-8000Inspect chrome-plated instruments for flakingInstrument brushOrder # 45-8000Post-Operative CareSeparate the rings and begin the decontamination process within20 minutes after surgery.The use of spray-on moisturizers such asSpectra-Moist (Order # SS6) is also a very effective way to preventthe blood from drying. Soak the instruments in an enzymatic solution(Spectra-Matic Order # SS9) or place a moist towel saturated withwater over the instruments.14
Official Guide:MAINTAINING & CLEANING SURGICAL INSTRUMENTSHemostat Inspection and Quality AssuranceTIP: Ratchets should alwaysbe open when cleaning andsterilizing for the followingreasons:1. Allows for adequate steam/sterilant penetration into boxlock area.1. Visually inspect serrations of jaws and all surfaces.2. Tips of serrated jaws should meet flush, with no overlay.3. Teeth of hemostatic tissue forceps should be present, aligned andfit together perfectly.4. Open and close hemostat, checking for stiffness.5. Carefully inspect box lock area for cracks and debris.6. Test ratchet prior to each assembly of tray. To test if ratchet issprung/ in need of adjustment, close ratchet and gently tap ringsevenly on a hard surface.2. Prevents cracks byreducing stress on boxlock area due to rapidexpansion of the steelduring the sterilizationprocess.Nylon bristle cleaning brushOrder # 45-303NStainless steel bristle brushOrder # 45-303SSDouble-ended nylon bristle brushOrder # M-16Double-Headed brushOrder # 45-202NSBox-lock instrument brushOrder # 45-7000Instrument brushOrder # 45-8000Recommended Brushes: 45-303N, 45-303SS, 45-202NS, M-16, 45-7000Post-Operative CareSeparate the rings and begin the decontamination process within20 minutes after surgery.The use of spray-on moisturizers such asSpectra-Moist (Order # SS6) is also a very effective way to preventthe blood from drying. Soak the instruments in an enzymatic solution(Spectra-Matic Order # SS9) or place a moist towel saturated withwater over the instruments. Be sure to thoroughly rinse and cleanthe box lock area and serrations of the jaws. These are the mostdifficult areas to clean.15
Official Guide:MAINTAINING & CLEANING SURGICAL INSTRUMENTSTissue and Dressing Forcep Inspection andQuality AssuranceNylon bristle cleaning brushOrder # 45-303N1. Visually inspect forceps from tip to tip.2. Make sure all teeth are present.3. Tips should meet evenly, with no overlay.4. Teeth of forceps should be aligned and fit together perfectly without sticking when testing.5. Carefully inspect for cracks and debris.6. Tissue and Dressing Forceps should not “click” and should not“stick” when testing.Stainless steel bristle brushOrder # 45-303SSDouble-ended nylon bristle brushOrder # M-16Double-Headed brushOrder # 45-202NSBox-lock instrument brushOrder # 45-7000Instrument brushOrder # 45-8000Recommended Brushes: 45-303N, 45-303SS, 45-202NS, M-16, 45-7000, 45-8000Post-Operative CareSeparate the rings and begin the decontamination process within20 minutes after surgery. The use of spray-on moisturizers such asSpectra-Moist (Order # SS6) is also a very effective way to preventthe blood from drying. Soak the instruments in anenzymatic solution (Spectra-Matic Order # SS9) or place a moisttowel saturated with water over the instruments.16
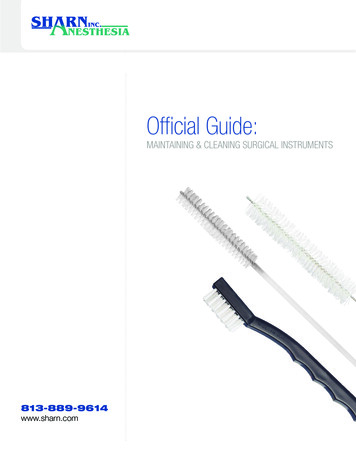
Official Guide:MAINTAINING & CLEANING SURGICAL INSTRUMENTSLaminectomy and Cervical RongeursTIP: Sharpness of a rongeurcan be tested by using astandard 3” x 5” index card.The rongeur should take aclean bite out of the card.Nylon bristle cleaning brushOrder # 45-303NStainless steel bristle brushOrder # 45-303SSDouble-ended nylon bristle brushOrder # M-16Double-Headed brushOrder # 45-202NSBox-lock instrument brushOrder # 45-70001. Closely inspect rongeur at distal tip, where damage most oftenoccurs, significantly reducing the instrument’s ability to cut.2. Inspect channel and interlocking parts for bioburden.3. If rongeur sticks, lubricate or send out for repair evaluation.4. Carefully inspect springs and screws for cracks and debris.Recommended Brushes: M-16, 45-303N, 45-303SS, 45-7000Post-Operative CareBegin the decontamination process within 20 minutes after surgery.The use of spray-on moisturizers such as Spectra-Moist (Order #SS6) is also a very effective way to prevent the blood from drying.Soak the instruments in an enzymatic solution (Spectra-Matic Order # SS9) or place a moist towel saturated with water over theinstruments. Be sure to thoroughly rinse, clean and inspect thechannel/ interlocking areas and cutting portion. These are the mostdifficult areas to clean.Instrument brushOrder # 45-800017
Official Guide:MAINTAINING & CLEANING SURGICAL INSTRUMENTSBone CuttersTIP: Sharpness of a bonecutter can be tested by usinga standard 3” x 5” index card.The bone cutter should cutcleanly through a single thickness of the card.1. Closely inspect bone cutter’s jaws at distal tip, where damagemost often occurs, significantly reducing the instrument’s ability tocut.2. If damage to cutting surface is discovered, schedule theinstrument to be repaired immediately and discontinue use.2. If bone cutter sticks, lubricate or send out for repair.4. Carefully inspect all springs and screws for cracks and debris.TIP: Test Pin Cutters in thecenter portion of the jaw. Thisis the area of the jawthat is designedto cut.Recommended Brushes: 45-303N, 45-303SS, 45-202NS, M-16, 45-8000Post-Operative CareNylon bristle cleaning brushOrder # 45-303NStainless steel bristle brushOrder # 45-303SSDouble-ended nylon bristle brushOrder # M-16Double-Headed brushOrder # 45-202NSBegin the decontamination process within 20 minutes after surgery.The use of spray-on moisturizers such as Spectra-Moist (Order #SS6) is also a very effective way to prevent the blood from drying.Soak the instruments in an enzymatic solution (Spectra-Matic Order # SS9) or place a moist towel saturated with water over theinstruments.Box-lock instrument brushOrder # 45-7000Instrument brushOrder # 45-800018
Official Guide:MAINTAINING & CLEANING SURGICAL INSTRUMENTSLaparoscopic Instrument Inspection, Testing, andCleaningTIP: To test laparoscopicinsulation, visually inspect theentire shaft for any nicks orcuts. Next, pull back on theinsulation. If the insulationslides back, the instrument isin need of reinsulation.19
Official Guide:MAINTAINING & CLEANING SURGICAL INSTRUMENTSLaparoscopic Instrument Inspection, Testing, andCleaningTIP: Laparoscopic tipprotectors help protectvaluable laparoscopicinstruments.Tip protectors are available in several sizesfrom Sharn.Order # LTP-5-8005mm diameter.75” length(20/pkg)Order # LTP-5-1685mm diameter1.68” length(20/pkg)Order # LTP-10-80010mm diameter.75” length(20/pkg)Order # LTP-10-22510mm diameter2.25” length(20/pkg)Order # LTP-VN-750Verres Needle Protector.75” length(50/pkg)20
Official Guide:MAINTAINING & CLEANING SURGICAL INSTRUMENTSLaparoscopic Instrument Inspection, Testing, andCleaningNEW BRUSH DESIGNSShallow Cannula Cleaning BrushesColor-coded hook handlesOrder #45-050545-050745-0510Diameter5 mm7 mm10 mmHandleGreenYellowPinkTo determine if the inner linkage is worn, stretched, or fatigued,wiggle the drive ring back and forth. If the jaw does not move, thelinkage is damaged and is in need of repair. As the ring move
Enemies of Surgical Instruments In addition to giving tips on the care and cleaning of instruments, this guide will discuss several enemies of surgical instruments. Water and moisture of any kind (especially blood, pus, surgical debris and chlorhexidine solutions) are the primary causes of stain