Transcription
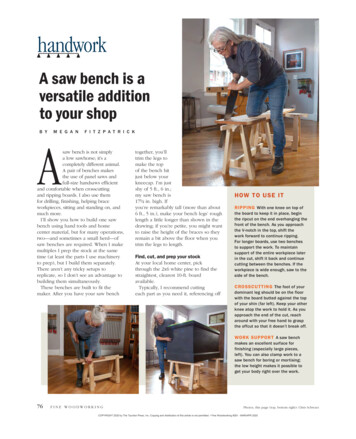
handworkA saw bench is aversatile additionto your shopB YM E G A NF I T Z P A T R I C KAsaw bench is not simplya low sawhorse; it’s acompletely different animal.A pair of benches makesthe use of panel saws andfull-size handsaws efficientand comfortable when crosscuttingand ripping boards. I also use themfor drilling, finishing, helping braceworkpieces, sitting and standing on, andmuch more.I’ll show you how to build one sawbench using hand tools and homecenter material, but for many operations,two—and sometimes a small herd—ofsaw benches are required. When I makemultiples I prep the stock at the sametime (at least the parts I use machineryto prep), but I build them separately.There aren’t any tricky setups toreplicate, so I don’t see an advantage tobuilding them simultaneously.These benches are built to fit themaker. After you have your saw benchtogether, you’lltrim the legs tomake the topof the bench hitjust below yourkneecap. I’m justshy of 5 ft., 6 in.;my saw bench is171 2 in. high. Ifyou’re remarkably tall (more than about6 ft., 5 in.), make your bench legs’ roughlength a little longer than shown in thedrawing; if you’re petite, you might wantto raise the height of the braces so theyremain a bit above the floor when youtrim the legs to length.Find, cut, and prep your stockAt your local home center, pickthrough the 2x6 white pine to find thestraightest, clearest 10-ft. boardavailable.Typically, I recommend cuttingeach part as you need it, referencing offHOW TO USE ITRIPPING With one knee on top ofthe board to keep it in place, beginthe ripcut on the end overhanging thefront of the bench. As you approachthe V-notch in the top, shift thework forward to continue ripping.For longer boards, use two benchesto support the work. To maintainsupport of the entire workpiece laterin the cut, shift it back and continuecutting between the benches. If theworkpiece is wide enough, saw to theside of the bench.CROSSCUTTING The foot of yourdominant leg should be on the floorwith the board butted against the topof your shin (far left). Keep your otherknee atop the work to hold it. As youapproach the end of the cut, reacharound with your free hand to graspthe offcut so that it doesn’t break off.WORK SUPPORT A saw benchmakes an excellent surface forfinishing (especially large pieces,left). You can also clamp work to asaw bench for boring or mortising;the low height makes it possible toget your body right over the work.76FINE WOODWORKINGPhotos, this page (top, bottom right): Chris SchwarzCOPYRIGHT 2020 by The Taunton Press, Inc. Copying and distribution of this article is not permitted. Fine Woodworking #281 - MAR/APR 2020W281HW.indd 761/8/20 8:55 AM
z41 2 in.Trim leg flush withbenchtop afterassembly.21 2 in.1 2 in.5 in. 31 2 in.10 11 2 in.TOP DETAILTopNotch, 1 2 in. deep1 2 in.LEG DETAILNotch, 13 8 in.wide by 11 4 in.deepLong braceShort brace starts 131 2 in.long. Mark final length fromassembled bench.QtyPartThicknessWidthLength1Top13 8 in.5 in.32 in.122 in.1131 2 in.123 in.4Legs2Short braces1Long brace31 8 in.31 8 in.31 8 in.2 2 in.2 2 in.2 2 in.Rabbet,1 2 in. deep5 in.32 in.12 in.Trimmedheight willvary.Leg starts 22 in. long.Trim to final length afterassembly.10 211 2 in.Trim legs to length afterassembly based on heightof user; see p. 84.18 in.23 in.FRONT VIEW133 8 in.SIDE VIEWPhotos, except where noted: Anissa Kapsales; drawings: Dan ThorntonMARCH/APRIL 202077COPYRIGHT 2020 by The Taunton Press, Inc. Copying and distribution of this article is not permitted. Fine Woodworking #281 - MAR/APR 2020W281HW.indd 771/10/20 11:25 AM
handworkcontinuedNotch the legsyour work. However, this project isa rare instance in which you shouldmark out and cut all the pieces tomatch the cut list before starting thejoinery. That’s because no one partrelies on another for its finished size,and because you need the parts cut andready for direct transfer of measurementsfor the joints.An angled half lap in the legs creates the splaywhen the legs are attached to the top.Mark the cheek and shoulder cuts. With abevel gauge set to 10 , mark a line to establishthe cheek. With the gauge still set to 10 , marka line to establish the shoulder.Cut the cheek. Cut a shallow kerf into theend grain, then tilt the tenon saw to follow thevertical cheek line. This will help you to followthe two lines accurately as you saw.Cut the shoulder. Deepen the shoulder lineslightly with a chisel. This small trench helps toposition the saw when starting the cut.Clean up the joint. With the leg in a hand-screw clamp, align the cheek flush to the top of thejaws. Then use the jaws to guide a wide chisel as you clean up the cheek cuts. Because the cheekand shoulder are at a 90 angle, you can use a shoulder plane to clean up the inside corner.78Leg joineryFlatten the least attractive side of eachleg with a jointer plane, then mark itas the true face. Now plane the edges,using a square to check that they areperfectly square to the true face, andshoot the top ends to ensure that they,too, are square to the true face. Theshow face can be cleaned up later ifyou wish. All the joinery layout will beon the true face and on the square endand edges; the show face of the legsdoesn’t affect the joinery.The legs get angled half laps thatfit into notches in the top. To lay outthe half laps, set a marking gauge to1 2 in. and scribe a line off the trueface onto the top of each leg. Nowset the gauge to 11 2 in., and scribe theshoulder line on each leg, registering offthe top.Both the cheeks and shoulders areangled at 10 . Set a bevel gauge to 10 and use a pencil to mark the angles.Now saw the cheeks. Use a chisel,bevel toward the waste, to make a smallV-shaped notch on the corner. Set a finetoothed ripsaw into the notch, then sawdown your layout line.Next, cut the shoulders. Drop a chiselinto your marking gauge line and cut asmall V-shaped trench along the jointline. Secure the leg against a bench hookon your bench, then use the trench toguide a fine crosscut saw as you sawdown to the cheek. Save the offcuts touse later as clamping cauls, and clean upthe cheeks.Top joineryJust as with the legs, with the top thetrue face is the side that won’t show.So true up the less attractive face, markit as true, then square the long edges tothat face.F I N E w o o d w o r k in gCOPYRIGHT 2020 by The Taunton Press, Inc. Copying and distribution of this article is not permitted. Fine Woodworking #281 - MAR/APR 2020W281HW.indd 781/8/20 8:56 AM
FW281p79.indd 1/9/20 9:22 AM pg 79 - (BlacK)(Cyan)(Magenta)(Yellow)44 YearsFeaturing hands-onclasses for all skill levelstaught by nationallyknown craftsmen includingWill NeptuneSteve LattaPeter FollansbeeDarrell PeartMike Pekovichand more!of projects, tips &techniquesto make you a betterwoodworkern!nieistLGet the 2019 Fine WoodworkingMagazine Archive on DVD or USB.Enjoy 279 fully searchableissues of Fine Woodworkingmagazine in one place.ShopTalkLive.comAvailable only atTauntonstore.com 2019 The Taunton PressFW-FH-FC 1/6v ad 14p3 x 28p6FW-FH-FC 1/3v ad 14p3 x 58p6www.fi newoodwor k i n g.comCOPYRIGHT 2020 by The Taunton Press, Inc. Copying and distribution of this article is not permitted. Fine Woodworking #281 - MAR/APR 2020March/April 202079
handworkcontinuedShape the topRipping notch.Use a panel saw orfull-size handsawto cut the V ofthe ripping notch.Because the cutsare at an angle,either a crosscut orrip saw will work.Next, lay out the V-shaped ripping notch on both faces atthe front end of the top. Use a pencil to mark a centerline,then measure 5 in. from the front edge and make a tick mark.Measure and mark 3 4 in. from both edges at the end. Connectthe dots with a straightedge. Use a ripsaw or crosscut saw tocut the notch, then clean up the cuts with a rasp as necessary.Now lay out and cut the notches for the legs. On both longedges, measure 41 2 in. from each end, then register a markingknife against a square to knife in the outside shoulder of eachnotch. Use the leg to locate the other shoulder of the notch.Use a cutting gauge to lay out the notch bottoms, 1 2 in. fromthe edge. Saw the shoulders of each notch, then remove mostof the waste with a coping saw, or pop it out with a chisel. Usea large router plane to clean up the bottoms.Remember those offcuts you saved? Tape them to the top ofthe legs, narrow side down. Brush glue in the notches and onthe cheeks of the legs, then clamp the legs in place, makingsure the top is firmly seated on the shoulders. Thanks to thoseoffcuts, the clamps should close squarely. Because the assemblyis upside down, you can leave it in clamps and move on to thenext few steps while the glue dries.Add the short bracesThe two short braces get lapped onto the inside of the legs, butthe legs don’t get a corresponding notch. True up the two shortbraces, and mark the true face (this time, it is the show face).The top edge of each short brace is located 12 in. from theunderside of the top, so cut a 12-in. spacer block from scrap,and use that to position each brace on the inside of the legs,with the true face against the legs. Clamp the braces to the legs,and mark the braces for length with a pencil.Register a knife against the inside face of the legs to mark outthe shoulders on the braces. After unclamping and crosscuttingthe braces to length, set a cutting gauge to 1 2 in. and mark thecheeks. Cut the cheeks and shoulders, then clean up the cheeksMark the legnotches. Alignthe leg to a knifedline 41 2 in. fromthe end of the top,then scribe alongthe other sideof the leg with aknife. Finish bymarking the depthof the notch oneach face of thetop.Cut the notches. Use a crosscut saw to cut both shoulders of the notch.Use a coping saw and chisel to remove the waste. Then use a routerplane to clean up the bottom, working into the center from each face soas not to blow out the back.80F I N E w o o d w o r k in gCOPYRIGHT 2020 by The Taunton Press, Inc. Copying and distribution of this article is not permitted. Fine Woodworking #281 - MAR/APR 2020W281HW.indd 801/8/20 8:56 AM
FW281p81.indd 1/9/20 9:46 AM pg 81 - (BlacK)(Cyan)(Magenta)(Yellow)Shop 1000’s of Innovative Tools!New & ExclusiveMEGA Flush Trim BitsFeaturing premium materials andunique spiral geometry designedto give you the smoothest finishand longest life in your toughestpattern routing applications!“These mega flush trim bits are themost precision made bits I haveever used (45years experience),well worth their cost!”Watch Video OnlineAs Seen In4-Pc. SetItem # 00-694Fine Woodworking, No. 274INFINITYTOOLS.COM877-USA-BITSMEET & LEARN FROM WOODWORKING’S FINESTFeaturing Keynote SpeakerRoy UnderhillApril 17-19 at the Southbridge Hotel andConference Center, MassachusettsRegister Now to get the Early Bird Discount!FineWoodworkingLive.com 2019 The Taunton Presswww.fi newoodwor k i n g.comCOPYRIGHT 2020 by The Taunton Press, Inc. Copying and distribution of this article is not permitted. Fine Woodworking #281 - MAR/APR 2020March/April 202081
handworkcontinuedAdd the bracesGlue the legs to the top. Use the taperedoffcuts from the leg half-laps as clamping cauls.Clamp the assembly upside down with the topshimmed up so the clamps will apply pressure tothe center of the joint.with a router plane and the shoulderswith a shoulder plane. Glue the shortbraces to the legs, and clamp them inplace while you cut the joinery for thelong brace.Long brace joineryOn the long brace, the true surface is nota face, but the bottom edge. So true upthe least-attractive edge, then true bothfaces 90 to that edge.Center the long brace end-to-end,then clamp it in position on the shortbraces. Use a marking knife to scribe thelocation of the short braces on the trueedge of the long brace. Then remove thelong brace to lay out the notches thatjoin it to the short braces. Remove mostof the waste with a coping saw or chisel;clean up the bottoms with a routerplane.If you want to be fancy, plane chamferson the top edge of the long brace, cutogees on the end, or whatever youchoose. You can also do nothing here.Nail, clean, and levelNail in the same order that you gluedand clamped; legs to top first, shortbraces to legs, and finally long brace to82Mark the short and long braces. With the short braces clamped in place, mark the inside edgewith a knife. Use a pencil to mark the outside edges. Saw them to length, then cut the half-laps.Glue and clamp them in place, and mark and cut the notches in the long brace. Then glue that inplace.F I N E w o o d w o r k in gCOPYRIGHT 2020 by The Taunton Press, Inc. Copying and distribution of this article is not permitted. Fine Woodworking #281 - MAR/APR 2020W281HW.indd 821/8/20 8:57 AM
FW281 adv index p 83.indd 1/10/20 2:35 PM pg 83 - (BlacK)(Cyan)(Magenta)(Yellow)Using Only a Pair of Dividers!Divide Out Dovetail SpacingCalculate Rake and Splay Draw Polygons Measure Angles The SectorAn ancient proportioning toolDistributed Exclusively By:(717) 799-0940redrosereproductions.comFW-FH-FC 1/8 ad 22p1.5 x 13p6FW-FH-FC 1/8 ad 22p1.5 x 13p6Groff & Groff Lumber, Inc.Exceptionally Fine Hard WoodsOrganizeyourWorkshopA specialty lumber company with a large supply ofkiln-driedkilndried & exotic hahardwoods.rdwoods.A large variety of LIVE EDGE SLABS and Matching Flitches, Walnut,Cherry, Curly Cherry, Maple, Oaks, Butternut, Purpleheart, Tiger Maple,Birds Eye Maple, Sycamore, Ash, Paulownia, Sassafras,Quarter Sawn Red and White Oak, Burls, Turning Blocks, & More!Custom sawing available.858 Scotland Road, Quarryville, PA 17566Product# FWW10011050Order online at1-800-342-00010001 1-717-284-00011-717717 284-00017170001 tore.comFW-FH-FC 1/8 ad 22p1.5 x 13p6FW-FH-FC 1/8 ad 22p1.5 x 13p6INDEX TO ADVERTISERSADVERTISERweb addresspageADVERTISERweb addresspageBerkshire ProductsBessey ToolsBriwaxCenter for FurnitureCraftsmanshipConnecticut Valley Schoolof WoodworkingDowelmaxEnvi by EheatEpilog LaserFelder Group USAFine Woodworking ArchivesFine Woodworking GearFine Woodworking 2020 LiveForrest BladesFurniture Instituteof MassachusettsGrex ToolsGroff & Groff Lumber, Inc.Hearne HardwoodsHighland WoodworkingIWF AtlantaInfinity Cutting ToolsInside Passage SchoolKeller Dovetail Jigsberkshireproducts.comp. 21p. 11p. 19www.lignomat.comp. 83briwax.comp. 2Leigh ToolsLignomatMaine Coast WorkshopMaverick AbrasivesOneida Air SystemsOneida Air SystemsOneida Air SystemsPantoRouterPygmy BoatsQuality VakRed Rose ReproductionsRikon ToolsRockler WoodworkingShaper ToolsShellac.netShoptalk Live PodcastSoutheast ToolStop Loss BagsTaunton WorkshopsVacuum Pressing SystemsVarathaneWagner s.commainecoastworkshop.comp. 27www.maverickabrasives.comp. 79oneida-air.comp. 15oneida-air.comp. 17oneida-air.comp. 27pantorouter.comp. 21www.pygmyboats.comp. 85www.qualityvak.comp. 85redrosereproductions.comp. 83www.rikontools.comp. 7rockler.comp. 27www.shapertools.comp. 9www.shellac.netp. 85shoptalklive.comp. 79www.southeasttool.comp. 21www.stoplossbags.comp. 11tauntonworkshops.com/fwp. 85vacupress.comp. 27varathanemasters.comp. 5wagnermeters.comp. 29woodcraft.comp. 29woodpeck.comp. 12-13www.woodschool.orgp. 11schoolofwoodworking.comp. 79dowelmax.comp. 23www.eheat.comp. 81epiloglaser.com/fwwp. 29www.feldergroupusa.comp. 19tauntonstore.comp. 79tauntonstore.comp. 11finewoodworkinglive.comp. 79www.forrestblades.comp. 23furnituremakingclasses.comp. 85www.grextools.comp. 23www.groffslumber.comp. 83www.hearnehardwoods.comp. 79highlandwoodworking.comp. 87www.iwfatlanta.comp. 71www.infinitytools.comp. 81insidepassage.cap. 85www.bestdovetails.comp. 85www.fi newoodwor k i n g.comCOPYRIGHT 2020 by The Taunton Press, Inc. Copying and distribution of this article is not permitted. Fine Woodworking #281 - MAR/APR 2020March/April 202083
handworkcontinuedNail and trim the benchDrill for the nails.Without pilot holes,the wedge shape ofcut nails or squareshanked nails couldsplit the work.Fitzpatrick usesdiamond-head forgednails from ClouterieRivierre, availablefrom leevalley.com, lienielsen.com, or directlyat forgednails.com.short braces. Then, use a flush-cutting saw to trim the legs flushto the top.Now measure from the floor to the bottom of your kneecapand note that number. Shim the saw bench level on a flatsurface, then measure down from the top of the bench to thelevel surface. Subtract your leg-measurement number from thecurrent saw bench height number, and cut a scrap the length ofthe result. Use a scrap and a pencil to mark each leg.You don’t need a finish on the saw bench. It will acquire itsown with age and while finishing other projects.Now go build that second saw bench. Flush the legs to the top. A cheap pull saw works great as a flushcutting saw on large work. Just be sure to take it to your sharpeningstones to remove the set from both sides before using it for this purpose.Megan Fitzpatrick is a writer, teacher, and furniture makerin Cincinnati, Ohio.The right height foryou. Measure from thefloor to the bottom ofyour kneecap. Levelthe saw bench on a flatsurface, shimming thelegs as necessary. Usea scrap and half-pencilto mark around all foursides of each leg, thencut them to length.84F I N E w o o d w o r k in gCOPYRIGHT 2020 by The Taunton Press, Inc. Copying and distribution of this article is not permitted. Fine Woodworking #281 - MAR/APR 2020W281HW.indd 841/8/20 8:57 AM
Get the 2019 Fine Woodworking Magazine Archive on DVD or USB. Enjoy 279 fully searchable issues of Fine Woodworking magazine in one place. Available only at Tauntonstore.com 44 Years of projects, tips & techniques to make you a better woodworker ShopTalkLive.com Listen in!