Transcription
AC1900 Enhanced Smart Dual-Band Gigabit WiFi RouterModel: AC18User Guide1
Copyright Statement 2016 Shenzhen Tenda Technology Co., Ltd. All rights reserved.Tenda is a registered trademark legally held by Shenzhen Tenda Technology Co., Ltd. Otherbrand and product names mentioned herein are trademarks or registered trademarks of theirrespective holders. Copyright of the whole product as integration, including its accessoriesand software, belongs to Shenzhen Tenda Technology Co., Ltd. No part of this publication canbe reproduced, transmitted, transcribed, stored in a retrieval system, or translated into anylanguage in any form or by any means without the prior written permission of ShenzhenTenda Technology Co., Ltd.DisclaimerPictures, images and product specifications herein are for references only. To improve internaldesign, operational function, and/or reliability, Tenda reserves the right to make changes tothe products without obligation to notify any person or organization of such revisions orchanges. Tenda does not assume any liability that may occur due to the use or application ofthe product described herein. Every effort has been made in the preparation of this documentto ensure accuracy of the contents, but all statements, information and recommendations inthis document do not constitute a warranty of any kind, express or implied.I
PrefaceThank you for choosing Tenda! Please read this user guide before you start with AC18.Commonly Used Functions Quickly accessing the internet Setting a WiFi name & password Turning off WiFi signals as scheduled Extending WiFi coverage Controlling bandwidth Upgrading the routerConventionsThe typographical elements that may be found in this document are defined as follows.ItemPresentationExampleCascading Menus System Live UsersParameter and valueBoldSet User Name to Tom.VariableItalicFormat: XX:XX:XX:XX:XX:XXUI controlBoldOn the Policy page, click the OK button.Message“The “Success” message appears.The symbols that may be found in this document are defined as follows.SymbolNoteTipMeaningThis format is used to highlight information of importance orspecial interest. Ignoring this type of note may result inineffective configurations, loss of data or damage to device.This format is used to highlight a procedure that will save time orresources.Acronyms and AbbreviationsAcronym orAbbreviationFull SpellingAPAccess PointDDNSDynamic Domain Name SystemDHCPDynamic Host Configuration ProtocolDLNADigital Living Network AllianceDMZDemilitarized ZoneDNSDomain Name SystemII
Acronym orAbbreviationFull SpellingIPTVInternet Protocol TelevisionISPInternet Service ProviderL2TPLayer 2 Tunneling ProtocolMPPEMicrosoft Point-to-Point EncryptionPPPPoint To Point ProtocolPPPoEPoint-to-Point Protocol over EthernetPPTPPoint to Point Tunneling ProtocolSSIDService Set IdentifierSTBSet Top BoxURLUniform Resource LocatorVLANVirtual Local Area NetworkVPNVirtual Private NetworkWISPWireless Internet Service ProviderWPSWiFi Protected SetupAdditional InformationFor more information, search this product model on our website at http://www.tendacn.com.III
ContentsChapter 1 Get to Know Your Router .- 1 1.1 Overview. - 1 1.2 Specifications . - 1 1.3 Package List . - 1 1.4 Appearance. - 2 -Chapter 2 Quick Setup to Access the Internet .- 6 2.1 Connecting to Your Router . - 6 2.2 Setting Up an Internet Connection . - 7 -Chapter 3 Other Functions . - 16 3.1 Internet Status . - 16 3.2 Internet Settings . - 20 3.3 Wireless Settings . - 22 3.4 Guest Network . - 32 3.5 Sleeping Mode . - 33 3.6 USB Application . - 34 3.7 VPN . - 58 3.8 Advanced Settings . - 67 3.9 System Settings . - 91 -I Appendixes . - 107 I.1 Connecting a Computer to the WiFi Network of the Router . - 107 I.2 Configuring the Computer to Obtain an IP Address Automatically . - 109 I.3 FAQ . - 114 I.4 Technical Support . - 117 I.5 Safety and Emission Statement . - 118 -IV
Chapter 1 Get to Know Your Router1.1 OverviewAC18 is a 1,900 Mbps 802.11ac dual-bandwireless router dedicated to villas and largeapartments. It is powered by a dual-core CPUand DDR3 memory, which ensure faster andmore stable system operation. It is alsoequipped with the Beamforming technology,built-in independent PA/LNA signal transmissionenhancement module, and three externalhigh-gain omnidirectional antennas, featuring arobust wall penetration capability that trulyachieves full dual-band WiFi coverage in villasand large houses. This router supportsadditional functions such as wireless repeating,LED indicator control, WiFi scheduling, USBdevice sharing, cloud management, and VPN server, making it an optimal choice of users whorequire wide network coverage, strong wall penetration performance, and resource sharing.1.2 Specifications Five 1,000 Mbps RJ45 ports and one USB3.0 port 1 GB built-in NAND flash memory and 2 GB built-in DDR3 memory 3 external high-gain dual-band antennas with a coverage area up to 450 m2 Support for 2.4 GHz and 5 GHz frequency bands with a concurrent throughput of up to1,900 Mbps Support for WiFi and LED indicator schedules Support for third-party firmware Operating temperature: 0 C 40 C Operating humidity: 10% 90% (RH), no condensing1.3 Packing List 1900 Mbps 802.11ac dual-band wireless router x 1 Power adapter x 1 CAT5E Ethernet cable x 1 Install guide x 1-1-
1.4 Appearance1.4.1 LED IndicatorsStates of LED indicators of the router that is powered onLED IndicatorNameLED IndicatorDescriptionPWRPower indicatorWANInternet portindicatorLANWPS2.4G5GLAN port indicatorWPS indicator2.4 GHz signalindicator5 GHz signalindicatorStateState DescriptionSolid onThe router has been powered on properly.OffThe router is not powered on or the power supply isfaulty.Solid onThe port is properly connected using an Ethernet cable.BlinkingThe port is transmitting of receiving data.OffThe port is not connected or the connection is faulty.Solid onThe port is properly connected using an Ethernet cable.BlinkingA LAN port is connected.OffThe port is not connected or the connection is faulty.Solid onWPS pairing is successful.BlinkingThe router is performing WPS pairing with anotherdevice.OffWPS pairing is disabled or fails, or it has been over 2minutes since WPS pairing succeeded.Solid onThe 2.4 GHz WiFi function is enabled.BlinkingThe router is transmitting or receiving data over the 2.4GHz WiFi network.OffThe 2.4 GHz WiFi function is disabled.Solid onThe 5 GHz WiFi function is enabled.BlinkingThe router is transmitting or receiving data over the 5GHz WiFi network.-2-
LED IndicatorNameUSB3.0SYSLED IndicatorDescriptionUSB port indicatorSystem indicatorStateState DescriptionOffThe 5 GHz WiFi function is disabled.Solid onThe port has been connected to a USB device.BlinkingThe port is transmitting of receiving data.OffThe port is not connected to a USB device or a USBdevice has been ejected.BlinkingThe system is working properly.1.4.2 Button& PortsDescription of buttons and portsButton/PortDescriptionDC-INIt is the power port to be connected to the power adapter includedin the package.PowerIt is the button used to power on/off the router after the router isconnected to a power supply using the power adapter.WiFi On/OffIt is the button used to enable or disable the WiFi function.WPSIt is the button used to perform WPS pairing between the routerand another device.ResetIt is the button used to restore the factory settings of the router.InternetIt is used to connect to an Ethernet cable with Internetconnectivity.1, 2, and 3They are LAN ports that can be connected to devices using Ethernetcables, such as computers, laptops, and switches.4/IPTVIt is a LAN port by default. After the IPTV function of the router is-3-
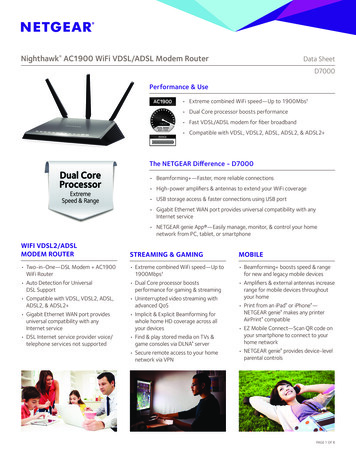
Button/PortDescriptionenabled, it functions as an IPTV port for connecting to an STB orsmart TV.USBIt is a USB3.0 port located on the front panel of the router forconnecting to USB devices. To disconnect a USB device from theUSB port, click Eject on the router web UI and remove the device,instead of removing it directly. Do not connect two or more devicesto the USB port using a USB hub. Otherwise, the devices may bedamaged. You are not recommended to recharge the battery ofyour phone using the USB port.1.4.3 Label on the Bottom(1)(2)(3)(4) (1) Default domain name and IP address of the router. You can use the domain name orIP address to access the router web UI. (2) Default 2.4 GHz WiFi name (SSID) of the router. (3) Default WiFi password of the router. It is required when you connect to the WiFinetwork of the router for the first time. (4) PIN that may be required by a wireless client, such as a smart phone, when the clientconnected to the router using the WPS function.1.4.4 Label on the Top(1)(2) (1) Default 2.4 GHz WiFi name (SSID) of the router. The default 5 GHz WiFi name (SSID) isTenda XXXXXX 5G.-4-
(2) Default WiFi password of the router. It is required when you connect to the WiFinetwork of the router for the first time.-5-
Chapter 2 Quick Setup to Access the InternetTo access the internet, you need at least two steps:Step 1 Connect to your router.Step 2 Set up an internet connection.---End2.1 Connecting to Your Router2.1.1 Connecting to Your Router Through WiFiPerform the following procedure:Step 1 Connect the Internet port using any of the methods shown in the following figure dependingon your internet connection means.Step 2 Use the power adapter to connect the router to a power supply.Step 3 Use a wireless device, such as a smart phone or tablet, to search for the WiFi network by theWiFi name of the router and connect to the WiFi network. You can find the default WiFi nameand password on the label on the top of the router. For details about how to connect to theWiFi network, refer to the appendix.After the wireless device is connected to the router, log in to the router web UI on the wirelessdevice and configure an internet connection. For details, refer to Setting Up an InternetConnection. After changing the WiFi name or password, you need to reconnect the wirelessdevice to the router.-6-
---End2.1.2 Connecting to Your Router Using an Ethernet CablePerform the following procedure:Step 1 Connect the Internet port using any of the methods shown in the following figure dependingon your internet connection means.Step 2 Use the power adapter to connect the router to a power supply.Step 3 Connect your computer to the 1, 2, 3, or 4/IPTV port of the router using an Ethernet cable.After the computer is connected to the router, log in to the router web UI on the computerand configure an internet connection. For details, refer to Setting Up an Internet Connection.---End2.2 Setting Up an Internet ConnectionStep 1 Start a web browser, type tendawifi.com or 192.168.0.1 in the address bar, and press Enteron the keyboard.Step 2 Click Start.The router detects your connection type.-7-
Step 3 According to the detection result, configure related settings. For details about the connectiontype–specific configuration procedures, refer to Setting Up an Internet Connection withPPPoE, Setting Up an Internet Connection with DHCP, and Setting Up an Internet Connectionwith a Static IP Address.-8-
---End2.2.1 Setting Up an Internet Connection with PPPoEStep 1 Select PPPoE, enter your PPPoE user name and password, and click Next.Step 2 Set a WiFi name and password, set a login password, and click Next.NoteThe WiFi password indicates the password for connecting to the WiFi network of the router. The loginpassword indicates the password for logging in to the router web UI. To use the same password for bothpurposes, select Set up the login password to the same as the WiFi password on the Wireless Settingspage of the quick setup wizard. Ensure that your password meets the complexity requirement.Step 3 When the login page appears, use the password you set to log in.-9-
Step 4 Go to the Internet Status page to view the current connection status.If "Connected! You can surf the Internet." is displayed at Internet Settings, the internet isaccessible.---End2.2.2 Setting Up an Internet Connection with DHCPStep 1 Select DHCP and click Next.- 10 -
Step 2 Enter a WiFi name, WiFi password, and login password, and click Next.NoteThe WiFi password indicates the password for connecting to the WiFi network of the router. The loginpassword indicates the password for logging in to the router web UI. To use the same password for bothpurposes, select Set up the login password to the same as the WiFi password on the Wireless Settingspage of the quick setup wizard. Ensure that your password meets the complexity requirement.Step 3 When the login page appears, use the password you set to log in.- 11 -
Step 4 Go to the Internet Status page to view the current connection status. If "Connected! You cansurf the Internet." is displayed at Internet Settings, the internet is accessible.---End2.2.3 Setting Up an Internet Connection with a Static IP AddressStep 1 Select Static IP, enter your static IP address and other related information, and click Next.- 12 -
Step 2 Set a WiFi name and password, set a login password, and click Next.NoteThe WiFi password indicates the password for connecting to the WiFi network of the router. The loginpassword indicates the password for logging in to the router web UI. To use the same password for bothpurposes, select Set up the login password to the same as the WiFi password on the Wireless Settingspage of the quick setup wizard. Ensure that your password meets the complexity requirement.Step 3 When the login page appears, use the password you set to log in.- 13 -
Step 4 Go to the Internet Status page to view the current connection status. If "Connected! You cansurf the Internet." is displayed at Internet Settings, the internet is accessible.NoteIf the internet is inaccessible after the preceding steps, refer to FAQ 5 in Appendix I.3. For the detailed procedure for connecting to your router through WiFi, refer to Appendix 1. If you change the WiFi password of the router when setting up an internet connection, all thewireless connections of the router are disconnected. You can access the internet only afterreconnecting to the router using the new password.---EndTo enable the router to provide more stable WiFi signals and cover a wider area, position yourrouter as follows: Put it on a high place at the center of your house.Keep it close to your wireless devices, such as mobile phones and laptops. Put it at a place with good ventilation. Unfold its antennas by 45 . Do not put it in anenclosure, such as a wire distribution box, shoes cabinet, or metal box.- 14 -
Keep it away from electrical devices, such as ceiling fans and microwave ovens. Keep it away from metal surfaces, such as metal doors or aluminum nails. Keep it away from other materials that may affect your wireless signals, such as glass,mirrors, and fish tanks.- 15 -
Chapter 3 FunctionsThis chapter describes how to configure the functions of this router.3.1 Internet StatusLog in to the router web UI and access the Internet Status page. On this page, you can viewthe network status of the router, set basic WiFi information, add blacklisted devices, and soon.3.1.1 Current Internet Connection StatusThe current internet connection status and Internet Settings are displayed on the lower partof the Internet Status page. If "Connected! You can surf the Internet." is displayed, you canaccess the internet through the router. If another message is displayed, follow the onscreeninstruction to resolve the issue. You can click Internet Settings on this page and configureinternet settings.- 16 -
To configure the settings, select your connection type, set related parameters, and click Save.For the detailed configuration procedure, refer to Internet Settings.3.1.2 WiFi Settings and InformationYou can click Wireless Settings in the upper-right corner of the Internet Status page to accessthe Wireless Settings page.- 17 -
For the detailed configuration procedure, refer to WiFi Name & Password.NoteOnly the wireless devices that can work with 5 GHz signals can find and connect to the 5 GHz network ofthe router. If your WiFi signals are not encrypted, you are recommended to encrypt those signals forhigher WiFi network security.3.1.3 Online Device and BlacklistThe number of online devices and the number of blacklisted devices are displayed in theupper-center part of the Internet Status page. See the following figure.- 18 -
To view the number of online devices of the router, click.When detecting an unknown device, you can click Add to add it to the blacklist. A blacklisteddevice can connect to the router but cannot access the internet through the router. To view blacklisted devices, click.To remove a device from the blacklist, click Remove corresponding to the device. The deviceremoved from the blacklist is added to the online devices list when it is online and can accessthe internet through the router.- 19 -
3.1.4 System StatusYou can click the router icon on the Internet Status page to access the System Status page,which shows the basic information, WAN port status, LAN port status, and WiFi status of therouter.3.2 Internet SettingsThis module enables you to configure internet settings and view internet connection statusand duration.When you use the router for the first time or after you reset the router, the router detectsyour internet connection type. You are recommended to select the detected type and followthe instructions of the quick setup wizard to configure internet settings. If you do notconfigure internet settings using the quick setup wizard, you can configure them on theInternet Settings page.The following table may help you understand your internet connection type. If you are stilluncertain about your internet connection type, consult your ISP.ParameterDescriptionPPPoEIf you directly connect an Ethernet cable with internet connectivityto your computer, you can access the internet only after setting upa dial-up connection on the computer using a user name andpassword provided by your ISP.DHCPIf you directly connect an Ethernet cable with internet connectivityto your computer, you can access the internet without configuringyour computer.Static IP AddressIf you directly connect an Ethernet cable with internet connectivityto your computer, you can access the internet only after settingstatic IP address and other related information on your computer.- 20 -
3.2.1 Setting Up an Internet Connection with PPPoEPerform the following procedure:Step 1 Set Select a connection type to PPPoE.Step 2 Set User name and Password to the user name and password provided by your ISP.Step 3 Click Save.---EndIf the "Connected! You can surf the Internet." message appears after a while, you can accessthe internet through your router.3.2.2 Setting Up an Internet Connection with DHCPPerform the following procedure:Step 1 Set Select a connection type to DHCP.Step 2 Click Save.---End- 21 -
If the "Connected! You can surf the Internet." message appears after a while, you can accessthe internet through your router.3.2.3 Setting Up an Internet Connection with a Static IP AddressPerform the following procedure:Step 1 Set Select a connection type to Static IP.Step 2 Set IP Address, Subnet Mask, Default Gateway, Preferred DNS Server, and Alternate DNSServer to the static IP address and other related information provided by your ISP.Step 3 Click Save.---EndIf the "Connected! You can surf the Internet." message appears after a while, you can accessthe internet through your router.3.3 Wireless SettingsThis module enables you to configure the WiFi function of the router.- 22 -
3.3.1 WiFi Name & PasswordThe router supports both 2.4 GHz and 5 GHz WiFi signals, featuring strong anti-interferenceperformance. This function enables you to configure WiFi names, encryption modes, andpasswords for both frequencies. The following figure shows a configuration example.The following table describes the parameters.Parameter2.4GHz and5GHzDescription2.4GHz specifies whether to enable the router to provide 2.4 GHz WiFisignals.5GHz specifies whether to enable the router to provide 5 GHz WiFi- 23 -
ParameterDescriptionsignals.WiFi NameIt specifies the name of a WiFi network.It specifies the encryption modes supported by the router, including:SecurityMode None: It indicates that a WiFi network is not encrypted and any clientscan access the network. This option is not recommended as it leads tolow network security. WPA-PSK: It indicates that WPA-PSK/AES is adopted to authenticateusers. WPA2-PSK: It indicates that WPA2-PSK/AES is adopted to authenticateusers. WPA/WPA2-PSK: It indicates that WPA-PSK/AES and WPA2-PSK/AESare adopted to authenticate users.PasswordIt specifies the password required when a client access the WiFi networkof the router.HideIt specifies whether to prevent a WiFi name from being detected bywireless devices. If this function is enabled, the corresponding WiFi nameis not broadcast. Therefore, the name is not displayed on the availableWiFi networks list of a wireless device. To connect a wireless device suchas a mobile phone to the WiFi network, you need to manually enter theWiFi name and password of the network on the device.3.3.2 WiFi ScheduleIt specifies whether to enable the WiFi function schedule, which allows you to specify thedowntime of the function. By default, the schedule is disabled. For the configurationprocedure, refer to the following example.Application ScenarioYou want to disable the WiFi function during 23:00 to 7:00 every day for a healthier sleepenvironment.- 24 -
WiFi function downtime:23:00 07:00 every dayIn this period, the WiFi functionof the router is inaccessible towireless devices.ConfigurationEnsure that the router is connected to the internet and the system time of the router issynchronized with the local internet time.Step 1 Choose Wireless Settings WiFi Schedule.The WiFi Schedule page appears.Step 2 Set WiFi Schedule to thestate.Step 3 Set Turn off WiFi during to the downtime. In this example, the downtime is 23:00 07:00.Step 4 Set Repeat to the days to which the downtime is applied. In this example, select Every Day.Step 5 Click Save.- 25 -
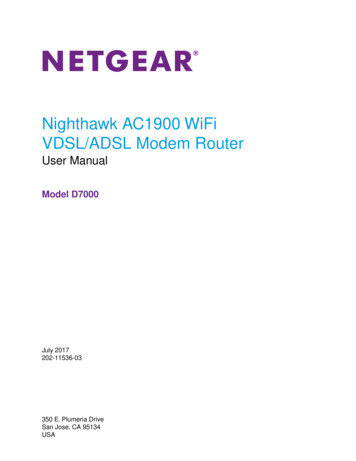
---EndVerificationVerify that the WiFi network is inaccessible during 23:00 to 07:00 every day while accessibleduring the rest of the time.NoteTo enable the WiFi function during the downtime, press the WiFi On/Off button on the back panel of therouter. This button is the preferred means to control the function. Alternatively, you can enable the WiFifunction by disabling the WiFi function schedule on the WiFi Schedule page.3.3.3 Wireless RepeatingThe wireless repeating function enables a wireless router or an AP to function as a wirelessrepeater to extend wireless network coverage. At least two wireless routers are required forimplementing this function. You can use this router to extend wireless network coverage inWISP or Client AP mode.NoteIf wireless repeating is enabled, the Sleeping mode, IPTV function, guest network, WPS function, TendaApp function, and WiFi function schedule become unavailable. For details, refer to the message on therouter web UI.Application ScenarioUser A subscribes to an 8 Mbps broadband service and purchases a wireless router for settingup an LAN with internet connectivity in his 100 square meters apartment, which has threebedrooms, one dining room, one living room, two restrooms, and one kitchen. The router isplaced in the living room. The WiFi signals are strong in the living room and master bedroom,but too poor in the other bedrooms and the restrooms to access the internet.- 26 -
SolutionTo improve internet connectivity, the user can add a Tenda AC18 router and configure thewireless repeating function of the router to extend the WiFi network coverage. That willeliminate blind areas in the apartment, enabling the user to access the internet anywhere inthe apartment.The following figure shows the application scenario.Assume that the router connections shown in the following figure are set up.- 27 -
Before configuring wireless repeating: Ensure that the Internet port of the new router is not connected. Ensure that the original router can access the internet. Record the WiFi name and password of the original router, which are Tenda 2 and12345678 in this example.Enabling the WISP ModeLog in to the web UI of the new router, choose Wireless Settings Wireless Repeating andconfigure the router and verify the configuration as follows: ConfigurationStep 1 Set Wireless Repeating to thestate.Step 2 Set Mode to WISP.Step 3 Select the WiFi name of the original router from the Base Station WiFi Name drop-down listbox. In this example, select Tenda 2.Step 4 Enter the WiFi password of the original router in the Base Station WiFi Password text box. Inthis example, enter 12345678. (If the password is not set on the original router, leave this textbox blank.)Step 5 Click Save.Step 6 Click OK on the dialog box that appears.The settings take effect after the router restarts.---End VerificationAfter the "Connected! You can surf the Internet." message appears on the Internet Statuspage, access the internet through the WiFi network of the new router.- 28 -
NoteIf the LAN IP address of the new router is in the same network segment as that of the original router,an IP conflict occurs. In this case, the new router replaces its LAN IP address with another thatbelongs to another network segment. You can log in to the web UI of the new router directly attendawifi.com. If the upstream router enables the DHCP function, the new router obtains network connectionsettings from the upstream router. If the upstream router disables the DHCP function, you need toconfigure the connection settings manually. In WISP mode, the new router can be connected wirelessly to a hotspot using DHCP or a static IPaddress and access the internet through the hotspot.Enabling the Client AP ModeLog in to the web UI of the new router, choose Wireless Settings Wireless Repeating andconfigure the router and verify the configuration as follows: ConfigurationStep 1 Set Wireless Repeating to thestate.Step 2 Set Mode to Universal Repeater.Step 3 Select the WiFi name of the original router from the Base Station WiFi Name drop-down listbox. In this example, select Tenda 2.Step 4 Enter the WiFi password of the original router in the Base Station WiFi Password text box. Inthis example, enter 12345678. (If the password is not set on the original router, leave this textbox blank.)Step 5 Click Save.Step 6 Click OK on the dialog box that appears.The settings take effect after the router restarts.---End VerificationStep 1 Log in to the web UI of the new router at tendawifi.com.If login fails, check the web UI of the upstream router (original router) for the IP addressassigned to
smart TV. USB It is a USB3.0 port located on the front panel of the router for connecting to USB devices. To disconnect a USB device from the USB port, click Eject on the router web UI and remove the device, instead of removing it directly. Do not connect two or more devices to the USB port using a USB hub. Otherwise, the devices may be damaged.