Transcription
ContentsOverviewFirst StepsPutting Batteries in Your CameraInserting and Removing Memory CardsChoosing a Language for the MenusSetting the Time and DateTaking Your First PhotographDIGITAL CAMERACOOLPIX 950Using the Buttons (A-REC, M-REC)Flash SettingsFocus SettingsUsing the Self-TimerImage Quality and SizeSensitivityExposure ModeUsing the Buttons (PLAY)Reference Manual-1-
The Camera MenusThe A-REC MenuUsing Folders (A-REC, M-REC)LCD BrightnessSound SettingsAuto OffFormatting Memory CardsThe M-REC MenuDigital Zoom (DIGITAL TELE)Black-and-White PhotographyLens Converter Settings (LENS)Making a Panorama—Tips (AE-LOCK)User SettingsRestoring Default SettingsLCD On/OffThe Controls Menu (M-REC)SEQ.XFERThe Playback MenuDeleting Multiple PhotographsUsing Folders (Playback)SlideshowProtecting Photographs from DeletionHiding Photographs During PlaybackPreparing Photographs for PrintingThe Controls Menu (PLAY)ContentsConnectionsConnecting to a Television or VCRViewing Photos on a ComputerCaring for Your CameraCleaningStorageAccessoriesWhat’s in the BoxOptional AccessoriesTroubleshootingGeneral ProblemsError MessagesSpecifications-2-
OverviewTroubleshootingoutlines steps to take when things go wrongThank you for buying a COOLPIX 950. This Reference Manualexplains how to use and care for your COOLPIX 950. It is intended Please read all instructions carefully to get the most from youras a supplement to the Fast Track Guide and Pocket Guide, to which camera.you can refer for guidance on topics not covered here. This manualis composed of the following chapters:First Stepslists the steps involved in setting up your camera and takingphotographsUsing the Buttons (A-REC, M-REC)covers the settings that can be changed using the camera’scontrol buttons and dials: flash, sensitivity, focus, exposurecompensation, exposure mode, and image quality and sizeUsing the Buttons (PLAY)outlines basic playback functions: viewing photographs anddeleting single imagesThe Camera Menusdescribes camera settings that can be accessed from the A-REC,M-REC, and PLAY menusConnectionsdescribes how to use the camera with a computer or televisionCaring for Your Cameraexplains the procedures for cleaning and storing your COOLPIX950Accessoriesidentifies items provided with the camera and available separatelyOverviewNotes on illustrationsThe illustrations in this manual are composites. Photographs taken with theCOOLPIX 950 may differ from those shown here.The illustrations in this manual show the LCD monitor used in the NTSCcompatible model of the COOLPIX 950. Owing to differences in videostandards, the PAL-compatible model will display items in positions slightlydifferent from those shown here.-3-
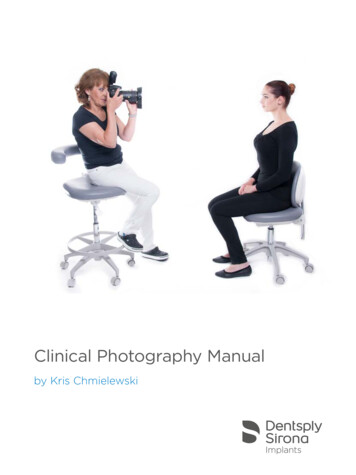
First StepsPutting Batteries in Your CameraThis chapter guides you through the steps you will take afterremoving the camera from the box, from inserting the batteries tomaking your first photographs and playing them back. Before youwill be able to use your camera, you will need to complete thefollowing steps: attach the camera strap (see For Your Safety) insert batteries or connect the AC adapter (sold separately;for information on using the AC adapter, see the documentation provided with the adapter) insert the compact flash-memory card choose the language to be used in the setting and playbackmenus set the camera’s clock-calendar to the current date and time1 Turn the camera offHaving completed these steps, you will be ready to take photographs as described at the end of this chapter.Turn the mode dial to OFF (if the camerais on a tripod, detach the tripod beforeinserting batteries).2 Open the battery cover1Turn the camera upside down and openthe battery chamber by sliding the latch tothe open position, slipping the cover outfrom the camera, and then opening thelid.323 Insert batteriesInsert the batteries with the positive ( )and negative (-) poles aligned as shown inthe diagram at the entrance to the batterychamber.4 Close the battery coverClose the cover and slide it back intoposition, then slide the latch button backto latch the cover.Important! Before inserting batteries or handlingmemory cards, be sure to read the warnings andcautions in For Your Safety.First Steps: Putting Batteries in Your CameraNotes on batteriesThe camera’s clock-calendar is powered by a separate rechargable battery.When you put batteries in your camera for the first time or after a longperiod of storage, wait a few hours for the clock battery to recharge beforeremoving the main batteries. The clock battery will remain charged forsome time after the main batteries have been removed.Photographs stored on the flash-memory card are not affected when thebatteries are removed. All manual-mode settings, with the exceptions ofthe date and language, will however be reset.-4-
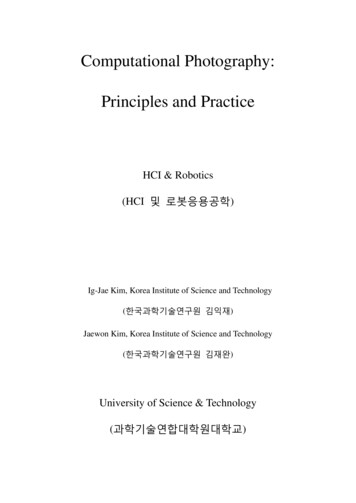
Inserting and Removing Memory CardsChoosing a Language for the Menus1 Turn the camera offThe cameras menus and messages can be displayed in English,German, French, or Japanese. To select a language for the display,follow these steps:Turn the mode dial to OFF.2 Open the card slotTurn the camera upside down (if thecamera is on a tripod, detach it from thetripod first), then open the card slot cover.3 Insert the memory card, or Insert the card as shown at right, sliding itin until it is firmly in place at the back of theslot and the card-release button pops up.Next, fold the card-release button over. remove the memory cardFlip the card-release button up and pushit down until the card can be removed byhand.1 Turn the mode dial to PLAY.2 Press the MENU button to display theplayback menu.P L AY BAC KD E L E T EAUTOF O L D E R SS L I D E S H OWP ROT E C TH I D E I M AG EP R I N T S E TS E T U P3 Using the zoom buttons, highlight the lastitem (SET UP) in the menu and press theshutter-release button (the exact appearance of the menu will depend on thelanguage currently selected; the illustrations at right shows the English menus).4 Use the zoom buttons to highlight the lastitem in the SET UP menu, then press theshutter-release button to display the LANGUAGE menu.0ON30sES E T U PL C D B R I G H TAUTOS O U N DC O N T RO L SAU TO O F FC A R D F O R M ATDAT EL A N G UAG EL A N G UAG EAUTO4 Close the card slot cover5 Select the desired setting from the LAN-About memory cardsMemory cards can be removed from the camera without loss of data whenthe camera is off. Once removed from the camera, cards can be read bya computer equipped with a CompactFlash card reader and photographsprinted on suitably-equipped printers. Cards can also be inserted in a PCcard adapter (sold separately) to be read by any computer with a Type IIPC-card slot.Using the menusIf the menu does not appear when you press the MENU button, press theMONITOR button until the LCD monitor comes on. Items can behighlighted using the zoom buttons and selected using the shutter-releasebutton. To clear a menu from the screen, highlight BK and press theshutter-release button, or press the MENU button until the menu disappears.First Steps: Choosing a Language for the MenusGUAGE menu.DEFJD E U T S C HE N G L I S HF R A N Ç A I S-5-
5 Rotate the command dial to select theSetting the Time and DateWhen you turn on your camera for the first time, you will need toset the time and date as follows:1 Turn the mode dial to PLAY.2 Press the MENU button to display theP L AY BAC KD E L E T EAUTOF O L D E R SS L I D E S H OWP ROT E C TH I D E I M AG EP R I N T S E TS E T U Pplayback menu.3 Using the zoom buttons, highlight SET UPand press the shutter-release button.4 Inthe SET UP menu, use the zoombuttons to highlight DATE and press theshutter-release button to display the DATEmenu.0ON30sES E T U PL C D B R I G H TAUTOS O U N DC O N T RO L SAU TO O F FC A R D F O R M ATDAT EL A N G UAG EUsing the menusIf the menu does not appear when you press the MENU button, press theMONITOR button until the LCD monitor comes on. Items can behighlighted using the zoom buttons and selected using the shutter-releasebutton. To clear a menu from the screen, highlight BK and press theshutter-release button, or press the MENU button until the menu disappears.First Steps: Setting the Time and Dateitem you wish to change, then edit theitem using the zoom-in button (T/ ) toincrease its value or the zoom-out button(W/ ) to decrease its value. After editing, rotate the command dial to move tothe next item or press the shutter-releasebutton. Highlight Y M D and use thezoom buttons to change the order inwhich the year, month, and day are displayed. Pressing the shutter-release button when this item is highlighted sets thetime and date to the specified values.If the date has not been set, a flashing clockicon will appear at upper right in the LCDmonitor when the mode dial is set to A-RECor M-REC. Photographs taken when thisicon appears will have a time stamp of “99/01/01 00:00”; set the time and date asdescribed above before shooting.D AT EY M DAUTO1 9 9 9 . 0 3 . 2 02 3 : 0 5A D J. Z O O M S WSET SHUTTERP1/30The clock batteryThe clock-calendar is powered by a separate, rechargeable battery, whichis charged as necessary when the main batteries are installed. If the camerahas been stored with the main batteries removed for a long period of time,the clock may need to be reset. Once the main batteries have beenreinserted, the clock battery will recharge in several hours, during whichtime the batteries should be left in the camera.-6-
Taking Your First PhotographStep 2—Turn the mode dial to A-RECTo enter automatic recording mode, turn theThis section outlines the basic steps involved in taking a photograph selector dial to A-REC. After a short pausein A-REC mode.while the camera initializes, a beep will soundand current settings will be displayed in theStep 1—Remove the lens capLCD monitor and the control panel.Remove the lens cap as shown below.P 1/125F4.0Lift latch andremove capSleep modeThe LCD monitor turns off automatically if no operations are performedfor a certain period of time (the length of time before the camera enterssleep mode can be set using the AUTO OFF item in the setup menu; see“The Camera Menus: The A-REC Menu,” below). To turn the monitor onagain, half-press the shutter-release button.First Steps: Taking Your First PhotographThe MONITOR buttonThe MONITOR button controls the LCD monitor. Press the MONITORbutton once to hide settings, a second time to turn the monitor off, and athird time to turn the monitor on with settings showing.-7-
Step 3—Check the number of exposures remainingStep 4—Adjust camera settingsThe control panel and LCD monitor show the number of expo- In automatic mode, the user can adjust flash, focus, exposuresures remaining at the current image quality setting.compensation, and image quality and size. The default settings,which produce the best results in most circumstances, are automatic flash, autofocus, no exposure compensation, an image qualityof “normal,” and an image size of “full” (1,600 1,200 pixels).Flash (auto)P 1/125F4.0Number of exposures remainingWhen this number reaches zero, you will need to insert a newImage quality (normal)memory card or delete items already in memory before you willP 1/125 F4.0be able to take more photographs. It may be possible to recordThese settings allow the camera to set focus automatically at anymore photographs at a different image quality setting.distance greater than 30 cm (one foot). The camera measures theavailable light and adjusts shutter speed and aperture accordingly,firing the flash to provide additional light as necessary.Step 5—Compose a photographInformation on composing photographs may be found on pages 2–4 of the Pocket Guide.First Steps: Taking Your First Photograph-8-
Step 6—Half-press the shutter-release buttonWhen lighting is poor, the flash lamp next to the viewfinder willglow red. If the flash is off, set the flash to “Auto” for a photo inwhich objects within the range of the flash are fully exposed. If thered flash lamp blinks, the flash is charging, and you will need to takeyour finger off the shutter-release button and wait a few secondsbefore taking a photograph.Step 7—Take a photographTo take a photograph, press the shutter-release button all the waydown.When the shutter-release button is pressed halfway, the camerawill automatically adjust focus according to the distance to thesubject. If the focus operation is successful, the green autofocuslamp next to the viewfinder will glow. The focus setting will remainunchanged as long as the shutter button is half-pressed (see thesection “Focus Lock” in the Fast Track Guide). The zoom ratiocannot be changed while focus lock is in effect.If the camera is unable to determine the distance to the subject, theautofocus lamp will blink rapidly. In this case you can use focus lockto focus on another object at the same distance, then recomposeyour photograph (see the Pocket Guide, page 4, for more information on autofocus).NoteWhen using the viewfinder at ranges of less than 90 cm (oneyard), frame your photographs using the smaller of the twoframes in the viewfinder display (the area shaded in purple in theillustration on the right).First Steps: Taking Your First PhotographNoteIf the LCD monitor is off, you will not be able to take photographs whenthe autofocus lamp is flashing. When the monitor is on, however,photographs can be taken even if the camera is not properly focused.Check focus in the LCD monitor before pressing the shutter-releasebutton all the way down.-9-
Step 8—Check the resultsStep 9—Turn the camera offAfter a photograph has been taken, theautofocus lamp will blink and an hourglassicon ( ) will be displayed in the LCD monitorwhile the photograph is recorded. Beforethe photograph is transferred to the memorycard, it will be displayed briefly in the LCDmonitor.When you have finished using the camera, be sure to turn themode dial to OFF. To avoid wasting batteries, check that the camera is off beforeIf the photo was taken at an image-size setting of “full,” you can putting it away.button to pause the display for ten seconds; shooting Step 10—Replace the lens cappress thecan be resumed by pressing the button again. If you are not pleasedwith the photograph, you can delete it before it is transferred to Replace the lens cap as shown below.memory by pressing thebutton. TheD E L E T Edialog at right will be displayed; using theAUTOD E L E T E1 I M AG Ezoom buttons, select YES and press theshutter-release button to erase the photoN OY E Sgraph. To continue shooting without deleting the photograph, select NO and press theshutter-release button. The photo will thenbe saved to the memory card and the cameraLift latch andwill return to shooting mode.replace capNotesDo not remove the batteries while photos are being recorded to, ordeleted from, memory.The pause and delete functions described above are only available whenphotos are taken at an image size of “full” (1,600 1,200 pixels).The delete dialog disappears if no action is taken for ten seconds. In thiscase the image will be saved and the camera will return to shooting mode.First Steps: Taking Your First PhotographNoteThe camera may become warm during use, but this does not indicate amalfunction.- 10 -
Using the Buttons (A-REC, M-REC)This chapter details some of the camera settings that can beaccessed without using the camera menus: flash, focus, imagequality, image size, sensitivity, and exposure mode. Exposurecompensation is covered in the Fast Track Guide.Flash SettingsThe following flash settings are available:SettingAutoFlash Cancel (off)How it worksWhen to use itCamera fires flash whenever lighting is poor.Best for general use.Flash will not fire even when lighting is poor.Use where flash is prohibited or to capture naturallighting under dim light. It is a good idea to use a tripodwhen lighting is poor, as shutter speed will be slowed.Auto with red-eyePre-flash lamp fires before the main flash to minimize Use for portraits (works best if subjects are well withinreductionthe “red-eye” effects a flash can sometimes cause. range of flash and are looking directly at the camera).AUTOAnytime Flash(forced on)Slow synchronizedFlash fires whenever photo is taken.Use to “fill-in” (illuminate) a back-lit subject.Auto flash combined with low shutter speed.Use to capture poorly-lit backgrounds; ideal for nighttime photography. Use of a tripod is advised.Important! Before using the flash, be sure to read thewarnings in For Your Safety.Using the Buttons (A-REC, M-REC): Flash Settings- 11 -
When the mode dial is set to A-REC or M-REC, the current flash Flash status is indicated by the red flash lamp next to the viewfinder.setting can be changed using thebutton next to theFlash lamp glows red: The camera is ready to fire the flashcontrol panel. The setting changes each time the button is pressed,when the shutter-release button iscycling through the different flash modes in the following order:fully pressed.Flash lamp blinks:The flash is charging. Wait until thelamp glows steadily before taking apicture.SLOWAUTOTipsWhen lighting is poor and the flash is set to “Off” ( ) or “Slow Synchro”(), shutter speed is slowed and photos may be blurred. If possible, usea tripod when lighting is poor.The built-in flash will automatically be set to “Off” when: you use autofocus with a setting of “Infinity” ( ) you choose a multi-shot setting of “Continuous,” “16-shots” or “VGAsequence” (an external flash can still be used with these settings) you use best-shot selection (BSS) you use lens converter (LENS) settings the AE LOCK option in the M-REC menu is onWhen using the flash, be sure the flash window is unobstructed.Using the Buttons (A-REC, M-REC): Flash SettingsUsing an External FlashA flash bracket (the SK-E900 Multi-Flash Bracket Unit) is available separately for connecting external flash units to the COOLPIX 950. When thebracket is connected to the camera’s synchro-flash terminal, external flashunits mounted on the bracket are synchronized with the camera’s built-inflash, increasing the size of the area illuminated and allowing sophisticatedflash techniques such as bounce-flash photography. You can use flashsettings such as “Auto,” “Slow Synchro,” and “On” with both the externaland built-in (internal) flash units, or you can turn the built-in flash off anduse the external flash only (to turn off the built-in flash, use the CONTROLS item in the M-REC setup menu). When the flash is fired, thebrightness of the external and built-in flash units is controlled by thecamera.Instructions for attaching the optional SK-E900 flash bracket and connecting external flash units may be found in the SK-E900 instruction manual.When the SK-E900 is in place, the following Nikon flash units (availableseparately) can be used: SB-28, SB-26, SB-25, SB-24, SB-22S, and SB-22.The use of non-Nikon flash units is not recommended.Once the external flash unit has been mounted on the flash bracket and thebracket’s lead connected to the camera’s synchro-flash terminal, you areready to use the external flash for synchro-flash photography. Turn theflash unit on (do not set the flash to “stand-by”—STBY—as the flash mayturn off unexpectedly), set the metering mode to TTL, and choose anilluminating angle of less than 28 mm. The intensity of the light producedby the flash will be controlled by the camera’s built-in photocell.- 12 -
Focus SettingsWith the mode dial set to A-REC, a choice of three autofocusmodes is available. In addition, M-REC mode offers a selection ofmanual focus settings.Autofocus settingsThe following autofocus settings are available in M-REC and A-RECmodes:SettingAutofocusNO ICONInfinityMacro Close-upHow it worksWhen to use itCamera automatically adjusts focus according to disUse when subject is 30 cm (1 ft) or more from lens.tance to subject.Focus is fixed at infinity. Flash is disabled.Use for photographing distant scenes in daylight (amanual focus setting of “Inf” is available for when youwant to use the flash)Focus adjusted automatically for subjects 2 cm (0.8 in)Use for close-up photography.or more from lens.When the mode dial is set to A-REC or M-REC, the autofocusmode can be changed using thebutton. Thesetting changes each time the button is pressed, cycling through thefocus modes in the following order:NO ICON (AUTO)Using the Buttons (A-REC, M-REC): Focus SettingsMacro Close-upWhen using macro close-up, it is recommended that you frame photographs in the LCD monitor.Macro close-up can be used at ranges as short as 2 cm (0.8 in) when thecamera is zoomed to the middle optical zoom position. When the camerais zoomed to a position suited to such close-range photography, the macroicon ( ) in the LCD monitor will turn yellow.While the flash can be used with a focus mode of “Macro Close-up,” it maysometimes be unable to light the entire subject. When using the flash, takea test picture and verify the results in the LCD monitor.- 13 -
Focus distance is displayed in the LCD monitor, while the controlpanel shows the focus distance together with a flashingicon.A short focus distance can be used to focus the camera on objectsat the specified distance while blurring background details. Choosea setting of Inf for a focus distance of infinity. Unlike the autofocussetting of Infinity, manual infinity allows use of the flash. Manualfocus can be cancelled by pressing thebutton.Manual focusIn M-REC mode, focus distance can be selected manually from a list of preset distancesranging from 0.1 m (4 in) to infinity. To setfocus distance manually:1 Measure the distance to your subject.2 Turn the mode dial to M-REC.3 Turnthe command dial while holdingdown thebutton to select a focus distance. NotesAt a manual focus setting of 0.1 m (4 in), the camera may not focus properlywhen zoomed out.When manual focus is used with the lens converters available separately forthe COOLPIX 950, the actual focus distance may differ from the settingchosen. Check focus in the LCD monitor when using a lens converter.Using the Buttons (A-REC, M-REC): Focus SettingsFocus DistanceFocus distance is measured from the cover that protects the lens.Focus distance can be shown in either meters or feet. To change the unitsused, select CONTROLS from the M-REC menu. To display distances infeet, check the DIST FT item and press the shutter-release button. If thisitem is not checked, distances are displayed in meters.- 14 -
Using the Self-TimerThe COOLPIX 950 is equipped with an automatic timer with twosettings: three seconds, useful when making group photographs,and ten seconds, ideal for self-portraits. To use the self-timer,follow these steps:1 Forself-portraits, mount the camera on a tripod (recommended) or rest it on a flat, stable surface.2 Press thebutton until thethe control panel or LCD monitor.icon appears in3 Compose the photograph.4 Fully depress the shutter-release button to activate the timer.Press the shutter-release button once for a ten-second delay.For a three-second delay, press the shutter-release buttontwice.The red-eye reduction lamp next to the viewfinder will start toblink one second before the picture is taken.TipsTo stop the automatic timer before a photograph is taken, turn the modedial to a different setting. The timer will stop and the indicator willdisappear from the control panel and LCD monitor.Using the Buttons (A-REC, M-REC): Using the Self-Timer- 15 -
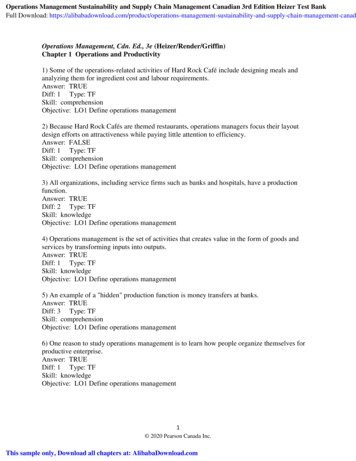
Image QualityImage Quality and SizeThe image-quality/image-size setting determines how many pho- At settings of BASIC, NORMAL, and FINE, the camera uses JPEGtographs can be stored on a single memory card. The following compression to reduce the amount of memory required to storephotographs. JPEG compression results in a slight loss in imagecombinations of image quality and size are available:quality, which grows more noticeable at higher compression ratios.The difference in quality is illustrated below:Approx. No.Photos/cardSizeQuality(8 MB)Full(1,600 1,200pixels)BASICNORMALFINEHI (M-REC only)321681XGA(1,024 768pixels)BASICNORMALFINE783919VGA(640 480pixels)BASICNORMALFINE20010050To choose a combination of image qualityand size, hold thebutton and turn thecommand dial (note that an image quality ofHI is only available when the mode dial is setto M-REC). Image quality and size aredisplayed in the control panel and LCDmonitor (no icon for image size indicates asetting of 1,600 1,200). Using the Buttons (A-REC, M-REC): Image Quality and SizeBASIC(high compression)NORMAL(medium compression)FINE(low compression)While a setting of NORMAL represents the best trade-off between memory and image quality in most cases, a setting of BASICcan be used to save memory. A setting of FINE is suitable forphotographs that will be enlarged or printed at high resolution.- 16 -
Photographs taken at an image quality setting of HI are stored inuncompressed TIFF format and show no loss in quality. An 8 MBmemory card is, however, sufficient to store only one suchphotograph at a time. To take photographs at an image quality ofHI, turn the mode dial to M-REC, then hold down thebuttonand turn the command dial until HI is displayed in the control panel.SensitivityIn A-REC mode, automatic gain control is used to producesensitivity roughly equivalent to ISO 80 film. In M-REC mode, youcan choose a fixed value for sensitivity equivalent to an ISO ratingof 100, or increase sensitivity further by a factor of 1.0 or 2.0.Increasing sensitivity reduces the time needed to make an expoImage Sizesure, allowing increased shutter speed. This can be used to reduceUse the image-size setting to adjust the size of photographs to suit blurring caused by camera motion when lighting is poor, or toyour purposes. The default size of 1,600 1,200 pixels is suitable “freeze” moving objects. To increase sensitivity:for printing images at high resolutions or for viewing fine details on 1 Turn the mode dial to M-REC.a computer. Smaller sizes can be used to save space on thememory card or to shoot photos destined for display on web pages2 Hold down thebutton andor on smaller computer monitors.turn the command dial to select the desired sensitivity. Choosing a value of dEFrestores normal sensitivity, roughly equivalent to ISO 80. The chosen setting will bedisplayed in the control panel while thebutton is held down. At settings other than dEF, aand LCD monitor.NoteHI image quality is not available at a multi-shot (CONTINUOUS) setting of“16-shots” or when BSS is on (see the Pocket Guide, “Taking Photographs”).Using the Buttons (A-REC, M-REC): Image Quality and Sizeicon appears in the control panelNotesA slight amount of noise may appear in photos taken at settings other than“dEF.”An exposure-mode setting of shutter-priority auto is only available at asensitivity setting of “dEF.”- 17 -
Exposure ModeWhen the mode dial is set to M-REC, you can choose an exposuremode from the following options:SettingProgramAperture PriorityShutter PriorityHow it worksCamera automatically sets shutter speed and aperture to produce the best exposure.When to use itBest for general use.A wide aperture (low f-number) can be used to blurYou choose the aperture (f-number) using the comdetails of the background. A small aperture (high fmand dial. Shutter speed is set automatically by thenumber) brings both your subject and the backcamera.ground into focus.Use a high shutter speed to freeze a fast-movingChoose the shutter speed using the command dial.subject. Lower shutter speeds can be used to blurAperture is set automatically by the camera.moving objects, suggesting motion.In A-REC mode, the camera is automatically set to Program. Toselect another exposure mode:1 Turn the mode dial to M-REC.Using the Buttons (A-REC, M-REC): Exposure Mode2 Hold down thebutton and turn thecommand dial to select an exposure mode.The chosen mode will be indicated by anicon in the control panel and LCD monitor. - 18 -
Aperture PriorityShutter PriorityAn exposure mode of Aperture Priority allows you to choose an When the exposure mode is Shutter Priority, shutter speed can beaperture setting from three pre-determined f-values. To choose chosen from settings ranging from 1/500 sec. to 8 sec. To set thea value for aperture:shutter speed:1 Set the exposure mode to Aperture Priority.1 Set the exposure mode to Shutter Priority.2 Turn2 TurnThe chosen f-number will be shown in the control panel and LCDmonitor. Note that in addition to increasing focus depth, smallapertures (high f-numbers) produce lower shutter speeds. Largerapertures (low f-numbers) can be used to blur background detailsand also increase the effective range of the flash.The shutter speed will be shown in the control panel and LCDmonitor. In the control panel, fractions of a second are shownwithout a numerator, with the result that a speed of 1/2 sec. is shownas 2, a speed of 1/4 sec. as 4, etc. Note that high shutter speeds resultin large apertures.the command dial to choose anaperture setting (if the aperture settingdoes not change when you rotate thecommand dial, press thebuttonand then turn the command dial again).Using the Buttons (A-REC, M-REC): Exposure Modethe command dial to choose ashutter speed (if the shutter speed doesnot change when you rotate the command dial, press thebutton andthen turn the command dial again).- 19 -
Using the Buttons (PLAY)This chapter describes the following playback functions: viewing photographs deleting unwanted photographs individuallyThese functions can be accessed using the zoom ( W/T )buttons, the command dial, and the three buttons below thecontrol panel. The options available in the playback menu aredescribed in the following chapter.Follow these steps to view or delete photographs stored on thememory card:TipsBy default, only photographs in the current folder are displayed in playbackmode. To select another folder for viewing, or to view photos in all folders,use the FOLDERS item in the playback menu (see “The Camera Menus: ThePlayb
Black-and-White Photography Lens Converter Settings (LENS) Making a Panorama—Tips (AE-LOCK) User Settings . This Reference Manual explains how to use and care for your COOLPIX 950. It is intended . This sectio