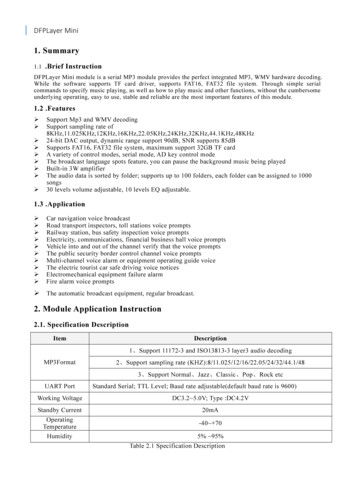
Transcription
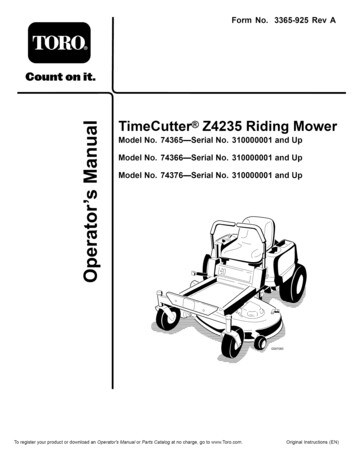
Model No. NETL27719.0Serial No.USER’S MANUALWrite the serial number in the spaceabove for reference.SerialNumberDecalCUSTOMER SERVICEUNITED KINGDOMCall: 0330 123 1045From Ireland: 053 92 36102Website: iconsupport.euE-mail: csuk@iconeurope.comWrite:ICON Health & Fitness, Ltd.Unit 4, Westgate CourtSilkwood ParkOSSETTWF5 9TTUNITED KINGDOMAUSTRALIACall: 1800 993 770E-mail: australiacc@iconfitness.comWrite:ICON Health & FitnessPO Box 635WINSTON HILLS NSW 2153AUSTRALIACAUTIONRead all precautions andinstructions in this manual beforeusing this equipment. Save thismanual for future reference.iconeurope.eu
TABLE OF CONTENTSWARNING DECAL PLACEMENT . . . . . . . . . . . . . . . . . . . . . . . . . . . . . . . . . . . . . . . . . . . . . . . . . . . . . . . . . . . . . . . 2IMPORTANT PRECAUTIONS . . . . . . . . . . . . . . . . . . . . . . . . . . . . . . . . . . . . . . . . . . . . . . . . . . . . . . . . . . . . . . . . . . 3BEFORE YOU BEGIN. . . . . . . . . . . . . . . . . . . . . . . . . . . . . . . . . . . . . . . . . . . . . . . . . . . . . . . . . . . . . . . . . . . . . . . . 5PART IDENTIFICATION CHART. . . . . . . . . . . . . . . . . . . . . . . . . . . . . . . . . . . . . . . . . . . . . . . . . . . . . . . . . . . . . . . . 6ASSEMBLY . . . . . . . . . . . . . . . . . . . . . . . . . . . . . . . . . . . . . . . . . . . . . . . . . . . . . . . . . . . . . . . . . . . . . . . . . . . . . . . . 7THE CHEST HEART RATE MONITOR. . . . . . . . . . . . . . . . . . . . . . . . . . . . . . . . . . . . . . . . . . . . . . . . . . . . . . . . . . 12HOW TO USE THE INCLINE TRAINER . . . . . . . . . . . . . . . . . . . . . . . . . . . . . . . . . . . . . . . . . . . . . . . . . . . . . . . . . 13HOW TO MOVE THE INCLINE TRAINER . . . . . . . . . . . . . . . . . . . . . . . . . . . . . . . . . . . . . . . . . . . . . . . . . . . . . . . 25MAINTENANCE AND TROUBLESHOOTING . . . . . . . . . . . . . . . . . . . . . . . . . . . . . . . . . . . . . . . . . . . . . . . . . . . . . 26EXERCISE GUIDELINES . . . . . . . . . . . . . . . . . . . . . . . . . . . . . . . . . . . . . . . . . . . . . . . . . . . . . . . . . . . . . . . . . . . . 30PART LIST. . . . . . . . . . . . . . . . . . . . . . . . . . . . . . . . . . . . . . . . . . . . . . . . . . . . . . . . . . . . . . . . . . . . . . . . . . . . . . . . 33EXPLODED DRAWING. . . . . . . . . . . . . . . . . . . . . . . . . . . . . . . . . . . . . . . . . . . . . . . . . . . . . . . . . . . . . . . . . . . . . . 35ORDERING REPLACEMENT PARTS. . . . . . . . . . . . . . . . . . . . . . . . . . . . . . . . . . . . . . . . . . . . . . . . . . . Back CoverRECYCLING INFORMATION . . . . . . . . . . . . . . . . . . . . . . . . . . . . . . . . . . . . . . . . . . . . . . . . . . . . . . . . . Back CoverWARNING DECAL PLACEMENTThis drawing shows the locations of the warning decals.If a decal is missing or illegible, call the telephonenumber on the front cover of this manual andrequest a free replacement decal. Apply the decalin the location shown. Note: The decals may not beshown at actual size.NORDICTRACK and IFIT are registered trademarks of ICON Health & Fitness, Inc. Google Maps is a trademarkof Google LLC. The Bluetooth word mark and logos are registered trademarks of Bluetooth SIG, Inc. and areused under license. Wi-Fi is a registered trademark of Wi-Fi Alliance. WPA and WPA2 are trademarks of Wi-FiAlliance.2
IMPORTANT PRECAUTIONSWARNING:To reduce the risk of burns, fire, electric shock, or injury to persons, read allimportant precautions and instructions in this manual and all warnings on your incline trainer beforeusing your incline trainer. ICON assumes no responsibility for personal injury or property damagesustained by or through the use of this product.1. It is the responsibility of the owner toensure that all users of this incline trainerare adequately informed of all warnings andprecautions.11. Never allow more than one person on theincline trainer at a time.12. Wear appropriate exercise clothes whileusing the incline trainer. Do not wear looseclothes that could become caught in theincline trainer. Athletic support clothes arerecommended for both men and women.Always wear athletic shoes. Never use theincline trainer with bare feet, wearing onlystockings, or in sandals.2. Before beginning any exercise program,consult your physician. This is especiallyimportant for persons over age 35 or personswith pre-existing health problems.3. The incline trainer is not intended for useby persons with reduced physical, sensory,or mental capabilities or lack of experienceand knowledge, unless they have been givensupervision or instruction concerning use ofthe incline trainer by someone responsiblefor their safety.13. When connecting the power cord (see page13), plug the power cord into an earthedcircuit. No other appliance should be on thesame circuit. When replacing the fuse in thepower cord adapter, insert an ASTA-approvedBS1362, 13-amp fuse into the fuse carrier.4. Use the incline trainer only as described inthis manual.14. If an extension cord is needed, use only a3-conductor, 14-gauge (2 mm2) cord that isno longer than 1.5 m (5 ft.).5. The incline trainer is intended for home useonly. Do not use the incline trainer in anycommercial, rental, or institutional setting.15. Keep the power cord away from heatedsurfaces.6. Keep the incline trainer indoors, away frommoisture and dust. Do not put the inclinetrainer in a garage or covered patio, or nearwater.16. Never move the walking belt while thepower is turned off. Do not operate theincline trainer if the power cord or plugis damaged, or if the incline trainer is notworking properly. (See MAINTENANCEAND TROUBLESHOOTING on page 26 if theincline trainer is not working properly.)7. Place the incline trainer on a level surface,with at least 2.4 m (8 ft.) of clearance behindit and 0.6 m (2 ft.) on each side. Do not placethe incline trainer on any surface that blocksair openings. To protect the floor or carpetfrom damage, place a mat under the inclinetrainer.17. Read, understand, and test the emergencystop procedure before using the inclinetrainer. (See HOW TO TURN ON THE POWERon page 15.) Always wear the clip while usingthe incline trainer.8. Do not operate the incline trainer whereaerosol products are used or where oxygenis being administered.18. Always stand on the foot rails when startingor stopping the walking belt. Always hold thehandrails while using the incline trainer.9. Keep children under age 16 and pets awayfrom the incline trainer at all times.19. When a person is walking on the inclinetrainer, the noise level of the incline trainerwill increase.10. The incline trainer should be used only bypersons weighing 135 kg (297 lbs.) or less.3
be able to safely lift 20 kg (45 lbs.) to raise,lower, or move the incline trainer.20. Keep fingers, hair, and clothing away fromthe moving walking belt.25. Never insert any object into any opening onthe incline trainer.21. The incline trainer is capable of high speeds.Adjust the speed in small increments toavoid sudden jumps in speed.26. Inspect and properly tighten all parts eachtime the incline trainer is used.22. The heart rate monitor is not a medicaldevice. Various factors, including the user’smovement, may affect the accuracy of heartrate readings. The heart rate monitor isintended only as an exercise aid in determining heart rate trends in general.27.DANGER: Always unplug the powercord immediately after use, before cleaningthe incline trainer, and before performing themaintenance and adjustment proceduresdescribed in this manual. Never remove themotor hood unless instructed to do so by anauthorized service representative. Servicingother than the procedures in this manualshould be performed by an authorized service representative only.23. Never leave the incline trainer unattendedwhile it is running. Always remove the key,press the power switch into the off position(see the drawing on page 5 for the location ofthe power switch), and unplug the power cordwhen the incline trainer is not in use.28. Over exercising may result in serious injuryor death. If you feel faint, if you become shortof breath, or if you experience pain whileexercising, stop immediately and cool down.24. Do not attempt to move the incline traineruntil it is properly assembled. (SeeASSEMBLY on page 7, and HOW TO MOVETHE INCLINE TRAINER on page 25.) You mustSAVE THESE INSTRUCTIONS4
BEFORE YOU BEGINThank you for selecting the revolutionaryNORDICTRACK COMMERCIAL X22I incline trainer.The COMMERCIAL X22I offers a selection of featuresdesigned to make your workouts at home more effective and enjoyable.reading this manual, please see the front cover of thismanual. To help us assist you, note the product modelnumber and serial number before contacting us. Themodel number and the location of the serial numberdecal are shown on the front cover of this manual.For your benefit, read this manual carefully beforeusing the incline trainer. If you have questions afterBefore reading further, please familiarize yourself withthe parts that are labeled in the drawing below.Sled GripConsoleAccessory TrayFanHandrailKey/ClipPush BarIdler RollerAdjustment ScrewsWalking BeltWalking PlatformWheelPlatform CushionPower SwitchLength: 178 cm (5 ft. 10 in.)Width: 99 cm (3 ft. 3 in.)Weight: 155 kg (342 lbs.)5
PART IDENTIFICATION CHARTUse the drawings below to identify small parts used for assembly. The number in parentheses below each drawing is the key number of the part, from the PART LIST near the end of this manual. The number following the keynumber is the quantity used for assembly. Note: If a part is not in the hardware kit, check to see whether it ispreattached. Extra parts may be included.3/8" StarWasher (3)–123/8" x 5 1/2" Screw (1)–46
ASSEMBLY Assembly requires two persons. To identify small parts, see page 6. Place all parts in a cleared area and remove thepacking materials. Do not dispose of the packingmaterials until you finish all assembly steps. Assembly requires the following tools:the included hex keys After shipping, there may be an oily substance onthe exterior of the incline trainer. This is normal.If there is an oily substance on the incline trainer,wipe it off with a soft cloth and a mild, non-abrasive cleaner.To avoid damaging parts, do not use power tools.1. To register your product and activate yourwarranty in the UK, go to iconsupport.eu. Ifyou do not have internet access, call CustomerService (see the front cover of this manual).1To register your product and activate yourwarranty in Australia, email or post thefollowing information to the email address orpostal address on the front cover of this manual. your receipt (make sure to keep a copy) your name, address, and telephone number the model number, serial number, and nameof your product (see the front cover of thismanual)7
2. Make sure that the power cord is unplugged.2Remove the four 3/8" x 3 1/4" Screws (18) fromthe Base (74) (only one side is shown). Save theScrews.18743. Remove the four 3/8" x 2 3/4" Screws (22) fromthe Uprights (83). Save the Screws.38322228
4. Set the Uprights (83) on the Base (74). Makesure that the hole with the Upright Wire (75)is on the right side.4Attach the right Upright (83) with two of the3/8" x 3 1/4" Screws (18) and two of the 3/8" x2 3/4" Screws (22) that you just removed andfour 3/8" Star Washers (3); do not fully tightenthe Screws yet. Make sure that the BaseWire (52) is not pinched.83Attach the left Upright (not shown) asdescribed above. Note: There are no wires onthe left side.18Then, fully tighten the 3/8" x 3 1/4" Screws(18) and the 3/8" x 2 3/4" Screws (22).3375745. Connect the Base Wire (52) to the Upright Wire(75). The connectors should slide togethereasily and snap into place. If they do not, turnone connector and try again.352583Then, remove the tie (A) from the Base Wire(52), and insert the connectors into the hole (B)in the right Upright (83).BA75529322
6. Remove the 5/16" x 1" Screws (87) and the5/16" Star Washers (65) from the brackets (C) onthe right and left handrail assemblies (D, E).687D65With the help of a second person, position theright and left handrail assemblies (D, E) upsidedown as shown. Attach the Crossbar (85) tothe handrail assemblies with the 5/16" x 1"Screws (87) and the 5/16" Star Washers (65).Do not tighten the Screws yet.C876585CE7. With the help of a second person, set the handrail assembly (D) on the console assembly (F).7Attach the handrail assembly (D) with four 3/8" x5 1/2" Screws (1) and four 3/8" Star Washers (3)(only one side is shown); start all four Screws,and then tighten them.FThen, firmly tighten the 5/16" x 1" Screw (87)located under each side of the Crossbar (85).8513D87101
8. Slide the Right Inside Upright Cover (70) againstthe lower end of the right Upright (83). Then,press the Right Outside Upright Cover (71)against the Right Inside Upright Cover until itsnaps into place. Make sure that the wires (G)are not pinched.87083Attach the Left Inside Upright Cover (notshown) and the Left Outside Upright Cover(not shown) as described above. Note: Thereare no wires on the left side.G719. If necessary, move the incline trainer to thedesired location (see HOW TO MOVE THEINCLINE TRAINER on page 25).9After the incline trainer is placed in the location where it will be used, make sure that theincline trainer rests firmly on the floor. If theincline trainer rocks even slightly, turn a LevelingFoot (77) as needed until the rocking motion iseliminated.7710. Make sure that all parts are properly tightened before you use the incline trainer. Keep the included hexkeys in a secure place. One of the hex keys is used to adjust the walking belt (see pages 27–28). To protectthe floor or carpet from damage, place a mat under the incline trainer. To avoid damage to the console, keepthe incline trainer out of direct sunlight.11
THE CHEST HEART RATE MONITORHOW TO PUT ON THE HEART RATE MONITOR Store the heart rate monitor in a warm, dry place. Donot store the heart rate monitor in a plastic bag orother container that may trap moisture.If the heart rate monitor looks like the one shownin drawing 1, press the transmitter (A) onto the snapfasteners on the chest strap (B). If the heart ratemonitor looks like the one shown in drawing 2,insert the tab (C) on one end of the chest strap (D) intoone end of the transmitter (E). Then, press the end ofthe transmitter under the buckle (F) on the chest strap;the tab should be flush with the transmitter.12 Do not expose the heart rate monitor to directsunlight for extended periods of time, and do notexpose it to temperatures above 50 C (122 F) orbelow -10 C (14 F). Do not excessively bend or stretch the heart ratemonitor when using or storing it. To clean the transmitter, use a damp cloth and asmall amount of mild soap. Then, wipe the transmitter with a damp cloth and thoroughly dry it with a softtowel. Never use alcohol, abrasives, or chemicalsto clean the transmitter. Hand wash and air dry thechest strap.DCBAEFTROUBLESHOOTINGNext, wrap the heartrate monitor aroundyour chest in the location shown; the heartrate monitor must beunder your clothes,tight against your skin.Make sure that the logois right-side-up. Then, attach the other end of the cheststrap. Adjust the length of the chest strap, if necessary. If the heart rate monitor does not function when positioned as described at the left, move it slightly loweror higher on your chest. If heart rate readings are not displayed until youbegin perspiring, re-wet the electrode areas. For the console to display heart rate readings, youmust be within arm’s length of the console. If there is a battery cover on the back of the transmitter, replace the battery with a new battery of thesame type.Next, pull the transmitter and the chestGstrap away from yourbody a few inchesand locate the twoelectrode areas (G).Using saliva or contact lens solution, wet the electrode areas. Then, returnthe transmitter and the chest strap to a position againstyour chest. The heart rate monitor is designed to work withpeople who have normal heart rhythms. Heart ratereading problems may be caused by medical conditions such as premature ventricular contractions(pvcs), tachycardia bursts, and arrhythmia. The operation of the heart rate monitor can beaffected by magnetic interference from high powerlines or other sources. If you suspect that magneticinterference is causing a problem, try relocating thefitness equipment.CARE AND MAINTENANCE Thoroughly dry the electrode areas with a soft towelafter each use. Moisture may keep the heart ratemonitor activated, shortening the life of the battery.12
HOW TO USE THE INCLINE TRAINERHOW TO PLUG IN THE POWER CORDFollow the steps below to plug in the power cord.This product must be earthed. If it should malfunction or break down, earthing provides a path of leastresistance for electric current to reduce the risk ofelectric shock. This product’s power cord has anequipment-earthing conductor and an earthing plug.IMPORTANT: If the power cord is damaged, it mustbe replaced with a manufacturer-recommendedpower cord.1. Plug the indicated end of the power cord (A) into thesocket (B) on the Incline Trainer.BADANGER: Improper connection ofthe equipment-earthing conductor can resultin an increased risk of electric shock. Checkwith a qualified electrician or serviceman ifyou are in doubt as to whether the productis properly earthed. Do not modify the plugprovided with the product—if it will not fitthe outlet, have a proper outlet installed by aqualified electrician.2. Plug the power cord into an appropriate outlet (C)that is properly installed and earthed in accordancewith all local codes and ordinances.UKAustraliaC13C
CONSOLE DIAGRAMIn addition, the console features a selection ofworkouts. Each workout automatically controls thespeed and incline of the incline trainer as it guides youthrough an effective exercise session.FEATURES OF THE CONSOLEThe advanced incline trainer console offers a selection of features designed to make your workouts moreeffective and enjoyable.You can even listen to your favorite workout music oraudio books with the console’s sound system while youexercise.The console features wireless technology that enablesthe console to connect to iFit. With iFit, you can accessa large and varied workout library, create your ownworkouts, track your workout results, and access manyother features.To turn on the power, see page 15. To learn how touse the touch screen, see page 15. To set up theconsole, see page 16.When you use the manual mode, you can change thespeed and incline of the incline trainer with the touchof a button. As you exercise, the console will displayinstant exercise feedback. You can also measure yourheart rate using the chest heart rate monitor.14
HOW TO TURN ON THE POWERHOW TO USE THE TOUCH SCREENIMPORTANT: If the incline trainer has beenexposed to cold temperatures, allow it to warm toroom temperature before you turn on the power. Ifyou do not do this, you may damage the consoledisplays or other electrical components.The console features a tablet with a full-color touchscreen. The following information will help you becomefamiliar with the tablet’s advanced technology:Plug in the power cord (seepage 13). Next, locate thepower switch on the inclinetrainer frame near the powercord. Press the power switchinto the reset position (D). The console functions similarly to other tablets.You can slide or flick your finger against the screento move certain images on the screen, such asthe displays in a workout (see step 5 on page 17).However, you cannot zoom in and out by sliding yourfingers on the screen.D The screen is not pressure sensitive. You do notneed to press hard on the screen.Next, stand on thefoot rails of theincline trainer. Locatethe clip (E) attachedto the key (F), andFslide the clip securelyonto the waistband ofEyour clothes. Then,insert the key intothe console. Note: Itmay take some time for the console to be ready foruse. IMPORTANT: In an emergency, the key can bepulled from the console, causing the walking beltto slow to a stop. Test the clip by carefully takinga few steps backward; if the key is not pulled fromthe console, adjust the position of the clip. To type information into a text box, touch the textbox to view the keyboard. To use numbers or othercharacters on the keyboard, touch the ?123 button. To view more characters, touch the [ button.Touch the ?123 button again to return to the numberkeyboard. To return to the letter keyboard, touch theABC button. To use a capital character, touch thebutton with an upward-facing arrow. To use multiplecapital characters, touch and hold the arrow button.To return to the lowercase keyboard, touch the arrowbutton again. To clear the last character, touch thebutton with a backward-facing arrow and an X.Note: The console can display speed and distancein either miles or kilometres. To find which unit ofmeasurement is selected, see HOW TO CHANGECONSOLE SETTINGS on page 21. For simplicity, allinstructions in this section refer to kilometres.15
HOW TO SET UP THE CONSOLE6. Calibrate the incline system.Before using the incline trainer for the first time, set upthe console.First, touch your name on the screen. Next, selectthe settings main menu. Then, select the maintenance section, touch the Calibrate Incline button,and then touch the Begin button to calibrate theincline system. See step 6 on page 22 for moreinformation.1. Connect to your wireless network.To access the internet, download iFit workouts, anduse several other features of the console, you mustbe connected to a wireless network. Follow theprompts on the screen to connect the console toyour wireless network.The console is now ready for you to begin working out.The following pages explain the various workouts andother features that the console offers.2. Customize settings.To use the manual mode, see page 17. To use amap workout, see page 18. To use a draw your ownmap workout, see page 19. To use a distance ortime workout, see page 20. To use the sled pushfeature, see page 21.Fill in the form on the screen to set the consoleto display the desired unit of measurement andyour time zone. Note: If you need to change thesesettings later, see HOW TO CHANGE CONSOLESETTINGS on page 21.To view or change console settings, see page 21.To use the wireless network mode, see page 23. Touse the sound system with a Bluetooth device, seepage 24. To use the sound system with an audiocable, see page 24.3. Log into or create an iFit account.Provide your email address, and follow the promptson the screen to sign up for or log into your iFitaccount.IMPORTANT: If there are sheets of plastic on theconsole, remove the plastic. To prevent damageto the walking platform, wear clean athletic shoeswhile using the incline trainer. The first time youuse the incline trainer, observe the alignment of thewalking belt, and centre the walking belt if necessary (see pages 27–28).4. Tour the console.The first time you turn on the incline trainer, dialogue boxes on the screen will guide you throughthe features of the console.5. Check for firmware updates.First, touch your name on the screen and touchthe Settings button. Next, select the maintenancesection. Then, touch the Update button to checkfor firmware updates using your wireless network.See HOW TO CHANGE CONSOLE SETTINGS onpage 21 for more information.16
HOW TO USE THE MANUAL MODENote: If the walking belt is moving at a highspeed and you adjust the incline below 0% orabove 15.5%, the speed of the walking belt mayautomatically decrease.1. Insert the key into the console.See HOW TO TURN ON THE POWER on page 15.Note: It may take some time for the console tobe ready for use.Note: The first time you use the incline trainer, youmust calibrate the incline system (see step 6 onpage 22).2. Select the main menu.5. Monitor your progress with the display modes.When you turn on the power, the main menu willappear after the console boots up. If you are in aworkout or the settings menu, touch the back arrowor the x on the screen to return to the main menu.The console offers several display modes. Thedisplay mode that you select will determine whichworkout information is shown. To select the desireddisplay mode or view stats and charts, drag downon the screen. You can also touch the button onthe screen to view stats or charts.3. Start the walking belt and adjust the speed.Touch the Manual Start button on the screen orpress the Start button on the console to start thewalking belt. The walking belt will begin to move ata low speed. As you exercise, change the speed ofthe walking belt as desired by pressing the speedincrease and decrease buttons. Each time youpress one of the buttons, the speed setting willchange by 0.1 Km/H; if you hold down the button, the speed setting will change in increments of0.5 Km/H.As you walk or run on the incline trainer, the screencan show the following workout information: The incline level of the incline trainer Your vertical gain Your vertical loss The elapsed timeIf you press one of the numbered speed buttons,the walking belt will gradually change speed until itreaches the selected speed setting. The approximate number of calories you haveburnedNote: When the incline setting is below 0% orabove 15.5%, you will not be able to select thehighest speed settings. The approximate number of calories you areburning per hour Your heart rate (see step 6)To stop the walking belt, press the Stop button ortap the middle of the screen. To restart the walkingbelt, press the Start button. Your average heart rate The distance that you have walked or run4. Change the incline of the incline trainer asdesired. Your paceTo change the incline of the incline trainer, pressthe incline increase and decrease buttons or one ofthe numbered incline buttons. Each time you pressone of the buttons, the incline will gradually changeuntil it reaches the selected incline setting. The speed of the walking belt17
The average speed of the walking beltHOW TO USE A MAP WORKOUT A track representing 400 m (1/4 mile)Note: To use a map workout, the console must be connected to a wireless network (see HOW TO USE THEWIRELESS NETWORK MODE on page 23).If desired, adjust the volume by pressing thevolume buttons on the console.1. Insert the key into the console.To pause the workout, tap the screen or pressthe Stop button on the console. To continue theworkout, touch the Resume button or the Startbutton. To end the workout session, touch theFinish button.See HOW TO TURN ON THE POWER on page 15.2. Select the main menu or the workout library.Touch the Home or Browse buttons on the screento select either the main menu or the workoutlibrary.6. Measure your heart rate if desired.For information about the chest heart rate monitor,see page 12. Note: The console is compatible withBluetooth Smart heart rate monitors.3. Select a map workout.To select a map workout, touch the desired buttonon the screen. Note: The featured map workoutson your console will change periodically. If you wishto save one of the featured workouts for future use,you can add it as a favorite by touching the heartbutton on the screen. To draw your own map workout, see page 19.7. Turn on the fan if desired.The fan features severalspeed settings. Press thefan buttons repeatedly toselect a fan speed or toturn on or turn off the fan.The screen will show the duration and distance ofthe workout, and the approximate number of calories you will burn during the workout.8. When you are finished exercising, remove thekey from the console.4. Start the workout.Step onto the walking platform and press the Stopbutton on the console or tap on the screen. Next,touch the Finish button. A workout summary willappear on the screen. If you wish to save one ofthe featured workouts for future use, you can addit as a favorite by touching the heart button on thescreen. You may also be able to either save orpublish your results using one of the options onthe screen. Then, remove the key from the consoleand put it in a secure place.Touch the Start button to start the workout. Amoment after you touch the button, the walking beltwill begin to move. Hold the handrails and beginwalking.During the workout, a map on the screen will showyour progress.When you reach the end of the workout, thewalking belt will slow to a stop, and a workoutsummary will appear on the screen. After you viewthe workout summary, touch the Finish button toreturn to the main menu. You may also be able toeither save or publish your results using one of theoptions on the screen.When you are finished using the incline trainer,press the power switch into the off position andunplug the power cord. IMPORTANT: If you donot do this, the incline trainer’s electrical components may wear prematurely.18
5. Monitor your progress with the display modes.If you make a mistake, you can use the Undobutton on the left side of the screen.See step 5 on page 17.The screen will display the elevation and distancestats for your workout. If desired, you can changethe default speed.6. Measure your heart rate if desired.See step 6 on page 18.4. Save your workout.7. Turn on the fan if desired.Touch the Save New Workout button on thescreen. If desired, change the title of the workout oradd a description, and then press the symbol onthe screen.See step 7 on page 18.8. When you are finished exercising, remove thekey from the console.5. Start the workout.See step 8 on page 18.Touch the Start button on the screen to start theworkout. A moment after you touch the button, thewalking belt will begin to move. Hold the handrailsand begin walking. See step 4 on page 18 for moreinformation.HOW TO USE A DRAW YOUR OWN MAPWORKOUTNote: To use a draw your own map workout, theconsole must be connected to a wireless network (seeHOW TO USE THE WIRELESS NETWORK MODE on
trainer in a garage or covered patio, or near water. 7. Place the incline trainer on a level surface, with at least 2.4 m (8 ft.) of clearance behind it and 0.6 m (2 ft.) on each side. Do not place the incline trainer on any surface that blocks air openings. To protect the floor or carpet from damage, p