Transcription
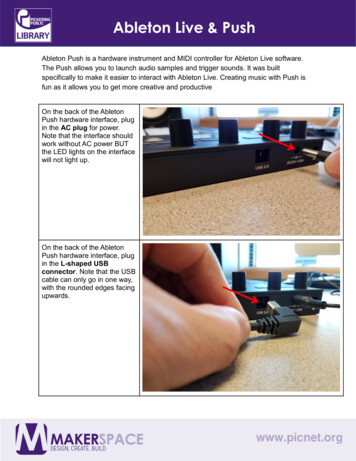
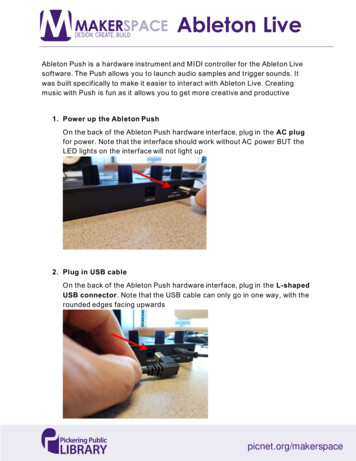
Ableton LiveAbleton Push is a hardware instrument and MIDI controller for the Ableton Livesoftware. The Push allows you to launch audio samples and trigger sounds. Itwas built specifically to make it easier to interact with Ableton Live. Creatingmusic with Push is fun as it allows you to get more creative and productive1. Power up the Ableton PushOn the back of the Ableton Push hardware interface, plug in the AC plugfor power. Note that the interface should work without AC power BUT theLED lights on the interface will not light up2. Plug in USB cableOn the back of the Ableton Push hardware interface, plug in the L-shapedUSB connector. Note that the USB cable can only go in one way, with therounded edges facing upwardspicnet.org/makerspace
Ableton Live3. Plug in USB cable into computerPlug in the other end of the USB cable into an y available USB slot on theback of the Mac computer4. Power on the Ableton Push unitOn the back of the Ableton Push hardware interface, push the Power buttonon to turn on the interfacepicnet.org/makerspace
Ableton Live5. Verify Ableton Push is powered onThe Ableton Push unit should look like this. You should have two cablesplugged in on the back side of the unit ( one for USB and one for ACPower). The front of the interface should have the Ableton logo with theword “Push” displayed. The unit will only operate once the Ableto n Livesoftware has been launched. Please note that Ableton Push was designedto only work with Ableton Live. It will not work with Apple’s Garageband6. Launch Ableton LiveClick on the “Live” icon on the macOS dockpicnet.org/makerspace
Ableton Live7. Verify Ableton Push connection with Ableton LiveOnce the software has been loaded, the front of the Push interface shouldlight up with a grid of white and blue buttons. Your current track (typicallythe first MIDI track in Ableton) will also be highlighted on the Push8. Setting up microphone with Ableton LiveIf you wish to also use the microphone to record vocals and/or speech,select Preferences under the Live menupicnet.org/makerspace
Ableton Live9. Using the RME Babyface Pro with Ableton LiveOnce in Live Preferences, select the Audio tab making sure that BabyfacePro is selected for both the Audio Input Device as well as the AudioOutput Device. Please refer to our other tutorial called “Using the RMEBabyface Pro to Record Voice” to learn how to setup the Babyface Proaudio interface in more detail. Note that you will need to create a newAudio track in Ableton Live to record vocals from the microphonepicnet.org/makerspace
Ableton Live10.Create a drum kit track in Ableton LiveLet’s setup our Ableton Live session with some drums. Under theCategories section, select Drums. You can always sample what the drumkit will sound like by clicking on the Preview button11.Create a MIDI drum track in Ableton LiveDrag and drop the drum kit you would like to use into the first MIDItrack/column. Ableton Live will automatically map the drum kit to the firstMIDI trackpicnet.org/makerspace
Ableton Live12.Automatic mapping of drum track in Ableton PushThe Ableton Push interface will also be automatically mapped with theactive drum kit buttons glowing in the same colour as the track colour (inthis case, a blueish purple)13.Recording a MIDI drum track with Ableton LiveYou can then hit Record and start playing the drums using the touchpadson the Push interface. Your recording will use up one slot in the Abletongrid. Once you are done, just hit the Stop buttonpicnet.org/makerspace
Ableton Live14.Previewing your recording in Ableton LiveYou can then preview your work by clicking on the Play button in the slotthat is holding your recording. Editing in Ableton Live is beyond the scopeof this tutorial. Please refer to the “ Additional Resources” section at theend of this tutorial for links to other learning resources15.Exporting your MIDI & audio out to a music fileOnce you are satisfied with your recording and performance, click on theFile menu and select “Export Audio/Video ”picnet.org/makerspace
Ableton Live16.Export audio settings for your music fileIn this dialog window, you can select what file type you would like to exportyour file as (WAV or AIFF are both safe choices for uncompressed audioand for listening directly on a computer via a media player like iTunes).If your end destination is for an audio CD, you should change the File Typeto WAV, leave the Sample Rate at “44100” and the Bit Depth at 16. Thenclick Export. Please note that Ableton Live version 9 does not nativelysupport exporting out to an MP3 filepicnet.org/makerspace
Ableton Live17.Saving your music file to diskSelect your saving destination (such as a USB thumb drive) and give your filea name. When done, finally click on Savepicnet.org/makerspace
Ableton LiveAdditional ResourcesAbleton Live 9 Essential Training (Course by Lynda org picnet.orgAbleton Push: Making Music (Course by Lynda ls/Making-Music-Ableton-Push/1333192.html?org picnet.orgpicnet.org/makerspace
Apr 01, 2020 · Ableton Live Ableton Push is a hardware instrument and MIDI controller for the Ableton Live software. The Push allows you to launch audio samples and trigger sounds. It was built specifically to make it easier to interact with Ableton Live. Creating music with Push is fun as it allows yo