Transcription
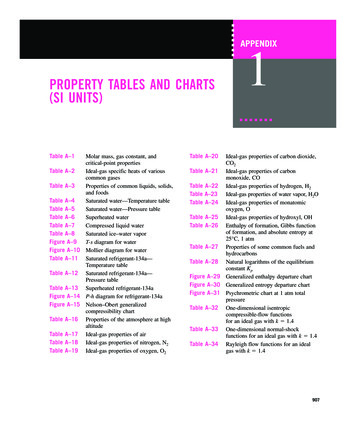
Table Of Contents2 Introduction2 Launchpad Pro at a Glance-Labelled diagram2 Setup in Ableton Live3 Latch vs Momentary3 Session Mode-Clip triggering and Colours-Scene Launch-Session Navigation4 Mixer Buttons-Record Arm-Track Select-Mute-Solo-Volume-Pan-Sends-Stop Clip6 Function Buttons-Session Mode vs Note/Device ouble-Record8 Note Mode/Drum Mode-General Functionality-MIDI Instruments-Drum Racks10 Device Mode-The 8 ‘Faders’-How to Create Macros-Automation-General Notes on Device Mode12 User Mode-Creating LED Light Shows113 The Setup Button-Layout Select-The Live Layout-Note, Drum, Fader and ProgrammerLayouts-Setup Page OptionsVelocityAftertouchAftertouch ThresholdPad LightingMIDI OutMIDI Channel16 Using the Launchpad Pro, Ableton Liveand Hardware-Using the Launchpad Pro’s MIDI Ports-Using Your Audio Interface’s MIDI In/Out17 Using Standalone Layouts WithHardware17 Using Other Software18 Troubleshooting
IntroductionThe Novation Launchpad Pro is a MIDI controller designedto inspire music making in Ableton Live and other software,whether on stage or in the studio.While the Launchpad Pro can be used with a variety ofsoftware and hardware (outlined in the final chapters), thisuser guide primarily focuses on its interaction with AbletonLive. The following pages will show you where all thebuttons and pads are and how they function, as well as tipsand tricks that we have found to be effective. Ultimately,however, there is no one way to use this creative piece ofkit—how you use the Launchpad Pro is up to you!Please see our ‘Getting Started Guide’ if you have issuessetting up the Launchpad Pro, or properly configuringAbleton Live.The Launchpad Pro at a GlanceThe following diagram shows the top of the Launchpad Pro,which has seven main areas:Setup buttonNavigation arrowsMode select buttonsAlong the back of the Launchpad Pro are a number of otherimportant places for connecting power, USB and MIDIcables.USB PortPOWERPower supplyMIDI out portMIDI OUTMIDI INMIDI in portPower on/off switchTroubleshooting: If your Launchpad Pro is not workingproperly, it could be an issue with your USB Hub,computer’s USB port, or even the USB cable you areusing. Please use the USB cable included in the box. If thisstill does not fix your issue, connect the included 12V DCpower supply.With an understanding of where things lie on the LaunchpadPro, it’s time to learn how to use it.Setup in Ableton LiveWhen you load up Ableton Live with the LaunchpadPro connected to your computer, Launchpad Pro willautomatically spring into life and connect to Ableton.However it is useful to understand the other optionsavailable in the MIDI sync tab which effect how Ableton Liveand Launchpad Pro work together.In Ableton Live, go to Preferences. From the list of tabson the left, click the MIDI / Sync tab and you will see thefollowing:64 pad gridFunction buttonsMixerScene launch buttonsThe above areas work together for a fun and creativemusical experience, as explained throughout this guide.POWERMIDI OUTMIDI INTrack On sets the Launchpad Pro as an Input device to playMIDI tracks (instruments and drums) in Live, and as andOutput device to see played and recorded notes fed-backto the pad LEDs.2
Set Sync On for the Output of Launchpad Pro so that thepad LEDs pulse and flash in time with your project tempo.Remote On for both Input and Output allows the LaunchpadPro to be manually mapped to parameters in Live, and tosee feedback of that mapping.Track On for Launchpad Pro MIDI Port allows Liveto playback and record any device connected to theLaunchpad’s physical MIDI connectors.If you find that features described later in this user guide arenot working as expected, please re-check your MIDI portsettingsLatch vs MomentaryTwo important behaviours to keep in mind as you learnabout the Launchpad Pro (the Mode Select and Mixerbuttons in particular) are what we’ll refer to as ‘latch’ and‘momentary’. Understanding these two behaviours will helpyou quickly move around the Launchpad Pro during liveperformance. Fortunately, the difference between latch andmomentary is simple: Latch means that when a button (e.g., Session) ispressed and quickly released, the functions are availableuntil the user navigates away (i.e., hits another button). Latchis best used when spending an indefinite time with Mode orMixer parameters. Momentary describes the temporary access of Modeor Mixer functions. Press and hold a button (e.g., Volume),make adjustments with the RGB pads, then upon release ofthe button you will jump back to what you were previouslyviewing (e.g., Session). In other words, functionality isavailable as long as you hold the button. Momentarybehaviour is great when performing and time is limited.Session ModeThe first of the Mode Buttons (upper right-hand corner ofthe Launchpad Pro) is Session Mode. This may be the mostimportant of the four mode buttons, since pressing it letsyou physically control Live’s Session View. If you’re new toAbleton Live, the Session View is where you can launch,record or edit audio or MIDI ‘clips’ without ever stoppingthe music. In other words, this is where you can jam forever.3Clip Triggering and ColoursWhen the Session button is pressed, the LaunchpadPro’s 8x8 grid of RGB LED pads gives you intuitivevisual feedback on your clips as you launch, stop, edit orrecord them. Conversely, you can see the area covered bythese 64 pads on your Live screen inside a coloured, 8x8rectangular ‘ring’. The colour of this ring changes dependingon which Control Surface chooser you select in Live’sPreferences (MIDI/Sync tab).Pressing a pad on the Launchpad Pro triggers a clip if oneexists in the corresponding slot in Live. Hitting an empty clipslot, however, on an unarmed track will stop clip playbackon that track. If the track is armed, pressing a pad beginsrecording into an empty clip slot.Clips that are playing (aka ‘launched’) on your AbletonLive screen appear as slowly pulsing green pads on yourLaunchpad Pro. The pad colours of non-playing clips,however, match the clip colours on your Live screen (e.g.,a purple clip makes a purple RGB pad). Clips that havebeen triggered, but have not yet started to play, quickly flashgreen until launched.Empty clip slots in Live show up as unlit pads on theLaunchpad Pro. Hitting an unlit pad will either do nothing,or it will stop playing clips on that track. On a record-armedtrack, empty clips slots are lit dimly red, indicating thatthey are ready to become new audio or MIDI clips. Whentriggered, these pads will quickly flash red until they startrecording.Recording clips slowly pulse red. To stop recording a clip,press its pad again, or the Record Button (the bottomFunction Button). With recording complete, the pad willpulse green.QUICK TIP 1: It might be helpful to think of red padson armed tracks as ‘hot’, since pushing them starts therecording of a new clip, and stops other clips on that track ifthey are playing.Holding Shift (the topmost Function Button) and touchinga pad selects the corresponding clip (or empty clip slot)without starting, re-launching, or stopping it. This actionbrings up the clip’s content in Live’s ‘Detail View’ (thebottom portion of the screen) and is a handy way to see aclip’s audio or MIDI before launching it. This is also a quickway to move from clip to clip for editing.
QUICK TIP 2: How quickly your clips launch, stop, or beginrecording depends on Live’s ‘Quantization Menu’, located inthe upper-left corner of the screen.button. You will now see solid red pads indicating 8x8 areascontaining clips. (If an 8x8 area does not have at leastone clip the pad will be unlit). Simply press one of thesered pads, or use the Up/Down arrow buttons, to jump theSession View’s focus in 8x8 blocks. If you jump into an 8x8area where no clips are playing, areas with playing clips willbe represented by solid green pads.Mixer ButtonsLive’s ‘Quantization Menu’Scene LaunchPressing the Scene Launch buttons on the right side ofthe Launchpad Pro will trigger horizontal rows of clips, aka‘scenes’. These buttons allow you to launch, stop, and/or record multiple clips with one button, and are fantasticfor performance. Just like the 8x8 grid of pads, the SceneLaunch buttons match the scene colours on your Livescreen.The Mixer’s eight buttons lie along the very bottom of theLaunchpad Pro, providing quick access to many functionsof Ableton’s Mixer section. Starting on the left, let’s examineeach one.MIDI OUTPOWERMIDI INRecord ArmIf you have more than 8 tracks the Scene Launch buttonswill launch the whole scene, not just the eight clips you cansee on the pads.Workflow Tip: While everyone uses Live differently, scenesare often used to break up music into different sections. Forexample, you could trigger the verse, chorus and bridge ofyour song with just three Scene Launch buttons.Session NavigationPress and hold Record Arm to momentarily display the Armpage, where you can arm or disarm a track by pressing itsbottommost pad (or press and hold up to eight bottommostpads to arm multiple tracks). Upon release of Record Armyou will return to the previous page or mode. In Record Arm,all pads on the track(s) chosen for recording are dimly red.POWERPress and release of Record Arm ‘latches’ the page.Pressing Record Arm again brings you to Session Mode.The simplest way to navigate the Session View is withthe Navigation Arrows, located at the top-left of theLaunchpad Pro.As one might expect, the Up and Down arrow buttonsmove the Pro’s 8x8-pad coverage up or down the SessionView in 1-Scene increments. The Right and Left arrowbuttons move pad coverage left or right, one track at a time.When you have gone as far as possible in a given directionthe corresponding button will turn off.Reminder: Latching means that functions are availableafter the press and release of a button until you navigateaway.Note that on the Record Arm page the Session Mode isavailable on the top seven rows of pads, allowing for furtherclip launching/stopping/recording, and so on.With live performance in mind, you may have wonderedhow to quickly navigate hundreds, or even thousands ofclips. To move around your Session View in big chunks, firstswitch to Session Mode, then press and hold the Session4
Track SelectSoloTrack Select allows you to focus on a given track, withoutrecord arming it. All of the bottommost pads on this pageare dimly blue but brighten when selected. Note that onlyone track can be selected at a time, and one track willalways be selected.The Solo page allows you to isolate the audio signal of oneor more tracks. This is great for close listening in the studioor as a performance technique.Press and hold Solo to momentarily display the Solo page—upon release you will return to the previous page or mode.Touching the bottommost pad on a track solos the track,MIDI OUT MIDI INPOWERPressPOWERand hold Track Select to momentarily make trackturning the pad bright blue (or press and hold up to eightselections—upon release you will return to the previous page bottommost pads to solo multiple tracks). The bottommostor mode.pads of un-soloed tracks are lit dimly blue.Press and release of the Track Select button latches thepage, letting you spend more time perusing your tracks. Inlatch, pressing Track Select again brings you to Session Mode.Note that on the Track Select page the Session Mode isalso available on the top seven rows of pads, allowing forfurther clip launching/stopping/recording, and so on. Hittinga Session Mode pad will also select the corresponding track.MIDI OUTPress and release of the Solo button latches the mode.Pressing Solo again exits the mode, returning to Session.While on the Solo page, the Session Mode is availableon the top seven rows of pads, allowing for further cliplaunching/stopping/recording, and so on.VolumeMuteMute allows you to quickly ‘kill’ all sound from one ormore tracks.Press and hold the Mute button to momentarily display theMute page—upon release you will return to the previousPOWERpage or mode. Touching the bottommost pad on a tracktoggles its ‘Track Activators’ on/off (effectively muting or unmuting it). The bottommost pad of muted tracks will show asdim yellow.POWERPress and release of the Mute button latches the page.Pressing Mute again brings you to Session Mode.Note that on the Mute page the Session Mode is alsoavailable on the top seven rows of pads, allowing for furtherclip launching/stopping/recording, and so on.The volume page turns each 8-pad column into a volume‘fader’: volume levels for up to 8 tracks at a time arerepresented as green pads. Simply hit an empty pad tomove Live’s Track Volume slider.Press and hold the Volume button to momentarily displaythe Volume page, where track volumes can be quicklyadjusted. Upon release you will return to the previous modeor page.MIDI OUTMIDI INPress and release of Volume latches the page. PressingVolume again brings you to Session Mode.The Volume page takes advantage of the Pro’s velocitysensitive pads: the softer you hit a pad the slower volumewill change. Conversely, the more force applied to a pad thefaster volume with increase or decrease.Please note that Session Mode capabilities, such as sceneand clip launching, are not available on the Volume page.5MIDI OUTMIDI IN
PanIt’s worth mentioning that although the full version ofAbleton Live allows for twelve Sends, only the first eightsends are accessible on the Launchpad Pro. Also notethat Session Mode capabilities, such as scene and cliplaunching, are not available on the Sends page.Production Tip: The most common effects to put onReturn Tracks are reverbs and delays. Luckily, Abletoncomes with a great reverb, and various delays. Make surethey are set to 100% wet and send away.The Pan button lets you move a track’s audio signal aroundthe stereo field.Press and hold Pan to momentarily display the Pan page—upon release you will return to the previous page or mode.In Pan, tracks can be panned left to right in varying degrees.Pan values for the 8 tracks are shown in orange. With themiddle two pads lit the track will be centred; touch unlitpads to move the pan knob left or right.Press and release of the Pan button latches the mode.Pressing Pan again brings you to Session ModeStop ClipMIDI OUTLike with Volume, Pan view takes advantage of the Pro’svelocity-sensitive pads: the softer you hit a pad the slower atrack’s pan value moves. Conversely, the more force appliedto a pad the faster panning will occur.Please note that Session Mode capabilities, such as sceneand clip launching, are not available on the Pan page.SendsMIDI INThe last mixer button is Stop Clip. Press and hold thisbutton to momentarily display the Stop Clip page, whereyou can stop clips on a per track basis, or stop all clips atonce. Upon release you will return to the previous pageor mode. The bottommost pads of tracks with playing clipsare lit red, but dim when pressed, stopping the clip on thattrack. Hitting the top seven Scene Launch buttons will stopall playing clips in those scenes, while hitting the bottommostScene Launch button will stop all clips in your Set.MIDI OUTMIDI INPress and release of the Stop Clip button latches the page.Pressing Stop Clip again brings you to Session Mode.Note that on the Stop Clip page the Session Mode isalso available in the top seven rows of pads, including cliplaunching/stopping/recording, and so on.The Sends page lets you send audio from your tracks toas many as eight return tracks. This page turns each 8-padcolumn into a virtual effect-send knob: simply hit an unlit padto move a track’s send knob up or down. The send knob youare controlling is selected with the scene launch buttons:the topmost button selects Send A, the second one downselects Send B, and so on.Press and hold the Sends button to momentarily display theSends page—upon release you will return to the previousMIDI OUT MIDI INpage or mode. Press and release of the Send button latchesthe page. Pressing Send again brings you to Session Mode.Like with Volume and Pan, the Sends page uses the Pro’svelocity-sensitive pads: the softer you hit a pad the slower atrack’s send value will change. Conversely, the more forceapplied to a pad the faster the send value changes.Function ButtonsThe far left column contains circular-buttonscalled the Function Buttons, which greatlyassist clip creation and editing.Activation of the Delete, Quantise, Duplicateand Double functions depends on your locationon the Launchpad Pro: In Session Mode, you must hold down oneof these buttons then touch the pad you wantto affect. For example, while holding Delete, hitthe pad whose clip you want to erase. With a clip selected and playing in Noteor Device Modes simply hit Delete, Quantise,Duplicate or Double to perform their respectiveactions.6
UndoShiftThe Undo button does exactly whatone would expect. Press it once togo backward one step (undoing oneaction of your Undo history), twiceto go back two steps (undoing twoactions), and so forth.The top Function Button is Shift. Whenpressed and held this button gives youaccess to secondary functions, much likeShift on a computer keyboard. Below aredescriptions of these functions: Clip Selection and Viewing: While inSession Mode, press and hold shift, thentouch a pad to see a clip’s audio or MIDI content in Live’s‘Clip View’ (bottom of the screen). This will not arm thetrack, or trigger the clip in anyway. Rather, this is a greatway to see a clip’s audio or MIDI before deciding whatto do with it. You might, for example, decide to edit theclip with some of the other Function buttons describedbelow. Drum Rack Pad Selection: While viewing a Drum Rackin Note Mode press and hold shift. Then touch a padcorresponding to a Drum Rack Pad. This will reveal thepad’s instruments or effects in Live’s ‘Device View’ (bottomof the screen). In live performance, this is a fast way toselect a sound and then start mangling it in Device Mode.As mentioned before, hitting Undowhile holding Shift will perform astandard ‘Redo’ action.DeleteThe Delete button allows you to clear clips and Drum Racknotes in various ways. In Session Mode, press and holdDelete, and then touch a pad to deleteits clip. Viewing a Drum Rack in NoteMode, press and hold Delete thentouch a Drum Rack pad to delete alloccurrences of that note in the clip.This only works with Drum Racks andwill not work in chromatic Note Mode(i.e., with other MIDI instruments). Redo: hold shift and hit the Undo button to perform astandard ‘Redo’. Quantise: holding shift and hitting the Quantise buttontoggles Record quantise on/off. (See below for moreinformation on the Quantise button).ClickPerhaps the simplest button on theLaunchpad Pro, Click turns Live’sMetronome on/off when pressed andreleased. When engaged, Click lightsup green. In all Live modes or pages(except User) you can press Click toreference the global pulse.POWER With a clip selected and playingin Note or Device Mode, one press ofDelete will erase the clip.QuantiseThe Quantise button lets you correct the timing of yourperformances while recording or afterward.Tip: Use this blue knob on screen toadjust to adjust the Metronome volumeif it is too loud or too soft.POWER7Press and hold Shift to see the stateof record quantisation: if active, theQuantise buttonwillMIDIbeINlit brightMIDI OUTwhite; if inactive it will be dim white.Continue to hold shift and hit Quantiseto toggle record quantise on/off.When off, the first press of this buttonsets record quantisation to SixteenthNotes. To change the quantise valuego to Live’s Edit menu and scrollto ‘Record Quantization’. Choose adifferent quantise value here.
Note that Double works for MIDI clips only.Musical Tip: If your loops are feeling too repetitive try usingDouble to lengthen them, and then add variation.RecordYou can always quantise clips after recording as well. Withthe Session Mode visible, press and hold Quantise, then hita pad to snap its MIDI or audio to the selected quantisationvalue. This can be done regardless of whether the clip isplaying.Using the Record button is the most straightforward wayto create new clips, or overdub into exiting ones. It can beused in a variety of ways: On an armed but empty track,hitting Record begins the recording of anew clip into the selected slot.If a clip is selected and playing in either Note or DeviceMode, one press of Quantise will quantise its audio or MIDI. On an armed track with clips,the Shift button can be used to selectan empty clip slot, at which point theRecord button can be pressed to beginrecording there.DuplicateThe Duplicate button allows you to copy a clip into the clipslot directly below. Be aware if there is already a clip in theslot below, the duplicated clip willerase the existing clip. On an armed track with at leastone clip, pressing Record will beginoverdubbing into the last played orselected clip if no other slot is chosen. In Session Mode press andhold Duplicate, then touch a pad toDuplicate its clip. If Live’s Transport is running, afterduplication the new clip will launch. If a clip is selected and playingin either Note or Device Mode, onepress of this button will duplicate theclip.Duplicate can also be used to duplicate a whole scene.Press and hold the Duplicate button in Session Mode, thenhit a scene launch button. Instead of overwriting existingclips, this will copy and insert the scene, causing any otherclips or scenes to slide down the page. With playing clips on armed tracks, Record can be usedto punch in and out of overdub record. Note that for audioclips, only automation can be overdubbed. If no tracks are armed, pressing Record can be usedas a quick way to start Live’s transport without recordinganything.Note POWERModeDoublePressing this Function button doubles clip length. Forexample, a 2-bar clip becomes 4 bars; an 8-bar clipbecomes 16 bars, and so on. With a clip selected in SessionMode, press and hold Double, then touchits pad to double the clip length.POWER If a clip is selected and playing ineither Note or Device Mode, one press ofthis button will double clip length.Note Mode lets you play the Launchpad Pro like aninstrument in order to create your own percussive andmelodic ideas. In other words, the Note page is whereyou can record, overdub and edit MIDI clips with MIDIinstruments or Live’s Drum Racks. Before looking at thedifferences in how Note Mode handles Drum Racks vsother MIDI instruments it is worth explaining some generalfunctionality.MIDI OUT MIDI IN8
General FunctionalityFinally, here are a couple general rules to be aware of:With a MIDI device (Drum Rack or other) on a record-armedtrack pressing the Note button enters Note Mode. How LEDfeedback appears on this page depends on whether thetrack contains a Drum Rack, or any other MIDI instrument.These ‘other MIDI instruments’ can be Ableton’s (e.g.,Operator), VST or Audio Unit plug-ins. If an audio track isselected, entering Note Mode displays nothing and has nofunctionality. Pressing the Note button enters Note Mode for therecord-armed track, potentially overriding the current trackselection. In other words, whatever track is armed becomesauto-selected for Note Mode. If multiple tracks are armed, the last track to be armed isused on the Note page. If no track is record armed, selecting a track andpressing Note will show its Note page. MIDI data, however,will not be sent until the track is armed.MIDI InstrumentsLive’s Clip View (left) and Device View (right).Press and release the Note button to latch Note Mode.Further hits of the Note button toggle the Clip View andDevice View on your screen. This allows you to see yourMIDI notes in one view (Clip View), and your instrumentsand effects in another (Device View). You might use ClipView to see existing MIDI notes as you overdub others—or you might want to see the notes move when you hitQuantise. Likewise, Device View can be handy to watch asyou make device adjustments, especially when recordingthose adjustments as automation.Note Mode can also be accessed momentarily from otherpages by pressing and holding the Note button. Uponrelease you will return to the previous page or mode.Notice how the Delete, Quantise, Duplicate and Doublefunctions are easily used in Note Mode: simply press andrelease these buttons to affect the currently playing clip onthe last armed track. Remember, you can always hit Undo ifyou make a mistake.Another attractive feature of Note Mode is that the scenelaunch buttons have no default functionality. This means thatthey are freely assignable via MIDI mapping. Furthermore,whatever MIDI mappings you create are unique to NoteMode and independent of all other modes.Custom MIDI Mapping: Create your own MIDI mappingsfor the scene launch buttons by first clicking the MIDI MapMode Switch in Live. Next, hit a parameter, such as a deviceon/off switch. Then hit a scene launch button. Finally, clickthe MIDI Map Mode Switch again to exit.9With any MIDI instrument on a track other than a DrumRack (e.g. Ableton Operator or Novation V Station plugin)pressing the Note Mode button will display the Note page,aka ‘note grid’. Here, the pad grid serves as a chromaticMIDI controller perfect for melody, chord or basslinecreation. The pads rise from left to right in semitone (akahalf step) intervals (e.g., C, C#, D, etc), and from bottom totop in perfect fourth intervals (e.g., C, F, Bb, etc).The note grid displays both lit and unlit pads: the lit padsoutline the white notes on a piano keyboard (i.e. a C majorscale), while the unlit pads fill in the non-diatonic, chromaticnotes. The tonic notes of the scale you choose (see below)are pink, and the other diatonic notes are blue. Pads turngreen, however, when played manually or during playback.By default,the pad in thelower-left cornerof the 8x8 notegrid plays thenote C1—theblue and pinkpads thereforeoutline a Cmajor scale. Youcan transposethis layout upor down insemitones byhitting the Left or Right arrow buttons across one octavein each direction. Press the Up or Down arrows to shift thescale by octaves. You can go as low as C-2 and as high asG8, beyond which the pads will be lit red and will not sendMIDI data.As you push the Left or Right arrow buttons purple padsscroll in semitone steps, reflecting how far you are from C.For example, if the purple pad is three-pads away from the
lower-left pad then the blue and pink pads are outlining theEb major scale.“Creating LED Light Shows” tutorial for information on howto light up User Mode).Tip: Press the Up and Down arrow buttons simultaneouslyto return the lower-left corner pad to C1. Press the Left andRight arrow buttons simultaneously to return the scale’s rootnote to C, staying in the current octave.At any given moment, the Launchpad Pro can only display64 of a Drum Rack’s potential 128 pads. Accessing all ofa Drum Rack’s pads, therefore, relies on the NavigationArrows, which light up green. The Up and Down arrowbuttons move Drum Rack coverage up and down in 4 rowincrements (blocks of 16 pads). The Left and Right arrowbuttons move Drum Rack coverage up and down one row ofpads at a time.Whatever tonic you choose becomes global. If you set thenote grid to begin on F#, for example, the outlined scale foryour other MIDI instruments will also be F# major (until youchange it). This global functionality makes it easy to stayharmonically consistent across multiple MIDI instruments,but you can always change the global settings as yourecord or perform.Colour-wise, Drum Rack pads containing a sample are lityellow, while a pad with no sample stays unlit. Purple padsshow that a Drum Rack sample is soloed; orange padsmean a sample is muted.Drum RacksFor a track containing a Drum Rack, pressing the Notebutton automatically configures the Launchpad Pro to workwith Live’s Drum Racks, an instrument designed for playingdrums, percussion and one-shot samples.By default, the lower-left corner pad of the 8x8 pad gridtriggers C1 on a Drum Rack. The default first 16 Drum Rackpads (C1 to D#2) are therefore playable in the lower-leftquarter (4x4) of the Launchpad Pro, as illustrated below:C2 C#2G#1 A1F1E1C1 C#1D2D#2A#1B1Drum Racks’ Show/Hide Devices Selector.F#1 G1D1D#1E2 to G3 are then playable in the 4x4 area directly aboveC1 to D#2. Meanwhile, G#3 to B4 continues in thelower-right 4x4 area, and C5 to D#6 are playable in theupper-right 4x4 area of the pad grid. The following diagramillustrates this:MIDI OUTPOWERE2 to G3Pads turn green when played manually or during playback.To select a Drum Rack pad simply hit its corresponding pad,which will trigger the sample and turn the pad light blue. Toselect a Drum Rack pad without triggering it, hold Shift andtouch the corresponding pad. Be aware that the Show/HideDevices selector needs to be engaged on a Drum Rack forthis to work.C5 to D#6With a pad selected, you will likely want Device Mode(described later) to help you adjust its parameters. You canalso press and hold Delete then touch a Drum Rack padto delete all occurrences of its note in a clip. This handyworkflow is specific to Drum Racks, and will not work withother instruments.Recording Shortcut: Momentarily enter the Record Armpage then press a pad. This will automatically arm that track(if it isn’t already) and begin recording or overdubbing inthat clip slot—highly recommended for live performance.MIDI INDevice ModeC#2D2D#2G#1A1A#1B1E1F1F#1G1C1C#1D1D#1C2G#3 to B4You may notice later that User Mode’s pad layout is identicalto the above diagram, but without LED feedback. (See theDevice Mode lets you control your MIDI instruments and10POWERMIDI OUTMIDI IN
effects without a mouse—a tremendous asset, especiallyon stage.How to Create MacrosTo effectively use Device Mode, first press and release theDevice button, entering the Device page. Next, engageTrack Select momentarily and choose a track by hitting oneof the bottom pads. You can now control the last selecteddevice
Setup in Ableton Live When you load up Ableton Live with the Launchpad Pro connected to your computer, Launchpad Pro will automatically spring into life and connect to Ableton. However it is useful to understand the other options available in the MIDI sync tab which effect how Ableton Live