Transcription
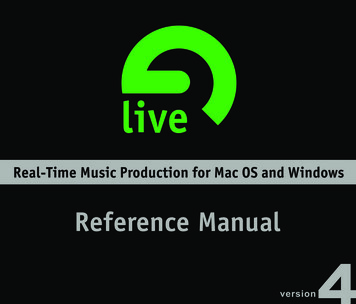
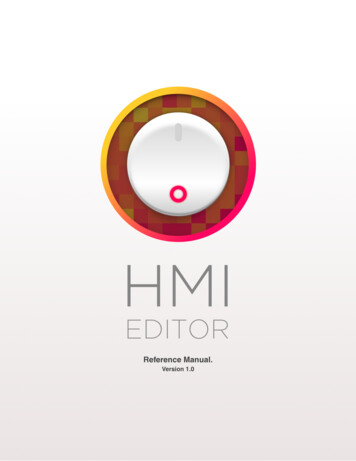
Volca Drum Editor ManualPlease follow this link to go to an online manual, where you will find more details plus some instructionalvideos: or-ableton-live-max-for-live/The Volca Drum Editor is a Max for Live device which lets you edit, control, save and recall every parameterfrom the Korg Volca Drum digital percussion synthesizer within Ableton Live. This could become handy forstoring and recalling presets, automate sound changes while playing and accessing parameters in a morestructured and better overview. You need to connect your Korg Volca Drum via the MIDI in 5-pin socket to yourcomputer. Maybe you have an external sound card with a MIDI out socket or use a USB-to-MIDI converter.Set Up in Ableton LiveThere is a Set-Up template/Ableton Live set included in this Ableton Live Pack/download for this Max for Livedevice BUT as the “MIDI To” section need to be edited and applied to your hardware I advise you to go throughthis whole set up section of the manual to fully understand how this MIDI routing works here.Set MIDI channelsThe Volca Drum Editor is designed to be used with the Korg Volca Drum set to use Midi Channel 1 to 6 fordrum parts 1 to 6. This is the default and factory preset. If the MIDI channel(s) never were changed on your unitit will be already set like this. However you can set the MIDI channels back to 1 to 6 by following the stepsdescribed in the Korg Volca Drum manual under the “Setting the MIDI channel” section. LINK TO MANUALMIDI channel conceptAs the Volca Drum is using different MIDI channels to access its 6 different drum sounds (“parts”) there is theneed to design a special set up here to be able to access all parameters via a Max for Live device.Let us have a look on the concept of the MIDI channels distribution here first.As understanding this concept might save you some time later on when things aren’t working straight away(e.g. when you re-open an Ableton Live set and use a different USB to MIDI converter) – I highly advise you totake some time and read through the next chapter carefully.1 to 6 on Volca Drums are 1 to 6 on MIDI channelsSo as those numbers are the same, this is easy to understand. Each drum “part”/sound on the Korg VolcaDrum is fixed to one MIDI channel. Only MIDI signals send on Channel 1 will effect “part”/sound 1, only MIDIsignals send on Channel 2 will effect “part”/sound 2, 3 on 3 and so on.CHANNEL 3CHANNEL 6CHANNEL 1CHANNEL 5CHANNEL 2CHANNEL 4
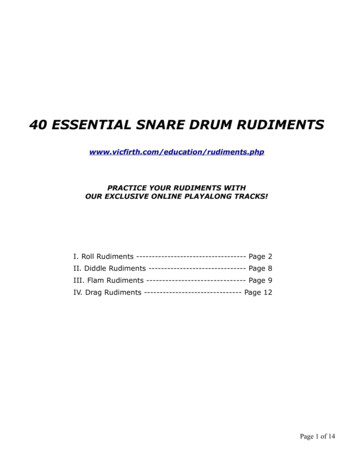
Ableton Live MIDI tracks limitation to one MIDI channelUnfortunately one MIDI track in Ableton Live is limited to send to one MIDI channel only.As we need to send MIDI messages on 6 different MIDI channels, we need to set up 6 different MIDI tracks andselect “MIDI To” to channel 1,2,3,4,5 and 6 to be able to send to all drum parts/sounds of the Korg VolcaDrum.Of course the first menu window in the “MIDI To” section needs to be set to the right MIDI port you have yourKorg Volca Drum connected to. Make sure you have your “TRACK OUT” for this MIDI port/USB-to-MIDI turnedon in the MIDI preferences in Ableton Live. (Otherwise it won’t show up in the “MIDI To” menu.)How are the MIDI signals coming into the MIDI tracks we just set up?Now each MIDI track in Ableton Live needs to get a specific Max for Live device for each channel which willreceive the MIDI signals created by the (‘main’) Drum Volca Editor Max for Live device.Ableton Live File BrowserYou will find those devices in the Ableton Live Pack (or folder) you got as a downloadwith the purchase.They are called “Volca Drum Receive (1-6)” and here again number 1 goes onto the first track which is set toChannel 1, number 2 to the track which is set to channel 2, 3 to 3 and so on.Volca Drum Receiver 1“Receiver 1” on track which is set to Channel 1- “Receiver 2” on track which is set to Channel 2- “Receiver 3” on track which is set to Channel 3- “Receiver 4” on track which is set to Channel 4- “Receiver 5” on track which is set to Channel 5- “Receiver 6” on track which is set to Channel 6
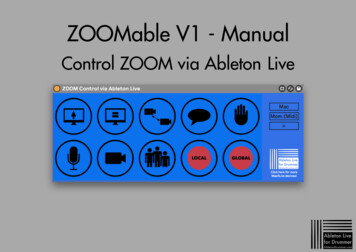
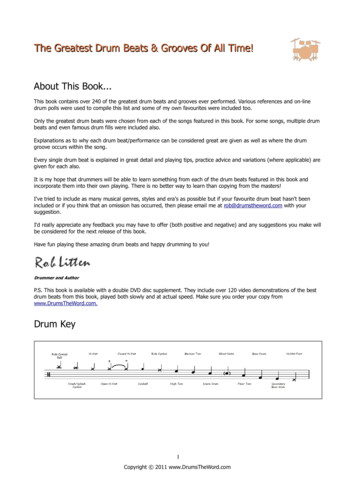
Final set-up part – adding the Volca Drum Editor on a new MIDI trackSo the last step to be ready to use the Volca Drum Editor is to create another MIDI Track and drag and drop the“Volca Drum Editor” Max for Live device on there.As there are some global parameters (the “Wave Guide” section), you want to set the newly created MIDI trackas well to be able to send to the MIDI port/USB-to-MIDI connection your Korg Volca Drum is connected to.You just have to select this MIDI port in the “MIDI To” menu and every channel from 1to 6 will work for that.You are now ready to dive into editing, storing and re-calling presets for your Korg Volca Drum. You may storethis set-up of tracks and devices in your Ableton User Library. This way you will be able to re-call this set up intoAbleton Live Sets as a whole. As mentioned before there is template for this already provided in this pack but asMIDI ports and channels need to be edited (nearly always) for each set-up, you will now know how to do this.Routing Overview:Volca Drum Editor onone dedicated MIDI trackIndividual parts/drum sound editing MIDI signals beingsend to each receiving device on each trackSome global MIDI signals beingsend straight to Korg Volca DrumIndividual sound editingfor each part/drum soundto Korg Volca Drum
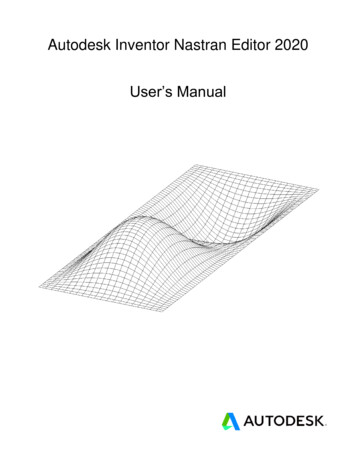
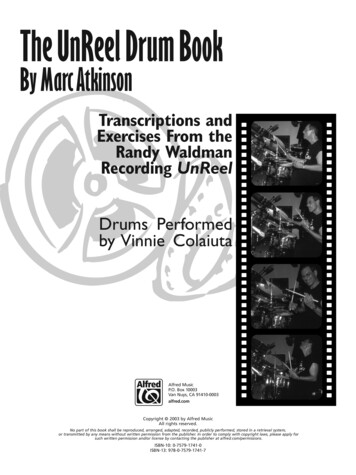
Editing with the Volca Drum EditorSelecting a drum part to editFirst of all you need to select the drum partyou want to edit via the Drum Part Selectoron the upper right of the device.Syncing and merging between the two layersThe Korg Volca Drum has 2 layers for each drum part. You have access to all the parameters on all 2 layersindividually but each parameter of those 2 layers can be synced and this way controlled with only one knob.To archive this you need to activate the Sync Boxes, which are located on the layer 2 surface right next to everyparameter dials. If you activate a Sync Box the parameter will be now synced and controlled via the dial onlayer 1. The dial on layer 2 for this parameter is now controlled by and synced to the corresponding dial onlayer 1. It jumps to the value from layer 1 immediately once activated and will send this change in value out tothe Korg Volca Drum.“Pitch” un-synced state“Pitch” synced stateSaving presetsOnce you have edited some sound settings you might want to store those as presets to be able to re-call those.You can just save those settings automatic by saving an Ableton Live set. You can save individual presets as wellin your User Library by ‘drag and drop’ the current Volca Drum Editor in your User Library.
Shoot section and resend valuesIn some use cases you might want to re-send the set values on the Volca Drum Editor to be send out to the KorgVolca Drum.Examples:-When you have a switched-off Volca Drum Editor being turned on again-When you use multiple Volca Drum Editors in one Ableton Live set-When you loaded a preset but not all MIDI send out connection were set rightThe Shoot section has two buttons:-CURRENT will ‘shoot’ out the current selected/visible part in the editor-ALL PARTS will ‘shoot’ out all values from all drum parts from 1 to 6You can click via mouse on those buttons or you can midi map these buttons (orautomate via clips). If MIDI mapped or automated you have to toggle thosebuttons off/send an off automation due to Ableton Live settings here.Using PUSH/PUSH 2 or external MIDI controllersYou can key or MIDI map all individual parameters of each part to be controlled via external MIDI controllers.You will find as well some preset banks for Abletons PUSH and PUSH 2 controllers, those mappings will beshown in your PUSH 2 LCD window, so it is easy to navigate through those.
Automations and envelopes via MIDI Clips in Ableton LiveYou can edit and record envelopes and automation via MIDI clips in Ableton Live to every parameter of theVolca Drum Editor. This way you can use the sounds of your Korg Volca Drum in a new, much moreexperimental and dynamic way.Live and dynamic changes of parametersAs all parameters of the Volca Drum Editor can be MIDI mapped you can as well use live velocity created byyour midi controller to control changes for those parameters. This will give you some more dynamic soundcreation options. NOTE: as the Korg Volca Drum is not designed for this purpose it has some limitations heree.g. will get some delay or some ‘crush’ added to sounds if you send a lot of sound changes controls on thesame time.Included Presets in this pack/downloadThis Max for Live devices comes with 10 sound presets. You can just load those into the Korg Volca Editor MIDItrack in your set-up and check those out. You will find those inside your Live Browser inside this pack or in thefolder you downloaded.
Audio connectionFor routing the audio from your Volca Drum to Ableton Live you need to establish an audioconnection. For this you will need an external sound card - (inbuilt sound cards would ‘work’as well but are not designed and usually don’t have the ability to perform for good musicproduction.)Hardware connections:Korg Volca Drumaudio cableSound CardUSB/otherComputerThe audio cable goes into your audio out mini jack socket of your Korg Volca Drum (minijack stereo) and in 2 x MONO inputs of your external sound card. Depending on your soundcard this connection might vary but in most cases would be going into 2 mono (big) jack INsockets. In this describe case you would need a mini jack stereo (male) to 2 x mono (big) jack(male) cable. This cable is widely available in music stores off or online. It is sometimedescribed as a “mini stereo jack to 2x mono big jack” or “stereo 3.5m jack to 2 x 6.3mm bigjack” cable.In Ableton Live you now just have to create an Audio Track and set the “Audio From” fromthis track to “Ext. In” (meaning your external sound card) and select the inputs you pluggedin your Korg Volca.
MIDI notes/sequences via one MIDI trackInside the Volca Drum Editor pack you will find a Drum Rack preset which will let you triggerall 6 drum parts of your Kork Volca Drum from just MIDI track.You will need to make some adjustments to the MIDI To section in this preset and apply thisto the MIDI port you are actually using.- Put the device on a MIDI track- Go through all different drumfields (CH1, CH2 and so on) byclicking/selecting those-Adjust every “MIDI To” of every“External Instrument” to the MIDIport/connection you are usingReceiving Volca Drumaudio on same channelOn one(!) “External Instrument”set the “Audio From” to thechannels your Korg Volca Drum isbeing connected to your externalsound card. This way youwouldn’t need a separate audiotrack for receiving the audio fromyour Volca Drum.This set up will as well compensate some latency caused by sending MIDI to and receivingaudio from an external source outside of Ableton Live.For more instructions and video tutorials please have a look on the onlinemanual as tor-for-ableton-live-maxfor-live/
Set Up in Ableton Live There is a Set-Up template/Ableton Live set included in this Ableton Live Pack/download for this Max for Live device BUT as the “MIDI To” section need to be edited and applied to your hardware I advise you to go through this whole set up section of the manual