Transcription
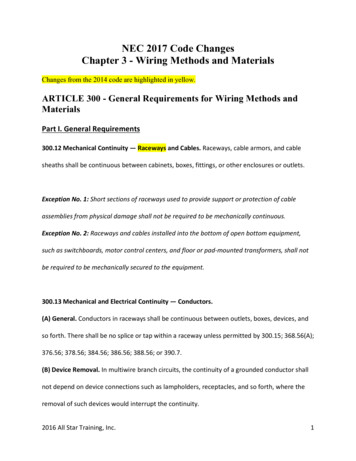
The Bigger Best1 Dollhouse Wiring Setthe best quality products of what you need for wiring an 8-12 room house a Quickstart GuideBegin with Confidence! 12 volt wiring systems are safe to work on and to use. Dollhouse wiring skills are easy to learn. www.dollhousewiring.com has photos and support foryour wiring project.Parts in the Bigger Best1 Dollhouse Wiring Set:CK-1009D 40watt Power Supply for up to 50 dollhouse lightbulbsEL-66 electrification tool is a superior tool for making electricalconnections (Bonus: includes a 1.5mm Collet and Drill)E-247 Jack and Plug make a robust connection to dollhouses withfoundations (Bonus: a Connection Wire is soldered to the jack)Layout Stick for marking wiring runs in 1” scale dollhousesCK-1023 Small Hollow Eyelets (80) make electrical connectionsCK-1023-2 Large Hollow Eyelets (40) to make a receptacle forlarge-sized plugs that come pre-wired on most lampsCK-204 TestlightCK-1000 Tapewire (60 feet)Real Good Toys’ kit #7999 4/14The Bigger Best1 Dollhouse Wiring Set contains allthe supplies you need for the wiring a 1” scale full sizeddollhouse; extend this set for even larger houses or moreintensive wiring.Other Supplies you may wish to purchase:Extra Tapewire and Small Eyelets to extend the wiring(check transformer capacity)CK-1023-6 Spring Loaded Eyelets for ceiling andsconce fixtures (included in many CirKit fixtures)Fixtures: There are a great many lighting componentsavailable for your house.ExtraBrite LED Striplights and Light-It-Up fixturesgive lots of light with very little heat for area lighting andspecial uses.Note: Throughout this guide,the author refers to the cellaras the place for the Jack, butthe Jack can live anywhere itcan be hidden. in front of astaircase, in a kitchen cabinet- If you don’t have a foundationtall enough for the jack (3/4” ormore), put it somewhere else.Real Good Toys10 Quarry StBarre, VT 05641802-479-2217www.realgoodtoys.com
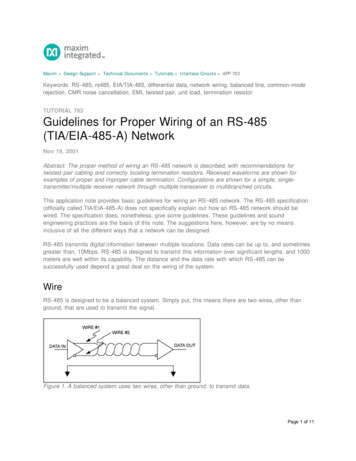
Page 2Dollhouse Wiring Quickstart GuideTools, Techniques, and PlanningThe most robust wiring has a single loop of tapewire all theway from the cellar to the ceiling of the attic, then back downthe other side into the Cellar again. This “Main Loop” givesreliability to the dollhouse by being in one piece (the fewerconnections, the better) and by being connected to the jack onboth ends.Electrification Slots make running tapewire from floorto-floor easier. If your kit has electrification slots in all thefloors, that’s good! If you need slots (or more slots), you cancut the floor with many small cuts of a sharp utility knife togive a slot 3/4” wide by 1/32” exposed (add that to the groovedepth for houses with grooves for the ectrificationslot/electrificationnotch.htmlCeiling Loops that connect to the Main Loop on both endsgive extra security. It is easiest to lay the Ceiling Loop beforeinstalling the Dividers, and if Dividers are already in, a slot atthe top of the Divider makes the Ceiling Loop simple. Here isa third option that is also reliable (the Ceiling Loop connectsto the Base Run on both ends):Ceiling LoopBase RunCutting an Electrification Slot before buildingThe House is already built? That’s OK. Run the VerticalFeed up the stairwell (that’s been the “go-to” solution foryears) or cut slots after construction with an Oscillating MultiTool (my new favorite tool!).24 gauge speaker wirePro Note: When I build and wire a house for a customer, Idon’t often know where they will want fixtures, so I preparefor all the options I can. In addition, this house will travel tofar away places and I must do everything possible to make ittrouble free for many, many years. The diagram on the firstpage is standard wiring practice for tapewire, but this diagramshows what I do. every run is connected on both ends and theMain Loop goes through electrification slots all the way into thecellar. This does take a bit more effort and a few more feet oftapewire, but it eliminates questions about where things shouldgo (they go everywhere), and when the house leaves my care, Idon’t have to worry a bit about the durability of the wiring.
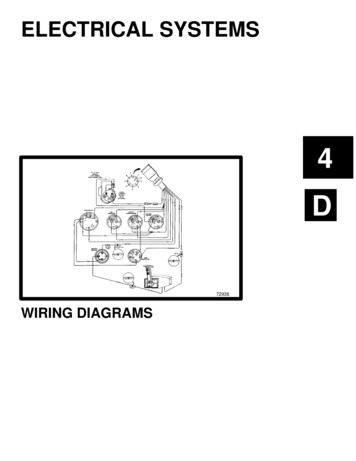
Page 3Dollhouse Wiring Quickstart GuideRe-directs are ways to change direction without making aconnection (remember: fewer connections more reliable).In the diagrams you see re-directs around the doors and windows, and in the photos lower in this column you can see are-direct from one angled wall or roof to another.Folded corner: About 3/4” before the door, make a turnupward. To do this, fold the tape, sticky side out, 90 in theopposite direction from where you want to go - in this case,the first fold is down. Push on the tape with your fingerto make a 45 crease and then fold the tape onto itself inthe direction that you want to go - up the side of the door.When you hit 3/4” over the top of the door, once again foldthe tape, sticky side out, in the opposite direction fromwhere you want to go. Press the tape toform a crease and then fold the tapeonto itself making a right angle abovethe door. You will do this 2 more timesfor the tapewire around the front door;then continue running the tape alongthe pencil mark on the other side of thedoor.Precautions1. The Cir-Kit tape wire system is to be used for “low voltage”application with 12 volt components only.2. Miniature lights are FRAGILE. be careful.3. Always disconnect the transformer when changing the electrical system in any way or moving the house.4. Test all lamps prior to installing them into the system.5. DO NOT cut wallpaper or moldings in place in the house- you WILL cut the tapewire! Measurements are for 1” scale houses. Make accommodations when using this set for other scales.www.dollhousewiring.comQuickstart Guide Table of Contents:Marking the Tapewire RunsLay the Tapewire RunsInstall the Jack and PlugConnections, Testing, TroubleshootingFixtures: Outlets, Sconces, and ChandeliersRemove any staircases and interior doors from your dollhouseFirst FoldTape run directionAdhesiveside is upSecond FoldA “Wrinkle” lets you control thetapewire direction when you goaround an angled corner. To make aWrinkle, lift a small bump of tapewirewith a rounded tool (like an openedup paper clip) right at the corner, thenlay the tapewire in its new direction.Once both runs of tapewire are correct, press the Wrinkle into the cornerto hide it.WrinkleA ZigZag is another kindof folded cornerThe first directionThe Layout Diagram: Tapewire allows you toput wiring in standard locations for future lightingneeds. Typically, a wired dollhouse has a baserunin every room, a ceiling run across each ceiling, andsconce runs in primary locations. Your wiring planmay be different. When you are done wiring yourdollhouse, tape the plan into the cellar for futurereference.The new directionThe WrinkleMark for the Base Runs 3/4 above the floor onevery wall all the way around the dollhouse usingthe 3/4 width of the Layout Stick.The 3/4” dimensionof the Layout Stick
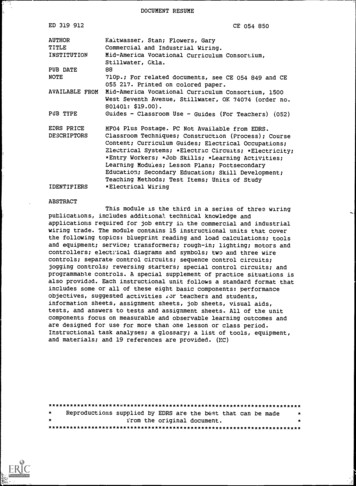
Page 4Dollhouse Wiring Quickstart GuideMark for Sconce Runsusing the 51/2” length of theLayout Stick from the floor.Mark the Ceiling Loops using the 51/2” length of the Layout Stick from the back edge of the floor. If your house haselectrification slots (“e-slot”) close to the middle of the floorfront-to-back, draw the Ceiling Loop to line up with the e-slot.Lay the Main Loop using the e-slots or stair cutouts to getfrom floor-to-floor. If you have an e-slot in the Base Floor,run the Main Loop all the way into the cellar.Lay the Sconce Runs just above the 51/2” sconce run mark.Lay the Ceiling Loop following the Marks. The CeilingLoop will connect to the Main Loop or to the Baserun, up thewall, across the ceiling, and back down the wall to the Baserun again. The Ceiling Loop will connect the Sconce Runsto the rest of the dollhouse wiring. Connect the Ceiling Loopon both ends to make the dollhouse wiring connections moretrouble-free.the Ceiling LoopMark for the Ceiling RunAt least 1” overlapcopper-over-copperblue-over-blueCeilingThe Main LoopWallThe Main Loop goes thruthe E-SlotThe Ceiling Loop is side-to-side, the Ceiling Run is front-to-back.Lay a Ceiling Run front-to-back in the center of each roomor wherever your plan needs power for ceiling lights.Lay the Base Run in a single piece with no cuts or interruptions just above the Baserun line all the way around the dollhouse. Go thru the dividers’ doors to get to the next rooms.Get around the Front Door with folded corners to avoidextra connections in the tapewire.The Jack and Plug: Drill a 1/2” hole thru the foundation(note, the Jack is sized for up to a 3/8” thick foundation. Ifyour foundation is thicker, create a pocket for the jack bycarving or drilling so that it can mount 3/8” from the outsidesurface). The Jack must be close enough to the main loop sothe connection wire on the Jack can easily reach.Remove the nut and glue the Jack into the hole. Let the glue dry.Folded - no eyelets1/2” DrillGlueJack (take off the nut)
Page 5Dollhouse Wiring Quickstart GuideMaking Connections: Where the Main Loop and the BaseRun overlap, punch a hole in the tapewire as close to thecenter of both copper leads as possible. If you pound with ahammer, back up the wall with a weight to absorb the impactso the glue joints won’t be stressed. A book-end, door-stop,or other weight with a smooth surface (gentle on the wall) isperfect.copper-to-copperblue-to-blueThe Jack’s Connection Wire: Separate the wires and stripabout 1/4” of the insulation from the end of each wire. Punch ahole in each lead of the Main Loop. Put the stripped wire endsinto the holes and pin them there with eyelets.If the Main Loop does not come into the cellar, drill holes thruthe Base Floor tight against the wall directly under the end of theMain Loop for the Connection Wire to reach the Main Loop.Main LoopConnection Wire andMain LoopBackerHammerEL-66 toolIn the cellarConnection Wire. or if the Main Loopdoesn’t come into the cellarEyelets: Put an eyelet on the pin in the EL-66 tool,push the eyelet and pin into the hole. Pound with ahammer (with a backer) to set the head of the eyeletflush.Repeat: Set another eyelet where the blue overlapsthe blue. Making the hole first is not strictly necessary, but it helps many builders get the eyelet closerto the center of both leads.Eyelet copper-to-copper and blue-to-blue at everyconnection, joining all the runs back to the MainLoop.Attach the Power Supply: Prepare the Plug’s wire to attach to thescrews of the Power Supply. a little more wire exposed and shapedto a hook makes the wires easier to hold under the screws. Loosenthe screws, wrap each wire under the washer, tighten the screws.Plug’s wirePower SupplyPlug’s wireConnect the runsTest and troubleshoot: Plug the Power supply into the wall and theplug into the jack. Test every run at the end of the run. every baserun,every sconce run, every ceiling run. If any run doesn’t light up the tester,go back and test just before the connections to that run. If it lights thetester before the connection but not after the connection, inspect the connection carefully to see if one of the eyelets has missed. Poke the pin ofthe EL-66 into the copper/copper or the blue/blue to try to make the testerlight up. When you find the place that succeeds, put another eyelet inright there.Test light
Page 6Dollhouse Wiring Quickstart GuideCoachlamps or wall lights on the porch are wired thru thewall before wallpaper or other interior finishing. See www.dollhousewiring.com for photos of installing coach lamps.Now you can add the cross dividers and attic partitions if youleft them out for access to the front of the house. They can bewired and connected to the existing wire runs.Your dollhouse is electrified! Add additional tapewire ifneeded and connect each new length with eyelets. Rememberto always test a new run of tapewire as it is installed.This is a perfect time to complete your record of the tapewireruns. Put notes and measurements into your diagram forfuture reference. Photos are also helpful. Once wallpaper isinstalled, it won’t be as easy to see the exact position of thetapewire (although you can still find it by poking your testerthrough the wallpaper).Fixtures of all types may be installed into the tapewiresystem using either a Chandelier adapter (figure F), a CeilingCanopy adapter, or a Sconce adapter. The type of fixture to bemounted will dictate the type of adapter. Whenever you areshopping for a fixture, pay attention to how it is mounted andwhat kind of bulb it uses. Always select fixtures that can beremoved for bulb replacement and have replaceable bulbs, andthat list what kind of adapter they use (some come with theappropriate adapter). Although one adapter may work withmore than one fixture, there are no “standard adapters”. makesure you know which one will work with your fixture.Outlets: Floor and table lamps can be installed in any room.You must first install an outlet into your tapewire. This willallow you to insert a plug from the lamp to be illuminated.After you have finished wallpapering your dollhouse, arrangeyour furniture in your favorite position. Determine where youwill need light and find your tapewire by using your tester.Once you have found the proper placement, make outlets.“Large plug” outlet using CK1023-2 “Large”eyeletsStep 1: use the plug’s pinsto make indentations in thewallpaper over the tapewireStep 2: Drill* a 1.5mm hole deeperthan the length of the plug’s pinStep 3: install CK-1023-2“Large Eyelets”Step 4: This outlet is now readyfor the CK-1004-4 size plugFinishing: Liner Paper (a paint store product) or several thincoats of lite spackle on the ceiling and a coat of paint willleave the tapewire ‘findable’ but not obvious in the decoratedhouse. Wallpaper will also cover the tapewire with no otherpreparation. If you are painting the walls over tapewire, applyLiner Paper before painting.F: Chandelier orCeiling AdapterCK1023-2 eyelets*Drilling with the EL-66: The big handle on the EL-66can overpower a drillbit and break it. Use your fingertips,spin the drill a lot and don’t push very hard, and pull thedrill out of the hole often to clear off the sawdust.Sconce AdapterVisit www.dollhousewiring.com for more informationon dollhouse wiring, for house-specific tips, or to findwiring diagrams for a variety of housesAcknowledgements:“Dollhouse Wiring” by the Dollhouse Builder’s Workshop“Dollhouse Electrification” by Taylor Jade Miniatures“Tapewire Instruction Book” by CirKit Concepts inc
The Bigger Best1 Dollhouse Wiring Set the best quality products of what you need for wiring an 8-12 room house a Quickstart Guide Real Good Toys’ kit #7999 4/14 Begin with Confidence! 12 volt wiring systems are safe to work on and to use. Dollhouse wiring skills are ea