Transcription
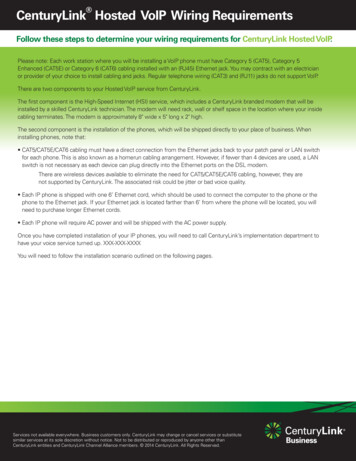
CenturyLink Hosted VoIP Wiring RequirementsFollow these steps to determine your wiring requirements for CenturyLink Hosted VoIP.Please note: Each work station where you will be installing a VoIP phone must have Category 5 (CAT5), Category 5Enhanced (CAT5E) or Category 6 (CAT6) cabling installed with an (RJ45) Ethernet jack. You may contract with an electricianor provider of your choice to install cabling and jacks. Regular telephone wiring (CAT3) and (RJ11) jacks do not support VoIP.There are two components to your Hosted VoIP service from CenturyLink.The first component is the High-Speed Internet (HSI) service, which includes a CenturyLink branded modem that will beinstalled by a skilled CenturyLink technician. The modem will need rack, wall or shelf space in the location where your insidecabling terminates. The modem is approximately 8" wide x 5" long x 2" high.The second component is the installation of the phones, which will be shipped directly to your place of business. Wheninstalling phones, note that: CAT5/CAT5E/CAT6 cabling must have a direct connection from the Ethernet jacks back to your patch panel or LAN switchfor each phone. This is also known as a homerun cabling arrangement. However, if fewer than 4 devices are used, a LANswitch is not necessary as each device can plug directly into the Ethernet ports on the DSL modem.There are wireless devices available to eliminate the need for CAT5/CAT5E/CAT6 cabling, however, they arenot supported by CenturyLink. The associated risk could be jitter or bad voice quality. Each IP phone is shipped with one 6’ Ethernet cord, which should be used to connect the computer to the phone or thephone to the Ethernet jack. If your Ethernet jack is located farther than 6’ from where the phone will be located, you willneed to purchase longer Ethernet cords. Each IP phone will require AC power and will be shipped with the AC power supply.Once you have completed installation of your IP phones, you will need to call CenturyLink’s implementation department tohave your voice service turned up. XXX-XXX-XXXXYou will need to follow the installation scenario outlined on the following pages.Services not available everywhere. Business customers only. CenturyLink may change or cancel services or substitutesimilar services at its sole discretion without notice. Not to be distributed or reproduced by anyone other thanCenturyLink entities and CenturyLink Channel Alliance members. 2014 CenturyLink. All Rights Reserved.
CenturyLink Hosted VoIP Wiring RequirementsFollow these steps to determine your wiring requirements for CenturyLink Hosted VoIP.There are four options for wiring the jacks:1. You want a single Ethernet jack at each location, and you have a patch panel in place:For stations or desks where you have a computer and phone at the same location, the computer will plug into the VoIP phoneusing the PC Ethernet slot and the VoIP phone will require an Ethernet jack and cabling. For stand-alone phones, the VoIP phoneplugs directly into an Ethernet jack. Analog devices (such as cordless phones) need to be plugged into an Analog TelephoneAdapter (ATA) and this ATA is plugged into the Ethernet jack. All of these jacks are wired to the patch panel, which in turn is wiredinto the VoIP switch. The below diagram illustrates this cabling layout:Computer co-locatedwith VoIP phoneVoIP Phone onlyCordless Phone with ATAEthernet Cable Patch PanelLAN SwitchCenturyLink NetworkDSL Termination PointOptional: If you have 4 orfewer lines, you can plugthem directly into DSL Modem.DSL ModemCat5, Cat5E, Cat6 Cable Inside the WallsCat5, Cat5E, Cat6 Exterior Cable DropsServices not available everywhere. Business customers only. CenturyLink may change or cancel services or substitutesimilar services at its sole discretion without notice. Not to be distributed or reproduced by anyone other thanCenturyLink entities and CenturyLink Channel Alliance members. 2014 CenturyLink. All Rights Reserved.
CenturyLink Hosted VoIP Wiring RequirementsFollow these steps to determine your wiring requirements for CenturyLink Hosted VoIP.2. You want a single Ethernet jack at each location, and you do not have a patch panel in place:If your VoIP phones are co-located where you have a computer, the computer will plug into the VoIP phone using the PCEthernet slot and the VoIP phone will require an Ethernet jack and cabling. For stand-alone phones, the VoIP phone plugs directlyinto an Ethernet jack. Analog devices (such as cordless phones) need to be plugged into an Analog Telephone Adapter (ATA) andthis ATA is plugged into the Ethernet jack. All of these jacks are wired directly to the VoIP switch. The below diagram illustratesthis cabling layout:Computer colocatedwith VoIP PhoneVoIP Phone onlyLAN SwitchCenturyLink NetworkDSL Termination PointCordless Phone with ATAOptional: If you have 4 orfewer lines, you can plugthem directly into DSL Modem.DSL ModemCat5, Cat5E, Cat6 Cable Inside the WallsCat5, Cat5E, Cat6 Exterior Cable DropsServices not available everywhere. Business customers only. CenturyLink may change or cancel services or substitutesimilar services at its sole discretion without notice. Not to be distributed or reproduced by anyone other thanCenturyLink entities and CenturyLink Channel Alliance members. 2014 CenturyLink. All Rights Reserved.
CenturyLink Hosted VoIP Wiring RequirementsFollow these steps to determine your wiring requirements for CenturyLink Hosted VoIP.3. You want to have two or more Ethernet jacks at each location, and you have a patch panel in place.In this wiring scheme, each computer, phone or analog device is directly plugged into a separate Ethernet jack.Analog devices (such as cordless phones) need to be plugged into an Analog Telephone Adapter (ATA), and thisATA is plugged into the Ethernet jack. All of these jacks are wired directly into the VoIP Switch. The diagram belowillustrates this cabling layout:Computer colocatedwith VoIP PhoneVoIP Phone onlyCordless Phone with ATAEthernet Cable Patch PanelOptional: If you have 4 orfewer lines, you can plugthem directly into DSL Modem.CenturyLink NetworkDSL Termination PointCat5, Cat5E, Cat6 Cable Inside the WallsCat5, Cat5E, Cat6 Exterior Cable DropsServices not available everywhere. Business customers only. CenturyLink may change or cancel services or substitutesimilar services at its sole discretion without notice. Not to be distributed or reproduced by anyone other thanCenturyLink entities and CenturyLink Channel Alliance members. 2014 CenturyLink. All Rights Reserved.LAN SwitchDSL Modem
CenturyLink Hosted VoIP Wiring RequirementsFollow these steps to determine your wiring requirements for CenturyLink Hosted VoIP.4. You want to have two or more Ethernet jacks at each location, and you do not have a patch panel in place.In this wiring scheme, each computer, phone or analog device is directly plugged into a separate Ethernet jack. Analog devices(such as cordless phones) need to be plugged into an Analog Telephone Adapter (ATA), and this ATA is plugged into the Ethernetjack. All of these jacks are wired directly into the VoIP switch. The diagram below illustrates this cabling layout:ComputerVoIP PhoneVoIP Phone onlyLAN SwitchCenturyLink NetworkDSL Termination PointATA with Cordless PhoneOptional: If you have 4 orfewer lines, you can plugthem directly into DSL Modem.DSL ModemCat5, Cat5E, Cat6 Cable Inside the WallsCat5, Cat5E, Cat6 Exterior Cable DropsServices not available everywhere. Business customers only. CenturyLink may change or cancel services or substitutesimilar services at its sole discretion without notice. Not to be distributed or reproduced by anyone other thanCenturyLink entities and CenturyLink Channel Alliance members. 2014 CenturyLink. All Rights Reserved.
CenturyLink Hosted VoIP Wiring Requirements Follow these steps to determine your wiring requirements for CenturyLink Hosted VoIP . CenturyLink Network DSL Modem DSL Termination Point VoIP Phone VoIP Phone only ATA with Cordless Phone LAN Switch Optional: If you have 4 or fewer lines, you can plug them directly into DSL Modem. 4.File Size: 2MBPage Count: 5Explore furtherCenturylink Dsl Wiring Diagram Free Wiring Diagramricardolevinsmorales.comProduct reviews, how-tos, deals and the latest tech news .www.cnet.comHow to Bond Two DSL Lines Into One Faster . - Speedifyspeedify.comYour Guide to CenturyLink Installation HighSpeedInternet.comwww.highspeedinternet.comHow to Self Install Your New CenturyLink Internet .www.centurylinkquote.comRecommended to you b